- How to Change DNS in Windows 10
- Why do we need to change DNS server?
- Top three fastest DNS servers.
- How do we change the DNS server?
- Method 1: Change the DNS server through the Network Settings
- Method 2: Using the Command Prompt to change the primary and secondary DNS server
- Method 3: Changing the DNS server from the router’s settings
- How to make Cortana search with Google instead of Bing in Windows 10
- Love Cortana, but hate Bing? We’ve got you covered.
- Firefox
- Chrome
- Как заменить Bing на Google в Windows 10?
- Установка и настройка DNS сервера BIND под Windows для разблокировки ЖЖ и Гугла
How to Change DNS in Windows 10
Domain name system or commonly known as DNS is a system that translates domain names into IP addresses. Whenever we write a website’s URL into the address bar of our web browser, the browser sends the URL to the default DNS server, the server then translates the URL into an IP address and the contents of that IP address are retrieved back to your web browser. The only reason why domain name system exists is because domain names are fairly easy to remember while trying to remember IP addresses is quite hard. DNS serves as a phone book; it binds a domain name to its respective IP address.
Why do we need to change DNS server?
Usually, your Internet service provider(ISP) provides default DNS server for your internet connection, but it can get slow due to high loads, which can cause slow browsing. Your ISP can also track your internet activity through your DNS, and also block websites through it. The only way to avoid all these problems is to change your primary DNS server with custom one.
Top three fastest DNS servers.
These DNS servers provide fast browsing speeds and they do not track your internet activity either. They are free to use, so you can use any of these without any problems.
- Google’s public DNS server: Google’s DNS server is a free alternative for a fast and secure browsing. To use Google’s DNS you will need to use the following address
Primary DNS server: 8.8.8.8
Secondary DNS server: 8.8.4.4 - OpenDNS’s public DNS: OpenDNS provides both free and paid DNS servers, even though the paid one comes with some additional benefits, the free one is not bad either.
Primary DNS server: 208.67.222.222
Secondary DNS server: 208.67.222.220 - Norton connect Safe’s public DNS: Norton doesn’t only provide virus protection; it also provides DNS service. Norton offers three different packages each with its own uniqueness. But the free ones are the most commonly used.
Primary DNS server: 199.85.126.10
Secondary DNS server: 199.85.127.10
How do we change the DNS server?
There are a number of ways to change your default DNS server, you can either change the DNS of your PC from the network settings or you could change the DNS settings from your router so that your whole internet connection uses a single custom DNS. Here’s how to get it done.
- Through the Network settings: The easiest way to change both your primary and secondary DNS is through the network settings. You can get this done in a few clicks
- Through the CMD: you can also change the DNS servers from the command prompt.
- Through the router’s settings: If you want to change the DNS server of your whole internet connection, then you can change the DNS from your router’s settings.
Method 1: Change the DNS server through the Network Settings
The simplest way to change your PC’s DNS server is through the Network Settings. To do this you must:
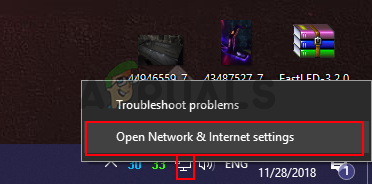
- Right click on the Network icon in the system tray.
- Now click on the Open Network and Internet Settings.
 Open Network & Internet settings
 - Now under the Change your network settings panel, you must click on Change Adapter Settings. This will open up the Network Connections folder. Choose Change adapter options
- In the Network Connection folder, you need to find your primary network connection and right click on it, and then click on Properties. Choose the Properties of the primary network
- Here you will need to find the Internet Protocol Version 4 and open its properties by first selecting it and then clicking on the Properties button. choose Internet Protocol Version 4 and click Properties
- Now choose the Use the following DNS server addresses radio button and now enter the primary and secondary DNS servers of your choice and click OK. Choose Use the following DNS server addresses and write the addresses
- Now click Close to apply the new DNS settings.
 Open Network & Internet settings
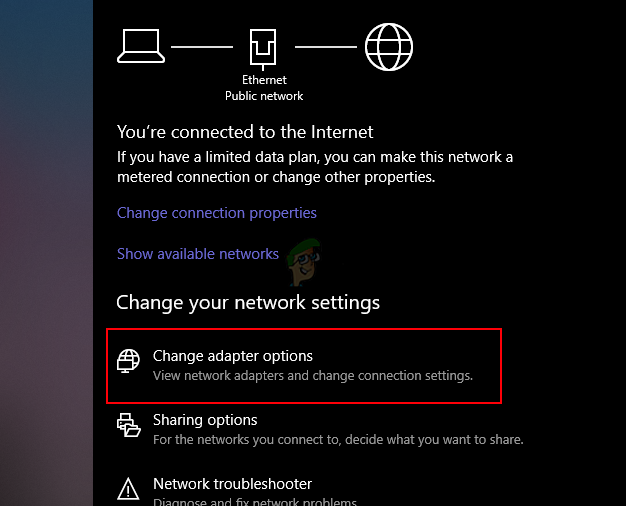 Choose Change adapter options
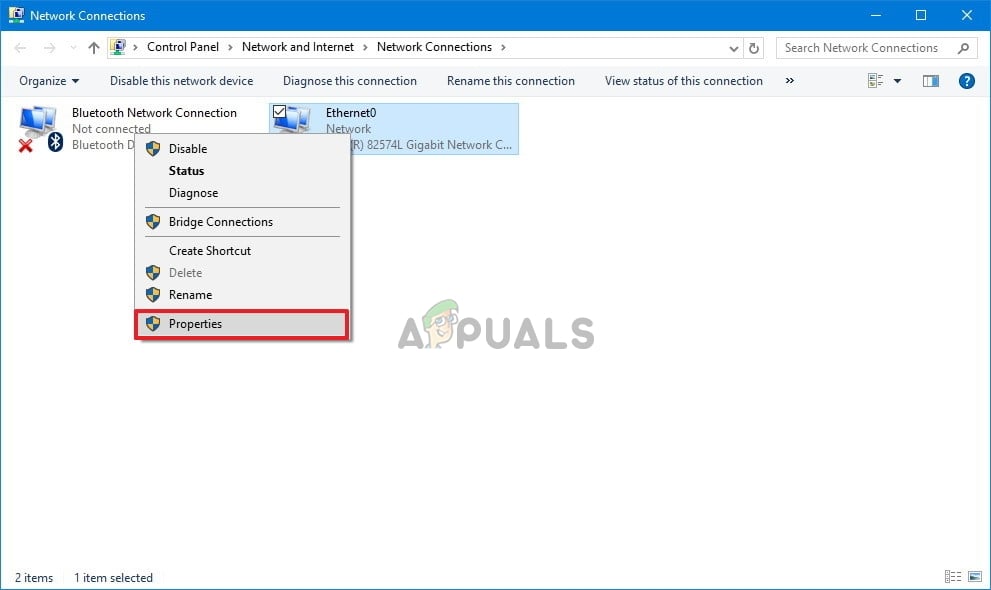 Choose the Properties of the primary network
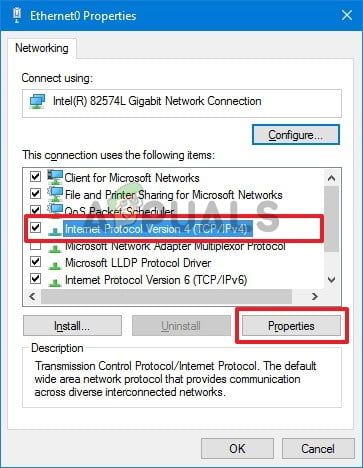 choose Internet Protocol Version 4 and click Properties
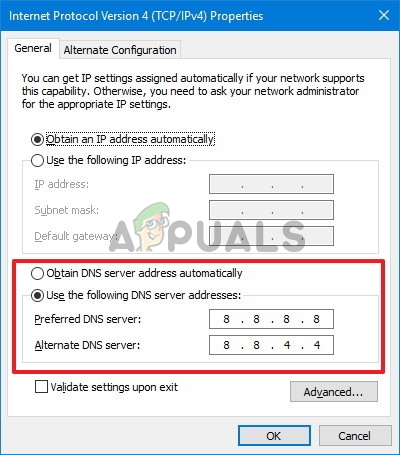 Choose Use the following DNS server addresses and write the addresses
Method 2: Using the Command Prompt to change the primary and secondary DNS server
This method will allow you to change your DNS server using the Windows command prompt, you will need to use some commands to get the job done.
- On your keyboard, press Windows + R keys and the Run Dialog box will appear, type CMD and press Ctrl + Shift + Enter to open the Command Prompt with administrative privileges. Press Yes If prompted by the UAC.
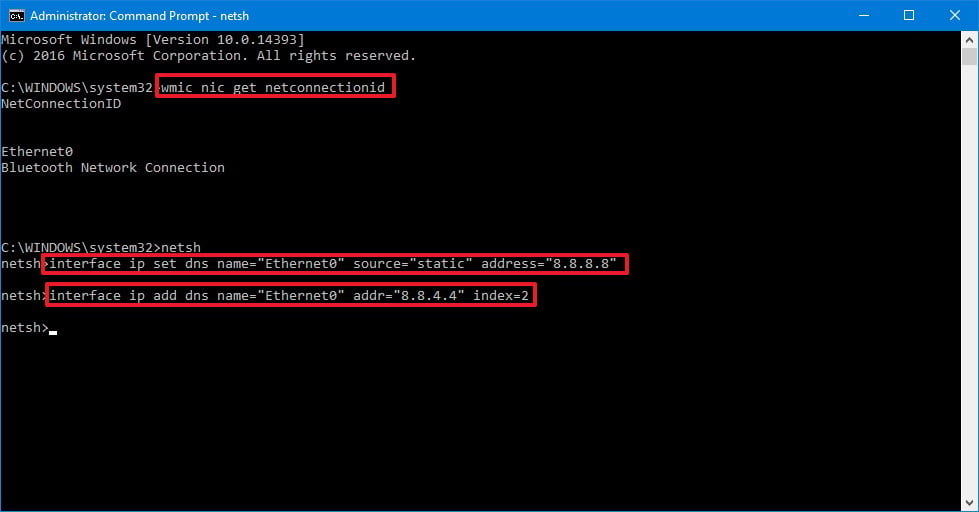
- Now once the Command Prompt is open, type the following and press Enter to show the name of your primary network connection, remember the name, as you will need it later on.
3. Now type the following command and press Enter to change the network settings.
4. Type the following command and press Enter to change your primary DNS server:
Remember to change the “ADAPTER-NAME” with your adapter’s name that you got in the second step, also change “X.X.X.X” with the required DNS server address.
5. Now type the following command and press Enter to change your secondary DNS server address:
 Commands in CMD
Method 3: Changing the DNS server from the router’s settings
If you want to change your DNS from the router, then the step will vary according to the model of your router but the overall options would be the same. You will need to know the IP address, username and the password of your router, all these details are written on the back side of your router.
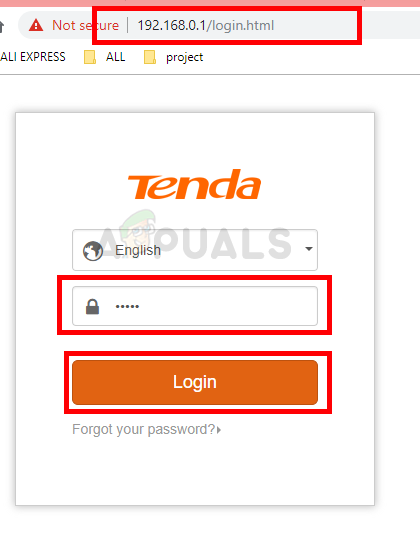
- Open your web browser, type the IP address of your router in the address bar and press Enter.
- The Router might ask for the username and password, put the credentials and press Login. Username and password
- Now depending on your router’s model, the DNS settings will either be under the Administration tab or the Advanced Lan Parameter tab.
- Write the preferred and the alternative DNS servers and press OK to save the settings. DNS servers
- Reboot your router to let the changes take effect. Reboot the router
 Username and password
 DNS servers
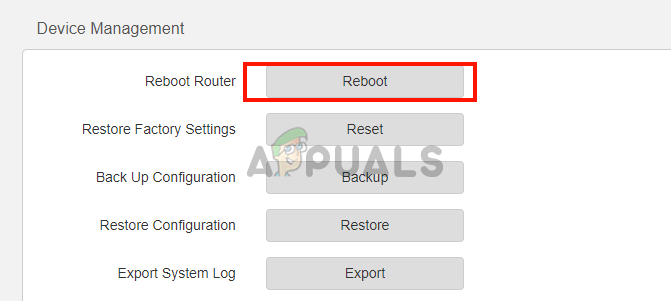 Reboot the router
How to make Cortana search with Google instead of Bing in Windows 10
Love Cortana, but hate Bing? We’ve got you covered.


Today’s Best Tech Deals
Picked by PCWorld’s Editors
Top Deals On Great Products
Picked by Techconnect’s Editors
Windows 10’s Cortana provides a great way to quickly launch a web search, but you may not appreciate that Microsoft’s digital assistant defaults to Bing—and there’s no built-in way to get Cortana to switch to Google instead.
The lack of multi-search engine integration makes a certain amount of sense since Cortana’s cloud-based brains are powered by Bing. That works out fine for tracking flights, solving math problems, and telling you the weather. But when it comes to simply displaying search results, many people prefer Google to Microsoft’s search engine.
Fortunately, there are a few solutions that can redirect your Cortana web searches from Bing to Google.
The downside is these solutions only work with Chrome or Firefox. That means if Microsoft Edge, Opera, or Internet Explorer is your browser of choice you’ll have to make due with Bing or switch your default browser.
If you’re not big on Google, these solutions also work with other search engines, such as DuckDuckGo and Yahoo.
Firefox
Firefox is the simplest of the two to get working as it has the ability to switch your Cortana search engine automatically and without any third-party add-ons.
All you have to do is set the most recent version of Firefox as your default web browser. If you don’t know how to do that, check out PCWorld’s tutorial on changing your default browser in Windows 10.
Once Firefox is your default, try searching with Cortana. You’ll notice that Firefox displays your search results using the browser’s default search engine. If you’ve never used Firefox before that means your Cortana searches will show results from Yahoo. Switching to Google, however, is really easy.
Search options in Firefox for Windows.
Open Firefox and click on the magnifying glass icon in the search bar. Next, a drop down menu appears where you can select Change Search Settings. In the tab that opens, click the drop down menu under Default Search Engine and select Google.
Now whenever you launch a search using Cortana you’ll get results in Google instead of Bing.
Chrome
Chrome won’t natively redirect your Cortana searches in Firefox-like fashion, but there is a third-party extension that offers the same effect: Chrometana.
Chrometana’s search engine options.
After you’ve installed Chrometana from the Chrome Web Store, type chrome://extensions into the address bar. Scroll down until you see Chrometana and click Options. A new page will open, allowing you to choose Google, DuckDuckGo, or Yahoo as your preferred search engine for Cortana.
Click the search engine of your choice, close the tab, and then do a search via Cortana. Just as before, the results will open up in Google instead of Bing. Success!
Ian is an independent writer based in Israel who has never met a tech subject he didn’t like. He primarily covers Windows, PC and gaming hardware, video and music streaming services, social networks, and browsers. When he’s not covering the news he’s working on how-to tips for PC users, or tuning his eGPU setup.
Как заменить Bing на Google в Windows 10?
Потому в Windows 10, как уже известно, к поисковику Bing, который там используется по умолчанию, «привязано» много чего. По примеру своих основных конкурентов — Apple и Google — новую операционку Microsoft фактически подарила (куда ж деваться?) тем своим юзерам, которые раньше пользовались версиями Windows 7 и Windows 8.1.
А поскольку «конь дареный», то комплектовал его разработчик, руководствуясь прежде всего собственными бизнес-интересами и «раскручивая» собственные сервисы.
Потому в Windows 10 Bing везде: через Bing работает новый поиск, которая появился в Панели задач, через Bing обрабатываются команды для Cortana и пр.
В общем, убрать Bing из Windows 10 полностью никак не получится (у обычного юзера, так точно), однако в Microsoft Edge — штатном браузере Windows 10 — поисковую систему заменить все же можно, при необходимости, конечно.
Итак, чтобы в Windows 10 заменить Bing на Google (или другой поисковик), делаем следующее:
- жмем кнопку Windows на клавиатуре (или кнопку Windows на панели задач, или кнопку Windows на экране) и запускаем приложение Microsoft Edge (это если оно не «висит» отдельной плиткой на Стартовом экране), либо кликаем «Все приложения» и находим Edge в списке установленных программ;
- запустив Microsoft Edge, жмем иконку с тремя точками, расположенную в правом верхнем углу экрана и заходим в «Настройки«;
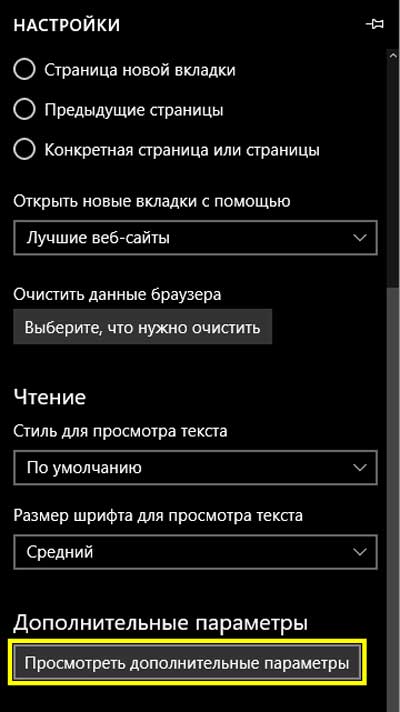
- прокручиваем меню настроек вниз и заходим в «Дополнительные параметры» (кнопка «Посмотреть дополнительные параметры»);
- в «Доп. параметрах» снова крутим меню вниз до вкладки «Поиск в адресной строке с помощью«, кликаем по надписи «Bing («www.bing.com»)«, выбираем нужный вариант Googleв списке (или набираем в строке « «) и подтверждаем выбор нажатием на кнопку «Использовать по умолчанию«.

Теперь Edge в вашей Windows 10 искать все будет через Google, а не через Bing, как раньше. Таким же образом, в Edge можно прописать и другой поисковик, но только из тех, которые Edge поддерживают.
Однако этим допускаемая Microsoft самодеятельность юзеров в плане замены поисковиков и заканчивается. Cortana и поиск в Windows 10 (а не в Edge), к примеру, в любом случае работают только через Bing, и тут, что называется, без вариантов.
Правда, если Bing в самой Windows 10 вам вдруг нравиться перестанет, можно вообще убрать поисковую строку (кликаем по ней ПКМ или тапаем и удерживаем нажатие до появления меню, в которой надо нажать «Скрыть»). Но способов отключить Cortana от Bing еще не придумали… Пока.
Установка и настройка DNS сервера BIND под Windows для разблокировки ЖЖ и Гугла

Установка BIND
- Скачайте bind для windows по ссылке — ftp://ftp.isc.org/isc/bind9/9.8.1/BIND9.8.1.zip
- Извлеките содержимое архива в заранее созданную пустую папку и запустите BINDInstall.exe
- Установщик спросит в какую папку установить программу. В своем случае я выбрал «C:\bind». Далее придумайте логин и пароль для сервиса.
Настройка
Сохраните их в указанных папках С:\bind\etc\named.conf C:\bind\zones\db.livejournal.com.txt C:\bind\zones\db.googleusercontent.com.txt
- Запустите командную строку (Пуск — Выполнить — cmd) и выполните по очереди следующие команды
cd С:\bind\bin
rndc-confgen -a
rndc-confgen > ..\etc\rndc.conf
В файле С:\bind\etc\named.conf поменяйте значение поля secret на аналогичное из файла C:\bind\etc\rndc.key
Запуск
- Пуск — Выполнить — services.msc
- Найдите службу ISC Bind и запустите ее
Проверка
- Пропишите в свойствах сетевой карты dns сервер 127.0.0.1
- Наберите в командной строке nslookup ya.ru 127.0.0.1
- Для проверки ЖЖ наберите nslookup megakhuimyak.livejournal.com 127.0.0.1
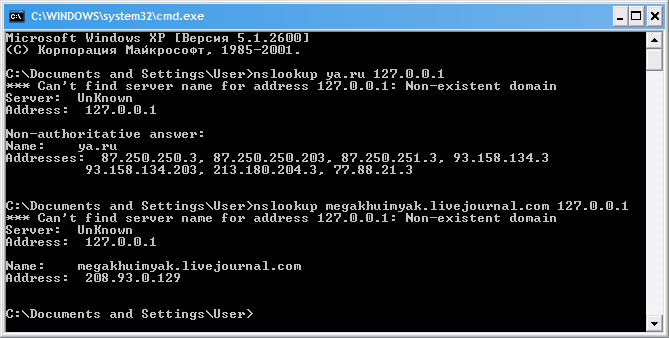
Если ответ как на картинке значит все ОК
PS
Для того что бы перезапускать bind после правки в конфигурации остановите службу ISC Bind? выполните в командной строке c:\bind\bin\rndc reload и запустите службу снова


