- Search indexing in Windows 10: FAQ
- What is indexing?
- How does indexing make my searches faster?
- What information is indexed?
- Which apps use the index?
- Why does indexing automatically run on my PC at all times?
- Where is the index information stored?
- How much space is used by the index?
- What languages can be indexed?
- Which file types can be indexed?
- Can I change how much of a file’s information is indexed?
- Change your default search engine in Microsoft Edge
- Fix problems in Windows Search
- Check for updates
- Run the Search and Indexing troubleshooter
- Restart Windows Search or your device
- Reset Windows Search
- Windows 10, version 1809 and earlier
- Windows 10, version 1903 and later
- Help us improve Search in Windows 10
- How to Change Default Search Engine in Windows 10
- Why Microsoft Recommends Bing
- Change Search Engine in Windows 10
- 1. Change Default Search Engine in Microsoft Edge
- Windows 10 Will Still Use Bing!
- 2. Change Default Search Engine in Windows 10 Search Box
Search indexing in Windows 10: FAQ
Indexing the contents of your PC helps you get faster results when you’re searching it for files and other things. Learn how it works.
What is indexing?
Indexing is the process of looking at files, email messages, and other content on your PC and cataloging their information, such as the words and metadata in them. When you search your PC after indexing, it looks at an index of terms to find results faster.
When you first run indexing, it can take up to a couple hours to complete. After that, indexing will run in the background on your PC as you use it, only re-indexing updated data.
How does indexing make my searches faster?
Much like having an index in a book, having a digital index allows your PC and apps to find content faster by looking for terms or common properties such as the date a file was created. A fully built index can return answers to searches such as «Show all songs by Coldplay» in a fraction of a second, versus the minutes it could take without an index.
What information is indexed?
By default, all the properties of your files are indexed, including file names and full file paths. For files with text, their contents are indexed to allow you to search for words within the files.
Apps you install may also add their own information to the index to speed up searching. For example, Outlook 2016 adds all emails synced to your machine to the index by default and uses the index for searching within the app.
Which apps use the index?
Many of the built-in apps on your PC use the index in some way. File Explorer, Photos, and Groove all use it to access and track changes to your files. Microsoft Edge uses it to provide browser history results in the address bar. Outlook uses it to search your email. Cortana uses it to provide faster search results from across your PC.
Many apps in the Microsoft Store also depend on the index to provide up-to-date search results for your files and other content. Disabling indexing will result in these apps either running slower or not working at all, depending on how heavily they rely on it.
Why does indexing automatically run on my PC at all times?
Your Windows 10 PC is constantly tracking changes to files and updating the index with the latest information. To do this, it opens recently changed files, looks at the changes, and stores the new information in the index.
Where is the index information stored?
All data gathered from indexing is stored locally on your PC. None of it is sent to any other computer or to Microsoft. However, apps you install on your PC may be able to read the data in the index, so be careful with what you install and make sure you trust the source.
How much space is used by the index?
A rule of thumb is that the index will be less than 10 percent of the size of the indexed files. For example, if you have 100 MB of text files, the index for those files will be less than 10 MB.
The index can take up a larger percentage if you have lots of very small files ( Modify.
What languages can be indexed?
All language packs installed with Windows include the information for indexing content in that language. If you have files or other content in a language that isn’t installed on your PC, the index will try to make it searchable, but that isn’t always possible.
To install more language packs to make sure the language is searchable on your PC, go to Settings > Time & Language > Region & language, and then select Add a language .
Which file types can be indexed?
For a list of file types that can be indexed, go to the Indexing Options control panel page and select Advanced > File Types.
Can I change how much of a file’s information is indexed?
Yes. There are two options for how much of a file to index: either properties only, or properties and content. For properties only, indexing will not look at the contents of the file or make the contents searchable. You’ll still be able to search by file name—just not file contents.
Choosing not to index the contents of files can reduce the size of the index, but it makes files harder to find in some cases.
To choose an option for each file type, go to the Indexing Options control panel page and select Advanced > File Types.
Change your default search engine in Microsoft Edge
Note: This article is for the new Microsoft Edge . Get help for the legacy version of Microsoft Edge.
Keeping Bing as your default search engine provides an enhanced search experience in the new Microsoft Edge , including direct links to Windows 10 apps, relevant suggestions from your organization if you’re signed in with a work or school account, and instant answers to questions about Windows 10. However, you can change the default search engine to any site that uses OpenSearch technology.
To change your default search engine in Microsoft Edge:
Perform a search in the address bar using the search engine you want to set as your default.
Select Settings and more > Settings .

Select Privacy and services.

Scroll all the way down to the Services section and select Address bar.
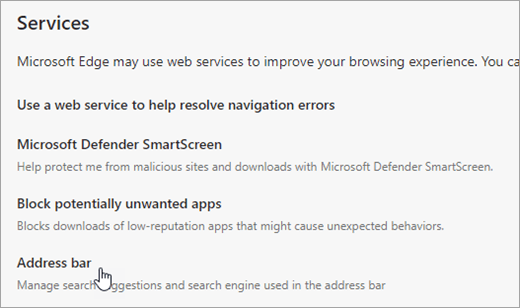
Choose your preferred search enginefrom the Search engine used in the address bar menu.
To add a different search engine, perform a search in the address bar using that search engine (or a website that supports search, like a wiki site). Then go to Settings and more > Settings > Privacy and services > Address bar. The engine or website you used to search will now appear in the list of options you can select.
Fix problems in Windows Search
If Windows Search is unresponsive or the search results don’t appear as expected, try any of the following solutions in this article.
If you’re running Windows 10 May 2019 Update (version 1903) or later versions and Windows can detect a problem, we’ll run the Search troubleshooter automatically. This troubleshooter will reset Windows Search back to the default experience. View your troubleshooter history under Settings > Update & Security > Troubleshoot > View History. Follow the steps below if your issue is still not resolved.
Original product version: В Windows 10 — all editions
Original KB number: В 4520146
Check for updates
Windows 10 lets you choose when and how to get the latest updates to keep your device running smoothly and securely. To manage your options and see any available updates, select the Start button, and then go to Settings > Update & Security > Windows Update > Check for updates. Install any available updates, and then restart your computer if the updates require it.
For more information, see Update Windows 10.
Run the Search and Indexing troubleshooter
Your PC automatically indexes content to deliver faster search results. Learn more about Search indexing in Windows 10.
Use the Windows Search and Indexing troubleshooter to try to fix any problems that may arise. To use the troubleshooter, follow these steps:
- Select Start, then select Settings.
- In Windows Settings, select Update & Security >Troubleshoot. Under Find and fix other problems, select Search and Indexing.
- Run the troubleshooter, and select any problems that apply. Windows will try to detect and solve them.
You can also use a command prompt to open the troubleshooter. Press Windows logo key+R, enter cmd in the Open box, and then select OK. At the command prompt, run the following command:
Restart Windows Search or your device
End the SearchUI process to restart Windows Search by following these steps:
- Press Ctrl+Alt+Delete, and select Task Manager.
- In the Task Manager window, select the Details tab.
- In the Name column, right-click SearchUI.exe, and then select End task.
- When you’re prompted to end SearchUI.exe, select End process.
The Windows Search process will automatically restart the next time that you search.
If this solution doesn’t fix your problem, try restarting your device. Restarting will also install any pending updates.
You may want to bookmark this page before you restart.
Reset Windows Search
Try resetting Windows Search by using the method that’s appropriate for your version of Windows.
To determine which version of Windows your device is running, follow these steps:
Select Start > Settings > System > About.
Under Windows specifications, check which version of Windows your device is running.
Resetting Windows Search does not affect your files. However, it may temporarily affect the relevance of search results.
Windows 10, version 1809 and earlier
If the Windows 10 October 2018 Update or an earlier update is installed, reset Cortana to reset Windows Search by following these steps:
- Select Start, right-click Cortana, select More, and then select App settings.
- In the Cortana settings, select Reset.
Windows 10, version 1903 and later
If the Windows 10 May 2019 Update or a later update is installed, use Windows PowerShell to reset Windows Search by following these steps:
You must have administrator permissions to run this script.
Download the ResetWindowsSearchBox.ps1 script from the Reset Windows Search PowerShell script, and save the file to a local folder.
Right-click the file that you saved, and select Run with PowerShell.
If you’re asked the following question, select Yes.
Do you want to allow this app to make changes to your device?
The PowerShell script resets the Windows Search feature. When the word Done appears, close the PowerShell window.
If you receive the following error message:
Cannot be loaded because running scripts is disabled on this system
enter the following command on the command line of the PowerShell window, and then press Enter:
The current policy appears in the window. For example, you might see Restricted. We recommend that you note this value because you’ll have to use it later.
Enter the following command on the command line of the PowerShell window, and then press Enter:
You’ll receive a warning message that explains the security risks of an execution policy change. Press Y, and then press Enter to accept the change.
To learn more about PowerShell execution policies, see About Execution Policies.
After the policy change is completed, close the window, and then repeat steps 2-4. However, when the Done message appears this time, DON’T close the PowerShell window. Instead, press any key to continue.
Revert to your previous PowerShell execution policy setting. Enter the following command on the command line of the PowerShell window, press the Spacebar, enter the policy value that you noted in step 5, and then press Enter:
For example, if the policy that you noted in step 5 was Restricted, the command would resemble the following one:
You’ll receive a warning message that explains the security risks of an execution policy change. Press Y, and then press Enter to accept the change and revert to your previous policy setting.
Close the PowerShell window.
If your organization has disabled the ability to run scripts, contact your administrator for help.
Help us improve Search in Windows 10
If the previous suggestions don’t fix the problem, let us know by sending feedback in the Feedback Hub. Provide details, such as a description of the problem, screenshots, log files, and any other information that might be helpful. In the Feedback Hub, select the appropriate category and subcategory. In this case, submit your feedback in the Cortana and Search category.
How to Change Default Search Engine in Windows 10
By: Waseem Patwegar
As you must have noticed, Windows 10 uses its default search engine (Bing) to display search results, while you may be used to searching with Google or other search providers. In this post you will be learning the steps to change the default search engine in Windows 10 to a search engine of your choice.

Why Microsoft Recommends Bing
Before changing the default search engine in Windows 10, you may like to learn a bit about why Microsoft wants you to continue using Bing as your default search engine.
According to Microsoft, leaving Bing as your default search engine in Windows 10 should help you enjoy a better user experience, due to the following reasons.
- Direct links to Windows 10 apps, taking you straight to your apps faster.
- More relevant suggestions from Cortana, your personal digital assistant.
- You get instant Microsoft Edge and Windows 10 related help.
Change Search Engine in Windows 10
Apart from Cortana, there are basically two main interfaces where most users will be coming across the default Bing search engine in Windows 10.
- Microsoft Edge
- Windows 10 Search Bar
We will be showing you how to change the default search engine in both these locations, so that you can make use of search results from Google or any other search provider of your choice.
1. Change Default Search Engine in Microsoft Edge
Changing default search engine in Microsoft Edge is not really a problem. Since Edge uses OpenSearch technology, it provides an option in its Settings Menu to use other search engines, as long as they also use OpenSearch.
Here is how you can change the default search engine in Microsoft Edge to any other search engine of your choice.
1. Open Microsoft Edge browser on your computer
2. An important step in order to set any other search engine as the default search engine on Microsoft Edge is to first visit the homepage of the search engine using Microsoft Edge browser.
In case you want to use Google, type www.google.com in the Microsoft Edge Address bar and press Enter (See image below)

3. Once you land on Google’s homepage, click on the three dots icon in the upper right corner of your screen to open a drop-down menu (See image below)

4. Select Settings from the drop-down menu and click on it (See image above)
5. Scroll down in the Settings panel and click on View advanced settings (See image below)

6. Scroll down in the Advanced settings page, till you see “Search in the address bar with” – You will see Bing set as the default search provider. Click on the Change button (See image above).

7. On the next page, select Google Search and also click on Set as Default to make Google as the default search engine on Microsoft Edge browser.

8. Restart Microsoft Edge browser and from now Google will be your new default search engine on this browser.
In above example, we have made Google as the default search engine for all searches carried out from the search bar on Microsoft Edge.
Apart from Google, you can add any other search engine of your choice by first visiting the home page of the search engine and then following the steps as indicated above.
After visiting the search engine’s home page, it should appear as an option in step#7 above. In case the search engine does not appear in the options, it is very likely that it does not support OpenSearch.
Windows 10 Will Still Use Bing!
Now that you have changed the default search engine using the Settings Menu in Windows 10, try searching from the Windows 10 Search Box, located at the bottom left corner of your screen (next to the Windows 10 Start button).
You will be surprised (if not annoyed), to see that Windows 10 still uses Bing as its default search engine when you search from the Windows 10 search box.
So the change to default search engine that we made using the Settings Menu in Windows 10 (above) does not apply to all aspects of search in Windows 10. It only applies to searches you make from Microsoft Edge Browser and does not affect the Windows 10 search box which is so convenient to use.
2. Change Default Search Engine in Windows 10 Search Box
A very easy work around to change the default search engine in Windows 10 search box is to install either Firefox or Google Chrome browser to your computer and follow the steps below.
In this example we are using Mozilla Firefox, you can also install Google Chrome and follow the steps to change the default search engine in Windows 10 search box to other search Engines like Google, Yahoo, DuckDuckGo, etc.
1. First download the latest version of Firefox to your PC.
2. Install Firefox browser on your computer.
3. Next, Open the Firefox browser on your computer and click on the 3 line icon , located to the top right corner of your screen (See image in Step 4)
4. Click on Options to launch the Firefox Options page (See image below)

5. On the Options page, click on Search to view the search related settings (See image in Step 6)
6. Next, under the Default Search Engine section, select Google as the default search engine. In the same way, you can choose any other search engine of your choice.

7. Make sure that the option titled Use this search engine for searches from Windows is enabled.
That’s it, we have successfully changed the Windows 10 default search engine from Bing to Google, both in Microsoft Edge and also in Windows 10 Search box.


