- Как создать и настроить «детский» аккаунт в Windows 10
- How to set up a kid-friendly Windows 10 device with a child account
- How to create a child account on Windows 10
- Signing in first time
- How to manage a child account on Windows 10
- Viewing recent activities
- Limiting devices screen time
- Applying app and game limits
- Applying content restrictions
- Set age restriction
- Set web filtering
- Adding money to account
- Ask to buy
- Adding funds
- Fixing common problems
- More Windows 10 resources
- The Dell XPS 15 is our choice for best 15-inch laptop
- Halo: MCC’s live service elements make it better, not worse
- Microsoft’s Surface Duo is not ‘failing up’
- These are the best PC sticks when you’re on the move
Как создать и настроить «детский» аккаунт в Windows 10
Помимо обычных пользовательских аккаунтов в Windows 10 можно создавать «детские». С помощью такого аккаунта вы сможете следить за тем, что делает на компьютере ваш ребенок, ограничивать ему доступ к некоторым сайтам, играм и приложениям, а также установить время, в течение которого ему можно пользоваться компьютером.
Как создать детский аккаунт:
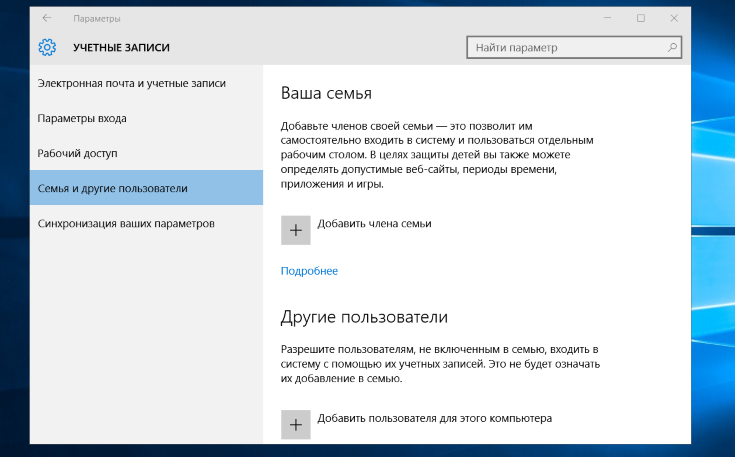
1. Откройте «Параметры» (Win+I), зайдите в раздел «Учетные записи», перейдите в меню «Семья и другие пользователи» и нажмите «Добавить члена семьи».
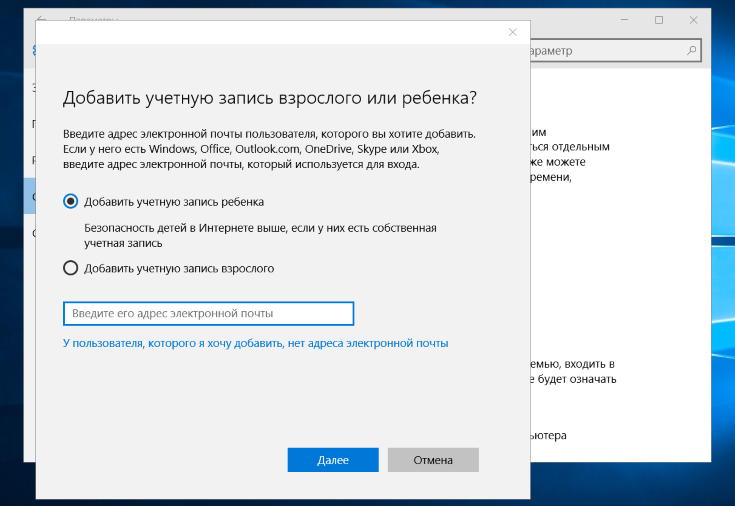
2. Выберите «Добавить учетную запись ребенка» и укажите адрес его электронной почты.
3. Если у него нет Email, его можно создать здесь же. Для восстановления доступа к аккаунту потребуется указать номер телефона или резервную электронную почту. На вашу почту придет подтверждение того, что вы добавили на компьютер доступ своему ребенку.
4. Вход на компьютер с детской учетной записью будет осуществлять с той почтой и паролем, что вы указали при добавлении нового аккаунта.
Как управлять детским аккаунтом:
2. Найдите учетную запись своего ребенка и нажмите на нее.
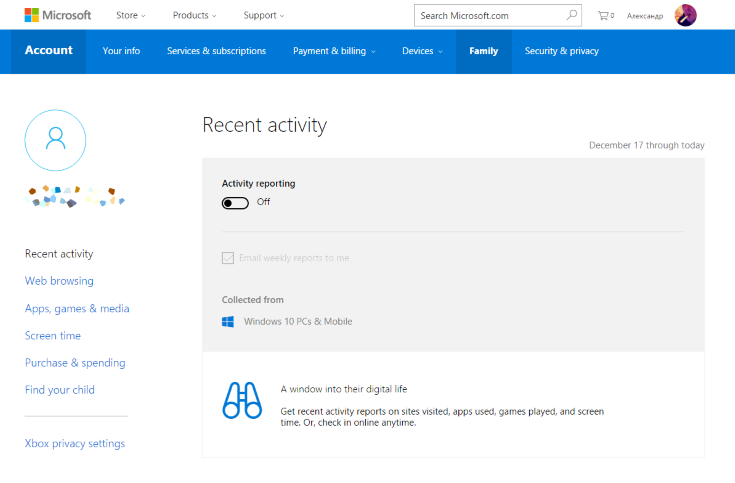
3. Вы увидите отчет о действиях, которые ребенок выполнял на компьютере, список посещенных им сайтов и запущенных программ, игр и медиафайлов. Сюда вы можете внести адреса сайтов и названия приложений, которыми вашему ребенку запрещено пользоваться — доступ к ним на компьютере будет заблокирован.
4. В разделе Screen time вы можете указать время, когда ребенку позволено пользоваться компьютером и максимальную длительность работы.

5. В разделе Purchase & spending вы можете добавить на счет своего ребенка деньги, которые он при желании израсходует на покупки в магазинах Windows или Xbox. В дальнейшем здесь будет показан список купленного им контента.
6. Последний раздел — Find your child. Он позволяет увидеть на карте, в каких местах ваш ребенок пользовался компьютером (то есть, где он находился или находится сейчас). По умолчанию эта опция выключена, но ее можно активировать.
Менять все эти настройки можно и через браузер, то есть вы можете контролировать своего ребенка удаленно без физического доступа к его компьютеру, ноутбуку или планшету.
How to set up a kid-friendly Windows 10 device with a child account
 Source: Windows Central
On Windows 10, you can add multiple accounts to share a device with other family members. If you have children, they can also have a personal space, but in a more controlled environment to make sure they have the safest experience possible while using apps, playing games, and browsing the internet. This can be a huge help now that people are working from home and the kids are not at school.
This is all possible to set up using a child account, which you can then manage in a number of ways through the family settings in your Microsoft account. Using these tools, you can review reports of your children’s online activities or limit the time they can spend in front of Windows 10 devices. You can also restrict age and screen time for apps and games, and can make sure they don’t end up visiting websites that aren’t suitable for them.
In this Windows 10 guide, we’ll walk you through the steps to properly set up a child account and manage its parental control settings.
How to create a child account on Windows 10
To create and properly set up a child account on Windows 10, use these steps:
- Open Settings.
- Click on Accounts.
- Click on Family & other users.
Under the «Your family» section, click the Add a family member button.
 Source: Windows Central
Select the Add a child option.
![]() Source: Windows Central
Source: Windows Central
Confirm the email address of the young person you want to add.
Quick tip: If the new member doesn’t have an account, click «The person I want to add doesn’t have an email address» option and continue with the on-screen directions.
Click the Confirm button.
![]() Source: Windows Central
Source: Windows Central
Once you complete the steps, a standard account with limited access will be created for the child, and the new member will be able to sign-in immediately. However, you won’t be able to control the account until they click the Accept Invitation button from the email invitation sent during the account creation process.
Signing in first time
To complete the set up of a child account, use these steps:
- Sign out of your account.
- Click the new account (it’ll initially show as an email address).
Click the Sign in option.
Source: Windows Central
Click the Set up button (recommended).
Source: Windows Central
Create a new PIN.
Source: Windows Central
Click the Only save files to this PC option. (Unless you want your kid’s data to get backed up in OneDrive.)
Source: Windows Central
Choose the privacy settings for the new Windows 10 account by turning on or off the toggle switch for each option.
Source: Windows Central
After you complete the steps, the next time the user signs in, the account will appear as the user’s name, and they can sign-in directly into the desktop.
How to manage a child account on Windows 10
Once the member has accepted the invitation, you can manage the kid account using the Microsoft family settings online. Using the online dashboard, you can view activity reports and limit screen time for apps and games. You can enforce rating for contents, apps, and games, and add money to allow the young person to make small purchases in the Microsoft Store.
To manage an account for a family member using Windows 10, use these steps:
- Open Settings.
- Click on Accounts.
- Click on Family & other people.
Under «Your family,» click the Manage family settings online option.
Source: Windows Central
Alternatively, you can sign-in to your Microsoft account in your web browser, and open the Family tab.
While in the family dashboard, you can view activity reports and manage various aspects of the account, such as screen time for the entire device and for apps and games, block innapropiate websites, and much more.
Viewing recent activities
Under the account name of the kid, click the Activity tab, and then turn on the Activity reporting toggle switch to start collecting activities from their Windows 10 devices.
Source: Windows Central
Once the option is enabled, you can see the websites they’ve been visiting, the apps and games they’ve been downloading and playing, and the time they’ve been spendinsg on their devices.
If you can’t stay on top of the daily activities, you can also turn on the Email weekly reports to me toggle switch to get a full report delivered to your email account.
![]() Source: Windows Central
Source: Windows Central
After enabling reporting, you can always come back and use the View activity from drop-down menu to select the day of activities you want to review.
Limiting devices screen time
In the Screen time tab page, you can enforce limits on the hours and days of the week the child can use their Windows 10 device.
Using the parental controls, you can set two types of schedules to limit screen time. Under the «Device limits» section, you can turn on the Use one screen time schedule toggle switch to use one schedule for all devices, including PC and game console. You can also turn on the screen time for each device (for example, Windows 10 or Xbox One) separately using the toggle switch on the right side.
Once you decide how to set device limits, configuring screen time schedules is an easy process.
![]() Source: Windows Central
Source: Windows Central
Under the «Time limit» column, use the drop-down menu and select the number of hours that the family member is allowed to use in a given day. Using this option, you can also set the allowance to all day or block the day entirely.
After specifying the hours that the child can use a device, click the hours timeline on the right, and define the time of the day that the new member is permitted to use time allowance. For instance, you can enforce two hours of computing time a day, which the kid can use between 4 p.m. and 8 p.m.
 Source: Windows Central
On the same page, you can also add and remove multiple schedules as needed. After configuring the screen time, click the Save button to apply the changes.
If you want to set the same time to multiple days, such as from Monday through Friday, click the Add time to multiple days option, select the time range and the days of the week, and click the Save button.
Applying app and game limits
Inside the App and game limits tab, similar to the device screen time settings, you can enforce screen time limits for apps and games to promote a healthier and safer lifestyle for young members.
To start using this feature, turn on the App and game limits toggle switch. Then select the app or game you want to set screen limits, and turn on the toggle switch on the right side to enable restrictions.
Source: Windows Central
While in the app settings, click on the Weekdays or Weekends tab and use the slider to set the amount of time the member can use the app.
Source: Windows Central
Also, use the Allow from option to specify the time of the day that the member can use the time. For example, you can enforce to hours of Google Chrome time a day, which the child can use between 2 p.m. and 6 p.m.
You can check out this guide with more details on using app and game limits on Windows 10, Xbox One, and Android.
Applying content restrictions
The Content restrictions tab includes settings that allow you to set an age limit to restrict inappropriate apps and games. Also, you can enable web filtering to block websites and search results that are known to be not suited for young people. In addition, you can restrict or specified the set of sites your child can access.
Set age restriction
To enforce age restrictions, simply turn on the Block inappropriate apps, games & media toggle switch.
Source: Windows Central
Once you enabled the option, use the Allow apps and games rated for drop-down menu to specify the age restriction (for example, 18-year-old).
Set web filtering
To start filtering online content not suited for young people, turn off the Block inappropriate websites toggle switch.
Under the «Always allowed» section, you can add the websites that a child can visit manually. Simply specify the link in the box, and click the + button, and repeat the steps to add more sites.
Source: Windows Central
It’s also possible to check the Only allow these websites option to explicitly set this list as the only websites a child can load in the web browser while blocking everything else.
Similar to the process to allow websites, you can use the «Always blocked» section to add the links for the sites that you want to restrict.
It’s worth noting that if you want to use web filtering, inappropriate searches will be more effective using Microsoft Edge and Bing as the default search engine.
If you want to restrict your child from using another search engine, which may not have safe search enabled, it’s a good idea to add those sites to the blocked list, including Google.com, Yahoo.com, DuckDuckGo.com, and others.
Also, because this feature only works with Microsoft Edge, enabling «Web browsing» will block other browsers, such as Chrome or Firefox, to help to keep your kids safer when surfing the internet. However, if you want to allow the use of another browser, you can unblock them from the Apps, games & media section, under «Always blocked.»
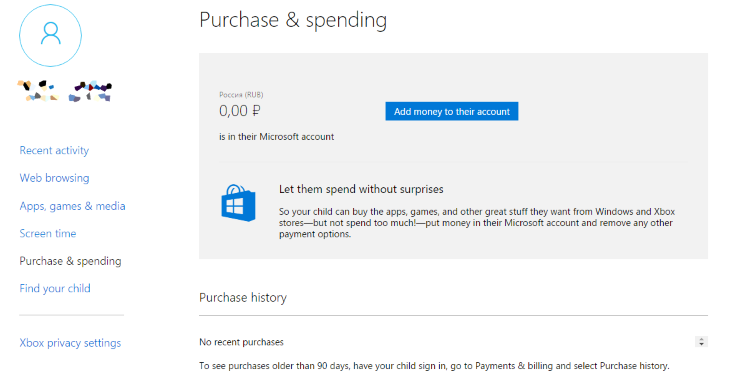
Adding money to account
The Spending tab allows you to add money to your kid’s Microsoft account to buy anything they want without breaking the bank.
This feature works in combination with the Content restrictions settings to block the products they shouldn’t buy, such as game rated for a much older audience.
Ask to buy
In the «Ask to buy» section, you can turn on the Needs organizer approval to buy things and Email me when they get stuff toggle switches to require authorization for apps, games, and entertainment they want to purchase in the Microsoft Store without the need to add funds.
Source: Windows Central
However, when you enable this option, it’ll exclude things they buy with a gift card or money already in the Microsoft account.
Adding funds
To add funds to your kid’s account, click the Add money button, specify the amount, and complete the transaction. (This process is not refundable. If you’re not sure how it’s going to work, start with a small amount, or use the «Ask to buy» option.)
 Source: Windows Central
In addition to adding money, at the bottom of the family settings page, you can also view your child’s purchase history.
Fixing common problems
Typically, after setting up a child account on Windows 10 and configuring the parental controls, settings will apply immediately. However, sometimes, you may come across some problems getting screen time and family activities working correctly.
To avoid or get around common problems, make use of these tips:
As soon as the child account has been created, you want to verify the account on Windows 10 on Settings > Accounts > Your info. Click the Verify link and follow the on-screen instructions to complete the process.
If the settings aren’t working, make sure the device is connected to the internet, and restart the computer to update the system settings.
Sometimes, problems can also occur as a result of missing updates; as such,, make sure to check for new updates manually on Settings > Update & Security > Windows Update, and click the Check for updates button.
We’re focusing this guide on Windows 10, but using the Microsoft family settings, you can also manage other compatible devices, such as Xbox One and Android phones, including additional features like «Find your Child,» and more.
More Windows 10 resources
For more helpful articles, coverage, and answers to common questions about Windows 10, visit the following resources:
We may earn a commission for purchases using our links. Learn more.
![]()
The Dell XPS 15 is our choice for best 15-inch laptop
For a lot of people, a 15-inch laptop is a perfect size that offers enough screen for multitasking, and in a lot of cases, some extra performance from powerful hardware. We’ve rounded up the best of the best at this size.
![]()
Halo: MCC’s live service elements make it better, not worse
Halo: The Master Chief Collection is more popular than ever, but some fans don’t agree with the live service approach 343 Industries has taken with it. Here’s why those elements are, at the end of the day, great for the game and for Halo overall.
![]()
Microsoft’s Surface Duo is not ‘failing up’
Microsoft announced this week that it was expanding Surface Duo availability to nine new commercial markets. While Surface Duo is undoubtedly a work in progress, this is not a sign of a disaster. It’s also doesn’t mean that Surface Duo is selling a ton either. Instead, the reason for the expansion is a lot more straightforward.
![]()
These are the best PC sticks when you’re on the move
Instant computer — just add a screen. That’s the general idea behind the ultra-portable PC, but it can be hard to know which one you want. Relax, we have you covered!


