Windows 10 controller com
At the bottom of the screen, you’ll see a «Not Connected» badge. Tap this badge.

If you’re using the Paid version, the app tries to connect to PC automatically at the app startup (if Quick Connect is enabled from user settings). Be sure Win10 Controller Server app is running on your PC to auto connect. It tries to connect to your PC automatically.
Or you can use the «Manual Connection» screen. It will ask you the local IP of your PC, so it will communicate through your PC by this local IP. Your local IP address is displayed on the Win10 Controller Server app’s main screen.

When the connection established, it will redirect you to the main screen and the a Connection Success tip will be displayed . Now you can move your finger over the screen and see if the mouse cursor on your PC is moving too.

Some of most used mouse functions are below. Please note that you can always change most of these actions from the Win10 Controller Server app’s settings window.
Move: Just move your finger over this area
Left Click: Tap with one finger once
Right Click: Tap with two fingers once
Middle Click: Hold one finger for a while
Double Click: Tap with one finger twice
Scroll with touch: Move your finger over the scroll area vertically or horizontally. This simulates a touch screen move. So say, you can use this area to move a window by its title area.
Scroll (traditional): Tap the scroll mode button (the small button below the scroll area, named «Touch» by default). It will change to «Scroll». Now when you move your finger over the scroll area, it works like a traditional mouse scroll wheel.

The blue lines on the 4 edges indicates the edge areas. (You can hide these lines from the settings screen) When you perform a swipe gesture beyond these indicators, it performs the edge gesture actions. There are lots of actions you can assign for every edge gesture. You can assign the actions from Win10 Controller Server app’s settings window. The default ones are below:
Left Edge with one finger: Switch to next open app
Right Edge with one finger: Open Action Center
Top Edge with one finger: Minimize the current window
Bottom Edge with one finger: Show Start Menu
Left Edge with two fingers: Switch to next virtual desktop
Rigth edge with two fingers: Switch to previous virtual desktop
Top Edge with two fingers: Close the current window
Bottom Edge with two fingers: Show Desktop
Just tap the app icon you want to control and it will display the available commands.

So, for example you can control the Media Player app to make it play, pause etc.
To assign an action to a custom tile, please go to the settings window of the Win10 Controller Server app and switch to Custom Tiles section.
You can define custom voice commands from the settings windows of the Win10 Controller Server app. And after you define commands there, you can tap the Command button (you see on the screenshot above) and say the command.
Also, as you can see on the screenshot above, there is another voice command option named «Text». This allows you to dictate text to your computer just by talking. You talk, it types automatically.
To add a new gesture, tap the Manage Gestures button (as seen above). Here you can see the saved gestures. To remove a gesture, please tap the trach icon of the gesture item on the list.

And tap the New Gesture button. And draw your preferred gesture.

By default, tilting is disabled. You can always enable it from the settings screen of your app. But please note that, when you enable both tilt and shake actions, only the tilt action will be performed and shake action will be ignored.
You can assign actions to tilt and shake from the settings window of Win10 Controller Server app.
Tilt: When you tilt your phone to the left or right, any action you set from the server app will be performed (like going to next page or previous page on a web browser).
Shake: When you shake your phone, any action you set from the server app will be performed (like switching to the next song on media player).
Zoom: You can zoom in/out photos or any other stuff on your computer just by tilting your phone. To make it happen, please tap the button just below the scroll area. It will switch to «Motion» (as seen below). Now, to zoom in or out, hold the scroll area and tilt your phone up/down.

Windows 10 controller com
At the bottom of the screen, you’ll see a «Not Connected» badge. Tap this badge.

If you’re using the Paid version, the app tries to connect to PC automatically at the app startup (if Quick Connect is enabled from user settings).
Otherwise, you can tap the either «Auto Connect» or «Manual Connect» button on the new screen.

Be sure Win10 Controller Server app is running on your PC and tap «Auto Connect». It tries to connect to your PC automatically.
Or you can use the «Manual Connection» screen. It will ask you the local IP of your PC, so it will communicate through your PC by this local IP. Your local IP address is displayed on the Win10 Controller Server app’s main screen.

When the connection established, it will redirect you to the main screen and the a Connection Success tip will be displayed . Now you can move your finger over the screen and see if the mouse cursor on your PC is moving too.

Some of most used mouse functions are below. Please note that you can always change most of these actions from the Win10 Controller Server app’s settings window.
Move: Just move your finger over this area
Left Click: Tap with one finger once
Right Click: Tap with two fingers once
Middle Click: Hold one finger for a while
Double Click: Tap with one finger twice
Scroll with touch: Move your finger over the scroll area vertically or horizontally. This simulates a touch screen move. So say, you can use this area to move a window by its title area.
Scroll (traditional): Tap the scroll mode button (the small button below the scroll area, named «Touch» by default). It will change to «Scroll». Now when you move your finger over the scroll area, it works like a traditional mouse scroll wheel.

The blue lines on the 4 edges indicates the edge areas. (You can hide these lines from the settings screen) When you perform a swipe gesture beyond these indicators, it performs the edge gesture actions. There are lots of actions you can assign for every edge gesture. You can assign the actions from Win10 Controller Server app’s settings window. The default ones are below:
Left Edge with one finger: Switch to next open app
Right Edge with one finger: Open Action Center
Top Edge with one finger: Minimize the current window
Bottom Edge with one finger: Show Start Menu
Left Edge with two fingers: Switch to next virtual desktop
Rigth edge with two fingers: Switch to previous virtual desktop
Top Edge with two fingers: Close the current window
Bottom Edge with two fingers: Show Desktop
Just tap the app icon you want to control and it will display the available commands.

So, for example you can control the Media Player app to make it play, pause etc.
To assign an action to a custom tile, please go to the settings window of the Win10 Controller Server app and switch to Custom Tiles section.
You can define custom voice commands from the settings windows of the Win10 Controller Server app. And after you define commands there, you can tap the Command button (you see on the screenshot above) and say the command.

Also, as you can see on the screenshot above, there is another voice command option named «Text». This allows you to dictate text to your computer just by talking. You talk, it types automatically.
To add a new gesture, tap the Manage Gestures button (as seen above). Here you can see the saved gestures. To remove a gesture, please hold your finger over the gesture for a while.

And tap the New Gesture button. And draw your preferred gesture.

By default, tilting is disabled. You can always enable it from the settings screen of your app. But please note that, when you enable both tilt and shake actions, only the tilt action will be performed and shake action will be ignored.
You can assign actions to tilt and shake from the settings window of Win10 Controller Server app.
Tilt: When you tilt your phone to the left or right, any action you set from the server app will be performed (like going to next page or previous page on a web browser).
Shake: When you shake your phone, any action you set from the server app will be performed (like switching to the next song on media player).
Zoom: You can zoom in/out photos or any other stuff on your computer just by tilting your phone. To make it happen, please tap the button just below the scroll area. It will switch to «Motion» (as seen below). Now, to zoom in or out, hold the scroll area and tilt your phone up/down.

How to quickly find your Gaming Controller in Windows 10

- To make things easier, Microsoft updated the text of the Add a Device dialog so the list of examples under Bluetooth includes controllers in the Windows 10 Insider Preview Build 19624.
- Make sure your controller is charged, is ON, and it has the Bluetooth connection turned ON (if applicable, of course).
- Controllers spice up things, especially when you connect them to your PC. Read all about them in our Controller section.
- For new and exciting guides, head over to our How to Hub.

We all know that a game controller can make games a lot more enjoyable on a Windows 10 PC. That’s if you’re used to them from a console or whatnot. Anyway, the first step after you get the controller is to connect it to your rig, right?
If it’s a USB controller, the things are pretty straight forward but what if it’s a Bluetooth one? In fact, some users complained that they can’t find it in Windows 10.
To make things easier, Microsoft updated the text of the Add a Device dialog so the list of examples under Bluetooth includes controllers in the Windows 10 Insider Preview Build 19624.
How can I find my Gaming Controller in Windows 10?
1. Prepare your controller
Make sure your controller is charged, is ON, and it has the Bluetooth connection turned ON (if applicable, of course).
2. Look for your controller in Windows 10
To start adding a new Bluetooth controller click on the Windows Start button or press the Windows key, then click on Settings (the little cogwheel), and then on Devices.
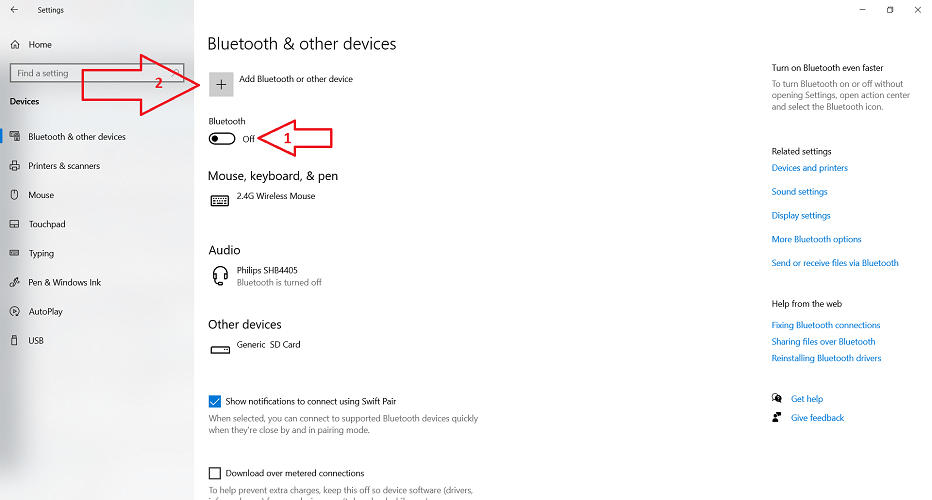
First, turn on the Bluetooth connection, then click on the + button like shown in the image.
3. Detect and setup
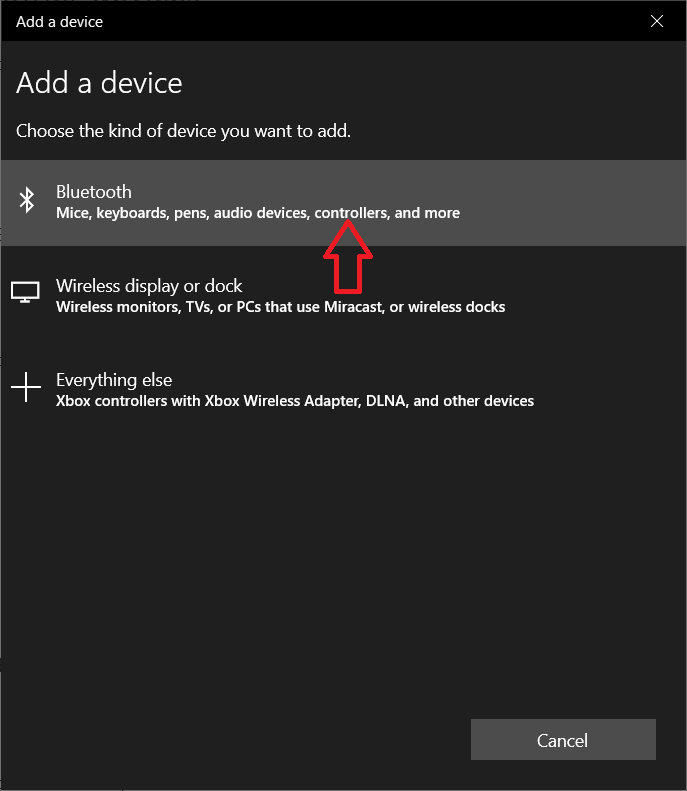
In the next window, you will see three options to add a device. You need the first option, to add a Bluetooth device, and as you can see, Microsoft added the controllers word to describe the list of devices you can add.
After you click on the Bluetooth button, you will see a list of devices that Windows detected and among them, hopefully, your Bluetooth controller. Click on it and follow the on-screen instructions. Again, make sure your controller is ON, charged, and with Bluetooth ON. Also, make sure that the controller is in the Bluetooth range.
That’s about it! Enjoy and game ON! If you have any other problems, questions or suggestions, please drop us a line in the comments section below.


