- How To Set Up Virtual Desktops In Windows 10
- Create a New Virtual Desktop in Windows 10
- Switch Between Desktops
- Work With Apps & Windows On Virtual Desktops
- Close Virtual Desktop Windows
- Customize Multiple Desktops
- How to create and manage virtual desktops on Windows 10
- How to create a new virtual desktop on Windows 10
- How to switch between virtual desktops on Windows 10
- How to move an app to another virtual desktop on Windows 10
- How to show an app on all virtual desktops on Windows 10
- How to remove a virtual desktop on Windows 10
- Wrapping things up
- How to Create, Delete, Use Virtual Desktops in Windows 10
- Create Virtual Desktop in Windows 10
- Use Virtual Desktop in Windows 10
- Delete Virtual Desktop in Windows 10
How To Set Up Virtual Desktops In Windows 10
Be more productive with just one screen
Windows 10 has a built-in feature enabling users to not only connect two or more computers to one monitor but to also create multiple virtual desktops. Each one will display different applications, programs and windows enabling plenty of multi-tasking.
It’s great for people who want to keep their personal and business apps and data separate, for dedicating space to specific tasks and in organizing groups of related jobs.

This article will explain how to:
- Create a new virtual desktop.
- Switch between desktops.
- Work with apps and windows on virtual desktops.
- Close virtual desktop windows.
- Customize multiple desktops.
Create a New Virtual Desktop in Windows 10
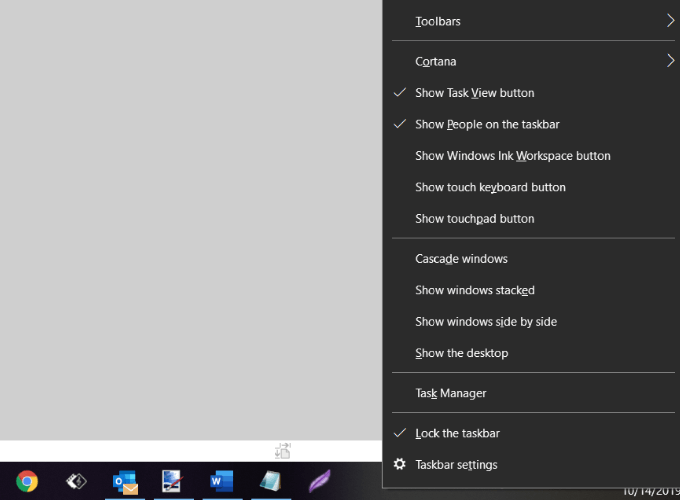
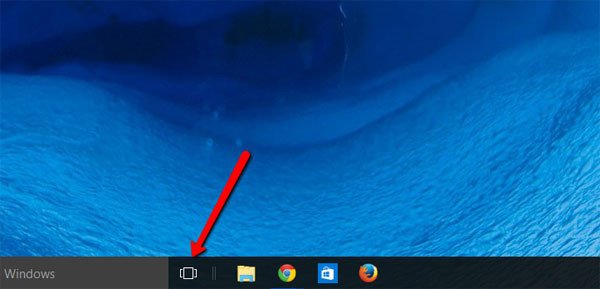
- In your taskbar, look for the Task View button and click on it.

- In the image above, it is the icon next to the search bar. If you don’t see the Task View button, right-click on any open space on the taskbar and select Show Task View button to turn it on.
- You can also use the shortcut by holding down the Windows key + Tab.
- When you open Task View, you will see all the apps running on your computer. Switch to an app by clicking on it.
- Add a new desktop by clicking the New Desktop button located on the bottom right-hand corner of your screen.

- The task view pane will show all your open programs arranged in rectangles across the screen.
You can create as many virtual desktops in Windows 10 as you want. However, don’t create too many or you may lose control and be unable to keep your activities organized.
Switch Between Desktops
After adding additional desktops, the Task View will show them all at the top of your screen.
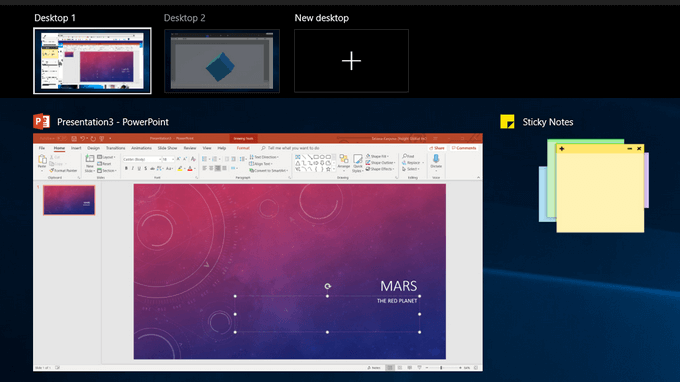
Below are several ways to switch from one desktop to another:
- If you are already on Task View, select the Desktop you want to use by clicking on it.
- Use your keyboard by pressing the Windows key + Tab. This will bring up the Task View. Click on the desktop you want to use. Move from screen to screen by using the Tab key.
- To switch between desktops without using the Task View, hold down the Windows and Ctrl keys and click either the left or right arrow key to scroll through the open desktops.
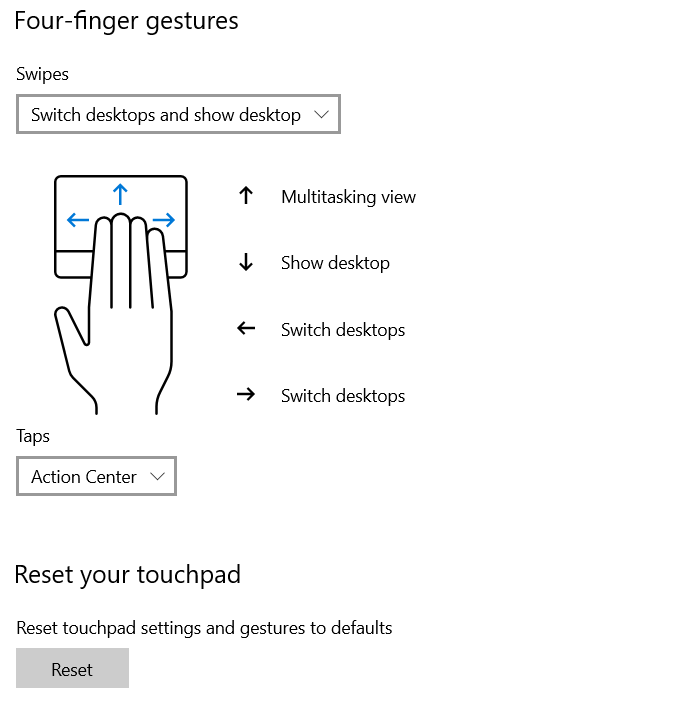
- Precision touchpads or touch screen device users can move from one desktop to another with the four-fingered swipe.
Work With Apps & Windows On Virtual Desktops
If you have created a new virtual desktop that you don’t want to use, click on the X at the top of the virtual desktop to delete it.
Now that you have created new desktops, how do you populate them with the applications and programs you need?
You can open different programs on every virtual desktop you create in Windows 10. If you open an app or window in one desktop, it will stay open and remain on that desktop. Some apps, such as Microsoft Word or Chrome, will let you open different windows on different desktops.
However, other apps (such as the Windows Store app) will only allow you to use them on one window at a time. For those apps, if you have it running on Desktop 1 and try to open it in Desktop 2, you will be jumped back to Desktop 1 where the app is running.
This can be inconvenient. Your only option is to look at your Task View to find where the app was installed.
You can move an open window from one desktop to another by following the steps below:
- Navigate to the desktop where the window is open.
- Click the Task View button or use the keyboard shortcut Windows key + Tab.
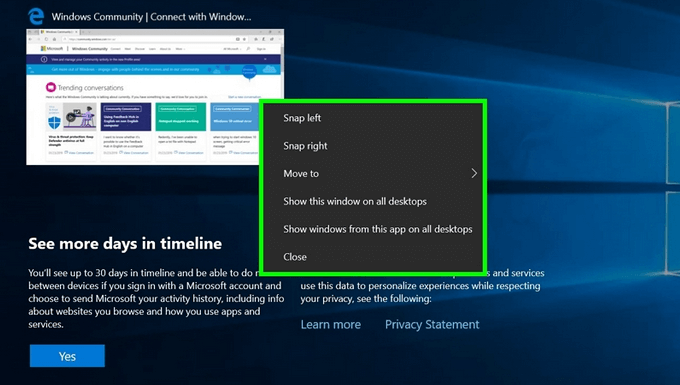
- Right-click on the window you want to move.
- Choose the Move to option.
- This will open a list of all the desktops on your computer.
- Select the desktop where you want to move the window, and it will be moved.
Close Virtual Desktop Windows
Having several virtual desktops on your Windows 10 computer is very helpful. However, depending upon your hardware and how many you have open at once, your system’s performance could be negatively affected.
Use the shortcut Windows key + Ctrl + F4 to close a virtual desktop. Repeat the shortcut to close more or all of the remaining desktops.
Customize Multiple Desktops
To manage the view of a virtual desktop, right-click on any open window.
If you want to affix a desktop to the left or right-hand side of your screen, you can use snap options from Snap Assist to organize your screens with two windows side-by-side.
- Use the keyboard shortcut by holding down the Windows Key and pressing either the left or right arrow key.
- Snap Assist will move the active window to the direction you choose.
- The other half of the screen will show all your other open windows.
- Click on the window you want on the other side of your screen.

Use multiple virtual desktops as temporary workspaces in Windows 10 to stay productive and organized. For example, rather than switching between PowerPoint, a browser, and a music app, putting them on different desktops makes it easier to move between them. You also don’t have to minimize and maximize each program while you use another.
David has a background in small business and lives in Australia. He is a WordPress and Ubuntu Developer who enjoys design, CSS and tech tool integration. Read David’s Full Bio
How to create and manage virtual desktops on Windows 10
You can quickly organize and separate tasks by grouping them into virtual desktops on Windows 10 — Here’s how to do it.

The ability to have multiple desktops is a powerful feature, as you can better organize and group your tasks, but it’s a problem when you only have one display. On Windows 10, the solution to this problem is “virtual desktops,” which is a feature that allows you to create additional desktops to overcome the limitations of a physical monitor.
Virtual desktops on Windows 10 is new, but the idea isn’t actually new. Linux and macOS had this feature for a long time, even Windows 3.x and Windows XP had this feature in one way or another, and now is coming back to the OS.
In this guide, you’ll learn the steps to create and manage virtual desktops on Windows 10.
How to create a new virtual desktop on Windows 10
On Windows 10, “virtual desktops” is actually part of Task View, which also includes a list of your running applications as well as a list of your Timeline activities.
In order to create a new virtual desktop, use these steps:
Click the Task View button in the Taskbar (or use the Windows key + Tab keyboard shortcut).
Task View button in the taskbar
Click New desktop in the bottom-right corner.
 Create new virtual desktop on Windows 10
Alternatively, you can simply use the Windows key + Ctrl + D keyboard shortcut to create a new virtual desktop. If you click the shortcut continuously, you’ll create multiple desktops.
How to switch between virtual desktops on Windows 10
In order to switch between virtual desktops, use these steps:
Click the Task View button in the Taskbar (or use the Windows key + Tab keyboard shortcut).
Click the virtual desktop you want to switch to from the top-left corner.
 Switch between virtual desktops
Alternatively, you can use the Windows key + Ctrl + Left or Windows key + Ctrl + Right to quickly move between desktops.
How to move an app to another virtual desktop on Windows 10
In order to move an app to another desktop, use these steps:
Click the Task View button in the Taskbar (or use the Windows key + Tab keyboard shortcut).
Right-click the app and select the Move to option.
Select the desktop you want to move the app to, or you can click New desktop to create and move the app to a new virtual desktop.
 Move app or window to another desktop
Alternatively, you can click, drag and drop the app to the desktop you want while in Task View.
How to show an app on all virtual desktops on Windows 10
If you want an app or window to be available on all virtual desktops, use these steps:
Click the Task View button in the Taskbar (or use the Windows key + Tab keyboard shortcut).
Right-click the app and select Show this window on all desktops. You can also select Show windows from this app on all desktops.
 Show app or window on all desktops
How to remove a virtual desktop on Windows 10
When you no longer need a desktop, you can delete it in a number of ways:
Click the Task View button in the Taskbar or use the Windows key + Tab keyboard shortcut.
Hover over the virtual desktop, and click the X button to close it.
 Close a virtual desktop
Alternatively, you can switch to the desktop you want to remove, and use the Windows key + Ctrl + F4 shortcut to close it.
Closing a virtual desktop doesn’t close the running apps. They will just simply move the next available desktop, and obviously, you can’t delete the last desktop standing.
Wrapping things up
The main goals with virtual desktops is to add more space to group related windows. It gives you a quick way to find and switch to any single or group of windows. You can easily re-organize your groups of tasks, and you can control the separation between your groups of windows.
In addition, you can create unlimited virtual desktops to keep your work separate from your personal stuff, and your desktops will remain after you restart your device.
If you ever forget in which desktop you left your music play, remember that you can hover over desktops to get an accurate peek of all the running apps on each desktop, and quickly jump into the app.
Although “virtual desktops” isn’t exactly a new feature, it’s a great addition on Windows 10, which once you know is there, you’ll be using it quite often. However, the experience lacks of some important features, such as the ability to rename desktops, you can’t have different backgrounds, and there isn’t a way to see the number of active desktops unless you open Task View.
Update June 26, 2018: This guide has been updated to reflect the new changes available on Windows 10 since these instructions were originally published in December 2016.
We may earn commission for purchases using our links to help keep offering the free content. Privacy policy info.
All content on this site is provided with no warranties, express or implied. Use any information at your own risk. Always backup of your device and files before making any changes. Privacy policy info.
How to Create, Delete, Use Virtual Desktops in Windows 10
By adding Virtual Desktop or Task View feature, Windows 10 has given more power to its users. The earlier versions of Windows did not have this feature. One had to stack all the opened programs or tasks in one single desktop’s taskbar. As the number of opened programs grew, it started becoming very cumbersome to manage tasks. Virtual Desktops in Windows 10 is expected to solve this problem.
Task View is a virtual desktop manager for Windows 10 and is launched, when you click on its button, next to the Search bar on the taskbar. Using this feature, you can create different arrangements of your running apps and open programs. You can create new Desktops, open different apps in each, work in each or any of them whenever you want, close the opened desktops when you finish work, etc. You can switch between applications, and you can also move an application from one desktop to another. This feature augments a snapping feature called Snap Assist, which can help you snap different windows in any arrangement, a little more easily.
Create Virtual Desktop in Windows 10
In order to get started, click on the “Task View” icon next to Windows 10 search bar in the Taskbar as shown in the below image.
Clicking on the Task View button opens up a new view. Right above the taskbar, you can notice a panel where all desktops are stacked side by side, with a number suffixing it e.g., “Desktop 1”, “Desktop 2” etc…
You can create a new desktop by clicking on “New Desktop” icon which is present at the right corner of this panel. You can now use the created desktop to run and group your programs within the created desktop. Win+Ctrl+D will also create a new virtual desktop.
Use Virtual Desktop in Windows 10
With the help of the Virtual Desktop feature, one can add an unlimited number of desktops and manage tasks better. For example, one can open all editor programs in one virtual desktop and have music, photos, etc. in the other. This way a person can logically separate the tasks based on its nature and simultaneously switch between them.
You can view all the opened programs by hovering on the thumbnail of the desktop – this gives you a quick overview of programs running on a particular desktop. You can directly navigate to a particular opened program in any desktop by clicking on it. Most importantly, you can move an opened program from one desktop to another by dragging it to your desired desktop.
To close the current virtual desktop use Win+Ctrl+F4. Win+Ctrl+ Arrows will help you navigate between your virtual desktops.
Delete Virtual Desktop in Windows 10
If you have opened multiple virtual desktops on your PC, you might want to close a few or all of the opened desktops. Remember, the programs opened in a particular desktop are grouped underneath it. If you wish to close any of the virtual desktops, simply click on “Task View” button in the taskbar which opens up all the active desktops, hit on the “close” button to terminate that particular desktop as shown in the image.
This closes the intended virtual desktop, and all the open programs on that particular desktop will be moved to its neighboring desktop merging with the existing opened programs. In short, you cannot terminate all the opened programs in a desktop by simply closing the desktop – the created desktops are virtual in nature and help you organize the opened programs in a cleaner way. You will have to individually close the programs even after killing a virtual desktop.
To conclude:
- To add a new desktop, click the task view button on your taskbar and click the “new desktop” button.
- There’s no limit to how many desktops you can create.
- The top part of this view shows previews of the windows you have open, just like Alt+Tab. However, the task view also filters this list when you create virtual desktops, so only the relevant windows appear.
- Under that, you will find the list of desktops you have opened. The labels along with accurate previews make it easy to find what you want to switch to.
- What if you’re trying to find that music player and you forgot which desktop you had it on? Just hover over each desktop preview and Windows will let you see what windows are open there.
- You can drag any window to the desktop you want to move it to right from the task view.
- You can even drag a thumbnail to the “new desktop” button to create and move it to a new desktop in one step.
Keyboard Shortcuts for Virtual Desktop:
- WIN + CTRL + LEFT/RIGHT: Switch to previous or next desktop
- WIN + CTRL + D: Create a new desktop
- WIN + CTRL + F4: Close the current desktop
- WIN + TAB: Launch task view.
Pro Tips
- Using the keyboard shortcut Win+Tab, one can open the Task View window.
- In order to navigate between different desktops, use Win+Ctrl+Left or Right Arrow key
- In order to close virtual desktops, use Win+Ctrl+F4.
In case you do not use this Virtual Desktop or Task View feature in Windows 10, you can simply remove the Task View button from the taskbar.
Date: July 16, 2020 Tags: Task View, Virtual


