- Windows 10 Desktop Grids
- Replies (8)
- Fix space between desktop icons in Windows 10
- Fix large spaces between desktop icons
- Change size of desktop icons
- Change size of text, apps and desktop icons
- Desktop icon spacing
- Replies (8)
- Disable Align Desktop Icons to Grid in Windows 10
- Disable Align Desktop Icons to Grid with a Registry tweak
- About Sergey Tkachenko
- 9 thoughts on “ Disable Align Desktop Icons to Grid in Windows 10 ”
- Руководство: использование Grid и StackPanel для создания простого погодного приложения Tutorial: Use Grid and StackPanel to create a simple weather app
- Предварительные условия Prerequisites
- Шаг 1. Создайте пустое приложение Step 1: Create a blank app
- Шаг 2. Определите элемент Grid Step 2: Define a Grid
- Шаг 3. Раскрасьте элемент Grid Step 3: Color the Grid
- Шаг 4. Организуйте содержимое с помощью элементов StackPanel Step 4: Organize content by using StackPanel elements
- Шаг 5. Добавьте значок изображения Step 5: Add an image icon
- Похожие статьи Related articles
Windows 10 Desktop Grids
I have a user that accidenlty turned on the feature Desktop grids? I could not figure how or where he changed it. Please help. Picture is below.
Replies (8)
Was this reply helpful?
Sorry this didn’t help.
Great! Thanks for your feedback.
How satisfied are you with this reply?
Thanks for your feedback, it helps us improve the site.
How satisfied are you with this reply?
Thanks for your feedback.
Sumit
Volunteer Moderator- Microsoft Community
Mark the reply as helpful or answered to help others if your query is resolved
Was this reply helpful?
Sorry this didn’t help.
Great! Thanks for your feedback.
How satisfied are you with this reply?
Thanks for your feedback, it helps us improve the site.
How satisfied are you with this reply?
Thanks for your feedback.
Hi Jason, that grid is not part of Windows.
It must be generated by Manufacturer specific software. What is the make and model of your system?
Power to the Developer!
MSI GV72 — 17.3″, i7-8750H (Hex Core), 32GB DDR4, 4GB GeForce GTX 1050 Ti, 256GB NVMe M2, 2TB HDD
Was this reply helpful?
Sorry this didn’t help.
Great! Thanks for your feedback.
How satisfied are you with this reply?
Thanks for your feedback, it helps us improve the site.
How satisfied are you with this reply?
Thanks for your feedback.
Press Windows key + R
Type: appwiz.cpl
Hit Enter
Sort by recently installed and see which apps were recently installed.
Post a picture so can possibly determine which app might be doing that.
Also, look in the Notification area for any apps that might running that could generate that grid.
Was this reply helpful?
Sorry this didn’t help.
Great! Thanks for your feedback.
How satisfied are you with this reply?
Thanks for your feedback, it helps us improve the site.
Fix space between desktop icons in Windows 10
After my upgrade to Windows 10 1909, I noticed large spaces between my desktop icons. A lot of things can be set in the settings of Windows 10, but not the spaces in between. In this blog post, I show how you can easily restore or adjust the spaces between your desktop icons.
Fix large spaces between desktop icons
- Click Start -> type Registry Editor -> Click Registry Editor.

- In Registry Editor, navigate to HKEY_CURRENT_USER ->ControlPanel ->Desktop ->WindowMetrics.
- In WindowsMetrics, double click IconSpacing.
- In the Edit String window, set the Value Data to -1650. (in my case, the faulty value was -3300, but yours may be different. In any way, -1650 is reasonable.).
- Click OK.
- In WindowsMetrics, double click IconVerticalSpacing.
- In the Edit String window, set the Value Data to -1200. (in my case, the faulty value was -3300, but yours may be different. In any way, -1200 is reasonable.).
- Click OK.
- Log out from Windows 10 and log in again. A reboot will do too. (But first: bookmark this site. If this solution didn’t solve your issue, maybe another solution below might fix your problem!).

After logging in again, the spaces between the icons should be smaller.
Change size of desktop icons
You may want to change the size of the desktop icons. While the font size may be just right for you, the icon size may be:
- Too small, which makes them unclear.
- Too large, which cause them to use much desktop space.
Here’s how to change the size of desktop icons
- Hover your cursor over an empty place on the desktop. So that’s practically any place on your desktop where there’s no application.
(Or press Windows+D to minimize all open Windows. This will do too.) - Hold down the Ctrl key on your keyboard. And scroll your mouse wheel up and down to scale the icons.
Change size of text, apps and desktop icons
If you experience text and icons to be too small, it may be desirable to increase the scale. In this way, you keep the best resolution for your monitor, while making it readable without glasses.
Here’s how to change the scale
- Right-click your desktop/wallpaper and choose Display Settings.
- In Display, select the monitor you want to adjust.
- Scroll down to Scale and Layout.
- In the box Change the size of text, apps, and other items, select a larger scale.
Other solutions for desktop icon size, scaling, font type will be added soon.
Desktop icon spacing
Replies (8)
16 people found this reply helpful
Was this reply helpful?
Sorry this didn’t help.
Great! Thanks for your feedback.
How satisfied are you with this reply?
Thanks for your feedback, it helps us improve the site.
How satisfied are you with this reply?
Thanks for your feedback.
Hey GW. I’m Greg, an installation specialist and 9 year Windows MVP, here to help you.
The easiest method: Click on Desktop, hold Ctrl button while rolling the mouse wheel (or tap + or — key) forward and back to adjust icon size and spacing.
I hope this helps. Feel free to ask back any questions and let us know how it goes. I will keep working with you until it’s resolved.
Always set a System Restore point first before editing registry: http://home.bt.com/tech-gadgets/computing/how-t.
I hope this helps. Feel free to ask back any questions and let us know how it goes. I will keep working with you until it’s resolved.
________________________________________________________
Standard Disclaimer: There are links to non-Microsoft websites. The pages appear to be providing accurate, safe information. Watch out for ads on the sites that may advertise products frequently classified as a PUP (Potentially Unwanted Products). Thoroughly research any product advertised on the sites before you decide to download and install it.
Windows MVP 2010-20
Over 100,000 helped in forums in 10 years
I do not quit for those who are polite and cooperative.
I will walk you through any steps and will not let you fail.
Disable Align Desktop Icons to Grid in Windows 10
Your Desktop is a special folder which shows your background wallpaper that you have chosen and your files, folders, documents, shortcuts and all such items you have stored. It appears every time you sign in to Windows. In this article, will we learn how to disable the Align Desktop Icons to Grid feature for your user account in Windows 10.
Tip: In earlier Windows versions, the Desktop had important icons enabled by default — This PC, Network, Control Panel, and your User files folder. They were all visible by default. However, in modern Windows versions, Microsoft made most of these icons hidden. In Windows 10, only the Recycle Bin is present on the Desktop by default. Also, the Windows 10 Start Menu does not have links to these icons either. You can enable classic Desktop icons as follows:
By default, Align Desktop Icons is enabled. If you drag and drop icons anywhere on the Desktop, they will be snapped to a grid and will get auto-arranged. It is possible to disable this feature and to place the desktop icons at any position you like on Desktop. Here is how to disable this feature.
To disable Align Desktop Icons to Grid on Desktop in Windows 10, do the following.
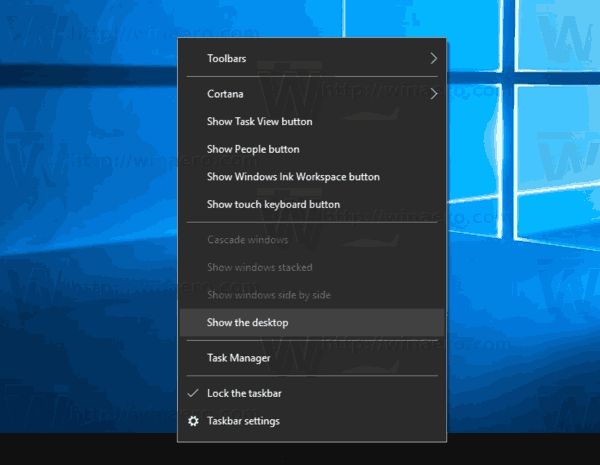
- Minimize all open windows and apps. You can use Win + D or Win + M shortcut keys. Alternatively, you can right-click the taskbar and select «Show the desktop» from the context menu or left click the far end of the taskbar.Tip: See What is the difference between Win + D (Show Desktop) and Win + M (Minimize All) keyboard shortcuts in Windows
- Right click the empty space on your Desktop and select View — Align icons to grid. This command will toggle the Align icons to grid feature.
 Tip: See What is the difference between Win + D (Show Desktop) and Win + M (Minimize All) keyboard shortcuts in Windows
When Align icons to grid is disable, a check mark will disappear next to the context menu command’s name.
This is pretty simple.
This feature can be configured with a special Registry tweak. Here is how it can be done.
Disable Align Desktop Icons to Grid with a Registry tweak
- Open the Registry Editor app.
- Go to the following Registry key.
See how to go to a Registry key with one click.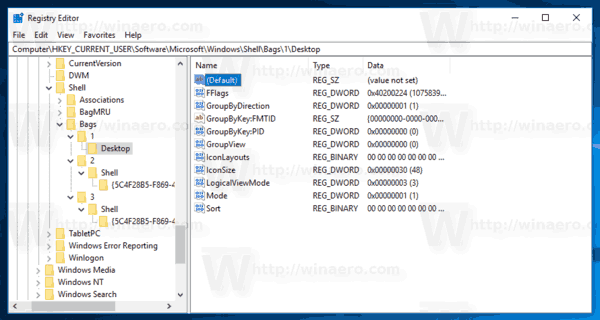
On the right, modify or create a new 32-Bit DWORD value «FFlags». Set it to one of the following values in decimal.
1075839520 — disable Auto Arrange Icons and Align Icons to Grid
1075839525 — enable Auto Arrange Icons and Align Icons to Grid
1075839521 — enable Auto Arrange Icons and disable Align Icons to Grid
1075839524 — disable Auto Arrange Icons but enable Align Icons to Grid
Note: Even if you are running 64-bit Windows you must still create a 32-bit DWORD value.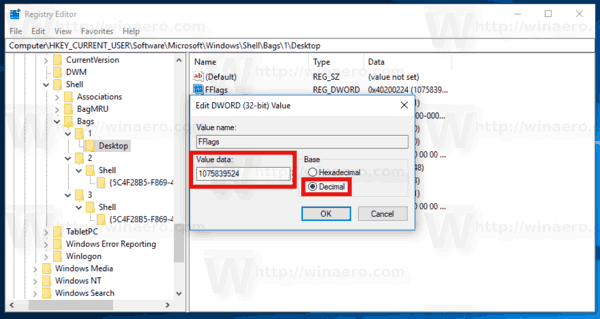
Winaero greatly relies on your support. You can help the site keep bringing you interesting and useful content and software by using these options:
Share this post
About Sergey Tkachenko
Sergey Tkachenko is a software developer from Russia who started Winaero back in 2011. On this blog, Sergey is writing about everything connected to Microsoft, Windows and popular software. Follow him on Telegram, Twitter, and YouTube.
9 thoughts on “ Disable Align Desktop Icons to Grid in Windows 10 ”
Thank you, Sergey, for this article on how to disable Windows 10 Align Desktop Icons to Grid through the registry. You have stopped a constant nuisance, that I’ve had to fix over and over again. Now I have my desktop defaulting to 1075839520. What a joy!
You are welcome.
environment: Windows 10 Pro 64-bit version 1703 OS 15063.608
Hi Sergey, The fix disappears after reboot. How can I make it permanent? Thanks!
Just now tried it in Safe Mode, Administrator.
The decimal value I set to 1075839520, that changed the hexadecimal value to 669af90.
But on reboot, it changed back to hexadecimal 0x48200224, decimal 1210057252.
I had made sure the FFlags was a 32-bit DWORD.
Has Microsoft put a limit on what kind of changes to the registry we can make?
What if you just untick the option in the context menu?
I’m having the exact same problem as Sonya. When Explorer shuts down and restarts, the FFlags reset to 1210057252. Occasionally, the icons will auto arrange to the left side of the screen. I was hoping that Sonya figured this out and has a solution. Changing the option in the context menu has no effect on this behavior.
alignment grid – is really making me mad . How do I get rid of it.
Руководство: использование Grid и StackPanel для создания простого погодного приложения Tutorial: Use Grid and StackPanel to create a simple weather app
Используйте XAML для создания макетов простого погодного приложения с помощью элементов Grid и StackPanel. Use XAML to create the layout for a simple weather app using the Grid and StackPanel elements. С помощью этих инструментов можно создать визуально привлекательные приложения, которые хорошо работают на любом устройстве с Windows 10. With these tools you can make great looking apps that work on any device running Windows 10. Работа с этим учебным материалом занимает 10–20 минут. This tutorial takes 10-20 minutes.
Предварительные условия Prerequisites
- Windows 10 и Microsoft Visual Studio 2015 или более поздней версии. Windows 10 and Microsoft Visual Studio 2015 or later. (Для применения последних обновлений средств разработки и системы безопасности рекомендуется использовать новейшую версию Visual Studio.) Щелкните здесь, чтобы узнать, как настроить Visual Studio. (Newest Visual Studio recommended for current development and security updates) Click here to learn how to get set up with Visual Studio.
- Сведения о том, как создать базовое приложение «Hello World» с помощью XAML и C#. Knowledge of how to create a basic «Hello World» app by using XAML and C#. Щелкните здесь, чтобы узнать, как создать приложение «Hello World», если у вас его еще нет. If you don’t have that yet, click here to learn how to create a «Hello World» app.
Шаг 1. Создайте пустое приложение Step 1: Create a blank app
- В меню Visual Studio выберите Файл >Новый проект. In Visual Studio menu, select File >New Project.
- На левой панели диалогового окна Новый проект выберите Visual C# >Windows >Universal или Visual C++ >Windows >Universal. In the left pane of the New Project dialog box, select Visual C# >Windows >Universal or Visual C++ >Windows >Universal.
- На центральной панели выберите Пустое приложение. In the center pane, select Blank App.
- В поле Имя введите WeatherPanel и нажмите ОК. In the Name box, enter WeatherPanel , and select OK.
- Чтобы запустить программу, выберите Отладка >Начать отладку в меню или нажмите клавишу F5. To run the program, select Debug >Start Debugging from the menu, or select F5.
Шаг 2. Определите элемент Grid Step 2: Define a Grid
В XAML элемент Grid состоит из серии строк и столбцов. In XAML a Grid is made up of a series of rows and columns. Указав строку и столбец элемента в пределах элемента Grid , вы сможете размещать и разделять другие элементы в пользовательском интерфейсе. By specifying the row and column of an element within a Grid , you can place and space other elements within a user interface. Строки и столбцы определяются элементами RowDefinition и ColumnDefinition. Rows and columns are defined with the RowDefinition and ColumnDefinition elements.
Чтобы начать создание макета, откройте MainPage.xaml с помощью Обозревателя решений и замените автоматически созданный элемент Grid этим кодом. To start creating a layout, open MainPage.xaml by using the Solution Explorer , and replace the automatically generated Grid element with this code.
Новый элемент Grid создает набор строк и столбцов, определяя таким образом макет интерфейса приложения. The new Grid creates a set of two rows and columns, which defines the layout of the app interface. Параметр Width первого столбца имеет значение «3*», а второго — «5*». Таким образом, горизонтальное пространство между этими двумя столбцами разделяется в соотношении 3:5. The first column has a Width of «3*», while the second has «5*», dividing the horizontal space between the two columns at a ratio of 3:5. Также и параметр Height двух строк имеет значение «2*» и «*» соответственно, поэтому элемент Grid назначает втрое больше места первой строке, чем второй («*» — это то же самое, что и «1*»). In the same way, the two rows have a Height of «2*» and «*» respectively, so the Grid allocates two times as much space for the first row as for the second («*» is the same as «1*»). Эти соотношения сохраняются даже при изменении размера окна или смене устройства. These ratios are maintained even if the window is resized or the device is changed.
Узнать о других методах определения размера строк и столбцов можно узнать в разделе Определение макетов с помощью XAML. To learn about other methods of sizing rows and columns, see Define layouts with XAML.
Если запустить приложение на этом этапе, вы увидите только пустую страницу, так как ни в одной области элемента Grid нет содержимого. If you run the application now you won’t see anything except a blank page, because none of the Grid areas have any content. Чтобы отобразить элемент Grid можно придать ему цвет. To show the Grid let’s give it some color.
Шаг 3. Раскрасьте элемент Grid Step 3: Color the Grid
Чтобы придать цвет элементу Grid , добавим три элемента Border , каждый из которых имеет собственный цвет фона. To color the Grid we add three Border elements, each with a different background color. Каждый из них также назначается строке и столбцу в родительском элементе Grid при помощи атрибутов Grid.Row и Grid.Column. Each is also assigned to a row and column in the parent Grid by using the Grid.Row and Grid.Column attributes. По умолчанию эти атрибуты имеют значения 0, поэтому их не нужно назначать первому элементу Border. The values of these attributes default to 0, so you don’t need to assign them to the first Border. Добавьте следующий код в элемент Grid после определений строк и столбцов. Add the following code to the Grid element after the row and column definitions.
Обратите внимание, что для третьего элемента Border мы используем дополнительный атрибут, Grid.ColumnSpan , который позволяет элементу Border охватить оба столбца в нижней строке. Notice that for the third Border we use an extra attribute, Grid.ColumnSpan , which causes this Border to span both columns in the lower row. Вы можете использовать Grid.RowSpan таким же образом. Вместе эти атрибуты позволяют растягивать элемент на любое количество строк и столбцов. You can use Grid.RowSpan in the same way, and together these attributes let you span an element over any number of rows and columns. Верхний левый угол охватываемой области — это всегда значения Grid.Column и Grid.Row , указанные в атрибутах элемента. The upper-left corner of such a span is always the Grid.Column and Grid.Row specified in the element attributes.
Если запустить приложение, результат будет примерно таким. If you run the app, the result looks something like this.

Шаг 4. Организуйте содержимое с помощью элементов StackPanel Step 4: Organize content by using StackPanel elements
StackPanel — это второй элемент пользовательского интерфейса, который мы будем использовать для создания нашего погодного приложения. StackPanel is the second UI element we’ll use to create our weather app. Элемент StackPanel является одной из основных составляющих многих базовых макетов приложений, позволяя распределять элементы вертикально или горизонтально. The StackPanel is a fundamental part of many basic app layouts, allowing you to stack elements vertically or horizontally.
В следующем коде мы создаем два элемента StackPanel и заполняем каждый из них тремя элементами TextBlocks. In the following code, we create two StackPanel elements and fill each with three TextBlocks. Добавьте эти элементы StackPanel в элемент Grid под элементами Border из шага 3. Add these StackPanel elements to the Grid below the Border elements from Step 3. Тогда элементы TextBlock будут отображаться поверх цветного элемента Grid , который мы создали ранее. This causes the TextBlock elements to render on top of the colored Grid we created earlier.
В первом элементе Stackpanel каждый элемент TextBlock расположен вертикально под следующим. In the first Stackpanel , each TextBlock stacks vertically below the next. Это стандартное поведение элемента StackPanel, поэтому нам не нужно устанавливать атрибут Orientation. This is the default behavior of a StackPanel, so we don’t need to set the Orientation attribute. Во втором элементе StackPanel нужно сделать так, чтобы дочерние элементы располагались горизонтально слева направо, поэтому мы установили атрибуту Orientation значение «Horizontal». In the second StackPanel, we want the child elements to stack horizontally from left to right, so we set the Orientation attribute to «Horizontal». Нам также нужно установить атрибуту Grid.ColumnSpan значение «2», чтобы текст выравнивался по центру над нижним элементом Border. We must also set the Grid.ColumnSpan attribute to «2», so that the text is centered over the lower Border.
Если запустить приложение, результат будет примерно таким. If you run the app now, you’ll see something like this.

Шаг 5. Добавьте значок изображения Step 5: Add an image icon
Наконец, заполним пустой раздел элемента Grid изображением, символизирующим сегодняшнюю погоду — переменная облачность. Finally, let’s fill the empty section in our Grid with an image that represents today’s weather—something that says «partially cloudy.»
Скачайте изображение ниже и сохраните его в формате PNG с именем «partially-cloudy». Download the image below and save it as a PNG named «partially-cloudy».

В обозревателе решений щелкните правой кнопкой мыши папку Ресурсы и выберите Добавить -> Существующий элемент. Найдите partially-cloudy.png в открывшемся браузере, выберите этот файл и щелкните Добавить. In the Solution Explorer , right click the Assets folder, and select Add -> Existing Item. Find partially-cloudy.png in the browser that pops up, select it, and click Add.
Затем в MainPage.xaml добавьте следующий элемент Image ниже элементов StackPanel из шага 4. Next, in MainPage.xaml , add the following Image element below the StackPanels from Step 4.
Поскольку нам нужно разместить элемент Image в первой строке и столбце, нам не требуется устанавливать его атрибуты Grid.Row и Grid.Column — оставим их значения по умолчанию («0»). Because we want the Image in the first row and column, we don’t need to set its Grid.Row or Grid.Column attributes, allowing them to default to «0».
Вот и все! And that’s it! Вы успешно создали макет для простого погодного приложения. You’ve successfully created the layout for a simple weather application. Если запустить приложение с помощью клавиши F5 , вы должны увидеть нечто подобное: If you run the application by pressing F5 , you should see something like this:

При желании вы можете поэкспериментировать с макетом выше и изучить различные способы представления данных о погоде. If you like, try experimenting with the layout above, and explore different ways you might represent weather data.
Похожие статьи Related articles
См. общие сведения о проектировании макетов приложений для Windows. For an introduction to designing Windows app layouts, see Introduction to Windows app design
Сведения о создании гибких макетов, адаптирующихся к разным размерам экрана, см. в разделе Определение макетов страниц с помощью XAML To learn about creating responsive layouts that adapt to different screen sizes, see Define Page Layouts with XAML


