- Device encryption in Windows 10
- What is device encryption?
- Is it available on my device?
- To see if you can use device encryption
- To turn on device encryption
- To turn on standard BitLocker encryption
- Additional resources
- How to Open Device Manager in Windows 10
- How can the Device Manager be Accessed?
- Method 1: Opening the Device Manager through the Start menu search
- Method 2: Accessing the Device Manager through the Quick Access Menu
- Method 3: Opening the Device Manager through the Run dialog box
- Method 4: Accessing the Device Manager through the Command Prompt
- Method 5: Opening the Device Manager through the System Properties
- Method 6: Accessing the Device Manager by the Manage menu
- Method 7: Using the Control Panel to access the Device Manager
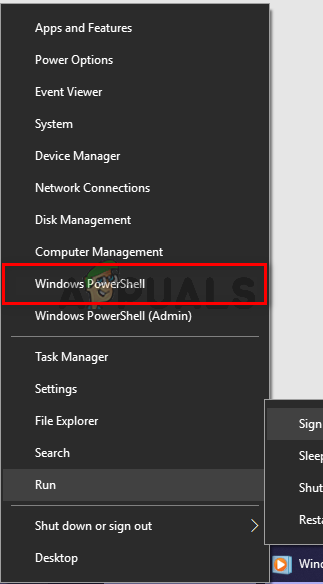
- Method 8: Access the Device Manager by using the Windows PowerShell
- Как открыть диспетчер устройств Windows 10
- Открытие диспетчера устройств с помощью поиска
- Контекстное меню кнопки Пуск Windows 10
- Запуск диспетчера устройств из диалогового окна «Выполнить»
- Свойства системы или значок «Этот компьютер»
- Управление компьютером
Device encryption in Windows 10
What is device encryption?
Device encryption helps protect your data, and it’s available on a wide range of Windows devices. If you turn on device encryption, the data on your device can only be accessed by people who’ve been authorized. If device encryption isn’t available on your device, you may be able to turn on standard BitLocker encryption instead.
Note: BitLocker is not available on Windows 10 Home edition.
Is it available on my device?
Device encryption is available on supported devices running any Windows 10 edition. If you want to use standard BitLocker encryption instead, it’s available on supported devices running Windows 10 Pro, Enterprise, or Education. Some devices have both types of encryption. For example, a Surface Pro which runs Windows 10 Pro has both the simplified device encryption experience, and the full BitLocker management controls. Not sure which version of Windows you have? See Which Windows operating system am I running?
To see if you can use device encryption
In the search box on the taskbar, type System Information, right-click System Information in the list of results, then select Run as administrator. Or you can select the Start button, and then under Windows Administrative Tools, select System Information.
At the bottom of the System Information window, find Device Encryption Support. If the value says Meets prerequisites, then device encryption is available on your device. If it isn’t available, you may be able to use standard BitLocker encryption instead.
To turn on device encryption
Sign in to Windows with an administrator account (you may have to sign out and back in to switch accounts). For more info, see Create a local or administrator account in Windows 10.
Select the Start button, then select Settings > Update & Security > Device encryption. If Device encryption doesn’t appear, it isn’t available. You may be able to turn on standard BitLocker encryption instead.
If device encryption is turned off, select Turn on.
To turn on standard BitLocker encryption
Sign in to your Windows device with an administrator account (you may have to sign out and back in to switch accounts). For more info, see Create a local or administrator account in Windows 10.
In the search box on the taskbar, type Manage BitLocker and then select it from the list of results. Or you can select the Start button, and then under Windows System, select Control Panel. In Control Panel, select System and Security, and then under BitLocker Drive Encryption, select Manage BitLocker.
Note: You’ll only see this option if BitLocker is available for your device. It isn’t available on Windows 10 Home edition.
Select Turn on BitLocker and then follow the instructions. (If BitLocker is turned on and you want to turn it off, select Turn off BitLocker.)
Additional resources
If your device requires a recovery key to unlock, see Find your recovery key.
How to Open Device Manager in Windows 10
Device Manager is a tool provided in every version of Windows, its main purpose is to identify all the connected devices. It allows the user to perform managerial tasks related to hardware drivers. You can use it to install/uninstall device driver, you can also add a hardware device, and enable/disable a device. The Device Manager can also be used to view vital information about all the known connected devices.
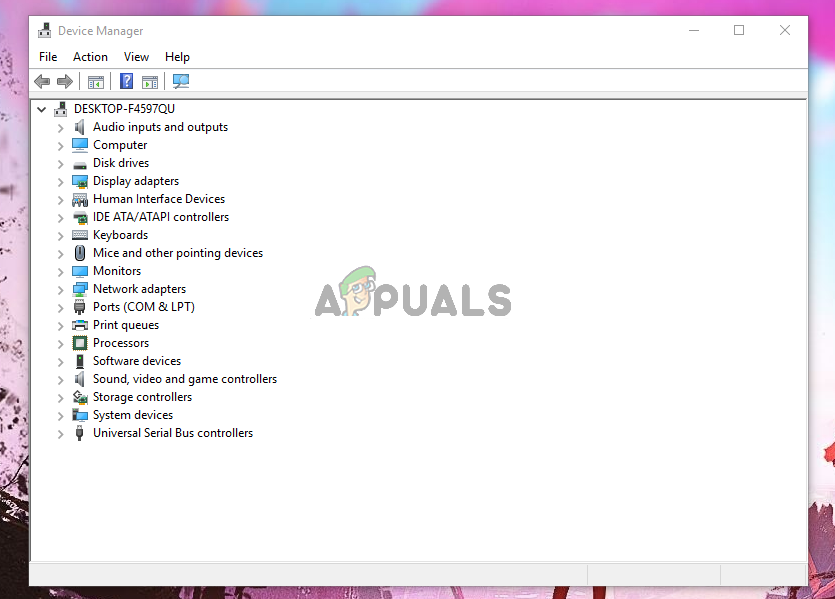 Device Manager
How can the Device Manager be Accessed?
There are a number of ways you can access the Device Manager, here are the most common ones.
- Through the start search: You can easily open the Device Manager through the search bar located under the start menu.
- Through the Quick Access menu: You can also access the Device Manager through the right-click menu.
- By the Run dialog box: The Run dialog box also allows the user to open the Device Manager.
- Through the Command Prompt: The command prompt also enables the user to run the Device Manager tool.
- Through the system properties: The system properties have a shortcut that leads to the Device Manager’s menu.
- By the Manage menu: The manage menu can also be used to open the Device Manager.
- Inside the Control panel: you can also open the Device Manager by accessing the control panel.
- Through the Windows PowerShell: You can also use the Windows PowerShell to open the Device Manager.
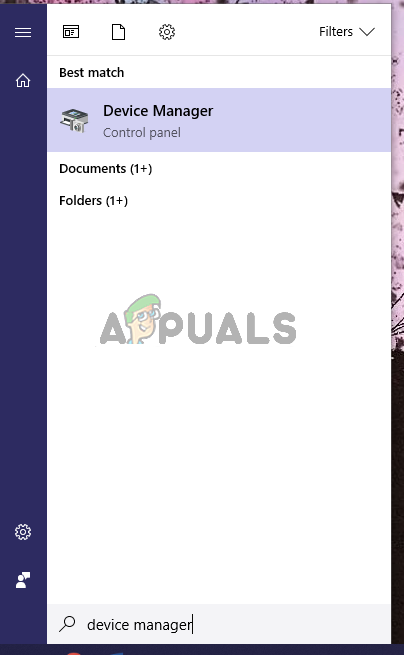
Method 1: Opening the Device Manager through the Start menu search
You can easily use the Start menu search to open the Device Manager.
-
- Open the Start menu by clicking on the Start button on the lower-left corner.
- Now Type device manager into the search bar and press Enter, if there is no search bar then just start typing and the bar will appear. This will open the Device Manager tool.
 Search for the Device Manager
 Search for the Device Manager
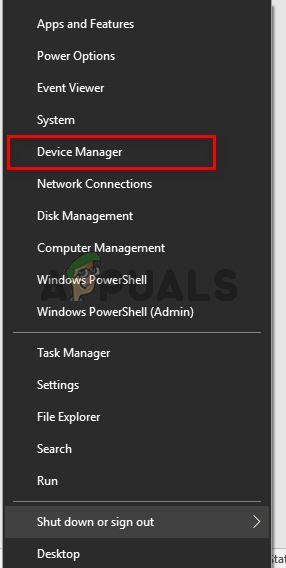
Method 2: Accessing the Device Manager through the Quick Access Menu
This is the only method that will allow you to open Device Manager with elevated administrative privileges.
-
- To open the Quick Access menu on your Windows, you could either right-click on the Start button or you could press Windows + X
- Now Hold the Shift + Ctrl keys and click on Device Manager to open it with administrative privileges. Opening the Device Manager through the Quick Access menu
 Opening the Device Manager through the Quick Access menu
Method 3: Opening the Device Manager through the Run dialog box
The Run dialog box could also be used to open different directories and different applications. Same can be done for the device manager.
-
- On your keyboard, press Windows + R keys and then type devmgmt.msc and then press Enter. This will launch the device manager. Opening Device Manager through the Run dialog box
- On your keyboard, press Windows + R keys and then type devmgmt.msc and then press Enter. This will launch the device manager.
 Opening Device Manager through the Run dialog box
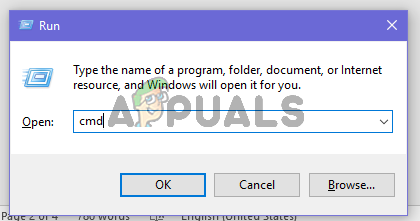
Method 4: Accessing the Device Manager through the Command Prompt
CMD also has the ability to open the Device Manager.
- On your keyboard, press Windows + R keys and then type CMD and press the Enter This will open the Command Prompt. Opening CMD through the Run dialog box
- Once the Command Prompt is on the screen, type devmgmt.msc and press Enter to open the Device Manager. Type devmgmt.msc in CMD
 Opening CMD through the Run dialog box
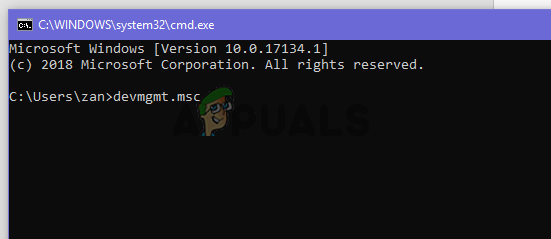 Type devmgmt.msc in CMD
Method 5: Opening the Device Manager through the System Properties
-
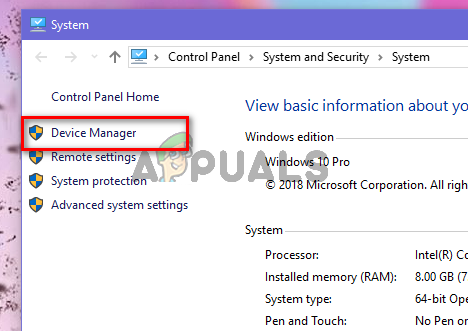
- Open the Start Menu, and type This PC, then press the Enter key to open it.
- Now right-click anywhere and then click on the Properties button to open the properties of the system.
- Now find the Device Manager option which is located in the left panel of the system properties. Click on it to open the Device Manager tool. Opening Device Manager through the system properties
 Opening Device Manager through the system properties
Method 6: Accessing the Device Manager by the Manage menu
The manage menu can easily provide access to the Device Manager.
- Right-click on This PC shortcut on your desktop. Now click on Manage.
- Now find and click on the Device Manager button located in the left panel. This will open the Device Manager. Opening Device Manager through the Computer Management
 Opening Device Manager through the Computer Management
Method 7: Using the Control Panel to access the Device Manager
You can also access the Device Manager through the Control Panel.
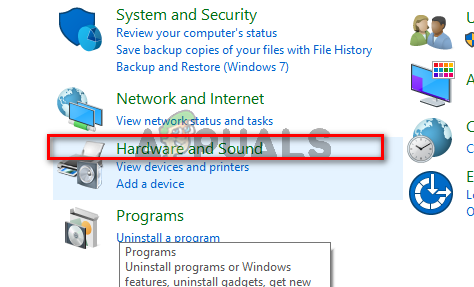
- Open the Start menu by clicking on the Start button and then type control panel, then press Enter key to open it.
- Now once the control panel is opened, click on the Hardware and Sound menu.
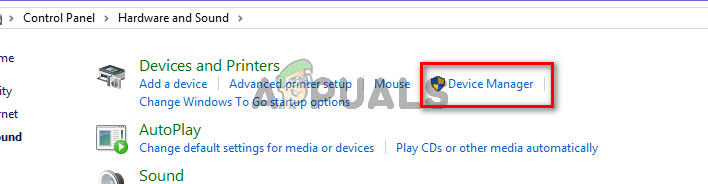
- Now click on the Device Manager option under the Devices and Printers This will give you access to the Device Manager.
 Select Device Manager
Method 8: Access the Device Manager by using the Windows PowerShell
When all other options are not working then the last resort is to use the Windows PowerShell application to open the Device Manager, this is how to get it done.
- Right Click on the Start button and then click on the Windows PowerShell button through the quick access menu. Open PowerShell through the Quick Access menu
- Once the PowerShell window is on the screen, type devmgmt.msc and then press Enter to open the Device Manager. Type devmgmt.msc in the PowerShell
 Open PowerShell through the Quick Access menu
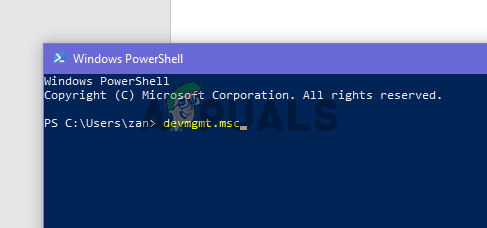 Type devmgmt.msc in the PowerShell
Как открыть диспетчер устройств Windows 10
 Многие инструкции по исправлению проблем с работой устройств в Windows 10 содержат пункт «зайдите в диспетчер устройств» и, несмотря на то, что это элементарное действие, некоторые начинающие пользователи не знают, как это сделать.
В этой инструкции — 5 простых способов открыть диспетчер устройств в Windows 10, используйте любой. См. также: Встроенные системные утилиты Windows 10, о которых полезно знать.
Открытие диспетчера устройств с помощью поиска
В Windows 10 присутствует хорошо работающий поиск и, если вы не знаете, как что-то запустить или открыть, это первое что стоит попробовать: почти всегда нужный элемент или утилита найдутся.
Чтобы открыть диспетчер устройств, просто нажмите по иконке поиска (лупа) в панели задач и начните набирать «диспетчер устройств» в поле ввода, а после того, как нужный элемент будет найден, нажмите по нему мышкой для открытия.

Контекстное меню кнопки Пуск Windows 10
Если нажать правой кнопкой мыши по кнопке «Пуск» в Windows 10, откроется контекстное меню с некоторыми полезными пунктами для быстрого перехода к нужным параметрам системы.

Среди этих пунктов есть и «Диспетчер устройств», просто нажмите по нему (правда, в обновлениях Windows 10 пункты контекстного меню иногда меняются и, если вы не найдете там того, что требуется, вероятно, это произошло снова).
Запуск диспетчера устройств из диалогового окна «Выполнить»
Если вы нажмете клавиши Win+R на клавиатуре (где Win — клавиша с эмблемой Windows), откроется окно «Выполнить».
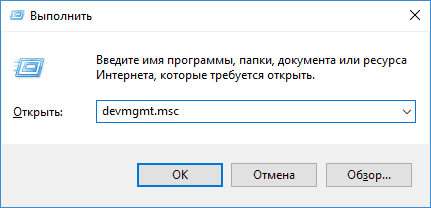
Введите в него devmgmt.msc и нажмите Enter: будет запущен диспетчер устройств.
Свойства системы или значок «Этот компьютер»
Если у вас на рабочем столе присутствует значок «Этот компьютер», то, нажав на него правой кнопкой мыши, вы можете открыть пункт «Свойства» и попасть в окно сведений о системе (если отсутствует — см. Как добавить значок «Этот компьютер» на рабочий стол Windows 10).

Еще один путь открыть это окно — зайти в панель управления, а там открыть пункт «Система». В окне свойств системы слева есть пункт «Диспетчер устройств», открывающий необходимый элемент управления.

Управление компьютером
Встроенная утилита «Управление компьютером» в Windows 10 также содержит диспетчер устройств в списке служебных программ.
Для запуска «Управление компьютером» используйте либо контекстное меню кнопки «Пуск», либо нажмите клавиши Win+R, введите compmgmt.msc и нажмите Enter.

Учтите, что для выполнения каких-либо действий (кроме просмотра подключенных устройств) в диспетчере устройств, вы должны иметь права администратора на компьютере, в противном случае вы увидите сообщение «Вы вошли с правами обычного пользователя. Вы можете просматривать параметры устройства в диспетчере устройств, но для внесения изменений необходимо войти в систему с правами администратора».
А вдруг и это будет интересно:
Почему бы не подписаться?
Рассылка новых, иногда интересных и полезных, материалов сайта remontka.pro. Никакой рекламы и бесплатная компьютерная помощь подписчикам от автора. Другие способы подписки (ВК, Одноклассники, Телеграм, Facebook, Twitter, Youtube, Яндекс.Дзен)
10.12.2017 в 15:23
А как можно добавить диспетчер устройств на плитки меню «пуск» ?
(добавить туда диспетчер задач просто — перетащить из стандартных , но устройств там нет..)
11.12.2017 в 11:55
Можно вручную создать ярлык, скажем, на рабочем столе (путь к объекту — devmgmt.msc ) сменить значок на нужный, закрепить на начальном экране.
11.12.2017 в 13:52
12.12.2017 в 09:30
подскажите , как настроить в вин 10 ИЕ чтобы при появлении инета он обновил страничку?
(а — то когда инет появляется — страничка пустая и надо ее обновить вручную)
12.12.2017 в 12:12
Не отвечу. Не уверен даже что есть такая возможность для IE.
12.12.2017 в 20:41
жаль если нет, в настройках я не нашел. в 8-ке он сам обновлял… как в прочем и все браузеры
13.12.2017 в 21:31
mmc.exe — Ошибка приложения
Ошибка при запуске приложения (0x0000428)
15.12.2017 в 23:37
Через командную строку удалось запустить, можешь добавить этот способ, он уж точно сработает


