- Остановка получения сборок для участников Программы предварительной оценки Windows 10
- Отказ от получения сборок с выходом новой выпускаемой сборки
- Возврат к исходной версии операционной системы устройства
- Disable preview in the Taskbar of Windows 10, how to?
- Disable in Windows 10 the Aero-Peek Thumbnail preview for programs window and APPs, that fly out when hovering over the tabs in the Task-Bar!
- Turn off or on the Windows 10 Taskbar Thumbnail via Registry Key!
- Enable or Disable Thumbnail Previews in Windows 10 File Explorer
- Disable Thumbnail Previews in Explorer
- 1] Enable or disable thumbnail previews via File Explorer Options
- 2] Show Thumbnail previews via Control Panel
- 3] Using Registry Editor
- 4] Via Performance options
- 5] Using Group Policy Editor
- Thumbnails still not showing in File Explorer
- How to Disable Preview Pane in File Explorer
- Replies (8)
Остановка получения сборок для участников Программы предварительной оценки Windows 10
Через некоторое время после того, как вы стали участником Программы предварительной оценки Windows и испытали последние сборки, вам может потребоваться отказаться от получения сборок на свой компьютер или телефон — особенно, если на вашем устройстве в настоящий момент используется выпускаемая сборка (Production). Вы можете отказаться от получения сборок с выходом новой выпускаемой сборки или сборки, относящейся к публичному выпуску, либо вернуться к операционной системе, которую использовали ранее.
Отказ от получения сборок с выходом новой выпускаемой сборки
Отказ от получения сборок Insider Preview на компьютер или телефон рекомендуется осуществлять, когда на вашем устройстве используется выпускаемая сборка, которая является более стабильной и вы хотите работать с ней дальше. Сборки Insider Preview менее стабильны по сравнению с выпускаемыми сборками, они не обслуживаются и со временем их срок действия истекает.
Примечание: Отказываясь от получения новых сборок на ваше устройство при использовании выпускаемой сборки вы не потеряете никакую информацию.
Дождитесь объявления следующей сборки. Для этого лучше всего подходит приложение центра отзывов.
Убедитесь, что на вашем устройстве используется выпускаемая сборка. На своем компьютере выполните следующие действия.
Нажмите кнопку Пуск и последовательно выберите пункты Параметры > Система > О системе, а затем найдите сведения о выпуске сборки, ее версию и номер.
В окне Поиск введите winver или одновременно нажмите клавишу Windows и клавишу R, а затем выполните поиск номера сборки.
При отказе от получения сборок на телефон убедитесь, что на нем используется выпускаемая сборка, нажав и удерживая нажатой (или щелкните правой кнопкой мыши) начальную кнопку , а затем последовательно выберите пункты Параметры > Система > Сведения об устройстве и выполните поиск номера сборки.
Нажмите кнопку » Пуск «, а затем выберите Параметры > Обновить & безопасность > программы предварительной оценки Windows, а затем выберите остановить сборки Insider Preview.
Следуйте инструкциям, чтобы отказаться от получения сборок на ваше устройство.
Возврат к исходной версии операционной системы устройства
Чтобы вернуться к использованию стабильной сборки, восстановите на устройстве версию операционной системы, которая была на нем установлена в момент покупки. Чтобы восстановить исходную версию операционной системы, используйте один из следующих образов для восстановления.
Восстановление исходной версии операционной системы на компьютере:
Выполните резервное копирование любой информации, которую необходимо сохранить.
Используйте один из следующих снимков для восстановления: Windows 7, Windows 8,1и Windows 10.
Восстановление исходной версии операционной системы на телефоне:
Выполните резервное копирование любой информации, которую необходимо сохранить.
Чтобы вернуться на Windows Phone 8,1: Скачайте средство восстановления устройств Windows на компьютер, а затем подключите телефон к этому компьютеру, чтобы переустановить Windows Phone 8,1.
Чтобы восстановить или сбросить Windows 10 Mobile: нажмите Start кнопку «Пуск», а затем выберите Параметры > система > о > Сброс телефона.
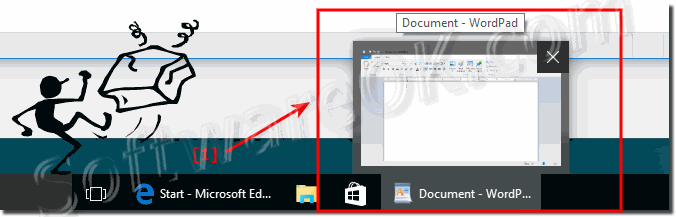
Disable preview in the Taskbar of Windows 10, how to?
Disable in Windows 10 the Aero-Peek Thumbnail preview for programs window and APPs, that fly out when hovering over the tabs in the Task-Bar!
Turn off or on the Windows 10 Taskbar Thumbnail via Registry Key!
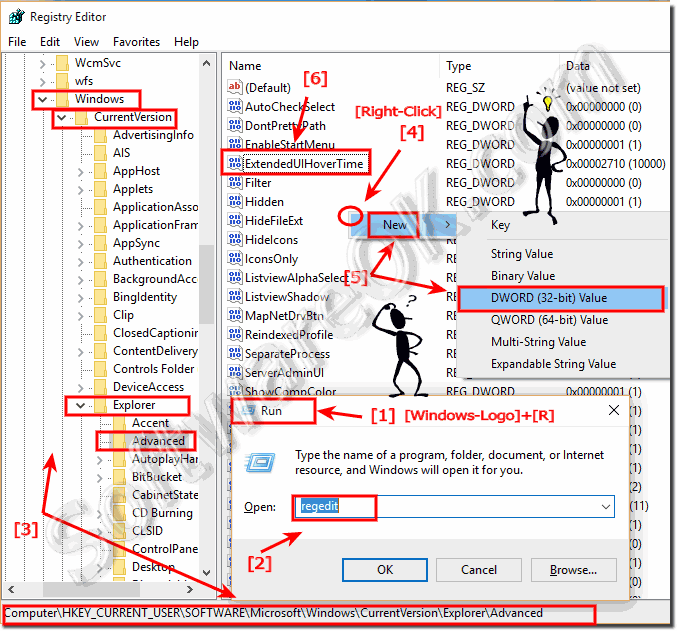
Please start Windows 10 Registry-Editor, for example via [Windows-Logo] + [R] keyboard shortcut and the command regedit
In Registry open the key HKEY_CURRENT_USER\Software\Microsoft\Windows\CurrentVersion\Explorer\Advanced
and create new DWORD ExtendedUIHoverTime and set the value to 10000.
10000=Task-Bar Thumbnails OFF (10000 msek. = 10 Sec.)
20000=Task-Bar Thumbnails OFF (20000 msek. = 20 Sec.)
0=Task-Bar Thumbnails ON
| (Image-1) Disable preview in the Windows-10 Task-Bar! |
 |

| (Image-2) Disable Task-Bar Thumbnails Windows Preview via Reg-Key! |
 |
| (Image-1) Preview in the Windows 10 Task-Bar! |
 |
To disable preview on taskbar applies for: Windows 10 Pro, Windows 10 Enterprise, Windows 8.1, Windows 8.1 Enterprise, Windows 8.1 Pro, Windows 8, Windows 8 Enterprise, Windows 8 Pro, Windows 7 Enterprise, Windows 7 Home Basic, Windows 7 Home Premium, Windows 7 Professional, Windows 7 Starter, Windows 7 Ultimate, Windows Vista Enterprise 64-bit Edition, Windows Vista Ultimate 64-bit Edition, Windows Vista Business, Windows Vista Business 64-bit Edition, Windows Vista Enterprise, Windows Vista Ultimate.
Enable or Disable Thumbnail Previews in Windows 10 File Explorer
In Windows 10, the File Explorer shows us tiny previews for videos and images that are stored on our system’s hard disk. Most of us are accustomed to browsing through our collection by looking at the thumbnail previews.
This is because these thumbnails give us a quick walk through the contents of the file explorer, and we do not need to open every single file that may have confusing file names. Thumbnail previews make the navigation process notably fast, but it comes with its own set of troubles that may encourage you to disable this feature on your Windows 10 system.
Building on this, understand how to enable and disable thumbnails previews in Windows 10.
Disable Thumbnail Previews in Explorer
Thumbnail previews can be a very useful feature as they let you view Windows files without opening them. The content of the File Explorer can be set to extra-large icons, large icons, medium icons, and details/tiles view, it is great for those who like to be organized. But as I said it brings its own set troubles. The creation of thumbnails for quick navigation/previewing of files slows down the other file operations, affects system performance, and causes UI clutter. In such a case, disabling the feature is a good idea.
If your images or other files are displaying a generic Windows icon like mountain and lake scene for images or media player icon for video files, probably the Thumbnail Previews feature is disabled. On the other hand, if you can view a small snapshot of the content of the file the feature is enabled.
Here are different processes to enable and disable the thumbnail display feature:
- Via File Explorer Options
- Using Control Panel
- Using the Registry Editor
- Via Performance options
- Using the Group Policy Editor.
These processes are described in more detail below.
1] Enable or disable thumbnail previews via File Explorer Options
To disable follow these steps:
- Go the ‘File Explorer’ and click on the ‘File’
- In the ‘File Menu’ options, click on ‘Change folder and Search options’
- The above action will open the ‘Folder Options’ dialog box, here hit the ‘View’ tab.
- Now check the ‘Always show icons, never thumbnails’ option appearing under ‘Advanced Settings’.
- Click ‘Ok’ and ‘Apply’ settings.
To enable, follow the same aforementioned process until step ‘3’, and then uncheck the ‘Always show icons, never thumbnails’ option.
2] Show Thumbnail previews via Control Panel
To enable follow these steps:
- From the ‘Start Menu’ go to the ‘Control Panel’
- Click on ‘System and Security’ and hit ‘System’.
- Select ‘Advance System Settings’ appearing on the left-side panel.
- In the ‘System Properties’ window, click ‘Settings’ under the ‘Performance’ heading.
- Now in the ‘Performance Options’ dialog, click the ‘Visual Effects’ tab
- Check the ‘Show thumbnails instead of icons’ under the ‘Custom:’ heading.
- Press ‘OK’ and ‘Apply’ to save changes.
To disable thumbnail previews via Control Panel, uncheck the ‘Show thumbnails instead of icons’ under the ‘Custom:’ heading.
3] Using Registry Editor
1] Press the ‘Windows key + R’ to open the ‘Run’ dialog.
2] Type ‘regedit’ and press ‘Enter’.
3] Navigate to the below path:
4] On the right side of the Window, search for ‘IconsOnly’ and double-click on it.
5] Change values to Enable/Disable:
- ‘0’ to show thumbnails
- ‘1’ to hide thumbnails
6] Click ‘Ok’ to save changes.
4] Via Performance options
Follow these steps:
- Press the ‘Windows Key + R’ to open the ‘Run’ dialog.
- Type ‘SystemPropertiesPerformance.exe’ and press ‘Enter’.
- Now, check or uncheck the ‘Show thumbnails instead of icons’ options to enable or disable thumbnail previews in Windows 10.
5] Using Group Policy Editor
You can use the Group Policy Editor to enable/disable this feature. Follow these steps:
1] Press ‘Win + R’ keys to open the ‘Run’ dialog.
2] Now, type ‘gpedit.msc’ and press ‘Enter’.
3] When the window opens the browser to the following path:
User Configuration > Administrative Templates > Windows Components > File Explorer
4] Now, on the right-hand side of the window, double click on ‘Turn off the display of thumbnails and only display icons’
5] Click on ‘Enabled’ or ‘Disabled’ to turn the feature on/off.
You should now be able to enable the thumbnail previews easily.
Thumbnails still not showing in File Explorer
The thumbnail preview on Windows normally uses thumbnail cache. Hence, if the thumbnail cache gets corrupted this issue may occur, and clearing the thumbnail cache becomes imperative. This post will show what to do if the Thumbnail Previews not showing in Windows File Explorer.
Do let us know if it was a smooth experience.
How to Disable Preview Pane in File Explorer
Replies (8)
![]()
Thank you for your interest in Windows 10.
- Open File Explorer.
- Click on View Tab.
- Click on Preview Pane to view\hide it.
Hope this information is helpful. Please do let us know if you need further assistance with Windows, we’ll be glad to assist you.
288 people found this reply helpful
Was this reply helpful?
Sorry this didn’t help.
Great! Thanks for your feedback.
How satisfied are you with this reply?
Thanks for your feedback, it helps us improve the site.
How satisfied are you with this reply?
Thanks for your feedback.
558 people found this reply helpful
Was this reply helpful?
Sorry this didn’t help.
Great! Thanks for your feedback.
How satisfied are you with this reply?
Thanks for your feedback, it helps us improve the site.
How satisfied are you with this reply?
Thanks for your feedback.
This doesnt apply to Windows 10 Pro x64- there are no options to disable the preview pane in explorer
Although, previous comments by Luisa, does work. Are there any additional Keyboard «Shortcuts» you
21 people found this reply helpful
Was this reply helpful?
Sorry this didn’t help.
Great! Thanks for your feedback.
How satisfied are you with this reply?
Thanks for your feedback, it helps us improve the site.
How satisfied are you with this reply?
Thanks for your feedback.
To disable/enable the preview pane
left click once on the «Preview pane» or «Details pane» title
the single left click is the on/ off switch
discovered this simple solution accidently while clicking the preview and details pane titles in frustration
71 people found this reply helpful
Was this reply helpful?
Sorry this didn’t help.
Great! Thanks for your feedback.
How satisfied are you with this reply?
Thanks for your feedback, it helps us improve the site.
How satisfied are you with this reply?
Thanks for your feedback.
Excellent. But since the stupid thing still occupies the same space there isn’t much point really is there.
You couldn’t make it up.
8 people found this reply helpful
Was this reply helpful?
Sorry this didn’t help.
Great! Thanks for your feedback.
How satisfied are you with this reply?
Thanks for your feedback, it helps us improve the site.
How satisfied are you with this reply?
Thanks for your feedback.
This doesnt apply to Windows 10 Pro x64- there are no options to disable the preview pane in explorer
Maybe you need a pair of glasses? Here’s a screenshot from Win10 Pro x64 1511:
Excellent. But since the stupid thing still occupies the same space there isn’t much point really is there.
What are you talking about? How can hiding the Preview pane make it still take up the same space as when it is visible?
35 people found this reply helpful
Was this reply helpful?
Sorry this didn’t help.
Great! Thanks for your feedback.
How satisfied are you with this reply?
Thanks for your feedback, it helps us improve the site.


