- FIX: 0xC1900101 driver errors in Windows 10
- How can I fix 0xC1900101 errors on Windows 10?
- 1. Update or uninstall corrupted drivers
- Fix graphics device problems with error code 43
- [Solved] Fix Display Driver Failed To Start Windows 10 Error
- How To Fix Display Driver Failed To Start error in Windows 10
- #1 – Update Display Driver to fix Display Driver Failed To Start error
- #2 – Roll Back Display Driver Update
- #3 – Reinstall Display Driver to fix Display Driver Failed To Start Windows 10 error
- #4 – Reinstall Windows 10 Without Losing Personal Files
- #5 – Scan PC for Malware
- #6 – Install Windows Updates
- #7 – Make A SFC Scan
- #8 – Do System Restore to fix Display Driver Failed To Start error
- Closing Words
FIX: 0xC1900101 driver errors in Windows 10

- The 0xC1900101 driver error is usually caused by missing or problematic drivers .
- The Windows update error 0xc1900101 can incapacitate your PC so fixing it is a priority.
- The first and most important solution is to update or uninstall corrupted drivers.
- Another failed to install 0xc1900101 solution is to disconnect peripherals and other components.
- Download Restoro PC Repair Tool that comes with Patented Technologies (patent available here).
- Click Start Scan to find Windows issues that could be causing PC problems.
- Click Repair All to fix issues affecting your computer’s security and performance
- Restoro has been downloaded by 0 readers this month.
Driver errors occur quite often when users try to upgrade their OS.
These errors are triggered by various driver-related factors: users haven’t installed the latest driver updates on their computers, some of the drivers are incompatible with the newest Windows 10 version, and more.
Many users who tried to upgrade to Windows 10 reported that they couldn’t complete the upgrade process due to a series of 0xC1900101 errors. As a quick reminder, 0xC1900101 errors are specific for driver issues.
Here are the driver-related errors that you may encounter when upgrading to Windows 10:
- 0xC1900101 – 0x2000c
- 0xC1900101 – 0x20004
- 0xC1900101 – 0x20017
- 0xC1900101 – 0x40017
- 0xC1900101 – 0x30018
- 0xC1900101 – 0x3000D
- 0xC1900101 – 0x4000D
How can I fix 0xC1900101 errors on Windows 10?
- Update or uninstall corrupted drivers
- Remove your antivirus
- Unplug all peripherals
- Remove additional RAM or your Network card
- Run an SFC scan
- Check your available upgrade space
- Use the Media Creation Tool
- Remove problematic applications
- Disable your LAN card in BIOS
- Upgrade your BIOS
1. Update or uninstall corrupted drivers
1.1. Update drivers manually
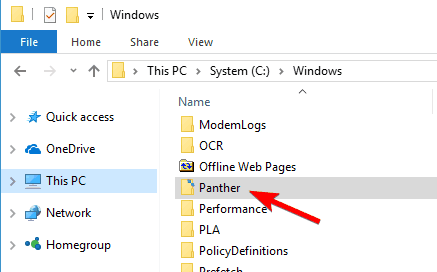
- Go to Local Disk C:\Windows.
- Scroll down to the Panther folder and open it.

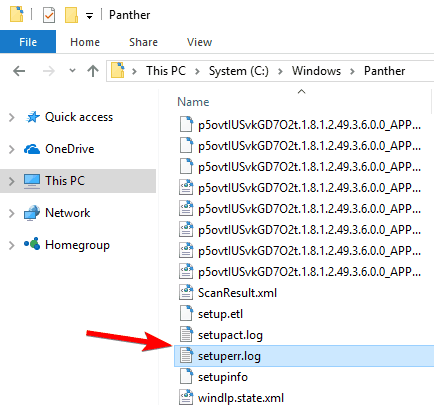
- Open the Setuperr.log and Setupact.log to locate the problematic drivers.
- Keep in mind that you might have to take ownership over those files in order to access them.
- Uninstall the corrupted drivers.
1.2. Use the Device Manager
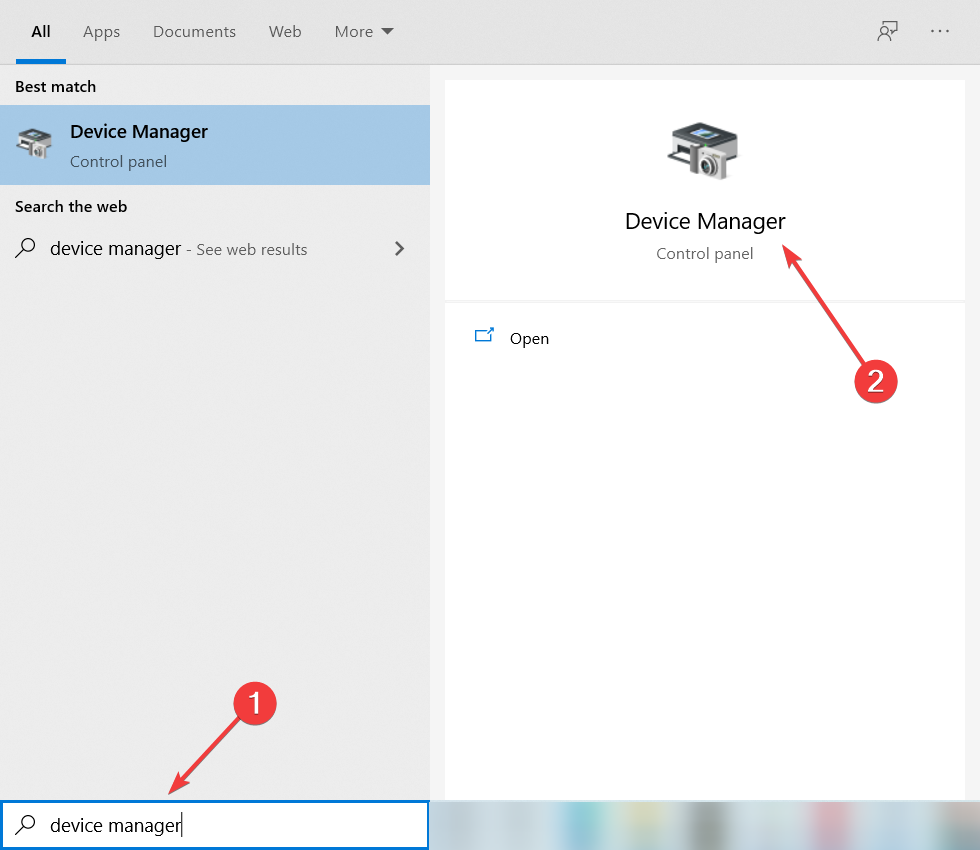
- Type Device Manager in the Search box and click on the first result.
- Expand the list of devices.
- The device causing error 0xC1900101 will likely appear with a yellow exclamation mark.
- Right-click the problematic driver and select Update Driver Software to install the latest updates.
- Click Uninstall to completely remove it.
1.3. Update drivers automatically
If this method doesn’t work or you do not have the necessary computer skills to update/fix the drivers manually after uninstalling them, we strongly suggest to do it automatically by using DriverFix.
It is far easier than using any of the methods listed above, as you only need to launch the program and your drivers will be as good as updated and fixed.
DriverFix is almost fully automated, so it downloads and installs the proper drivers by itself, and you only need to restart your PC to apply the changes.

It is extremely lightweight, and you can even let it run in the background to remind you to check for newer drivers.
After updating or uninstalling the problematic drivers, the issue should be completely resolved and you’ll be able to upgrade without any problems.
Fix graphics device problems with error code 43
This error occurs when your graphics device driver has notified Windows that the device isn’t working properly. This may mean that the device has a hardware problem, or that the driver or driver software is failing. To fix this error, try the following:
Driver updates for Windows 10 and many devices (such as network adapters, monitors, printers, and video cards) are automatically downloaded and installed through Windows Update. Though it’s likely you already have the most recent driver, if you’re having trouble with a device, you can try fixing it by updating the driver.
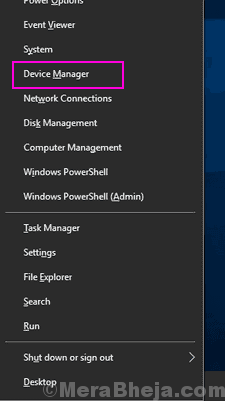
Tap and hold or right-click the Start button, and then select Device Manager.
On the list of devices, find the device that’s having driver problems (it will often have a yellow exclamation point next to it). Then tap and hold or right-click the device and select Properties.
Select Driver, and then select Update Driver.
Select Search automatically for updated driver software.
If a driver update is found, it will install automatically. Select Close when it finishes installing.
If Windows doesn’t find a new driver, you can try looking for one on the device manufacturer’s website and follow their instructions to install it.
If an update was recently installed, or you updated your device driver or driver software, you may be able to fix the problem by rolling back the driver to the previous version.
Note: Windows 10 installs drivers automatically, so you don’t have to choose which updates are needed. In rare cases, a specific driver might temporarily cause problems on your device. In this situation, you can prevent the problematic driver from reinstalling automatically the next time Windows updates by rolling back to a previous version.
Tap and hold or right-click the Start button and select Device Manager.
On the list of devices, find the device that’s having driver problems (it will often have a yellow exclamation point next to it). Then tap and hold or right-click the device and select Properties.
Select Driver, and then select Roll Back Driver.
In some cases, uninstalling and reinstalling the driver fixes the error:
Select the Start button. Type device manager in the search box, and select Device Manager from the list of results.
On the list of devices, find the device that’s having driver problems (it will often have a yellow exclamation point next to it). Then tap and hold or right-click the device and select Uninstall > OK.
After the driver uninstalls, tap and hold or right-click the name of your PC (found at the top of the device list) and select Scan for hardware changes. This reinstalls the device driver.
To see if this fixed the problem, tap and hold or right-click the name of the device again. On the General tab under Device status, you should see the message “This device is working properly.” If you don’t see this message, see the device documentation or contact the manufacturer.
[Solved] Fix Display Driver Failed To Start Windows 10 Error
Most issues that Windows 10 users ever face is related in one or the other way to their graphics driver. One of the most common of these issues is Display Driver Failed To Start error in Windows 10. As the name states, this error shows up as a notification when your Graphics card driver fails to start. This very specific issue arises usually after a Windows 10 update. It may also occur when the graphics card driver installed on your PC is having some discrepancies. There might be other issues as well, but these two are the most common ones.

The Display Driver Failed To Start Windows 10 error may occur for any type of graphics card, be it NVIDIA, AMD, or Intel graphics card. In this article, we try to find possible ways to fix Display Driver Failed To Start error in Windows 10.
How To Fix Display Driver Failed To Start error in Windows 10
If the Display Driver Failed To Start error has showed up just once, then you probably need not worry. A simple restart is recommended to fix the issue for you. But, if you are getting this error message multiple times, then you must try out the following methods in the order they are mentioned below.
#1 – Update Display Driver to fix Display Driver Failed To Start error
If the restart has not worked for you, then you should consider updating the display driver on your PC. After updating Windows 10, sometimes old graphics drivers are famous to cause issues. You must try this method, even though you do not remember updating your Windows 10. Follow these steps:
Step 1: Open Device Manager on your PC. For this, press the Windows + X buttons on your keyboard at once. From the Win+X menu, click on the Device Manager option.
Step 2: In the Device Manager menu, look for Display Adapters option When found, click on it to expand its options. In there, you will find the driver of the graphics card installed on your PC. Right click on it, then select the Update Driver option from the right-click menu.
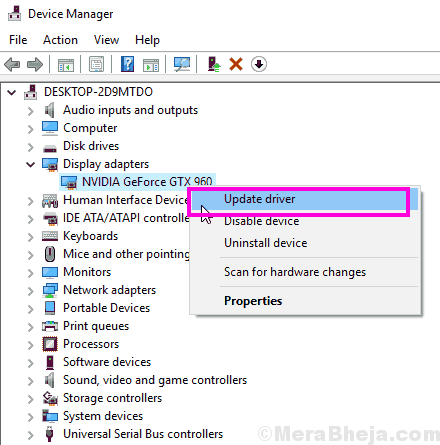
Step 3: From the new Update Drivers window that opens up, you will have to select the Search automatically for updated driver software option.

This will begin looking for an updated version of the graphics driver installed. If an option is available, it will download and install it on your computer. After the update, restart your PC and see if you are getting the Display Driver Failed To Start error. If you are, skip to Method 3 and reinstall your graphics driver.
In case, the latest version of the graphics card driver is already installed on your PC, then you will not be able to update it. In that case, try to Roll Back the display driver.
#2 – Roll Back Display Driver Update
If your display driver was working fine earlier and has been updated recently, then, you might wanna stick with the older driver. You can easily roll back to the older version of the display driver installed. Here’s how to:
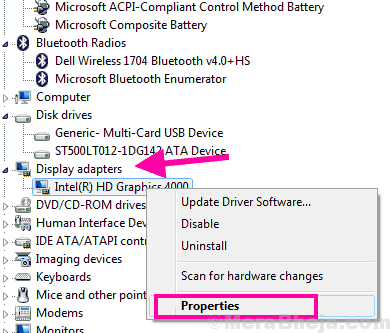
Step 1: Follow Steps 1 and Step 2 of Method #1 mentioned above. But, you do not have to click on the Update Driver option, instead, click on the Properties option.
Step 2: This will open the Properties window. Here, go to the Driver tab and click on the Roll Back Driver button.
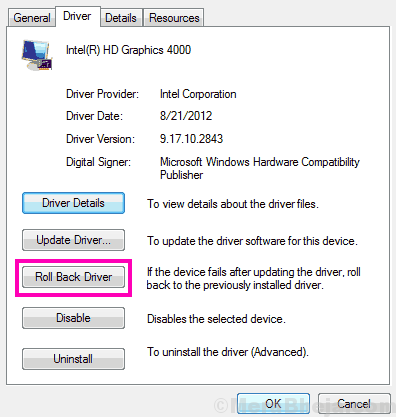
This will begin the process of rolling back your graphics card driver to its previous version. When the process is complete, do a Restart on your PC. After that, see if the Display Driver Failed To Start Windows 10 error still shows up. If yes, you need to try Method #3.
It may also happen that the Roll Back Driver button is grayed out. This means that no older version of the graphics driver is available. In that case too, go to Method #3.
#3 – Reinstall Display Driver to fix Display Driver Failed To Start Windows 10 error
You should totally try to reinstall your graphics card driver if updating or rolling back the driver didn’t work for you. Follow these steps to reinstall graphics driver.
Step 1: Repeat the Step 1 and Step 2 that are mentioned in Method #1, but instead of selecting the Update Driver option, select the Uninstall option.
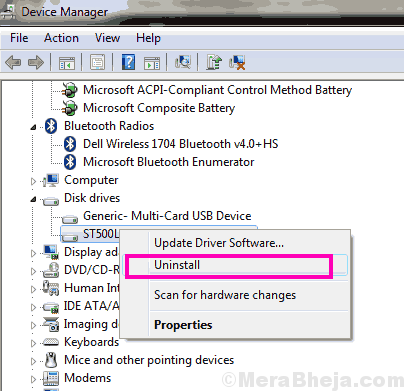
Step 2: Now, if you have Intel graphics driver installed, simply go to your PC manufacturer’s website to download the latest graphics driver compatible with your PC and Windows version. If you use NVIDIA or AMD graphics card, then go to their respective websites and download the latest driver compatible with your graphics card model and PC.
Step 3: Run the downloaded driver file to install it on your PC.
When the installation is complete, you will have to restart your PC. After restarting, see if you fixed the Display Driver Failed To Start error. If not, try out the next method.
#4 – Reinstall Windows 10 Without Losing Personal Files
Although this method is one of the sure shot methods to get rid of the Display Driver Failed To Start error in Windows 10, it is not recommended unless there are no options left. You will be able to preserve your personal data, but all the software and apps installed on your PC will be lost. If you are ready, let’s go through the steps to Reinstall Windows 10:
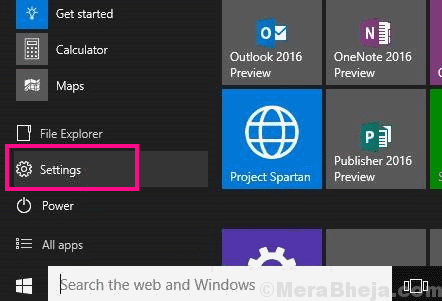
Step 1: Click open the Windows Start menu, and select the Settings option there.
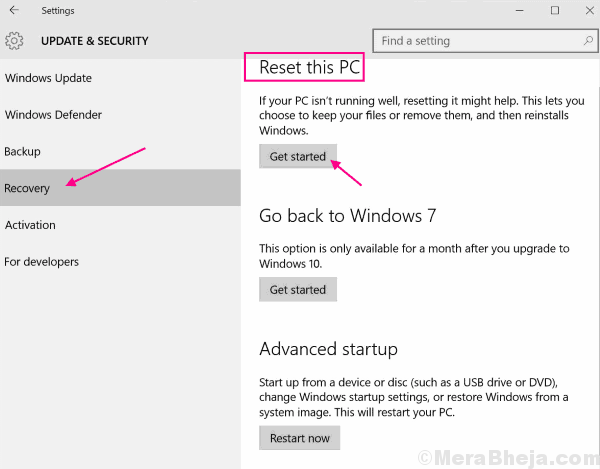
Step 2: In the Settings window, click on the Update & security option.

Step 3: In Update & security window, go to the Recovery option.
Step 4: In the Recovery window, the first option that you will find is the Reset this PC option. There, click on the Get started button.
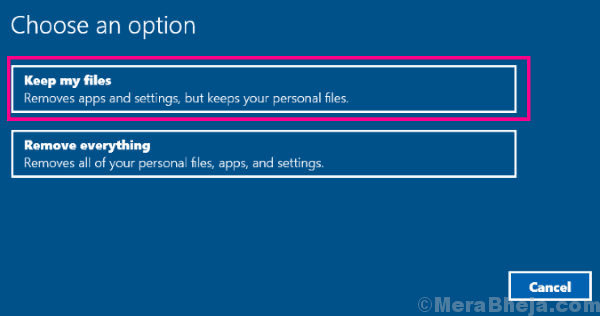
Step 5: Now, you will get two options. Here, you have to click on the Keep my files option. Mind you again, that all your apps and settings will be removed, but not the personal files.
Once you select that, a wizard will help you reset or you can say, reinstall Windows 10 on your PC. Once the reinstall is complete, your Display Driver Failed To Start Windows 10 error would have been fixed.
#5 – Scan PC for Malware
There are two possibilities regarding Malware that could be causing the Display Driver Failed To Start error to show up. The mere presence of malware could trigger this error on your PC. The other possibility is that hackers using malware to show fake Display Driver Failed To Start error to show up, later leading to pishing.
What you should do here is run an Antivirus or Antimalware scan on your PC. If you do not have an antivirus installed on your PC, here are some best Antivirus software for Windows 10 available out there. Run a scan, and if a malware is detected, remove it right away from your PC. When done, restart your PC and see if the error is still there.
#6 – Install Windows Updates
If Windows drivers are not up to date, it could be possibly causing the Display Driver Failed To Start Windows 10 error to show up. You should consider updating your Windows 10. Here’s how to update Windows:
Step 1: Click on the Start button to open the Start menu. In the Start menu search bar, type Settings. From the search result click on the Settings option.
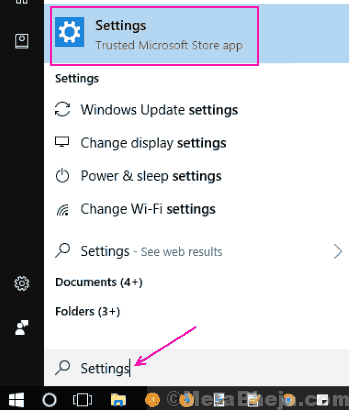
Step 2: In the Settings window, You will find an Update and Security option; click on it.
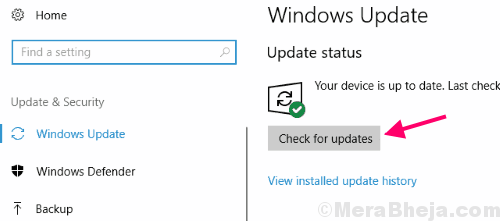
Step 3: From the Update & Security window that opens, go to Windows Update section. You will find a Check For Updates button there which you will have to click. Now, Windows will start looking for new Windows updates. Follow the update wizard to complete the Windows 10 update.
Your computer will restart after the update is complete. When done, check if the Display Driver Failed To Start error still shows up. If this doesn’t solve the issue, gove the next method a try.
#7 – Make A SFC Scan
When you run an SFC scan on your PC, it scans through the system files. In case corrupt files are found, this utility fixes it. The Display Driver Failed To Start error in Windows 10 could be showing up because of corrupt or bad driver files. Follow the below mentioned steps to do an SFC scan on your PC:
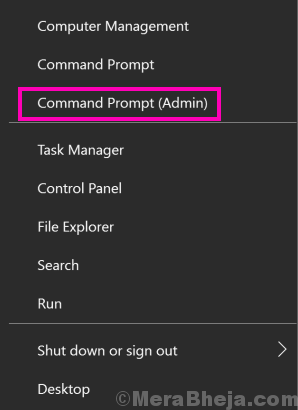
Step 1: Press the Windows + X keys simultaneously on your PC. From the Win + X menu that opens, select the Command Prompt (Admin) option. This will open the Command Prompt in admin mode.
Step 2: When in Command Prompt window, type the following command and hit the Enter key:
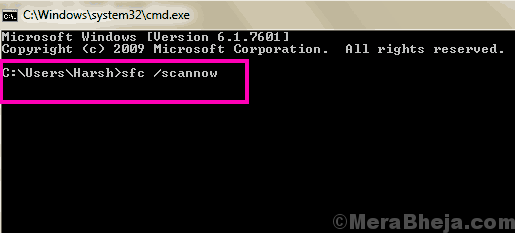
When you begin the scan, you will have to wait for some time. The SFC scan goes for around 10 to 15 minutes on average. Make sure you do not interrupt the scan and wait till the scan is fully complete.
After the completion of scan, restart your computer and then check if the error is still popping up. If yes, give Method #8 a try.
#8 – Do System Restore to fix Display Driver Failed To Start error
When you do a System Restore, it takes your computer back to a point where it was in past. So, you can restore back your system to a point when you didn’t use to get this error. For a successful System Restore to happen, it is necessary that you have a System Restore Point created in advance. In case, you do not have a System Restore point on your PC, unfortunately, you will not be able to proceed with this step (skip to Method #9). But if you do, here are the steps to follow for a System Restore in Windows 10:
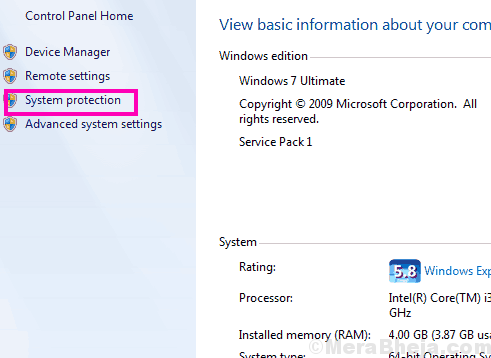
Step 1: Find the This PC icon on your Desktop. When found, do a right click on it. From the right-click menu, click on the Properties option.
Step 2: A new window will open. Here, select the System Protection option, which will be available on the left panel.
Step 3: This will again open a new window. Here, you will find a System Restore button. Click on it, then select the restore point to which you want to restore back your PC. Just take care that the date of restore point you select is a date before you started to get the Display Driver Failed To Start Windows 10 error. Run the restore and wait till the System Restore is complete.
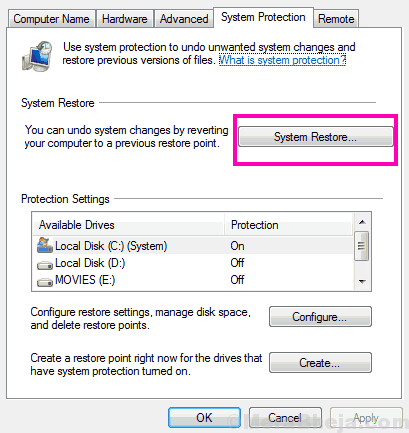
Note: When you carry out a System Restore, all the data that you stored on your PC after the date of restore point you select will be wiped out completely. It is highly suggested that you take a backup of the files you would like to keep on an external drive before you do a System Restore.
Closing Words
Reinstalling Windows or System Restore will for sure fix the issue. But, if you are not in a situation to carry out any of these methods, then you must contact your PC manufacturer’s customer support to get them to help you fix this issue.


