- Windows 10: How to Change or Add Keyboard Language
- Problem
- Solution
- Manage the input and display language settings in Windows 10
- Change your keyboard layout
- Change the keyboard layout or other method you use to type
- Install or change a display language
- Change your keyboard layout
- Все о раскладке клавиатуры в Windows 10
- Что такое раскладка клавиатуры
- Как поменять раскладку клавиатуры на Windows 10
- Специальные программы
- Punto Switcher
- Keyboard Ninja
- Как добавить раскладку и дополнительный язык в раскладку
- Видео: как добавить и удалить язык из раскладки
- Как переназначить сочетание клавиш для смены раскладки на Windows 10
- Как изменить комбинацию для переключения языка на блокировочном экране
Windows 10: How to Change or Add Keyboard Language
Problem
- How to change or add new keyboard language in Windows 10?
Solution
- 1. Open the Settings Charm with the shortcut Windows Key
 + I
+ I
 + I
+ I- 2. Click/tap Change PC settings.

- 3. Click/tap on the Time and Language.

- 4. Click/tap on the Region and language.

- 5. Under «Languages» click/tap on the Add languages. (See picture below)

- 6.Choose your languages, for instance German.(See picture below)

- 7. Now you have two languages on your Keyboard English and German.(See picture below)

- 8. To make new language the main language tap the new language and tap on «Set as primary».(See picture below)

- 9. When finished, you can close PC settings if you like.
- 10. To switch between keyboard languages use the shortcut Shift + Alt
Manage the input and display language settings in Windows 10
To manage all aspects of the input and display language settings on your Windows 10 device, use the following methods.
To switch the keyboard layout you’re using in Windows 10, press and hold the Windows key and then repeatedly press the Spacebar to cycle through all your installed keyboards. (If this doesn’t do anything, it means you have only one installed.)
You can also select the language abbreviation on the far right of the taskbar and then choose the language or input method you want to use.
Note: In the input field, press Windows +period (.) to access the emoji keyboard, if your language supports this.
If you can’t find the keyboard layout you want, you may have to add a new keyboard.
Adding an input language lets you set a language-preference order for websites and apps, as well as change your keyboard language.
Select the Start button, then select Settings > Time & Language > Language.
Under Preferred languages, select the language that contains the keyboard you want, and then select Options.
Select Add a keyboard and choose the keyboard you want to add. If you don’t see the keyboard you want, you may have to add a new language to get additional options. If this is the case, go on to step 4.
Return to the Language settings page, and select Add a language.
Choose the language you want to use from the list, and then select Next.
Review any language features you want to set up or install, and select Install.
The display language you select changes the default language used by Windows features like Settings and File Explorer.
Select the Start button, then select Settings > Time & Language > Language.
Choose a language from the Windows display language menu.
If a language is listed under Preferred languages but doesn’t appear on the Windows display language list, you’ll first need to install its language pack (if it’s available).
Select the Start button, then select Settings > Time & Language > Language.
Choose a language from the Add a language list under Preferred languages, and then select Options.
Select Download from the Download language pack option.
After the language pack is installed, select Back .
Choose a language from the Windows display language menu.
If you receive an «Only one language pack allowed» or «Your Windows license supports only one display language» message, you have a single language edition of Windows 10. Here’s how to check your Windows 10 language edition:
Select the Start button, select Settings > About, and then scroll down to the Windows specification section.
If you see Windows 10 Home Single Language next to Edition, you have a single language edition of Window 10, and you can’t add a new language unless you purchase an upgrade to either Windows 10 Home or Windows 10 Pro.
Select the Start button, then select Settings > Time & Language > Language.
Under Preferred languages, select the language you want to remove, and then click Remove.
To remove an individual keyboard, select the language in question (see step 2), select Options, scroll down to the Keyboards section, select the keyboard you want to remove, and click Remove.
Change your keyboard layout
Swipe in from the right edge of the screen, tap Settings, and then tap Change PC settings. (If you’re using a mouse, point to the lower-right corner of the screen, move the mouse pointer up, click Settings, and then click Change PC settings.)
Tap or click Time and language, and then tap or click Region and language, and then tap or click Add a language.
Browse for the language you want, and then tap or click it to add it to your language list.
Swipe in from the right edge of the screen, tap Settings, and then tap Change PC settings. (If you’re using a mouse, point to the lower-right corner of the screen, move the mouse pointer up, click Settings, and then click Change PC settings.)
Tap or click Time and language, and then tap or click Region and language.
If the language says Language pack available, tap or click Options.
Note: If you don’t see Language pack available, you might be able to download the language pack at the Download Center.
Tap or click Download. The download process might take a while, depending on your PC and the size of the language pack.
Swipe in from the right edge of the screen, tap Settings, and then tap Change PC settings. (If you’re using a mouse, point to the lower-right corner of the screen, move the mouse pointer up, click Settings, and then click Change PC settings.)
Tap or click Time and language, and then tap or click Region and language.
Tap or click the language that you want to see Windows in, and then tap or click Set as primary. The Will be display language after next sign-in message will appear under the language.
Tap or click Set as primary to move the language to the top of the list. If the language can become your Windows display language, you’ll see Will be display language after next sign-in appear under the language.
Sign out of Windows, and then sign back in.
Warning: When you change your primary language, your keyboard layout might also change. When signing back in to Windows, make sure you’re using the right keyboard layout for entering your password. Otherwise, you might not be able to sign in. You can change your keyboard layout on the sign-in screen by tapping or clicking the language abbreviation button in the lower-right corner.
Change the keyboard layout or other method you use to type
Whenever you add a language, a keyboard layout or input method is added so you can enter text in the language. If you want to use a different keyboard layout or input method, you can add a new one or switch between the ones you have.
Swipe in from the right edge of the screen, tap Settings, and then tap Change PC settings. (If you’re using a mouse, point to the lower-right corner of the screen, move the mouse pointer up, click Settings, and then click Change PC settings.)
Tap or click Time and language, and then tap or click Region and language.
Tap or click the language you want to add a keyboard to, and then tap or click Options.
Tap or click Add a keyboard, browse the input method list for the one you want to use, and then tap or click it.
You can enter text with different keyboard layouts or input methods by switching between them. There are a few different ways to switch between keyboard layouts or input methods:
On a hardware keyboard, press and hold the Windows logo key , and then press the Spacebar to cycle through your input methods.
If you have a touchscreen, you can switch your touch keyboard layout by tapping or clicking the keyboard icon, and then tapping or clicking the keyboard layout you want to switch to.
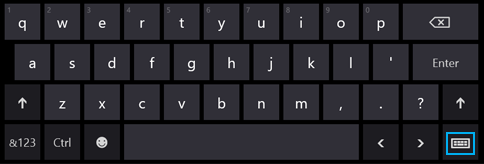
Language abbreviation button in the touch keyboard
On the desktop taskbar, tap or click the language abbreviation in the notification area at the far right of the taskbar, and then tap or click the keyboard layout or input method you want to switch to.
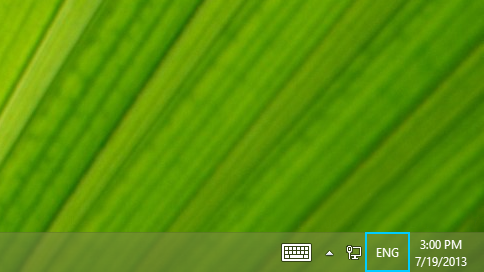
Language abbreviation button in the desktop taskbar
Your default keyboard layout or input method is the one that’s automatically used with the language you see Windows in (for example, the QWERTY keyboard for American English). If you want to keep your Windows language the same but use a different keyboard automatically, follow these steps:
Open Control Panel by swiping in from the right edge of the screen, tapping Search (or if you’re using a mouse, pointing to the upper-right corner of the screen, moving the mouse pointer down, and then clicking Search), entering Control Panel in the search box, and then tapping or clicking Control Panel.
Enter Add a language in the search box, and then tap or click Add a language.
Tap or click Advanced settings.
Under Override for default input method, choose the keyboard layout or input method you’d like to be your new default, and then tap or click Save.
Note: If you don’t see the keyboard layout or input method you want, then you haven’t added it to your input method list. For instructions, see the Add a keyboard layout or input method for a language section.
Install or change a display language
You can change the language Windows uses to display text in wizards, dialog boxes, menus, and other items in the user interface. Some display languages are installed by default, while others require you to install additional language files.
To install a Language Interface Pack (LIP), double-click the file to open the setup program. To install a language pack, follow these steps:
Open Region and Language by clicking the Start button , clicking Control Panel, clicking Clock, Language, and Region, and then clicking Region and Language.
Click the Keyboards and Languages tab.
Under Display language, click Install/uninstall languages, and then follow the steps.  If you’re prompted for an administrator password or confirmation, type the password or provide confirmation.
Note: The Display language section will be visible only if you have already installed a Language Interface Pack or if your edition of Windows supports a language pack. Language packs are available only in Windows 7 Ultimate and Windows 7 Enterprise.
When you change the display language, the text in menus and dialog boxes for some programs might not be in the language that you want. This happens because the program might not support Unicode.
Open Region and Language by clicking the Start button , clicking Control Panel, clicking Clock, Language, and Region, and then clicking Region and Language.
Click the Keyboards and Languages tab.
Under Display language, choose a language from the list, and then click OK.
Note: If you don’t see the list of display languages, you need to install additional language files.
Change your keyboard layout
On the Language bar, click the Input language button, and then select an input language.
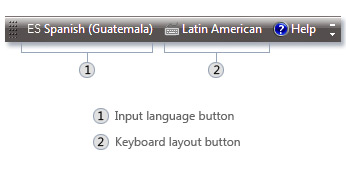
Click the Keyboard layout button, and then select a keyboard layout.
Note: If you don’t see the Language bar, right-click the taskbar, point to Toolbars, and then click Language bar.
On the Welcome screen, click the Keyboard layout button  , and then select a keyboard layout.
Note: If you don’t see the Keyboard layout button, you might not have more than one input language, or your regional and language settings might not be applied to reserved accounts.
Все о раскладке клавиатуры в Windows 10
Не так просто настроить языковую составляющую Windows 10. Параметры раскладки клавиатуры несколько сокрыты, по сравнению с предыдущими версиями. Однако, если немного разобраться, добавить язык, изменить сочетание клавиш и многое другое будет проще простого.
Что такое раскладка клавиатуры
Раскла́дка клавиату́ры — соглашение о соответствии типографических символов (букв, цифр, знаков препинания и т. д.) письменного языка клавишам клавиатуры компьютера, пишущей машинки или другого устройства, с помощью которого вводится текст.
Википедия
https://ru.wikipedia.org/wiki/Раскладка_клавиатуры
Говоря проще, раскладка клавиатуры — это способ понимания компьютером команд, которые вводит пользователь, нажимая на определённые клавиши клавиатуры.
Практически для каждого языка созданы и адаптированы свои раскладки (соответствие клавиш с числами, буквами, символами и иероглифами). Кроме того, при вводе команд или текста нередко используются функциональные вспомогательные клавиши Shift, Alt, Ctrl, CapsLok и другие. Во встроенные клавиатуры ноутбуков добавлена клавиша Fn, для ещё большей функциональности при сокращении количества клавиш.
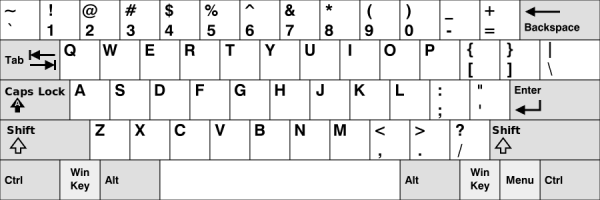 Впервые раскладка QWERTY появилась еще в пишуших машинках
Как поменять раскладку клавиатуры на Windows 10
Поменять раскладку клавиатуры очень просто: для этого существует несколько возможных способов, для большего удобства каждого пользователя: горячие клавиши, языковая панель и специальные утилиты.
- Самая быстрая возможность — это воспользоваться горячими клавишами (по умолчанию это комбинация из одновременно нажатых кнопок Alt+Shift, нажатие которых меняет раскладку на следующую и так по кругу).
- Также раскладку можно изменить при помощи языковой панели. В правом нижнем углу, рядом с часами щёлкаем на буквенный значок, затем из списка раскладок выбираем ту, которая нужна в данный момент. Щелкаем по буквенному значку и выбираем язык ввода текста
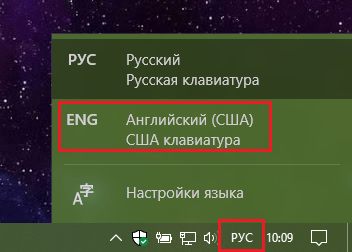 Щелкаем по буквенному значку и выбираем язык ввода текста
Специальные программы
Для Windows создано несколько программ для переключения раскладки. Причём некоторые из них имеют дополнительные функции, вроде автоматического переключения языков, исправление слов путём перевода их между языками и многое другое.
Punto Switcher
Punto Switcher по праву считается лучшей программой для работы с раскладками языка для Windows. Утилита имеет большой встроенный функционал для работы, может автоматически переключать раскладки, исправлять слова и многое другое. Также большим преимуществом является возможность задавать собственные горячие клавиши для смены языка. Пользователь может писать текст в двух раскладках одновременно и не заморачиваться с переключением, программа все сделает за него.
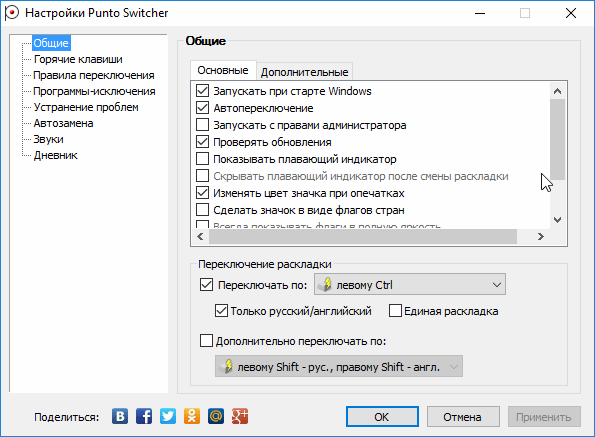 Punto Switcher — это продвинутая программа для работы с текстом и раскладками
Как автор статей, я много работаю с текстами, публикациями и прочим контентом, потому часто использую в своём ремесле программы для проверки и обработки текста. Punto Switcher — это одно из первых приложений, которое устанавливается на моём ПК после переустановки операционной системы. Иногда даже чувствуется зависимость от программы, так сильно она помогает при наборе текста. Конечно не бывает без курьёзов, всё-таки программа не может учесть всего, и некоторые нормальные слова могут переводиться на английский язык. Потому используя подобные программы необходимо следить за их работой.
Keyboard Ninja
Ещё одна известная программа — Keyboard Ninja. Утилита имеет множество настроек, в которых можно заблудиться. Однако программа довольно легко настраивается «под себя», если привыкнуть. Основные возможности похожи на аналоги: транскрипция текста, автоматическая замена раскладок, собственные горячие клавиши, исправление опечаток при наборе слов и многое другое.
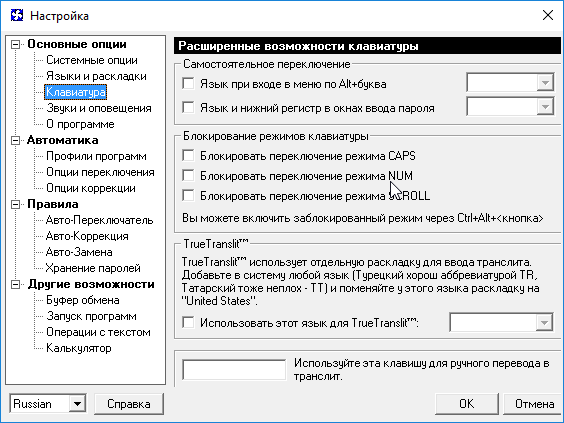 Keyboard Ninja — это известная программа для работы с раскладками и текстом
Как добавить раскладку и дополнительный язык в раскладку
Windows не ограничивает пользователя в количестве возможных раскладок, их можно добавлять и удалять как угодно.
- Чтобы добавить раскладку, щёлкаем на языковую панель и выбираем «Настройки языка». Щелкаем по языковой панели и выбираем
- В открывшемся окне параметров кликаем по «Добавьте язык». В открывшемся окне параметров выбираем «Добавить язык»
- Внимательно выбираем раскладку, нажимаем «Далее». Внимательно выбираем язык расскладки и нажимаем «Далее»
- Снимаем галочку с «Назначить языком интерфейса Windows» (или оставляем, если вы хотите чтобы язык операционной системы перешёл на выбранный язык) и щёлкаем «Установить». Выбираем языковые компоненты и нажимаем «Установить»
- После того как пакеты скачаются, они будут установлены и доступны наряду с предыдущими раскладками. Все добавленые языки будут отображаться списком сразу же после установки
 Щелкаем по языковой панели и выбираем
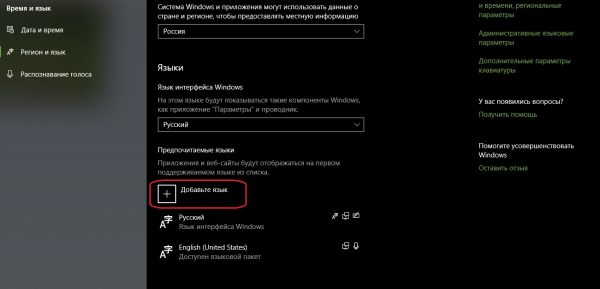 В открывшемся окне параметров выбираем «Добавить язык»
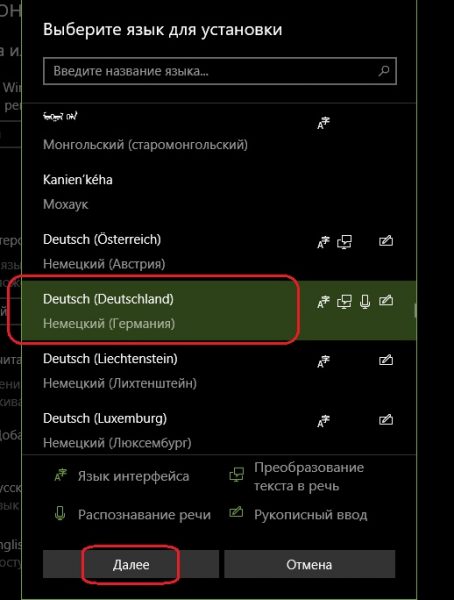 Внимательно выбираем язык расскладки и нажимаем «Далее»
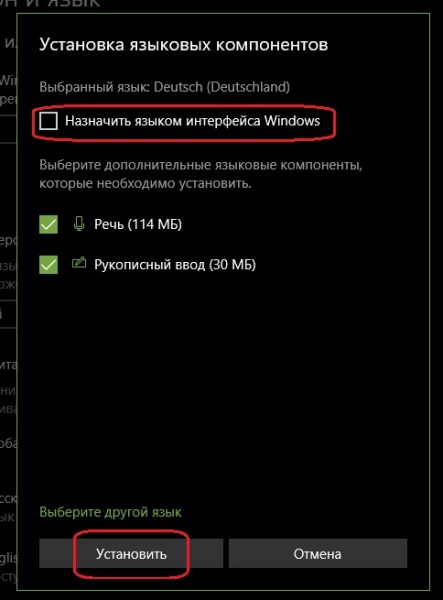 Выбираем языковые компоненты и нажимаем «Установить»
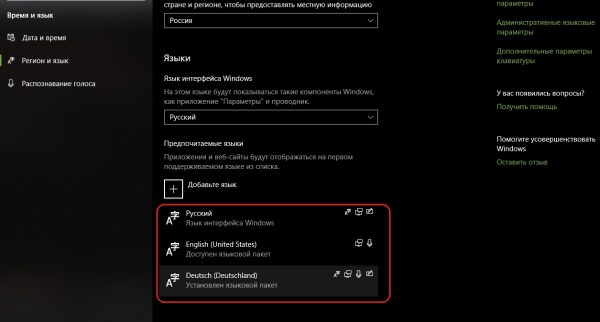 Все добавленые языки будут отображаться списком сразу же после установки
Также в языковую раскладку можно добавить ещё одну «клавиатуру». При этом переключение между языками будет происходить через комбинацию клавиш Ctrl+Shift слева.
- Щёлкаем на установленный языковой пакет, выбираем «Параметры». Выбираем раскладку и нажимаем «Параметры»
- Нажимаем «Добавить клавиатуру» и выбираем язык из списка, добавление проходит мгновенно. Нажимаем «Добавить клавиатуру» и выбираем язык из списка
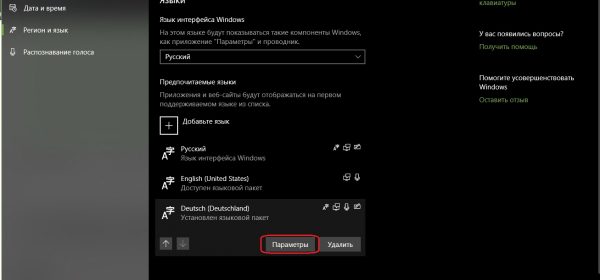 Выбираем раскладку и нажимаем «Параметры»
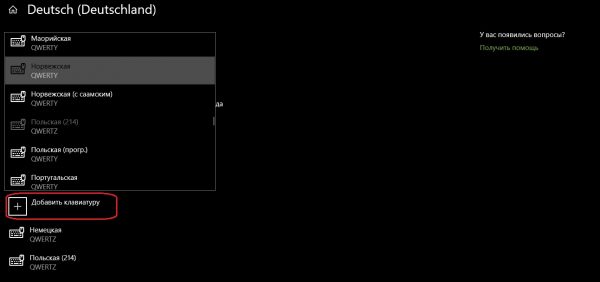 Нажимаем «Добавить клавиатуру» и выбираем язык из списка
Видео: как добавить и удалить язык из раскладки
Как переназначить сочетание клавиш для смены раскладки на Windows 10
В Windows существует возможность стандартными средствами переназначить горячие клавиши для смены языковой раскладки. К сожалению, эти настройки скрыты глубже, чем в предыдущих версиях.
- Открываем настройки языковой панели, как показано выше, нажимаем ссылку «Дополнительные параметры клавиатуры». В колонке справа щелкаем «Дополнительные параметры клавиатуры»
- Затем выбираем «Параметры языковой панели». Щёлкаем ссылку «Параметры языковой панели»
- Далее в окне «Языки и службы текстового ввода» переходим на вкладку «Переключение клавиатуры» и в ней щёлкаем на «Сменить сочетание клавиш». Переходим на вкладку «Переключение клавиатуры» и в ней щёлкаем на «Сменить сочетание клавиш»
- Переключаем тумблеры на необходимые значения и сохраняем изменения кнопкой OK. Переключаем тумблеры на необходимые значения и сохраняем изменения кнопкой OK
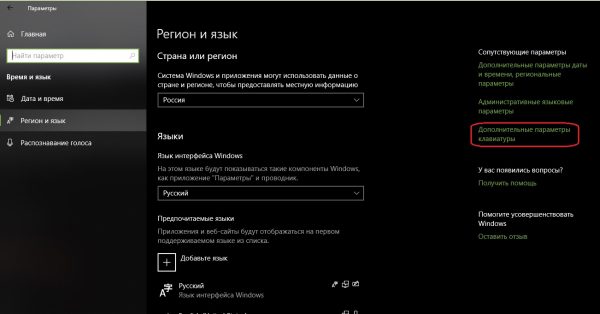 В колонке справа щелкаем «Дополнительные параметры клавиатуры»
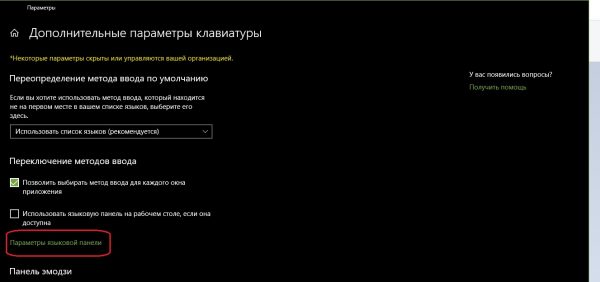 Щёлкаем ссылку «Параметры языковой панели»
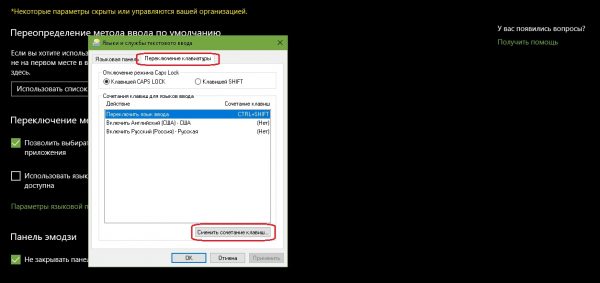 Переходим на вкладку «Переключение клавиатуры» и в ней щёлкаем на «Сменить сочетание клавиш»
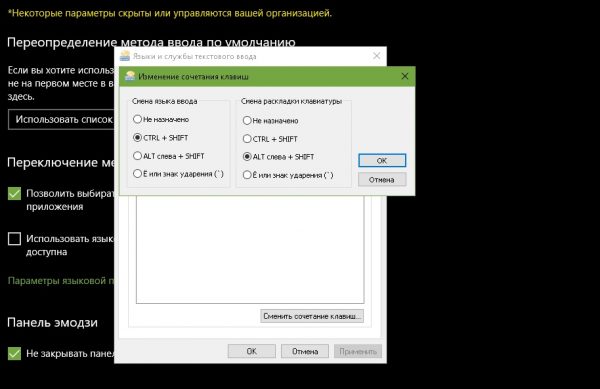 Переключаем тумблеры на необходимые значения и сохраняем изменения кнопкой OK
Как изменить комбинацию для переключения языка на блокировочном экране
К сожалению, в Windows нет интерфейса, в настройках которого можно изменить горячие клавиши для переключения языка на экране блокировки. Но это можно сделать через терминал командной строки одной строчкой.
- Нажимаем комбинацию клавиш Win+X и в выпавшем списке выбираем «Командная строка (администратор)». Нажимаем комбинацию клавиш Win+X и в выпавшем списке выбираем «Командная строка (администратор)»
- В консоли вводим команду reg add «HKU\.DEFAULT\Keyboard Layout\Toggle» /v Hotkey /t REG_SZ /d 2 /f и запускаем её в работу клавишей Enter:
- если задать значение 1 — будет присвоена комбинация Alt+Shift;
- если задать значение 2 — будет присвоена комбинация Ctrl+Shift.
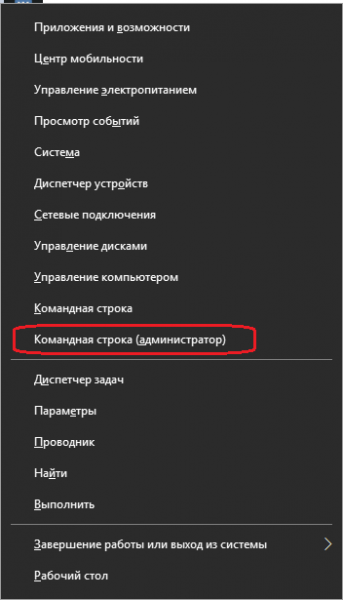 Нажимаем комбинацию клавиш Win+X и в выпавшем списке выбираем «Командная строка (администратор)»
 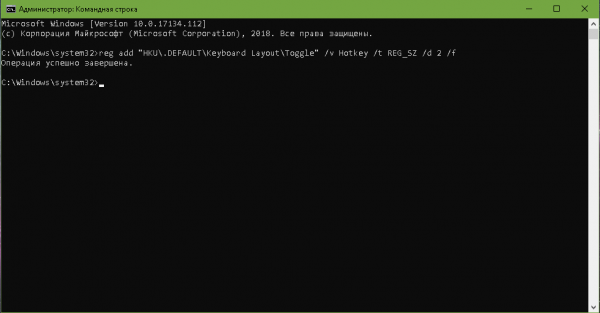 В консоли вводим команду reg add «HKU\.DEFAULT\Keyboard Layout\Toggle» /v Hotkey /t REG_SZ /d 2 /f и запускаем её в работу клавишей Enter
Настроить раскладку клавиатуры под себя очень просто. Нужно лишь немного покопаться в параметрах и изменить некоторые установки.


