- FIX: Games loading slow on PC [Windows 10]
- How do I fix slow game loading times?
- Important checks before resolving slow game loads on Windows 10
- 1. Update Graphics Card Drivers
- DriverFix
- 2. Run maintenance task
- 3. Uninstall third-party software
- Run a System Scan to discover potential errors
- IObit Uninstaller 10 PRO
- 4. Disk defragmentation
- 5. Perform a Clean Boot
- 6. Use Safe Mode
- 7. Install drivers in compatibility mode
- Slow game performance on Windows 10
- Replies (9)
- Tips to improve PC performance in Windows 10
FIX: Games loading slow on PC [Windows 10]

- We are always eager to get into our favorite games as soon as possible.
- However, slow game load speeds can greatly hinder this, and we are here to solve it.
- To learn more about how to fix Games, go to our dedicated Game Troubleshooting Hub.
- Do you like reading about games in general? Then you’ll love our Gaming section.

- Download Restoro PC Repair Tool that comes with Patented Technologies (patent available here).
- Click Start Scan to find Windows issues that could be causing PC problems.
- Click Repair All to fix issues affecting your computer’s security and performance
- Restoro has been downloaded by 0 readers this month.
As a gamer, you’ve probably had those moments when you’re all set and ready to play this really cool trending game that’s all the rage with your ilk, then it happens – slow game loads.
You’re so eager to get started, but even logging in is on snail speed mode. Two minutes seem longer than an hour, and you’re still waiting for it to start.
You’ve tried everything you can think of to go around it but nothing fixes the chop! We did the homework for you and here are some fix-it solutions that can help you hasten load up time for your next attempt.
How do I fix slow game loading times?
Important checks before resolving slow game loads on Windows 10
Before you begin, here are some checks you need to consider:
- Recent program installations. Programs downloaded from the internet and installed to your computer, come with third party applications that may slow down your computer.
- Whether the issue is only when playing online games or offline as well
- The make and model of your computer
- Any updates on your graphics card driver
- Whether other games work as they should on Windows 10
Once you have these in mind, you can proceed to the solutions.
1. Update Graphics Card Drivers
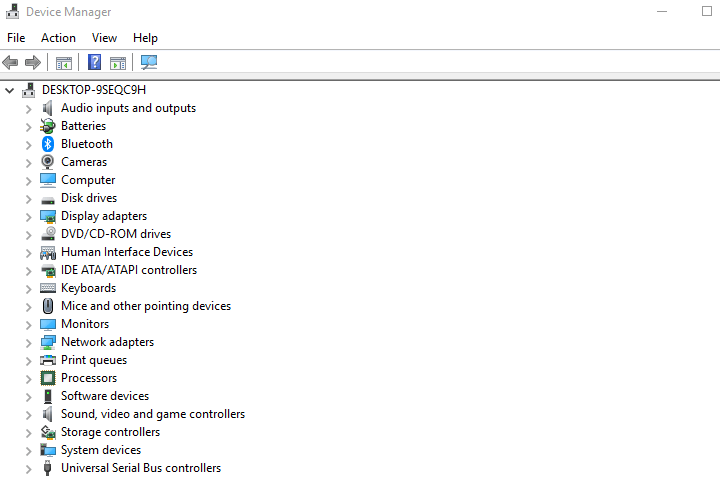
- Right-click Start
- Select Device Manager

- Click Display adapters to expand it
- Right-click on the graphics card driver and choose Update driver software

If you don’t have any driver updates available, right-click on the graphics card driver and click Uninstall, then restart your computer.
Update drivers automatically (third-party tool suggested)
The safer and easier way to update drivers on a Windows computer is by using an automatic tool such as DriverFix.
It will keep your system away from malfunctions caused by the installation of the wrong drivers.

The program is incredibly lightweight and doesn’t take up too much disk space or RAM when running, and this is mostly because it acts as a downloader, since the driver libraries that it uses are all online.
Launching DriverFix will trigger a full system scan every time, and it will detect any old, broken, or missing drivers, regardless of the device manufacturer.
It will then download the drivers, install them, and you only need to restart your PC to be done.

DriverFix
2. Run maintenance task
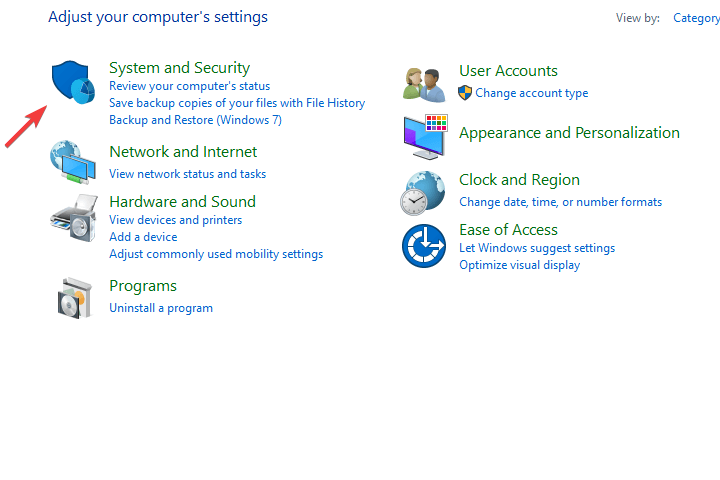
- Right-click on the Start button
- Select Control Panel
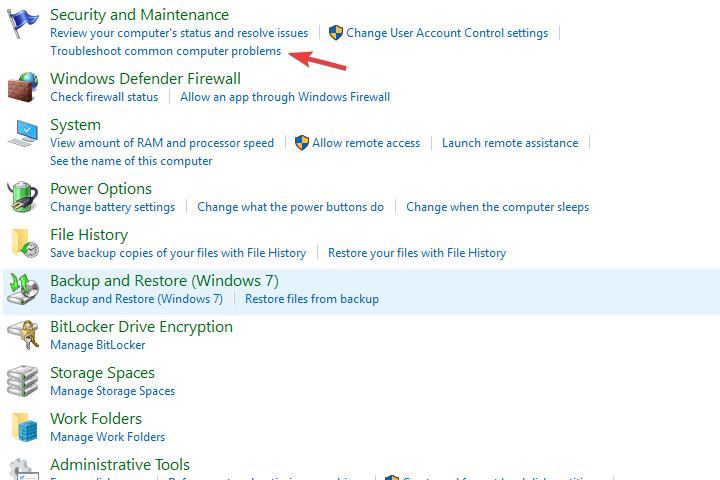
- Click on System and Security
- Under Security and Maintenance, click Troubleshoot common computer problems
- Locate System and Security
- Click on Run maintenance tasks
Running maintenance task checks on the problems within your computer that may affect or slow down its performance.
Such issues include the number of users logged on to the computer, or whether there are any multiple programs running concurrently.
A pop up will appear. Follow the instructions to run maintenance tasks.
Note: sometimes you will get a prompt to run as administrator so you can do so to complete the process.
3. Uninstall third-party software
Run a System Scan to discover potential errors


If the issue wasn’t found while under Safe Mode, you can uninstall third-party software on your computers such as computer cleaner or antivirus.
However, in order to be sure 100% that the job is done, you need to make sure that all files are deleted as well.
Normally, a typical uninstall will leave leftover data on your PC, but that’s not the case if you use an uninstaller.
The best one on the market today is IObitUninstaller 10 PRO, and it will not only remove all software, extensions, Store Apps, and bloatware, it will get rid of the leftover data as well.
IObit Uninstaller 10 PRO
4. Disk defragmentation
If the first solution didn’t work to resolve slow game loads on Windows 10, try defragmenting your hard disk by doing the following:
- Right-click the Start button
- Select Search
- In the search box type Disk Defragmenter
- Click Disk Defragmenter from the search results
- Under Current Status, choose the disk you want to defragment
- Click Analyze disk to determine if it needs defragmentation. Type your administrator password or give permissions when prompted to.
- Go to Last Run column to check the defragmentation percentage. If more than 10 percent, defragment the disk
- Click Defragment disk. Type your administrator password or give permissions when prompted to.
5. Perform a Clean Boot
- Type System Configuration in the search box > hit Enter
- On the Services tab > select the Hide all Microsoft services check box > click Disable all .
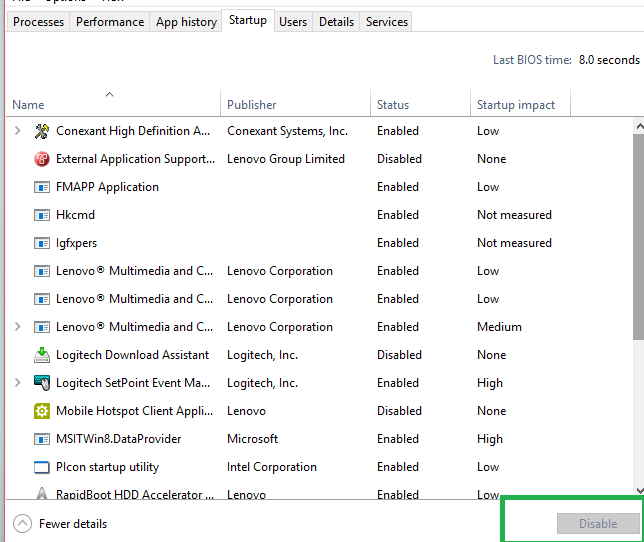
- On the Startup tab > click on Open Task Manager .
- On the Startup tab in Task Manager > select all items > click Disable .
- Close the Task Manager.
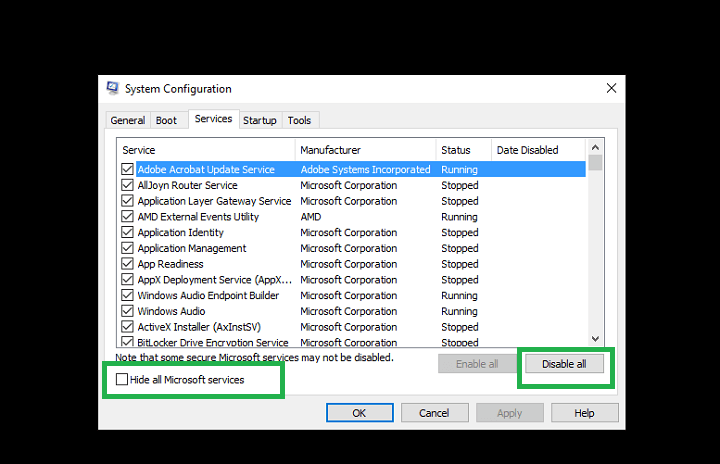
Performing a clean boot for your computer reduces conflicts related to software that can bring up the root causes of the slow game loads issue. These conflicts can be caused by applications and services that start up and run in the background whenever you start Windows normally.
On the Startup tab of the System Configuration dialog box >click OK > restart your computer.
You will have a clean boot environment after all these steps are carefully followed, after which you can try loading your game again.
6. Use Safe Mode
There are two versions:
- Safe mode
- Safe mode with Networking
The two are similar, though the latter includes network drivers and other services necessary to access the web and other computers in the same network.
Follow these steps to start your computer in Safe Mode:
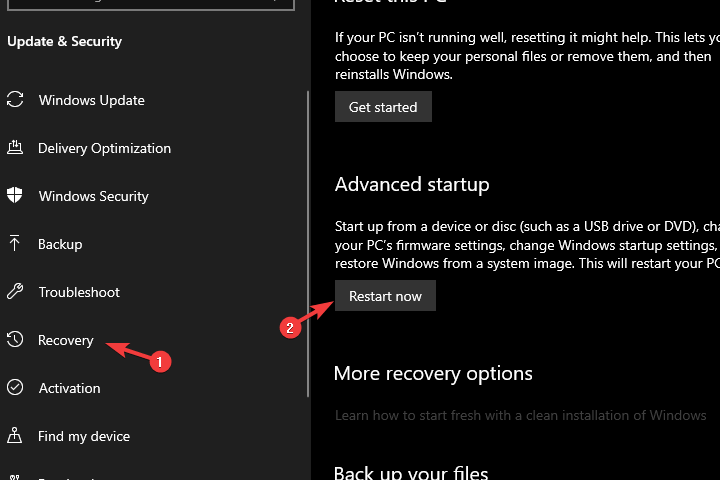
- Click on Start button
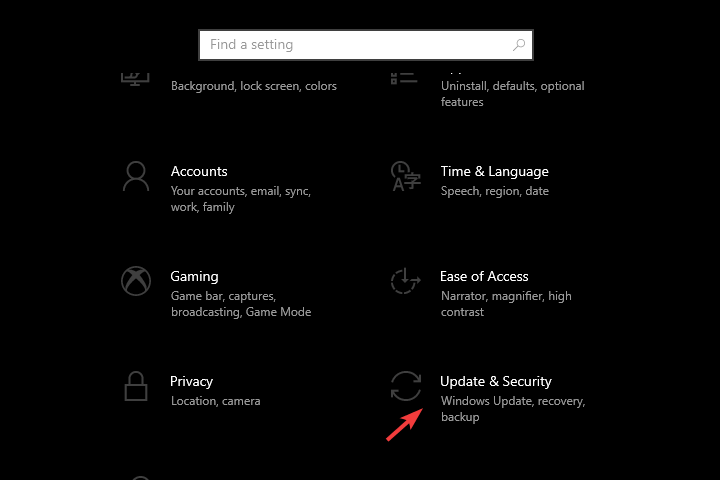
- Select Settings – the Settings box will open up
- Click Update & Security
- Select Recovery from the left pane
- Go to Advanced startup
- Click Restart now
- Select Troubleshoot from the choose an option screen, then click Advanced options
- Go to Startup Settings and click Restart
- Once your computer restarts, a list of options will come up.
- Choose 4 or F4 to start your computer in Safe Mode
A quicker way to get into Safe Mode is to restart your computer then do the following:
- From the Choose an option screen, select Troubleshoot>Advanced options>Startup Settings>Restart
- Once your computer restarts, a list of options will come up.
- Choose 4 or F4 to start your computer in Safe Mode
If the problem isn’t there while in Safe mode, then your default settings and basic drivers are not contributing to the issue.
Do the following to exit Safe Mode:
- Right click Start button
- Select Run
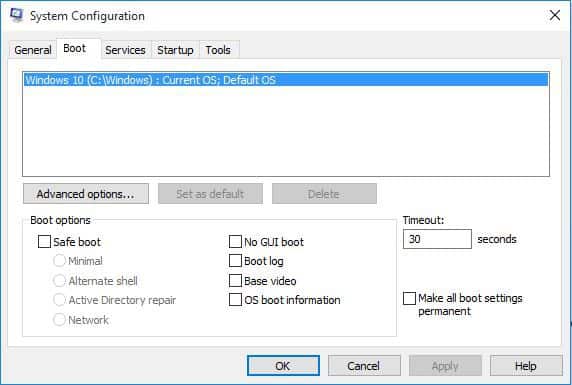
- Type msconfig
- A pop up will open
- Go to the Boot tab
- Deselect or uncheck Safe Boot option box
- Restart your computer
7. Install drivers in compatibility mode

This solution can be executed while online. Go to your computer’s manufacturer website and install the drivers in compatibility mode for previous Windows versions.
Follow these steps to execute this:
- Install the drivers
- Right-click the installation file
- Choose Properties
- Click Compatibility tab
- Select the Run this program in compatibility mode for: box
- From the drop down box, choose a previous Windows OS
- Click Ok
- Install the driver
Did these solutions work to resolve the slow game loads issue on your computer? Let us know in the comments section.
Slow game performance on Windows 10
My PC spec is as follows:
Samsung 850 EVO 256gb (main)
WD Black 2.5″ 750gb (Storage & Games)
Previously running a GTX980, I upgraded to a 1440p display and that card couldn’t maintain 60fps in Crysis 2&3 when maxed.
The TITAN X allowed both the above games to run flawlessly smooth under Windows 7 Pro 64bit.
I then purchased exactly the same primary drive (Samsung EVO 850) and did a fresh install of Windows 10 Pro 64bit.
After reinstallation of all my programs I played Crysis 2 & 3 again. Both struggle and are choppy in several places including many that are low stress. If I pop my old HDD in again and play with Windows 7 install the games are fine.
Something about Windows 10 is killing my PC gaming performance which has ticked me off having spent what I have on it.
I am running the latest July 29th drivers from Nvidia so don’t think it’s that erly problem with Windows update clashing.
I have also run repair on my C++ 2012 distributable but the problem persists.
Hopefully additional Windows & Nvidia updates will fix this but if nobody makes them aware.
Replies (9)
![]()
Welcome to the Microsoft community.
I would like to have some more understanding to the issue so that I can assist you better:
1. What is the make and model of the PC?
2. Have you tried updating the graphics card driver after upgrading to Windows 10?
3. Are other games working correctly on Windows 10?
I would suggest you to follow these methods and check if it helps.
Method 1:
Update the graphics card driver and check if it helps.
Download and install drivers.
http://windows.microsoft.com/en-us/windows-8/all-drivers
Method 2:
To help troubleshoot issues, you can start Windows by using a minimal set of drivers and startup programs. This kind of startup is known as a «clean boot.» A clean boot helps eliminate software conflicts.
How to troubleshoot a problem by performing a clean boot in Windows 8.1
http://support.microsoft.com/kb/929135
important: After troubleshooting, make sure to place the computer back to Normal Startup Mode by following the same article
Let us know if it helps. If the issue persists, we would be happy to help you further.
Tips to improve PC performance in Windows 10
If your PC is running slowly, the following suggestions might help speed things up. The tips are listed in order, so start with the first one, see if that helps, and then continue to the next one if it doesn’t.
One of the best ways to get the most out of your PC is to make sure you have the latest version of Windows 10 installed. When you check for updates, your PC will also search for the latest device drivers, which can also help improve your PC’s performance.
To check for updates
Select the Start button, then select Settings > Update & Security > Windows Update > Check for updates.
Check for Windows updates
Do one of the following:
If the status says «You’re up to date,» go to the next tip.
If the status says «Updates are available,» select Install now.
Select the updates you want to install, then select Install.
Restart your PC and see if it seems to run better.
For more info about updates, including how you can have them installed automatically, see the Windows Update FAQ.
If your PC still runs slowly, continue to the next tip.
Having many apps, programs, web browsers, and so on open at once can slow down your PC. Having a lot of browser tabs open at once can also slow it down quite a bit. If this is happening, close any apps, browser tabs, etc., that you don’t need and see if that helps speed up your PC. If it doesn’t seem to help, restart your PC and then open just the apps, programs and browser windows you need.
To restart your PC
Select the Start button, then select Power > Restart.
After your PC restarts, open just the apps you need, then close them when you’re done.
Sometimes apps that were made for an earlier version of Windows will still run on Windows 10, but they might slow down your PC. If this happens after you open a certain program, check the software company’s website for an updated version, or run the Program Compatibility Troubleshooter.
To run the Program Compatibility Troubleshooter
In the search box on the taskbar, type troubleshoot, then select Troubleshoot settings, which has System settings listed underneath it.
In the list of troubleshooters, select Program Compatibility Troubleshooter > Run the troubleshooter.
Select the program that you’re having problems with, then select Next and continue through the troubleshooter.
PC still running slowly? Continue to the next tip.
ReadyBoost lets you use a removable drive, like a USB flash drive, to improve your PC’s performance without opening your PC and adding more memory (RAM). To use ReadyBoost, you’ll need a USB flash drive or a memory card that has at least 500 MB free and a high data transfer rate.
To use ReadyBoost
Insert the USB flash drive into a USB port on your PC.
Select File Explorer from the taskbar.
Press and hold (or right-click) the USB flash drive (or SD card if you used one instead), then select Properties.
Select the ReadyBoost tab, then select Use this device.
Windows determines if the device can use ReadyBoost. If it can’t, it’ll let you know.
After Windows determines how much free space to use to optimize memory, select OK to reserve this space so ReadyBoost can use it.
When you look at the contents of the USB flash drive in File Explorer, you’ll see a file named ReadyBoost.sfcache on the flash drive. This file shows how much space is reserved for ReadyBoost.
Note: ReadyBoost can’t be used if Windows is installed on a solid state drive (SSD). An SSD is already fast, and ReadyBoost won’t be able to improve its performance.
The paging file is an area on your hard disk that Windows uses like memory. There’s a setting in Windows 10 that manages the page file size automatically, which can help improve your PC’s performance.
To make sure automatic page file management is turned on
In the search box on the taskbar, type advanced system, and then select View advanced system settings, which has Control panel listed underneath it.
In System Properties, select the Advanced tab, then select Settings in the Performance area.
In Performance Options, select the Advanced tab, then select Change in the Virtual memory area.
Make sure the Automatically manage paging file size for all drives check box is selected. If it is, continue to the next tip. If it’s not, select it and then restart your PC by selecting the Start button > Power > Restart.
Use your PC and see if it’s running better. If it’s not, try the next tip.
You may improve performance if you free some disk space on your PC.
To check for low disk space
Select the Start button, then select Settings > System > Storage .
Open Storage settings
Your drives will be listed in the Storage area. Note the amount of free space and total size for each drive.
Note: If your PC is not low on space, try the next tip.
You can use Storage Sense to delete unnecessary or temporary files from your device, which can also free up space.
If you turn on Storage Sense, Windows will automatically free up space by getting rid of unnecessary files—including files in your recycle bin—when you’re low on disk space or at intervals you specify. The instructions below show you how to delete temporary files and how to turn on and configure Storage Sense.
If you can’t find Storage Sense on your device using the following steps, see the «Free up space with Disk cleanup» section below instead.
Note: You may not want to delete temporary files to improve performance. While these files may not be used at the moment, they help your apps load and run faster.
To delete temporary files with Storage Sense
Select the Start button, then select Settings > System > Storage .
Open Storage settings
Select Temporary files in the storage breakdown. Note: If you don’t see Temporary files listed, select Show more categories.
Windows will take a few moments to determine what files and apps are taking up the most space on your PC.
Select the items you want to delete, and then select Remove files.
To see what’s in your Recycle Bin before you empty it, open it from your desktop. If you don’t see the Recycle Bin icon on your desktop, in the search bar on the taskbar, type recycle bin, then select Recycle Bin from the list of results.
Note: Windows moves files you delete to the Recycle Bin in case you change your mind and need them again in the future. You might be able to free up a significant amount of space by deleting Recycle Bin files to permanently remove files you’ve previously deleted.
To turn on and configure Storage Sense
Select the Start button, then select Settings > System > Storage .
Open Storage settings
In the Storage area, turn on Storage Sense.
Select Configure Storage Sense or run it now.
In theStorage Sense area, choose how often you want Storage Sense to run.
In the Temporary Files area, select Delete temporary files that my apps aren’t using.
Select which files you want Storage Sense to delete (your choices are files in your Recycle Bin and in your Downloads folder), then select the corresponding time intervals.
Scroll down and select Clean now.
Windows will take a few moment to clean up your files, and then you’ll see a message indicating how much disk space has been freed up.
If your system doesn’t have Storage Sense, you can use the Disk Cleanup tool to delete temporary files and system files from your device.
To run Disk Cleanup
In the search box on the taskbar, type disk cleanup, then select Disk Cleanup from the list of results.
Select the checkbox next to the type of files you want to delete. (To view a description of each type of file, select the name.) By default, Downloaded Program Files, Temporary Internet Files, and Thumbnails are selected. Be sure to clear those check boxes if you don’t want to delete those files.
To free up even more space, select Clean up system files. Disk Cleanup will take a few moments to calculate the amount of space that a can be freed up.
Note: If it’s been fewer than 10 days since you upgraded to Windows 10, your previous version of Windows will be listed as a system file you can delete. If you need to free up drive space, you can delete it, but keep in mind that you’ll be deleting your Windows.old folder, which contains files that give you the option to go back to your previous version of Windows. If you delete your previous version of Windows, this can’t be undone. (You won’t be able to go back to your previous version of Windows.)
Select the types of files you want to delete, select OK, then select Delete files in the confirmation window to start the cleanup.
If your PC still runs slowly, try uninstalling apps you don’t use anymore.
To uninstall apps you don’t use anymore
Select the Start button, then select Settings > Apps > Apps & features.
Open Apps & features settings
Search for a specific app or sort them to see which ones are using the most space.
When you find an app to remove, choose it from the list and select Uninstall.
Restart your PC and and see if performance has improved.
If your PC still runs slowly, try moving files to another drive.
If you have photos, music, or other files that you want to keep but don’t use often, consider saving them to removable media, like a USB drive. You’ll still be able to use them when the drive is connected, but they won’t take up space on your PC.
To move files to another drive
Connect the removable media to your PC.
Select File Explorer from the taskbar and find the files you want to move.
Select the files, go to Home, then select Move to > Choose location.
Select your removable media from the location list, then select Move.
Restart your PC and see if performance has improved.
If your PC still runs slowly, try the next tip.
Windows 10 includes many visual effects, such as animations and shadow effects. These look great, but they can also use additional system resources and can slow down your PC. This is especially true if you have a PC with a smaller amount of memory (RAM).
To adjust the visual effects in Windows
In the search box on the taskbar, type performance, then select Adjust the appearance and performance of Windows in the list of results.
On the Visual Effects tab, select Adjust for best performance > Apply.
Restart your PC and see if that speeds up your PC.
If your PC still runs slowly, continue to the next tip.
Your PC settings let you choose where files will be saved by default. You can save files on your PC or to OneDrive by default and sync files between the two locations. This lets you get to your files from any device that can connect to the internet, and it helps make sure your files are backed up in case your PC is ever damaged or lost. However, files must sync between your PC and OneDrive, and syncing can slow down your PC. You can pause OneDrive syncing temporarily and see if it helps improve your PC performance.
To pause syncing to OneDrive
On the taskbar, look for OneDrive near the notification area.
Select OneDrive > More > Pause syncing, and then choose how long you want to pause syncing your files.
Restart your PC and see if your performance issues have improved with syncing paused.
To resume syncing your files, select OneDrive > More > Resume syncing.
You can also visit Fix OneDrive sync problems to check for any sync issues.
If you have Window 10 version 1709 or higher, you can use OneDrive Files On-Demand to choose which files you want to sync and always keep on your PC. This can help improve PC performance if you reduce the number of files that are synced to your PC. To see which version of Windows 10 your device is currently running, select the Start button, then select Settings > System > About.
Open About settings
For more info on OneDrive Files On-Demand, see Learn about OneDrive Files On-Demand.
When you turn on your PC, some programs start automatically and run in the background. You can disable these programs so they don’t run when your PC starts.
Many programs are designed to start automatically when Windows does. You don’t realize they’re running, but they’ll open quickly when you go to use them. This is helpful for programs you use a lot, but not for programs you don’t use often because it increases the time it takes Windows to start.
Find the programs that start automatically
Sometimes you can determine which programs start automatically by looking at the program icons in the notification area on the far right of the taskbar. Check there first to see if there are any programs running that you don’t want to start automatically. To try to find out the name of the program, point to the icon with your mouse pointer. Make sure you select Show hidden icons , so you don’t miss any programs.
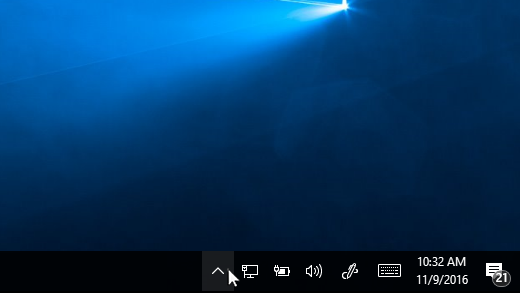
Notification area with mouse pointing to show hidden icons
Even after you check the notification area, you might still miss some programs that run automatically at startup. Here’s how you can find all the programs that start automatically, and stop the ones that you don’t want to start automatically when Windows starts.
To stop a program from starting automatically
Select the Start button, then select Settings > Apps > Startup .
Open Startup Apps settings
In the Startup Apps area, find the program you want to stop from starting automatically and set it to Off.
If you turn off a program and it continues to start automatically when Windows starts, you should scan for viruses and malware. See the next section for more info.
To use the procedure above to stop a program from starting automatically, you need to have Windows 10 (Version 1803 or higher) installed. To see which version of Windows 10 your device is currently running, select the Start button, then select Settings > System > About.
Open About settings
If you have Windows 10 (Version 1709 or earlier) installed, press Ctrl + Alt + Delete, select Task Manager, select Startup, select the program you want to stop from starting automatically, then select Disable.
A virus, malware, or malicious software could cause your PC to run slowly. Other symptoms include unexpected pop-up messages, programs that unexpectedly start automatically, or the sound of your hard disk constantly working.
The best way to handle viruses and malicious software is to try to prevent them by running antimalware and antivirus software and keeping it up to date. However, even if you take precautions, your PC can still become infected.
You can scan your PC for viruses or other malicious software by using Windows Security (formerly Windows Defender Security Center), which is included in Windows 10. For more info, see How to protect your Windows 10 PC.
If you’re using other antivirus or anti-malware software, see the documentation for that program to learn how to scan for viruses. Also, make sure multiple antivirus programs aren’t running at the same time. If they are, choose the one you want to run, and then disable or uninstall any others.
If you have another antivirus program installed and turned on, Windows Security will be turned off by default.
To scan for viruses using Windows Security (Windows 10 Version 1809 or later)
Select Start > Settings > Update & Security > Windows Security and then select Open Windows Security.
Open Windows Security settings
Select V irus & threat protection, then select Check for updates under Virus & threat protection updates.
On the Protection updates screen, select Check for updates to make sure you have the most recent updates.
Select Virus & threat protection, then select Quick scan.
Wait for Windows Security to finish scanning for viruses and malware.
Do one of the following, depending on the results of the scan:
Run the recommended advanced scan. This scan takes longer but searches more extensively for threats on your PC.
If Windows Security finds a virus or malware and can’t remove or quarantine it, contact Microsoft Support for help.
If no viruses are found, restart your PC and try to reproduce the performance problem you were having with your PC.
If Windows Security doesn’t open, can’t update the definition file, or can’t finish scanning for viruses, try running Windows Defender Offline, which is explained below in To scan for malware and viruses with Windows Defender Offline (Windows 10 Version 1809 or later).
To see which version of Windows 10 your device is currently running, select the Start button, then select Settings > System > About.
Open About settings
To scan for viruses using Windows Defender Security Center (Windows 10 Version 1803)
Select Start > Settings > Update & Security > Windows Security and then select Open Windows Defender Security Center.
Open Windows Security settings
Select Virus & threat protection, then select Virus & threat protection updates > Check for updates to make sure you have the latest definition file.
Select the Virus & threat protection tab, then select Scan now.
Wait for Windows Defender Security Center to finish scanning for viruses and malware.
Do one of the following, depending on the results of the scan:
Run the recommended advanced scan. This scan takes longer but searches more extensively for threats on your PC.
If Windows Defender Security Center finds a virus or malware and can’t remove or quarantine it, contact Microsoft Support for help.
If no viruses are found, restart your PC and try to reproduce the performance problem you were having with your PC.
If Windows Defender Security Center doesn’t open, can’t update the definition file, or can’t finish scanning for viruses, try running Windows Defender in Offline Mode, which is explained below in To scan for malware and viruses with Windows Defender Offline (Windows 10 Version 1803).
To see which version of Windows 10 your device is currently running, select the Start button, then select Settings > System > About.
Open About settings
To scan for malware and viruses with Windows Defender Offline (Windows 10 Version 1809 or later)
Save any documents or anything else you might have open on your PC.
Select Start > Settings > Update & Security > Windows Security and then select Open Windows Security.
Open Windows Security settings
Select Virus & threat protection, and then under Current threats, select Scan options > Windows Defender Offline scan > Scan now.
Your PC will restart, and Windows Defender Offline will run and scan for viruses and malware. The scan might take 15 minutes or so, and your PC will restart again after that.
Try to reproduce the performance issue.
If your PC still runs slowly, continue to the next tip.
To scan for malware and viruses with Windows Defender Offline (Windows 10 Version 1803)
Save any documents or anything else you might have open on your PC.
Select Start > Settings > Update & Security > Windows Security and then select Open Windows Defender Security Center.
Open Windows Security settings
Select Virus & threat protection, then select Run a new advanced scan > Windows Defender Offline scan > Scan now.
Your PC will restart, and Windows Defender Offline will run and scan for viruses and malware. The scan might take 15 minutes or so, and your PC will restart again after that.
Try to reproduce the performance issue.
If your PC still runs slowly, continue to the next tip.
Restoring your PC undoes recent changes that might be causing problems. If you think a recently installed app, driver, or update for Windows could be causing problems, you might get things running normally again by restoring your PC to an earlier point, called a restore point.
Restoring from a restore point won’t affect your personal files, but it will remove apps, drivers, and updates that were installed after the restore point was created.
System restore works for changes made in the last 7 to 14 days.
To restore your PC from a restore point
In the search box on the taskbar, type restore point, then select Create a restore point from the list of results.
On the System Protection tab, select System Restore.
Select Next, then choose the restore point related to the app, driver, or update that might be causing the problem. Then select Next > Finish.
Restart your PC and see if performance has improved.
If you don’t see any restore points, it might be because system protection isn’t turned on.
To turn on system protection
In the search box on the taskbar, type restore point, then select Create a restore point from the list of results.
On the System Protection tab, select Configure.
Select Turn on system protection > OK.
If your PC still runs slowly, try the next tip.


