- Как узнать частоту кадров в играх средствами Windows 10
- Windows 10 наконец-то получает встроенный счетчик FPS
- Предстоящие улучшения Диспетчера задач
- Windows 10 optimization guide for gaming
- Even though Windows 10 keeps getting faster and leaner, and hardware more capable, eventually, the performance of your computer will slow down due to a lot of factors. Pc in today’s world have been upgraded with Smarter operating system and advanced hardware. Yet slow performance and sluggishness still remain the biggest problem for computer users. No matter how smart your Operating System is, it still requires a few tweaks to optimize Windows 10 performance.
- 1) Installing Windows updates
- 2) Go to settings> Personalization> Colors
- 3) Go to settings> apps> Offline maps
- 4) Go to settings> Gaming> Xbox Game bar
- 5) Go to settings> Ease of Access> speech
- 6) Go to settings> Privacy> General
- 7) Go to settings> Update & security > Windows update
- 8) Go to settings> Accounts> Sign-in options
- 9) Turn off visual effects
- 10) Defragment your Windows 10 PC
- 11) Turn Off Mouse Acceleration
- 12) Decrease sound quality to improve system performance
- 13) Delete temporary files
- 14) Services tweaks
- 15) Disabling HPET settings
- 16) Optimizing games
- 17) Install/update two important Microsoft gaming software/packages
- 18) Update your GPU driver
- 19) Turn on GPU Scheduling
- 20)Prevent steam auto updating games
- 21) Automatically Clear ram chaches to get smooth gameplay without shuttering
- 22)Turn off Hardware Acceleration
- 23)Disable Nagle’s Algorithm
- 24)Use static picture as wallpaper or solid background
Как узнать частоту кадров в играх средствами Windows 10
Частота кадров в играх, она же FPS — самый важный показатель плавности. Конечно, в широких пределах ее можно узнать на глазок, но чтобы точно получить «играбельный» результат используются различные счетчики. Пожалуй, один из самых известных это Fraps, но есть и множество других, начиная от встроенных в Steam или Uplay и заканчивая MSI Afterburner и FPS Monitor. Но у всех этих программ есть минус: их нужно устанавливать, и некоторые из них платные. Поэтому Microsoft пошла своим путем, интегрировав счетчик FPS в Xbox Game Bar. Он работает в подавляющем большинстве игр и неплохо кастомизируется, так что как базовое средство мониторинга плавности отлично подойдет.
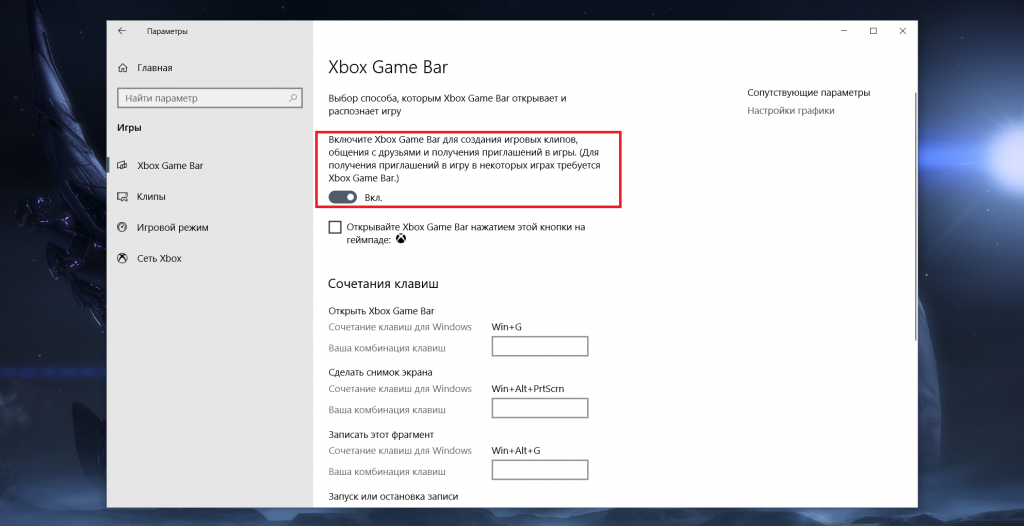
Итак, чтобы воспользоваться таким измерителем частоты кадров в секунду, вам нужно обновить Windows 10 до версии 2004 (May 2020 Update). После этого нужно убедиться, что у вас в системе установлен Xbox Game Bar (если вы его удалили — он бесплатно ставится из Microsoft Store). Также нужно убедиться, что он включен — для этого нужно перейти в Параметры > Игры > Xbox Game Bar и активировать самый первый переключатель на странице:
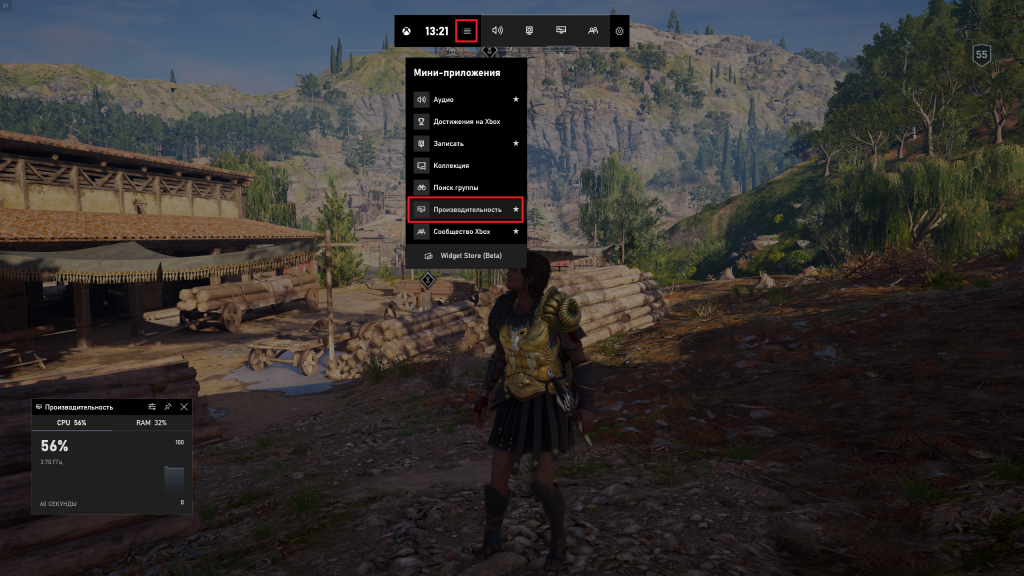
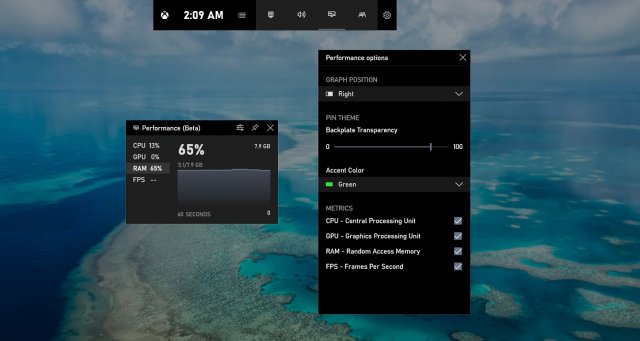
Все, после этого запустите нужную игру и нажмите в ней сочетание клавиш Win+G. После этого нажмите на значок мини-приложений и выберите там опцию «Производительность» (возможно, она сразу будет на оверлее и включать ее не придется):
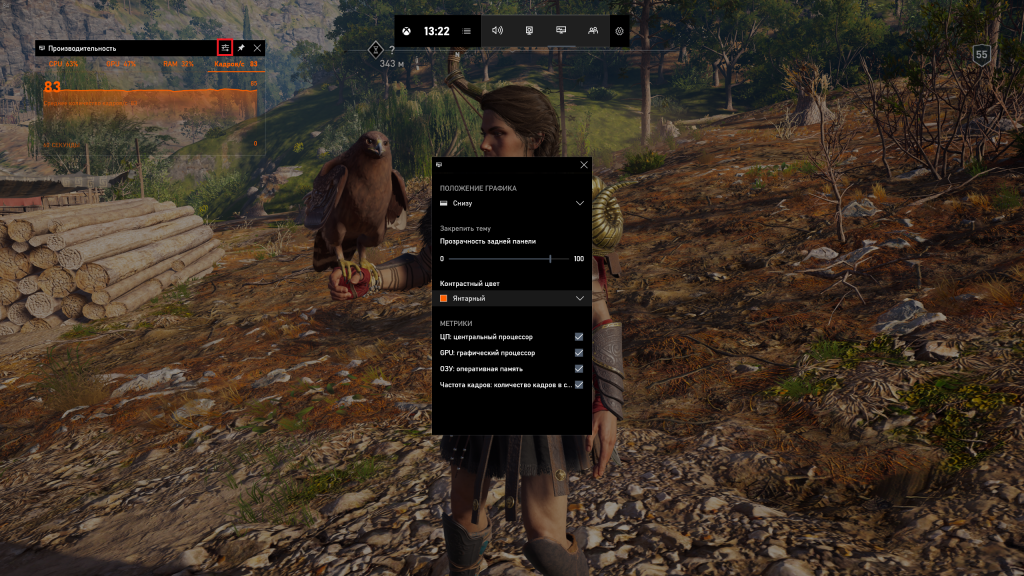
Теперь нужно настроить само окошко мониторинга. Нажмите в нем на значок настроек, после чего выберите, что должно отображаться, каким цветом и с каким коэффициентом прозрачности:
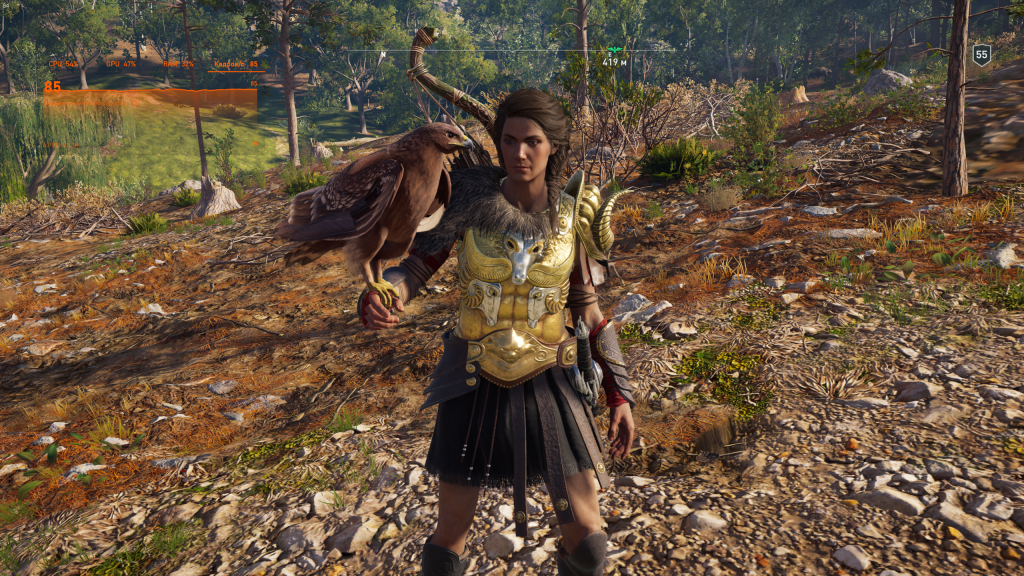
При этом само окошко, разумеется, можно передвинуть в любую удобную область экрана. Также нужно понимать, что мониторинг пока реализован достаточно криво: так, показывается лишь общая нагрузка на CPU и его базовая, а не реальная частота. Мониторинг GPU вообще показывает загрузку видеопамяти. Поэтому если вы хотите кроме FPS видеть нагрузку на остальные компоненты ПК, то стоит перейти к диспетчеру задач и его превратить в оверлей.
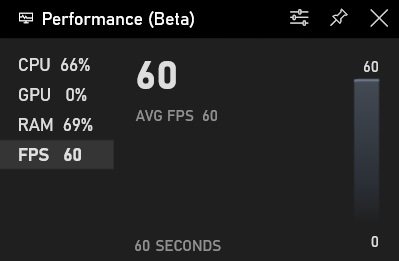
После всех настроек окна мониторинга нужно нажать на нем на вкладку в FPS, чтобы видеть график и среднее количество кадров в секунду. Далее остается скрыть Xbox Game Bar нажатием на Win+G и вуаля, у вас остается игра и небольшое окошко с FPS:
Работе Nvidia G-Sync или AMD FreeSync оно не мешает, а влияние на производительность ПК оказывает минимальное, так что его вполне можно использовать во всех играх.
Windows 10 наконец-то получает встроенный счетчик FPS
Частота кадров в секунду (FPS) связана с мониторингом частоты обновления во время игр на компьютерах, консолях и смартфонах. Игра с высоким FPS будет выглядеть более плавно, и важно отслеживать FPS, если вы хотите определить игровую производительность.
Вы можете отображать FPS игры со встроенным FPS-дисплеем Steam, программным обеспечением NVIDIA GeForce Experience, MSI Afterburner и другими сторонними инструментами.
Microsoft выпускает новое обновление для приложения Windows 10 Xbox Game Bar, которое включает в себя новый мониторинг FPS. В то время как сторонние приложения, отмеченные выше, всегда предлагали способ мониторинга FPS, Microsoft наконец-то осознала, что Windows 10 нужно нативное решение для определения производительности игр. Это давно назревший шаг, который порадует геймеров, использующих Windows в качестве ежедневной платформы для игр.
Microsoft выпускает встроенный счетчик FPS в Windows 10 с обновлением для Game Bar в октябре 2019 года, которое можно открыть, нажав комбинацию клавиш Win+ G. Game Bar также позволяет пользователям быстро проверить использование процессора, графического процессора и памяти.
Microsoft заявляет, что новая версия Игровой панели будет загружаться и устанавливаться автоматически, но вы также можете проверить наличие обновлений в магазине Microsoft Store и загрузить обновление вручную. Для работы счетчика FPS не требуется вступление в программу Windows Insider и иметь предварительную сборку.
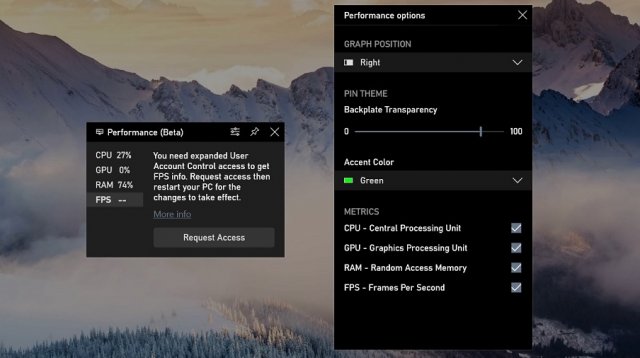
Чтобы включить счетчик FPS в Windows 10, вам необходимо обновить приложение и согласиться на дополнительные разрешения Windows после запуска Game Bar с комбинацией клавиш Win+G. После предоставления разрешений перезагрузка системы также потребуется для завершения установки.
Счетчик FPS отображается только когда вы находитесь в игре. Все игры, включая традиционные игры для ПК, Microsoft Store (UWP) и даже эмуляторы, поддерживаются встроенным счетчиком FPS, который отслеживает последние 60 секунд игрового процесса.
Microsoft также добавила несколько опций для настройки взаимодействия. Например, вы можете изменить положение графика, настроить прозрачность задней панели и выбрать собственный цвет для акцента. По умолчанию вы увидите данные о производительности в правом углу экрана.
Предстоящие улучшения Диспетчера задач
Согласно последним новостям, весеннее обновление Windows 10 в 2020 году предоставит две новые функции для Диспетчера задач.
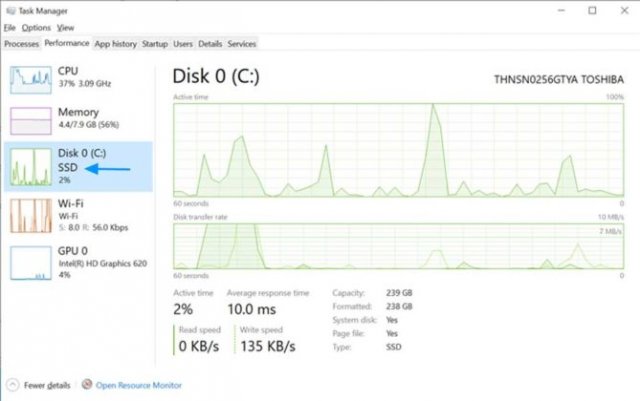
Обновление добавит тип диска на вкладку «Быстродействие» в «Диспетчере задач», чтобы вы могли проверить, установлен ли на вашем ПК или ноутбуке жесткий диск, или твердотельный накопитель.
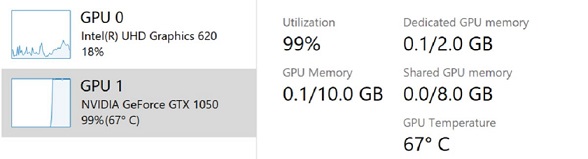
Windows 10 также отображает температуру графического процессора на вкладке «Быстродействие» Диспетчера задач. В ближайшем будущем мониторинг температуры процессора также появится в Диспетчере задач.
В то время как улучшения Диспетчера задач появятся в следующем году, счетчик FPS уже доступен всем в Microsoft Store.
Windows 10 optimization guide for gaming
Even though Windows 10 keeps getting faster and leaner, and hardware more capable, eventually, the performance of your computer will slow down due to a lot of factors. Pc in today’s world have been upgraded with Smarter operating system and advanced hardware. Yet slow performance and sluggishness still remain the biggest problem for computer users. No matter how smart your Operating System is, it still requires a few tweaks to optimize Windows 10 performance.
1) Installing Windows updates
2) Go to settings> Personalization> Colors
now, click on »Choose which folders appears on start» and turn off everything except settings to keep a more minimalistic look
3) Go to settings> apps> Offline maps

4) Go to settings> Gaming> Xbox Game bar
- For Nvidia users- Ultimately Keep game mode feature on but if you experience any performance problems turn it off
- For AMD users- No need to check anything just Keep this game mode feature off it may Cause lag, FPS drop, Shuttering, Freezing in AMD GPUs when turn on
5) Go to settings> Ease of Access> speech
6) Go to settings> Privacy> General
Click on background apps tab and Turn off »Background apps»
7) Go to settings> Update & security > Windows update
8) Go to settings> Accounts> Sign-in options
9) Turn off visual effects
-now Assign the virtual memory to the fastest drive select your fastest drive> tick system managed size and click on SET
🔴(SSD is faster than HDD, install your games in the fastest drive)
10) Defragment your Windows 10 PC
11) Turn Off Mouse Acceleration
When mouse acceleration is turned off, for every inch the mouse moves over the mouse pad, the cursor on the screen will also move a fixed distance, and the distance will not be different depending on how fast the mouse moves.
12) Decrease sound quality to improve system performance
-Then one by one disable sound devices that you are not using or not plugged in one by one.

-Finally go to the advanced tab (same window) under default format set DVD Quality(16bit, 48000hz) and under exclusive mode untick both configurations.

13) Delete temporary files
14) Services tweaks
15) Disabling HPET settings
-Right-click on High Precision Event Timer and select Disable to stop the HPET service

16) Optimizing games
-Navigate to the .exe file of the game (it’s likely in Program Files)
-Right-click the file, select properties
-Navigate to the compatibility section of the window that just opened up
-Check the box that says “disable fullscreen optimizations”

-Now go to »change high DPI settings»
-check the box saying »override high DPI scaling behavior»
-ok, apply, ok
17) Install/update two important Microsoft gaming software/packages
—Visual Studio 2015, 2017 and 2019
18) Update your GPU driver
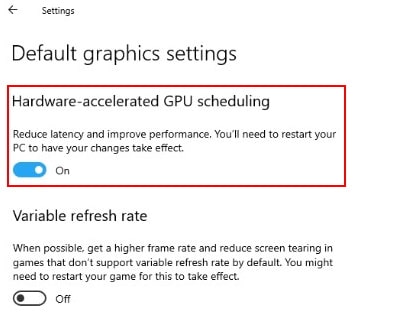
19) Turn on GPU Scheduling
How did this feature work?
Hardware-accelerated GPU scheduling (HAGS) will pass memory management control from the software to the GPU, which in turn should allow the GPUs to better manage their VRAM and free up the CPU a little to improve graphics responsiveness and performance.
Huge fps gain in Fortnite using this feature
20)Prevent steam auto updating games
Steam Auto-update feature may eat up memory by updating games you don’t play or limit your network connectivity with background updates.
To prevent Steam from updating games in the background:
-Launch the Steam client
-Open Steam > Settings > Downloads
-Uncheck Allow downloads during gameplay

You can also prevent Steam from downloading updates for largely unused games:
-Open the Steam Library
-Right-click an underused but installed game
-Select Properties and find Automatic Updates
-Change Always keep this game up to date to Only update this game when I launch it

21) Automatically Clear ram chaches to get smooth gameplay without shuttering
-Download EmptyStandbyList on your computer.
-Open C drive then create new folder name Empty standly list then open this folder and paste EmptlyStandbyLink.exe here after download)
-Close the browser window.
-Click on the Search box beside Windows icon and type “Task Scheduler“.
-Click on “Task Scheduler” from the elevated Search result to open Task Scheduler.
-In the Task Scheduler window, on the right-hand side, click on “Create Task…“.
-In Create Task window, name the task “Cache Cleaner“.
-Now, click on “Create User or Groups…“.
-Click on “Advanced“.
-In Select User or Groups window, click on “Find Now“.
-In the Search results: scroll down and then select “SYSTEM“.
-Finally, click on “OK” to save the changes.
-Now, click on “OK” to save the changes.
-Go to settings tab then untick «stop the task if runs longer than» and go to general tab
-Coming back to Create Task window, check the option “Run with highest privileges“.
-Click on the drop-down beside ‘Configure for:’ and select “Windows 10“.
-Now, go to the “Triggers” tab.
-In the New Trigger window, under ‘Advanced settings‘ set the ‘Repeat task every:’ to “5 minutes“.
-And set ‘for a duration of:‘ to “Indefinitely“.
-In the same window, check the option “Enabled“.
-Click on “OK” to save the trigger settings.
-Now, go to the “Actions” tab.
-Then, click on “New…“.
-In the New Action window, click on “Browse“.
-Now, navigate to the location where you have downloaded the ‘EmptyStandbyList‘ application.
-Select the application and then click on “Open“.
-Now, click on “OK” to save the action.
-Coming back to the “Create Task” window, click on “OK” to save the task.
-In the Task Scheduler window, click on “Refresh” to refresh the tasks list.-
-That’s it! From now on at a regular interval of 5 minutes, this ‘Cache Cleaner‘ task will automatically run on your computer to clean cache memory
22)Turn off Hardware Acceleration
If you’re a gamer and you experience frame drops while playing, it’s recommended you turn off hardware acceleration discord.
-First, you need to open the Settings page:
Click on the three dots symbol in the top-right of your browser, then select Settings.
-Scroll to the very bottom of the page and click on Advanced.
-Scroll down further until you see System. Here, click on the switch next to Use hardware acceleration when available so it turns grey.
-Click on the Relaunch button to restart Chrome and finalize your change
Note→same way to disable hardware Acceleration in other browsers like opera, firefox, edge
23)Disable Nagle’s Algorithm
Nagle’s Algorithm is a way to improve the efficiency of TCP/IP networks by decreasing the number of packets that need to be sent over the network.
So, in order to improve game performance on Windows 10, you can try disabling Nagle’s Algorithm.
Now, here is the tutorial.
-Press Windows key and R key together to open Run
-Then type regedit in the box and click OK to continue.
-Navigate to the path: HKEY_LOCAL_MACHINE\SYSTEM\CurrentControlSet\Services\Tcpip\Parameters\Interfaces
-To access the file, match your IP address to the listed DhcpIPAddress in one of those folders.
( You can check your IP address by pressing the Windows + X keys on your keyboard, then choosing Windows Powershell. Here, type in “ipconfig” and look for “IPv4 address.”)
-Right-click it and choose New > DWORD (32-bit) Value.
-Create two new keys and name them as TcpAckFrequency and TCPNoDelay.
-After that, double-click them and change their value data to 1.
24)Use static picture as wallpaper or solid background
Make Windows 10 not change wallpapers while gaming.
If you have slideshow running in Windows 10 background, that also changes the system accent colors when the wallpaper does, this causes the PC to drop a few FPS for a few seconds, freezes, stuttering.
Use static picture as wallpaper or for best performance use solid background.
To do this- Select the Start  button, then select Settings > Personalization.
In Background, Use the drop-down menu under “Background” in the main windows to choose whether to use a picture, or solid color as a wallpaper
Now restart your laptop and enjoy it!
Let me know in the comments below your results or if you have any questions and don’t forget to like if this guide is helpful .


