- How To Record Screen In Windows 10 in 2021 (Without Any Software)
- Steps To Record Screen In Windows 10 in 2021
- Using VLC Media Player
- Windows 10 Games’ full screen problem (all games running in windowed mode)
- Replies (5)
- How to Capture Video Clips in Windows 10
- Enable Screen Recording
- Record Your Screen
- Recording in the Background
- Customize Game Bar
- Game Bar Workaround
- How to Record Your Screen on Windows 10
- Which Screen Recording Method Should I Use On Windows 10?
- Quick Recording With Windows 10 Game Bar
- Free Screen Recording Software – OBS Broadcaster
- Step 1: Choose audio/microphones
- Step 2: Choose a program or window to record
- Step 3: Adjusting audio and recording
- Summary
How To Record Screen In Windows 10 in 2021 (Without Any Software)
You might be using Windows 10 for a while, but that doesn’t mean that you have discovered everything it has to offer. Actually, Windows 10 offers users lots of features, but most remain undiscovered. In this article, we will talk about a hidden feature of Windows 10 that would allow you to record your screen.
To record the screen on Windows 10, users generally need to install third-party software. However, what if I tell you that you can record the Windows 10 screen without installing any additional software? Windows 10 has a hidden screen recording tool built into the Game Bar.
The screen recording tool is specially designed for gamers who want to record their gameplay videos. In this article, we will share a working method that would help you record Windows 10 screens easily. So, let’s check out how to Record a screen in Windows 10 without using any software.
Steps To Record Screen In Windows 10 in 2021
The method is straightforward, and you need to use some shortcut keys on your keyboard. Windows 10 will display the game bar you will use to record the screen. So follow the complete steps below.
Step 1. First of all, in your Windows 10, click on start and then type “Xbox app” and then open the Xbox app.
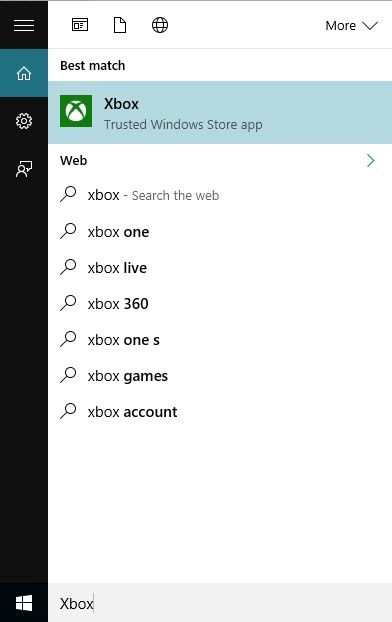
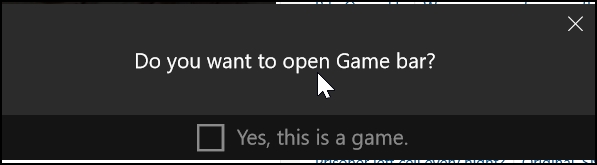
Step 2. Now in the Xbox app, you have to press a keyboard that is “win+G” this can be done on the screen you want to record. Now, as soon as you press this combination, the popup will appear, asking you that it is a game? Simple click on Yes, it is a game.
Step 3. Now you will see few options that are “Screenshot,” “Start Recording,” and “Settings.”
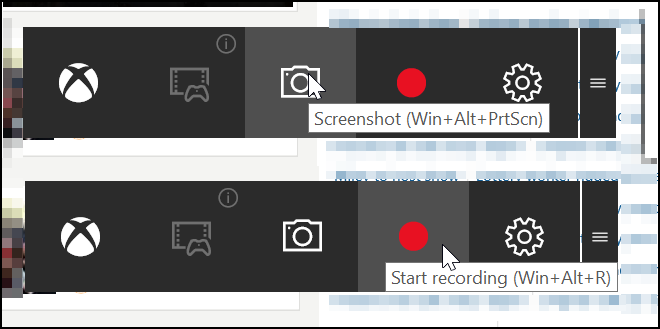
Step 4. Now select the Start recording button, and the recording will get started, and you can stop recording when you are done.
By default, all your recordings get saved to the folder
“C/Users/Videos/Captures“.
That’s it! You are done; now, you can easily record the screen with this cool trick that will not need any third-party tool. You can also choose out the screenshot feature in this game bar tool.
Using VLC Media Player
Well, VLC Media Player is software, and the reason I had mentioned VLC Media player is that almost everyone uses it. With the VLC Media player’s help, you can record the screen without any external third-party recording software. You can use this method in Windows 7,8, and 10. Let’s know how to record the screen using the VLC media player.
Step 1. First of all, download and install VLC Media Player on your Windows computer if you don’t have one.
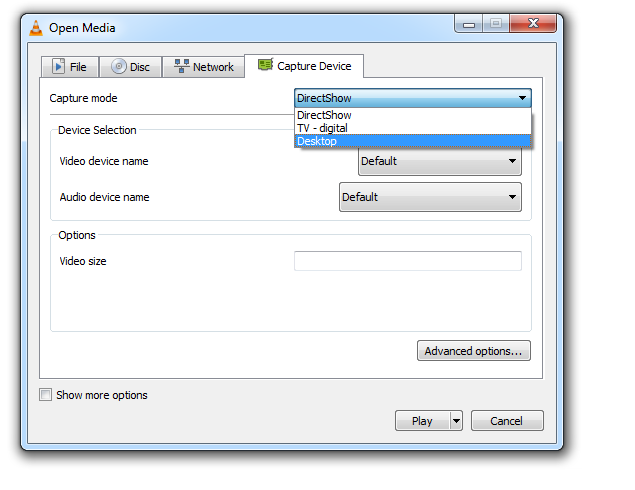
Step 2. Now launch the VLC media player, click on “Media,” and then select “Open Capture Device.”

Step 3. Under Capture mode, you need to click on the drop-down and then select desktop.
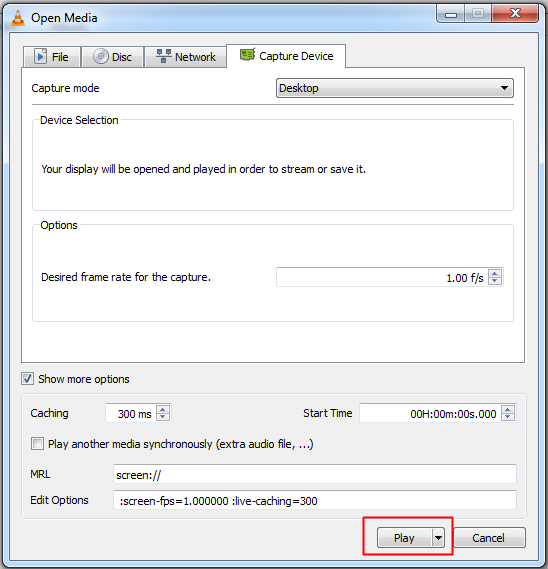
Step 4. Set all other options according to your wish, and then click on the “Play” button.
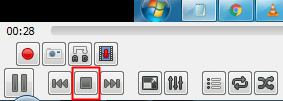
Step 5. Now you need to click on the “Stop” button.
Step 6. Now you will see the screen like below. Here you need to right-click on your recording and select the option “Save,” and save it to your desired location.

That’s it! You are done. This VLC media player method works with every Windows version. You don’t need any additional software to record your desktop screen.
So, this is all about Windows 10 screen recording. We have shared the two best methods to record Windows 10 screen. If you don’t want to go through all hassle and want a straightforward way to record Windows 10 screen, you need to visit our article Best Screen Recording Software For Windows. I hope this article helped you! Please share it with others also.
Windows 10 Games’ full screen problem (all games running in windowed mode)
Hi, recently I faced with a problem with my games on Windows 10 PC.
Approximately a month ago all of my games stopped to run in full screen mode. Instead of full screen mode I can see only windowed mode. All game settings are set to run games in full screen mode.
I’ve tried to reinstall the graphics adapter driver twice. It didn’t help.
I tried to run games in compatibility mode (Windows 7 and 8), it didn’t help either.
— Windows 10 x64 with anniversary update
— MSI GeForce GTX 1070 video card
— Intel Core I7 6700K CPU
— MSI GamingX G5 motherboard
— Kingston SSD drive 240 Gb
I have no idea what should I do to fix that problem as I spent a lot of time reading different posts on forums. BTW please don’t suggest to try click Alt+Enter to enter full screen mode.
Does anyone know how this problem can be fixed?
Replies (5)
![]()
We got your concern. We would like to know if this happens only in games? What are the games that won’t run in full screen? Do you see any error message?
You can also do these basic troubleshooting steps:
Uninstalling display drivers.
1. Move the mouse to bottom left corner and right-click on the ‘Start icon’.
2. Select ‘device manager’.
3. Expand ‘Display adapter’ and right-click on ‘display adapter’ and select ‘uninstall’.
Installing display drivers in compatibility mode.
1. Download the display drivers from the manufacturer’s website.
2. Right-click on the driver and click on ‘properties’.
3. Click on the ‘compatibility’ tab and check the box ‘Run this program in compatibility mode for’ and select Windows 7 operating system from the drop down.
4. Click on ‘Apply’ and click ‘OK’ and run the file to install it.
Keep us updated
3 people found this reply helpful
Was this reply helpful?
Sorry this didn’t help.
Great! Thanks for your feedback.
How satisfied are you with this reply?
Thanks for your feedback, it helps us improve the site.
How to Capture Video Clips in Windows 10
Windows 10 has a built-in tool called Game Bar to help you record your screen during PC and Xbox gaming sessions. But this tool can also be used to record non-gaming apps.


Taking a screenshot in Windows 10 is fairly quick and simple. You can easily snap your screen using the handy Print Screen button on your keyboard and fine-tune it via the Snip & Sketch tool. Capturing video of your screen activity is more challenging, but Microsoft makes it possible through the use of a built-in video capture tool called Game Bar.
Game Bar was designed to record games you play directly on your PC, or those you stream from an Xbox One, but it can just as easily capture video of screen activity from your web browser, Windows applications, and many other programs. Any screen activity you record is automatically saved as an MP4 video file.
Game Bar does impose certain system requirements, including the right type of graphics card. If you try to use Game Bar and your PC isn’t up to snuff, you may receive an error telling you that your PC doesn’t meet the hardware requirement for recording clips. But fear not, as there is a way around this limitation.
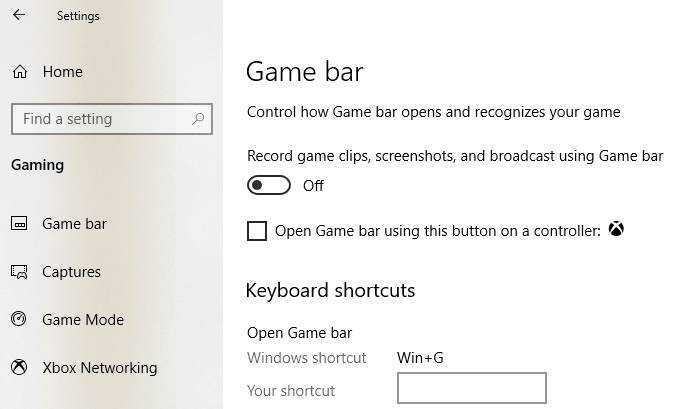
Enable Screen Recording
First, make sure that Game Bar is enabled. Open Settings > Gaming > Game bar and turn on the switch to Record game clips, screenshots, and broadcast using Game Bar, if it’s not already on. If you have an Xbox One controller, or Xbox 360 controller with the right driver, you can even trigger Game Bar through the Xbox button on the gamepad. From this screen, you can also change any of the keyboard shortcuts associated with opening the Game Bar, taking a screenshot, and recording video.
Open what you wish to record. You can start a recording from most applications and windows, but there are exceptions. You can’t kick off a capture from the Windows desktop, File Explorer, or certain Windows apps such as Weather. Otherwise, the field is pretty wide open.
Record Your Screen
Press Win+G to open the Game Bar. Several Game Bar widgets pop up with options for capturing screenshots, controlling your video and audio, and viewing your Xbox social account. The pane also displays the name of your current app, file, or window as the source for the video capture.
Click the camera icon to take a simple screenshot or hit the Start Recording button to capture your screen activity. Instead of going through the Game Bar pane, you can also just press Win+Alt+R to start your recording.
The first time you choose to record screen activity from a specific application or window, Game Bar needs your permission. Click the checkbox to «Enable gaming features for this app to record gameplay.» Click the Start Recording button again, and the video capture starts.
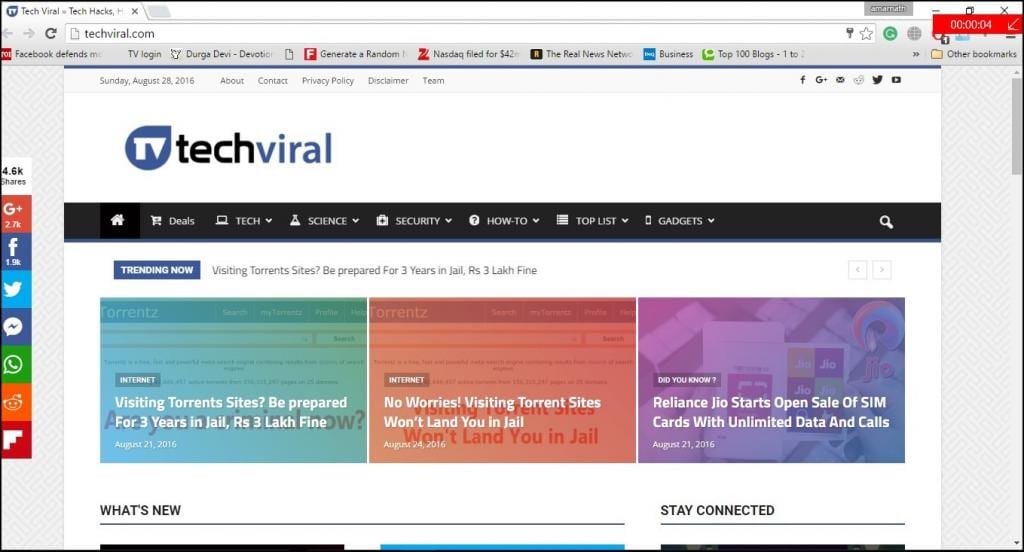
You can now perform whatever screen actions you want to capture. The Game Bar widgets vanish, replaced by a small floating bar in the upper-right corner of the screen through which you can control the recording.
To stop the recording, click the Recording button on the floating bar. A notification appears telling you that the game clip was recorded. Click the notification, and File Explorer opens to the specified location. Just double-click the video file to play it in its associated application.
If you don’t like where video captures are being saved by default, you can always change the location. Go to Settings > Gaming > Captures. Click the Open folder button and choose a different folder.
Recording in the Background
Have you ever done something on your computer and then suddenly wished you’d captured the moment? With the Windows 10 Game Bar, you can record the last several seconds or minutes of screen activity after you’ve already performed it.
To do this, you first need to grant permission for the computer to record your activities in the background. Open the Game Bar and click the Settings icon. Scroll down the Settings screen and check the box to Record in the background while I’m playing a game. While here, you can click the drop-down menu for Record the last and change the interval to anywhere from 15 seconds to 10 minutes.
Now you need never miss a moment again. Just click the Record last 30 sec button, and a video is generated based on the number of seconds or minutes you set.
Customize Game Bar
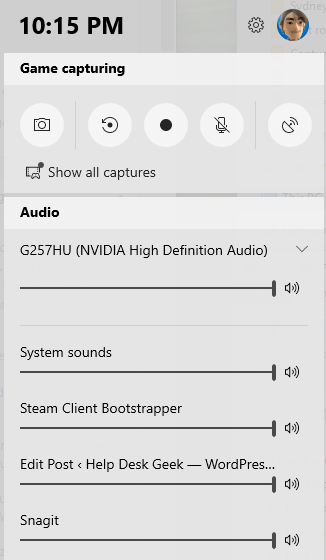
You can view your video captures, control which widgets appear, and customize an array of settings directly through Game Bar. Press Win+G to open the Game Bar. In the Capture widget, click the Show All Captures link to see a list of all your captured videos. Click the video you want to play.
Windows allows you to set which widgets pop up when Game Bar is activated. From the Game Bar display, close the window for any widget that you don’t want to see. In the top widget toolbar, click the Widget menu icon to the right of the time, then select the widgets you want to use. You can also turn certain widgets on or off by clicking the appropriate icon on the top widget toolbar.
Click the Settings icon at the right end of the top widget. Here, you can view and change the accounts, shortcuts, theme, recording options, notifications, and other controls for Game Bar.
If you bump into problems with Game Bar, or the tool won’t let you capture your screen activity, your best bet is to check Microsoft’s web page on “Troubleshoot Xbox Game Bar on Windows 10.”
Game Bar Workaround
But what if you receive an error that your device doesn’t meet the hardware requirement for recording clips? Assuming you can’t change your PC hardware or video card, there is one trick you can try courtesy of a third-party utility called Game DVR Config.
How to Record Your Screen on Windows 10
Step by step using free software
We have included two free methods for recording your screen on Windows 10 in this article. One method is via a feature built straight in to Windows 10 and the other requires you to download free software.
For both methods, we will be showing you step by step instructions to record videos and access your files. Before we get started, we’ll explain the differences between each method so that you know which option to go for.
Which Screen Recording Method Should I Use On Windows 10?
In this article, we’ll be focusing on recording via the Windows 10 Game Bar and recording via OBS Broadcaster. If you’d like to get a video recorded as quickly as possible, we’d suggest choosing the Windows 10 Game Bar.
If you want more control over what is recorded, for example, if you’d like to record a specific window or change recording quality, we would suggest OBS Broadcaster.
It’s also worth noting that the Game Bar will only record the events in the current active app, not the entire screen. If you start it while Chrome is the active window, it will only record what happens inside Chrome.
Quick Recording With Windows 10 Game Bar
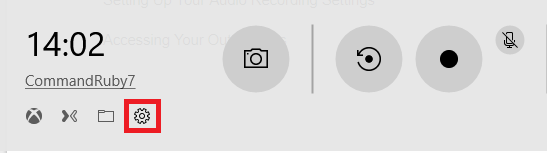
Using the Windows 10 Game Bar can be a very quick and convenient option for recording your screen on Windows 10. To get started, simply press the Windows Key + G Key.
Doing this will open the Windows 10 Game Bar. Below, we have provided a screenshot for reference.

In the latest version of Windows, Windows 10 1809, the game bar has been redesigned a looks like this:
If nothing happens, that means you need to go to the Windows Store and download the Game Bar app. If it still doesn’t load, click on Start – Settings – Gaming – Game Bar and make sure it’s turned On.
To start recording, click the Start Recording button (the circle with the black dot). Alternatively, you can press Windows Key + Alt + R. You will now see a small recording icon in the top right hand of your screen.
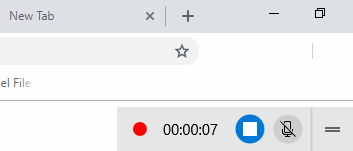
At any point you can click the Stop button to stop recording, or you can press Windows Key + Alt + R again to stop it.
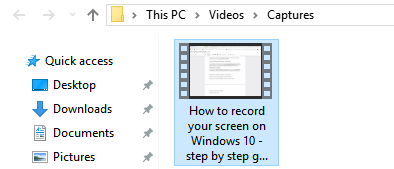
To access your new recording, go to This PC, Videos, then Captures. You’ll find all of your new saved recordings there. By default, your recordings will be named after whichever program you have open and in view at the time.
If you’d like to turn on your microphone and record your voice whilst you are recording a video, you can use the shortcut Windows Key + Alt + M. You can turn the microphone back off again by pressing the same keys again.
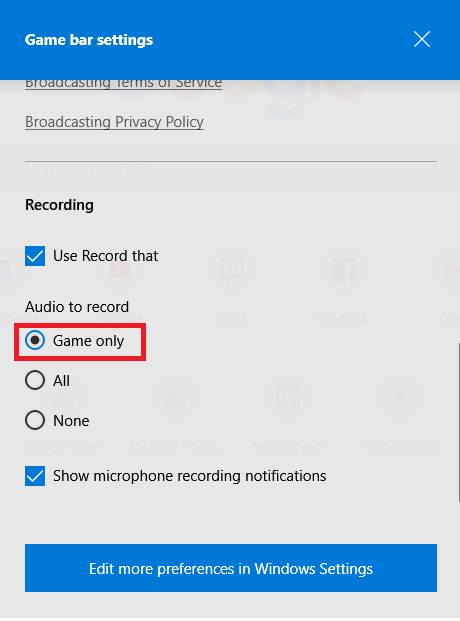
Finally, if you’d like to record the audio from the application you are currently using, but don’t want to record audio from any apps in the background, press Windows Key + G to open the Game Bar, then click the Settings cog on the left hand side.
Next, scroll through the settings menu that pops up, and select Game Only under the Audio to record section. Alternatively, you can choose to record no sound whatsoever, or record all audio on your computer.
Windows Game Bar was specifically created to record your video game moments, but you’ll find that it works perfectly well for recording your screen in any other standard program as well.
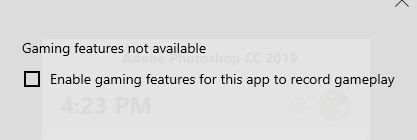
For some programs like a web browser or something like Adobe Photoshop, etc., you’ll get a message stating gaming features are not available for this app and you have to check a box to enable it.
The one big downside to Game Bar is that you can’t use it to record your desktop or Windows Explorer. If you need to do that or need to record the entire screen regardless of which app is active, then you should check out our second suggestion below.
Free Screen Recording Software – OBS Broadcaster
Windows Game Bar can be a great way to quickly record your screen, but if you want more control, we’d suggest using OBS Broadcaster. You can download it for free here. OBS is mostly used as a video game streaming tool, but you can also use it to record your own screen and save the videos to your local drive.
Once you have downloaded and installed OBS Broadcaster, you will see a screen that looks somewhat like what is shown below.
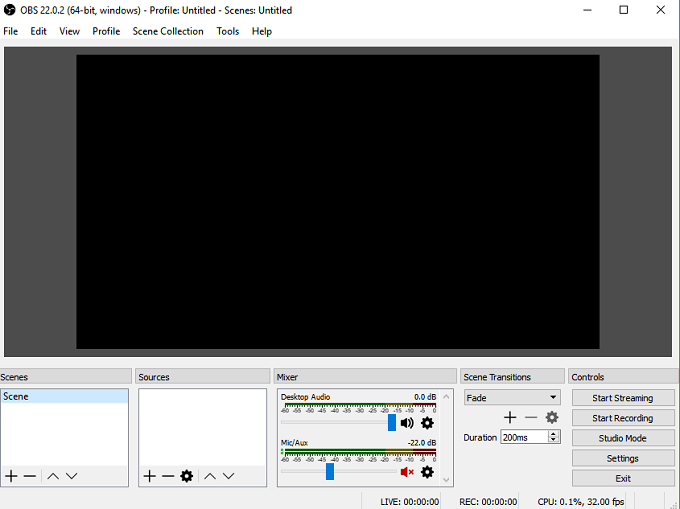
It may seem quite complex to begin with, but we’ll take you through the basics to get you up and running as quickly as possible. There are three steps we need to take before we can start recording.
- Step 1: Choose audio/microphones
- Step 2: Choose a program or window to record
- Step 3: Adjusting audio and recording
Step 1: Choose audio/microphones
This is a one time process that must be completed so that OBS uses the right devices for recording audio and your voice.
To get started,click the Settings option on the far right.
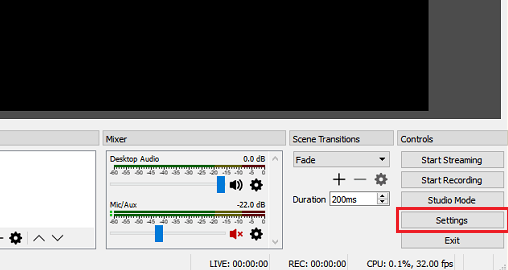
Once the settings menu is open, click on the Audio tab (1). From within here, you can then click and select your audio device from the Desktop audio device dropdown option (2).
Finally, select your microphone from the Mic/Auxiliary Device dropdown option (3).

Once you are done, click the Apply button and then OK.
Step 2: Choose a program or window to record
For this next step, you’ll need to add a source so that OBS Broadcaster knows what to record. This can be done with the ‘sources’ box on the OBS Broadcaster main dashboard.
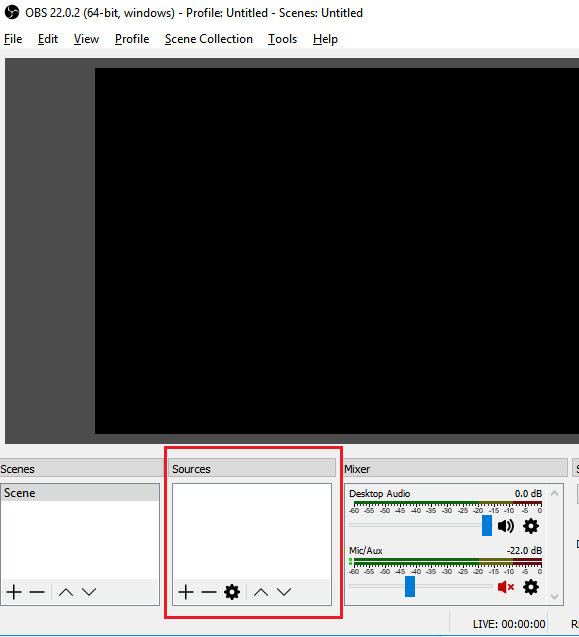
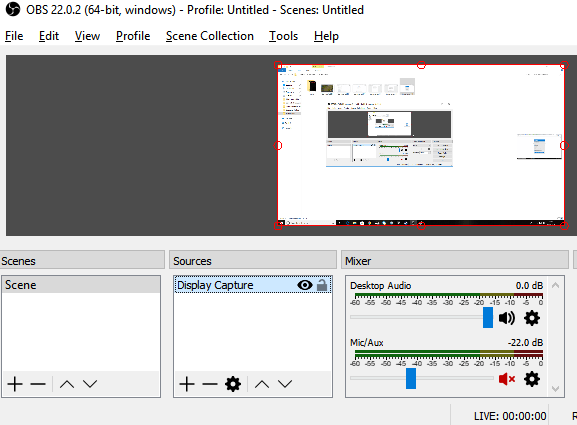
The easiest option is to add your entire display. Click the ‘+’ arrow and then select Display Capture. After,click OK.
You’ll now have your display appear in the OBS Broadcaster dashboard. This option is perfect if you’d like to be able to record your whole display and any programs you have open.
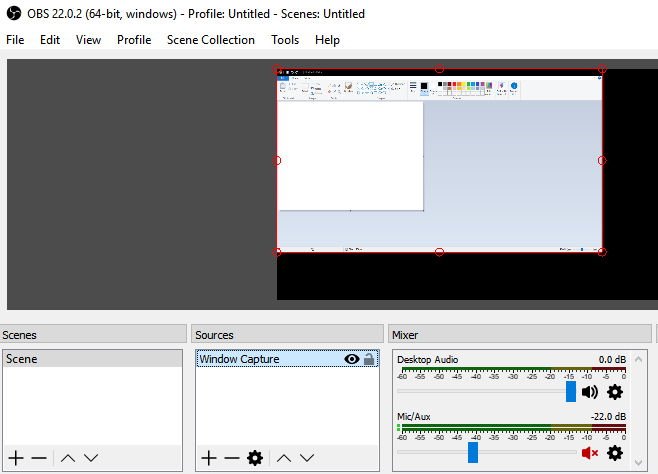
If you don’t want to record everything on your display, you can instead record the contents of a single open program. To do this, Click the ‘+’ arrow and then select Window Capture.
You can then select a specific program from a drop down list. Once selected, OBS Broadcaster will only record the contents of that specific window.
Step 3: Adjusting audio and recording
You are now ready to start recording. However, before you get started, you may want to adjust the volume levels of your desktop audio and microphone audio. You will have a number of tools in the mixer tab. This includes a volume slider, a mute button, and a settings button.
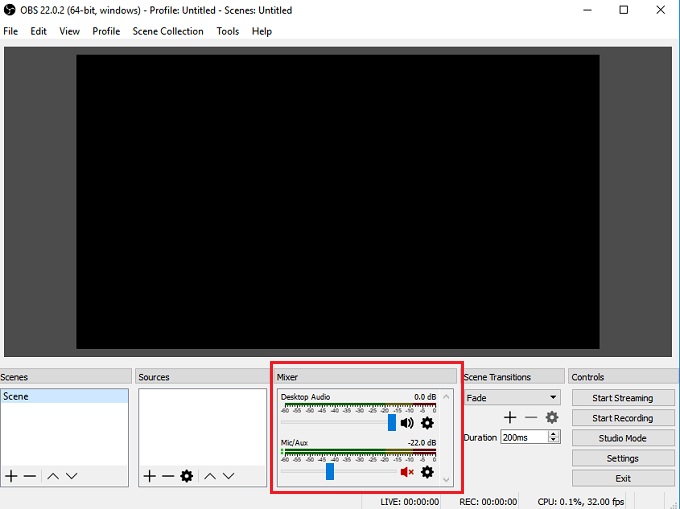
After adjusting your audio, you can click the Start Recording button on the right side of the OBS Broadcaster dashboard. At any time, you can return back to OBS Broadcaster and click the same button to stop recording.
By default, the saved video files will be sent to C:\Users\your_username\Videos.

To see the exact output location, click the settings button on the OBS Broadcaster dashboard and click Output, then click Recording.
Mastering OBS Broadcaster is another topic on its own, but the program gives you the freedom to set up complex scenes, change recording resolution, bitrate, and frames, and make adjustments to the audio or recording format.
Summary
Did this Windows 10 screen recording tutorial help you? Do you have any questions about the methods I used in this article? If so, leave a comment below and I’ll be happy to help as soon as I can. Enjoy!
Founder of Help Desk Geek and managing editor. He began blogging in 2007 and quit his job in 2010 to blog full-time. He has over 15 years of industry experience in IT and holds several technical certifications. Read Aseem’s Full Bio


