- How to Optimize Windows 10 for Gaming
- How to Improve Gaming Performance in 10 Easy Steps
- Use Windows 10 Game Mode
- Go for an SSD
- Manage Your Active Hours
- Disable Mouse Acceleration
- Tweak Your Visual Effects Settings
- Disable Nagle’s Algorithm
- Manage Steam Auto-Updates
- Use a High-Performance Power Plan
- Keep Your GPU Drivers Updated
- Install DirectX 12
- Windows 10 gaming support
- 1) Increase Windows 10 performance with Updated Drivers
- 2) Use boost mode and game booster
- 3)Increase virtual memory
- 4) Optimize Windows 10 With Gaming Mode
- 5) Disable Nagle’s Algorithm
- 6) High-performance mode to make windows faster
- 7) Set Windows settings for MAX Performance
- 8) Turn off unnecessary services and widgets
- 9) Use cleaning apps to optimize windows 10
- 10) Defragment your hard drive to boost performance
- 11) Uninstall apps to optimize windows
- 12) Install DirectX and make your pc faster
- 13) Update windows to make pc faster
- 14) Disable start-up services to optimize windows
- 15) Stop all Windows services to optimize windows
- 16) Prevent Steam From Auto-Updating Games
- 17) Disable mouse acceleration
- 18) Install Windows on A SSD to optimize windows
- 19)Remove inbuilt windows apps & optimize windows
- 20) Reset Windows
How to Optimize Windows 10 for Gaming
Today, Windows 10 is the gamers’ favorite when it comes to operating systems. Microsoft has done a great job of optimizing the OS and adapting it to the needs of the gaming community. Windows 10 offers better game performance and faster frame rates. It serves as a base for the best graphic drivers on the market, which is crucial when it comes to gaming. It supports native games, as well as retro ones, and it supports Xbox streaming with the Game DVR feature. It even has a Game Mode: a special optimization of settings to speed up your PC.
But it’s not quite that simple. To benefit from all Windows 10’s possibilities, boost your gaming experience and make your games run faster, you need to know how to optimize your PC for gaming.
Looking for an app to record your gameplay? Try Gecata by Movavi – an easy-to-use screen-recording program for Windows.
How to Improve Gaming Performance in 10 Easy Steps
Here’s our quick guide to setting up your PC for gaming: you’ll learn which tweaks and updates to make and which settings to disable to make your Windows 10 faster for gaming.
Use Windows 10 Game Mode
Here’s a quick and easy way to optimize Windows 10 for gaming using a tool that’s built into the system. Game Mode appeared in the most recent releases of the OS and is designed to improve the gaming experience by dedicating more system resources to games. It also prevents other programs, such as Windows Update, from hogging system resources while you’re playing.
To locate the Game Mode settings, press Windows key + I, type “game mode” in the search box and click Control Game Mode for optimizing your PC for games.
In the menu that opens, click Game Mode. Switch to On to turn Game Mode on. If your PC supports Game Mode, the system will optimize your PC gaming performance.
If you can’t find these settings, it means the latest Windows Creators Update is not installed on your PC.
Go for an SSD
Upgrading from an HDD to an SSD won’t drastically improve your game performance, but it can help you reduce loading times significantly. It is true that SDDs can be quite expensive and it may seem that loading times is not such an important issue to invest your money in. But while it is probably not the first thing to think about when speeding up your laptop, it is not the last either. Today’s games take more and more disk space, so if you want to play the latest ones, changing from an HDD to an SSD can be a real time-saver and your game loading times can go down from 30-40 seconds to 2-3, which is pretty significant.
As for the money side of things, if a big SSD for both your OS and games is too expensive for you, just get one small SSD for your OS, and keep a big HDD for games.
Manage Your Active Hours
Yes, Windows 10 can install updates and reboot your computer in the middle of your gaming session without so much as an “excuse me”. Ouch. That can be disappointing, to say the least, especially if you’re a competitive gamer and your unplanned exit may affect your teammates or ranking.
But even without such “in-your-face” restarts, which are actually quite rare, the downloading of updates on the background limits your connection speeds and takes up working memory on your PC.
While your first reaction might be to completely turn off automatic updates, we would advise against it. Windows’ aggressive updating without asking permission is the way it is because in earlier versions users wouldn’t update of their own volition and so their systems were regularly exposed to cyber threats. Remember that Windows auto-updates are there not only to ruin your raid, but also to protect your system, keep it up-to-date and working optimally.
So, another “softer” and far more intelligent solution is to set your active hours appropriately. You can specify your gaming and working schedule in Windows and prevent the OS from downloading updates during those times. Windows will then use your non-active hours to update and restart your system.
To set your active hours, hit Windows key + I, then go to Update & Security and click Change active hours. There you can set up to 18 active hours, leaving a gap of 6 (you have to sleep sometimes, don’t you?) for Windows to install your updates.
If you’re a night gamer or your sleeping hours vary dramatically so that you can’t set a specific non-active time, we would advise you (aside from changing your sleeping habits) to make sure Windows reminds you every time it will want to restart so that, if it happens during your gaming, you can always delay it.
To do this, go back to Windows Update, click Advanced options and make sure the switch under “We’ll show a reminder when we’re going to restart” is turned on.
Disable Mouse Acceleration
This one has nothing to do with improving your PC’s performance in gaming, but is rather a tip for you to enhance your personal gaming performance. Mouse acceleration is a setting that makes your mouse move based not only on detection of physical movements but also on speed. This option actually makes your mouse movements less accurate, as it adds an extra parameter to the movement that you convey to the mouse. Given how crucial precision is for accurate aiming in first-person shooters, if you’re a fan of Call of Duty, Counter-Strike, or Overwatch type of games, you should definitely turn this off.
To do this, hit Windows key + I. Type “mouse pointer” in the search box. Choose Change the mouse pointer display or speed. In the window that opens, go to the Pointer Options tab and uncheck Enhance pointer precision.
Also, you may want to tweak the pointer speed slider to create a configuration that suits you best.
Tweak Your Visual Effects Settings
There are plenty of fancy visual effects in Windows 10 graphical user interfaces (GUIs). Nevertheless, those pretty background graphics, most of which are turned on by default, can affect the available processing power of your PC when a game is running in the foreground. So, one way to optimize Windows 10 for gaming performance is to sacrifice some, or even all, of those settings.
Once again, hit Windows key + I. Then, type “performance” and select Adjust the appearance and performance of Windows. In the window that opens, choose Adjust for best performance. Then, go to the Advanced tab and verify that the setting is applied to Programs.
If you want to keep at least the minimum of graphics so that your interface doesn’t look so bleak, we recommend you keep at least these three options from the list checked:
- Show thumbnails instead of icons.
- Show window contents while dragging.
- Smooth edges of screen fonts.
Disable Nagle’s Algorithm
Basically, Nagle’s algorithm improves the efficiency of TCP/IP networks by creating bundles of data packets, thus reducing the number of packets that need to be sent over the network. That process affects your internet connection, making it less stable. Having this algorithm disabled on your PC may contribute to latency issues when playing games online.
Open your Windows Registry Editor by clicking Windows key + Q, typing “regedit” and clicking on the regedit file. Scroll down the HKEY_LOCAL_MACHINE menu to find the following path: \SYSTEM\CurrentControlSet\Services\Tcpip\Parameters\Interface. That’ll lead you to the menu that comprises folders with many numbers and letters. To access the correct file, match your IP address to the listed DhcpIPAddress in one of those folders.
To find your IP address, press Windows key + X and follow these steps: Control Panel — Network and Internet — Network and Sharing Center — Connections — Details — IPv4 Address.
Now you can track down the folder with the proper IP Address. Right-click on that folder and select New — DWORD (32-bit) Value. You’ll have to create two of those values: TcpAckFrequency and TCPNoDelay. Double-click on each of them and set both of their parameters to 1. The Nagle’s Algorithm is now disabled.
Manage Steam Auto-Updates
The problem here is the same as with Windows Updates. Steam auto-updates all your games, even those you haven’t played for ages. Updating in the background eats up your PC’s memory and can slow down gaming processes.
To prevent Steam from updating games while you’re playing, go to your Steam client and find update options in Steam — Settings — Downloads. Uncheck Allow downloads during gameplay.
Also, games on Steam are being updated all the time, and it often happens that new bugs appear in new updates, or some things just stop working, so you may want to wait to hear what others are experiencing before updating a game yourself.
To roll a game version back to the one you need, open Steam, right-click on the game, choose Properties, and go to the Betas tab. Choose the desired version from the drop-down menu.
Use a High-Performance Power Plan
This might be a good solution if you’re using a desktop PC rather than a laptop, because power plans were designed to better manage battery use on portable devices. Having no such limitations on a desktop PC, it is worthwhile opting for a high-performance power plan that keeps the CPU frequency high and makes your PC perform better while consuming more energy and increasing the temperature level.
To change your power plan, click Windows key + I, type “power” in the search box, choose Power & sleep settings and then Additional power settings. If you don’t see a high-performance power plan on the left side of the screen, click Create a power plan and choose High performance.
Keep Your GPU Drivers Updated
The GPU (Graphics Processing Unit) is crucial to your gaming experience and to your PC performance in games, but you need to keep your GPU drivers up to date to feel the benefit. What’s more, an outdated driver may result in bugs, glitches and system crashes, so we recommend you take this issue seriously and take care of your drivers.
Although Windows 10 doesn’t update your GPU drivers automatically, manufacturers often create special software in the form of GPU control panels that make regular checks for updates and notify you if a new update is available. Don’t ignore these notifications, as the updating process takes little time and can save you plenty of trouble during gaming.
For example, depending on your GPU’s manufacturer, you can download either Radeon Software Adrenaline or GeForce Experience. Both programs check for auto-updates and suggest powerful optimization options. Additionally, GeForce Experience includes game capture and streaming software and provides special Game Ready drivers, designed by NVIDIA in collaboration with top game developing companies.
You can update your driver directly from the Windows properties, but the safest way to get the latest driver is to go directly to the manufacturer’s website, choose your GPU model, and check for updates.
If you don’t know your GPU specs, right-click on the Desktop, choose Display settings, then Advanced display settings and click Display adapter properties.
Here are some links to the most popular manufacturers’ driver updates:
Install DirectX 12
DirectX 12 is a real must-have for anyone serious about playing games on Windows 10. Put simply, DirectX is the application the game uses to communicate with your computer and tell it what to do. DirectX 12 is a great improvement over its predecessor, DirectX 11, introducing the ability of graphics cards to draw resources from more than one core of a PC’s CPU, increasing frame rates, enhancing graphical effects and lowering power consumption. Tests have shown an 85-300% difference in gaming performance between version 11 and version 12.
That said, to benefit from DirectX 12 features the game needs to have been developed using this version. The good news is that the list of such games gets longer every day as more and more game companies adopt this version.
To verify that you have the latest version of DirectX, hit Windows key + R, type “dxdiag” and click OK. The DirectX Diagnostic Tool will open.
If you don’t have DirectX 12, go ahead and install it; the process will take just a few minutes. Hit Windows key + I, choose Update & Security and click Check for updates in the Windows Update tab. Wait for the installation to finish.
Windows 10 gaming support
Share and Support Noobs2pro Gaming Community
Want to Optimize Windows 10 for gaming but don’t know where to start? Here are 20 expert tips on how to increase Windows performance for gaming. I always recommend taking a backup before starting any windows optimization feature. Simply because we all know Windows 10 is full of bugs.
1) Increase Windows 10 performance with Updated Drivers
There are many automated tools like the driver booster I use for automatically updating system drivers. Use the Driver Booster for updating all other drivers.
Updating graphics card drivers is a must for gaming.
If its NVIDIA, Visit this site and download Geforce Experience
if its AMD, Visit this site and download Radeon™ Graphics Drivers
for intel, Visit this site and download Intel Graphics drivers.
2) Use boost mode and game booster
Apps such as drive booster and razer cortex etc. Have a boost mode which can help increase gaming performance and get the best out of your system. These apps will close all the unnecessary windows services and give you the resources you require for optimizing windows 10 for gaming.

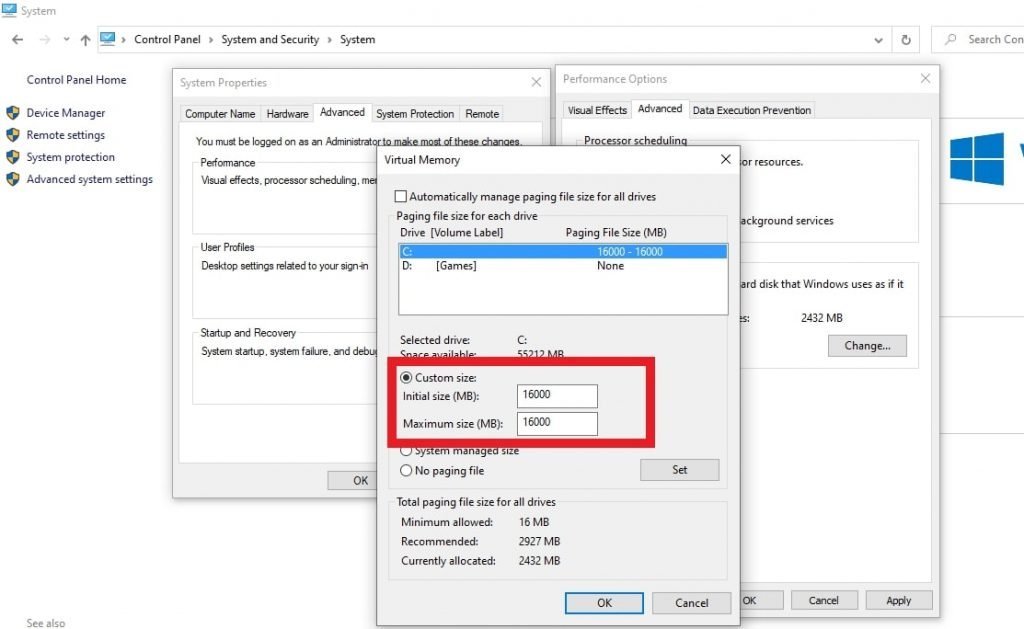
3)Increase virtual memory
Increase virtual memory to twice the ram you have so that you get plenty of memory while playing games on your windows device. This memory is used when the system runs out of ram, so the more you have, the better.
This setting is hidden inside system settings.
Go to control panel>System and security
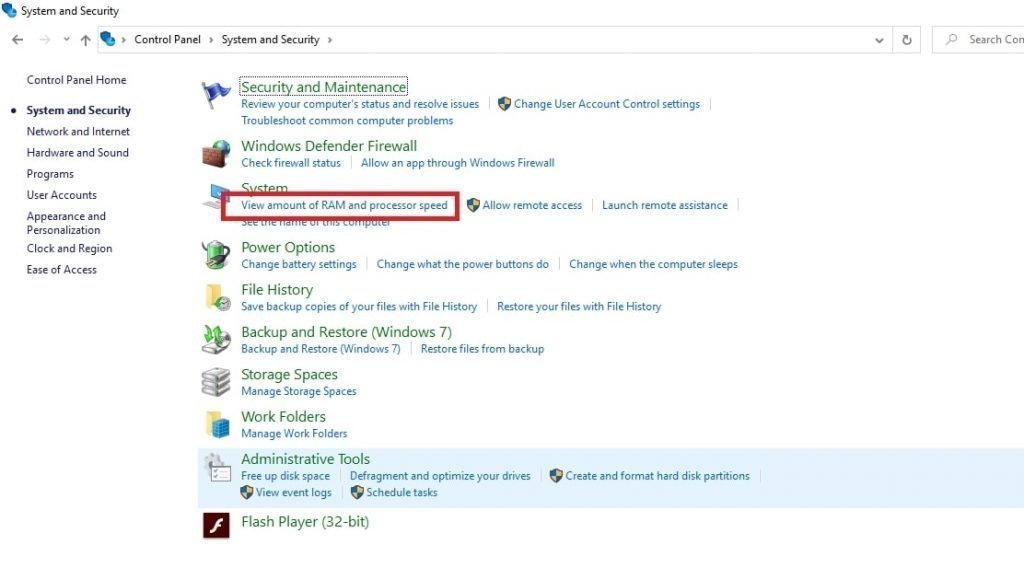
System>advanced system settings>
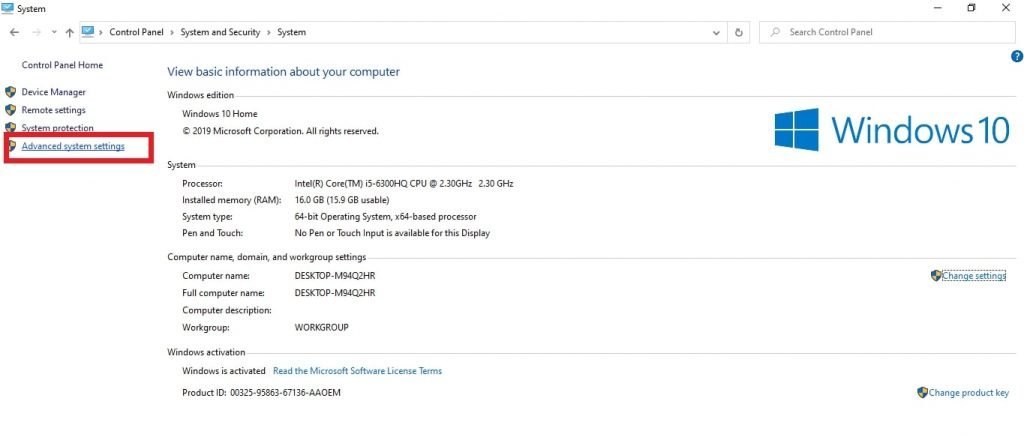
Performance settings>

Advanced>
Virtual memory.
Set it as double your actual ram. Mine is 8GB Ram, so I used 16000mb(16gb)
See the images above for reference.
4) Optimize Windows 10 With Gaming Mode
The latest release of the Windows 10 operating system features a gaming mode with built-in optimizations for Gaming.

On the search bar type Game Mode. Select the option that comes up and Switch it to On. If your PC supports Game Mode, Windows Update will be suspended while gaming and the game will get higher preference.
5) Disable Nagle’s Algorithm
Nagle’s algorithm is a windows feature which bundles data packets at the cost of a smoother internet connection. Having Nagle’s algorithm enabled on your computer causes latency issues while gaming.
To disable this you need to edit the Windows Registry: Start > type regedit > Regedit.
In the address bar, copy and paste the following path:
HKEY_LOCAL_MACHINE\SYSTEM\CurrentControlSet\Services\Tcpip\Parameters\Interfaces
Match your IP address with the listed DhcpIPAddress in one of these files as shown in the image below:

- To find your Ip address on the search bar type cmd:
- Then type: Ipconfig
Look for the “IPv4 address” listed under your current connection.
Once you find the IP address of your internet connection, right-click on the corresponding folder and select New > DWORD (32-bit) Value.
Here, create two DWORD Values: name one TcpAckFrequency and the other TCPNoDelay. Once you’ve created the values, double-click on each and set their parameters to 1.
This activates the two parameters, thereby disabling Nagle’s Algorithm. If you run into any issues, set their parameter value back to 0 and they will be disabled.
6) High-performance mode to make windows faster
Set battery mode to high performance on the laptop. High performance ensures that the battery is used optimally for performance.
The battery is generally in a balanced mode. When you put the system in the high-performance mode, you can get a lot of performance boost from the system.
This is absolutely essential for gaming.

Also, enable the hidden power settings:
Power Management (Windows 10)
- Settings >System > Power & sleep > Additional Power Settings
- Choose customise a power plan option, open the option which says “Unhide Additional plans.”
- If you do not see Ultimate Performance Mode, then do the following

- Open a command prompt “cmd.exe” as Administrator
- In the command prompt, copy the below command and hit enter
powercfg -duplicatescheme e9a42b02-d5df-448d-aa00-03f14749eb61
With this, you will surely get a performance boost. Do note laptop users your battery will drain faster.
7) Set Windows settings for MAX Performance
Set windows appearance settings for max performance. By default, it is set for maximum appearance. When you switch it to performance, then the appearance and graphics will look a little crappy, but the performance will get a considerable boost.
Do this before starting the game. To get the best performance.
Go to control panel>
System and security>
system>advanced system settings>
performance settings>advanced>visual effects>
adjust for best performance

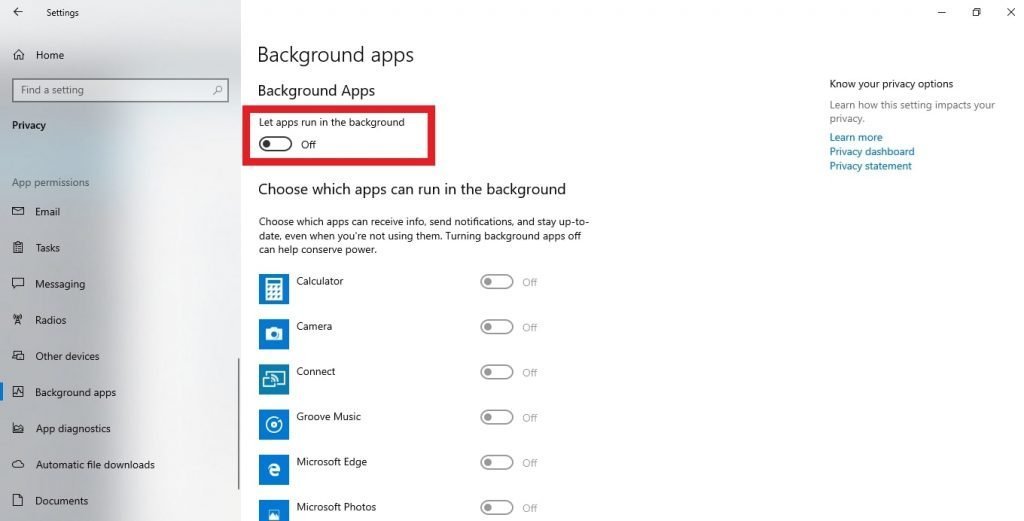
8) Turn off unnecessary services and widgets
Go to Windows 10 settings and turn off all background apps.
Disable unnecessary features of windows that you don’t use like Cortana maps location and other background services. There are many apps like CCleaner and i0bit uninstaller, which can help you uninstall stock windows apps.
You can remove apps like maps, mail apps, etc. to get some extra space and performance for your system.
9) Use cleaning apps to optimize windows 10
Use CCleaner to fully erase all temporary junk files and clean your c drive for max performance. Uninstall all the bloatware from your system.

10) Defragment your hard drive to boost performance
Defragment your hard drive regularly. Also, clean your laptop and desktop properly so that dust doesn’t accumulate on fans and the board slows down the system.
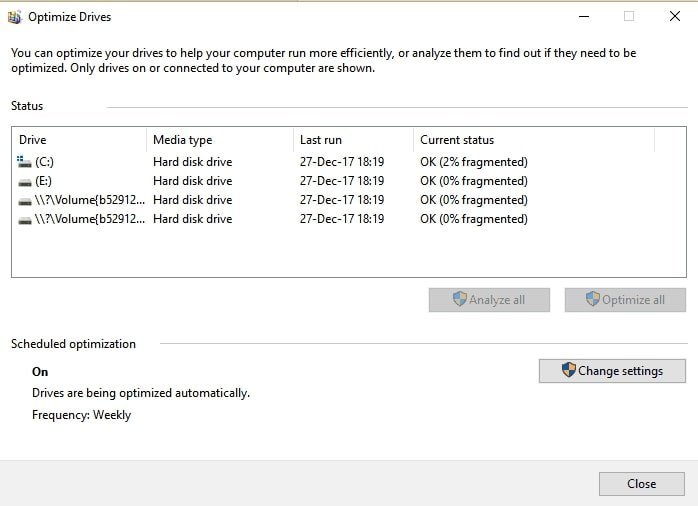
Fans need to provide proper cooling in order for your system to be cool and efficient in running. You need to clean and maintain it properly.
11) Uninstall apps to optimize windows
Uninstall apps and services you no longer use. Make some space for games. Lower the pc load by taking out all the crapware from your system. The lesser apps you have, the better the performance for gaming. This can optimize windows 10 for gaming
It will save you space as well as processing power, which can be used efficiently for games instead.

12) Install DirectX and make your pc faster
Installing DirectX can significantly boost your laptop performance. These are key drivers required for game optimization. By making sure your laptop or PC is having the latest version of Direct X you can make your pc or laptop faster for gaming.
Use the command: dxdiag

DirectX is free software and is available from the windows website.

13) Update windows to make pc faster
Believe it or not, updating windows can really boost performance. Sometimes windows do give useful updates, especially driver-based updates, which can really help your system become faster and smoother.
I won`t sugarcoat the fact that windows sometimes give terrible updates which make you doubt buying a windows PC. But some of their updates are really good. So, be updated.

14) Disable start-up services to optimize windows
Go to the task manager and disable the AutoStart up of all the apps using task manager and privacy settings. This will save precious RAM memory. And increase startup speed.

There are many apps and background services that run in the background and keep eating precious memory and processing power. Remove all of them for a significant boost.
Do not disable graphics drivers or essential startup services which you need.
15) Stop all Windows services to optimize windows
Windows, as you all know, has way too many services that take your performance as well as your privacy away. They take an extra ram and add overhead for your processor. Not something you want for your gaming needs.
So use shutupwindows 10 app for disabling all unnecessary features automatically. This can make your pc or laptop faster at the price of some unnecessary functions.

And run as admin. It has no installation. Just download and install:
Click on actions:

And select apply all settings for the max performance boost. Or Recommended settings for a medium performance boost.
With the max boost, you will get the following. All green settings:

Now reboot the system and enjoy the optimized windows settings.
Note: This also disables windows update which saves data and processing power for you.
16) Prevent Steam From Auto-Updating Games
If you use Windows to play games, you’re probably buying and installing games via Steam.
One of the most resource-consuming features is the steam update features that run in the background.
To prevent Steam from updating games in the background, open Steam client and set your update options under Steam > Settings > Downloads.

Uncheck Allow downloads during gameplay to prevent Steam from updating content while you’re gaming.
To prevent Steam from downloading updates for largely-unused games right-click on each of the installed games in your Library in question and select Properties.
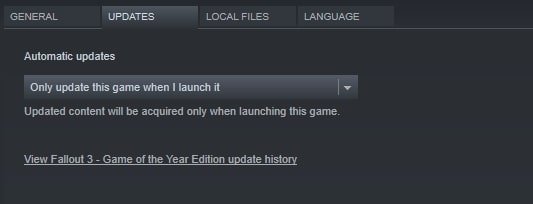
Under Automatic Updates, change Always keep this game up to date to Only update this game when I launch it.
17) Disable mouse acceleration
Windows 10 has a feature called mouse acceleration which adds some lag while playing FPS Games. If you play a lot of FPS shooter games like Pubg then you might want to disable this feature to make more accurate mouse movements.

- Press Windows Key+ Q.
- Type “pointer.”
- Choose: Change the mouse pointer display or speed.
- Uncheck Enhanced pointer precision.
18) Install Windows on A SSD to optimize windows
For this, you need to reinstall windows 10 on an SSD. It will be significantly faster and more optimized for gaming and performance.

This is a drag but it will also shorten the boot time to a couple of seconds. Depending on SSD Quality some systems have boot times under 3 secs. That’s worth the effort if you ask me.
19)Remove inbuilt windows apps & optimize windows
To optimize Windows 10 for gaming. You need to first uninstall windows 10 bloatware which cannot be directly removed.
For that install CCleaner on your Windows system. Then go to Cleaner tools and then the uninstaller.

From here you can uninstall the unneeded applications like windows maps and windows calendar etc. Now you can optimize windows without any restrictions.
20) Reset Windows
Last but not least if your windows 10 device is clogged to the point that it cannot bear anymore. You need to reset windows for a fresh start. Reset windows and do the following optimization again.

You will get the most optimized windows gaming experience ever.
I hope this guide has been informative for you and I thank you for reading. If you liked this how-to guide on how to optimize Windows 10 for gaming then do share it with fellow gamers. Happy Gaming.
Share and Support Noobs2pro Gaming Community


