- WINDOWS 10 constant graphics crashing
- Replies (3)
- Новое обновление Windows 10 привело к массовой критической ошибке у некоторых владельцев видеокарт Nvidia
- реклама
- реклама
- Geforce driver is crashing continuously on Windows 10
- 2 Answers 2
- Geforce driver is crashing continuously on Windows 10
- 2 Answers 2
- Windows 10 Creators Update Crashes and Freezes
- Repair Corrupt System Files
- Solution 1: Uninstall any problematic third-party programs
- Solution 2: Reset your computer’s Winsock catalog
- Solution 3: Ensure that your chipset drivers and BIOS firmware are up to date
- Solution 4: Update the drivers for your computer’s network adapter
- Solution 5: Turn Link State Power Management off
- Solution 6: Turn off your computer’s Location Service
- Solution 7: Disable and then re-enable your computer’s graphics card
- Solution 8: Update your GPU drivers to version 382.05 (For NVIDIA users only)
- Solution 9: Install GeForce Hotfix driver 381.78 (For NVIDIA users only)
- Solution 10: Disable AMD Cool’n’Quiet and/or Fast Boot in BIOS
- Solution 11: If you are using an SSD, update its firmware
- Solution 12: If Nothing Works, Go Back to the Previous Build
- Solution 13: Disabling Fast Boot from your BIOS (Post 1709 Update)
- Solution 14: Disabling Fast Boot from your Computer (Post 1709 Update)
- Solution 15: Disabling Hibernation Mode (Post 1709 Update)
WINDOWS 10 constant graphics crashing
having major issues with my PC its a HP workstation running Windows 10 keeps crashing with graphics card crashed and recovered (Nvidia NVS310) although this was all working fine till a week ago and I think it is something to do with the Cumulative update for W10 version 1511 (KB3135782) sent out since then its been a nightmare. It also freezes and then I have to hard power off the PC. I was hoping the cumulative update that came out yesterday (KB3140768) was maybe the fix but still the same.
Replies (3)
![]()
Thank you for posting your query in Microsoft Community.
We do understand your concern and we will be happy to help you regarding this.
I request you to try the following steps:
Uninstall and Reinstall the Graphics Card Drivers.
Step 1: Uninstall the Graphics Card Drivers
Right click on the Start menu.
Click on “Device Manager” from that list.
Search for the Graphics Card from the device list, right click on it and then select “Uninstall”. On the un-installation window, if you have an option: “Delete the driver software for this device” you may select that and then remove the corrupted drivers from the computer.
Follow the on-screen instructions to complete it and then restart the computer if prompted.
After the restart, please go ahead with the next steps to install the latest drivers and check if that resolves the issue.
Step 2: Go to the Computer or Graphics Card manufacturer’s website and search for the latest Windows 10 drivers available for the Graphics Card model and then install it by following the instructions given in the website.
I hope this helps you. If you have any further query in future, feel free to contact us. We will be happy to help you.
1 person found this reply helpful
Was this reply helpful?
Sorry this didn’t help.
Great! Thanks for your feedback.
How satisfied are you with this reply?
Thanks for your feedback, it helps us improve the site.
How satisfied are you with this reply?
Thanks for your feedback.
I’ve done clean uninstalls of video drivers in safe mode. Didn’t help
Clean install of Win10, didn’t matter which Nvidia driver I used, problem remained
Clean install of Win7, problem remained
Back to Win10, screen goes black moments after I start a game and I have to reboot the system
Something between the Nvidia driver updates and the Windows update has corrupted our GPU’s.
Was this reply helpful?
Sorry this didn’t help.
Great! Thanks for your feedback.
How satisfied are you with this reply?
Thanks for your feedback, it helps us improve the site.
How satisfied are you with this reply?
Thanks for your feedback.
![]()
Thanks for the update.
Boot the PC in Safe mode by following the steps from the link below. Logging into Safe mode will help in diagnosing if the issue is caused due to the device driver or the corrupted system files on the PC.
Step 1: Safe mode is a diagnostic mode that starts your computer with limited drivers necessary to run Windows. The words Safe Mode appear at the corners of your monitor to identify which Windows mode you are using.
Expand the options to boot the PC in Safe Mode:
Restart the PC to exit from Safe mode and start the computer in normal mode.
To know more about Safe mode, following is an article on Windows Startup Settings (including safe mode) (Applies to Windows 10 also):
Step 2: Run System Maintenance troubleshooter by following the steps below and check for the status of the computer behavior. System freezes are mostly caused due to the unwanted/unused files retained in the PC.
- Press Windows logo key on the keyboard, type Troubleshooting and select the top most search result.
- Select View all from the left side panel of the window.
- Select System Maintenance from the listed options, click on Advanced option and check Apply repairs automatically option.
- Follow the on-screen instructions and wait for the troubleshooting to complete.
- After the troubleshooting is completed, check the status for any missing system components on the computer.
- Close the window and check if the issue is resolved
Write to us with the status of the issue for further assistance. Your reply is most important for us to ensure we assist you accordingly.
Новое обновление Windows 10 привело к массовой критической ошибке у некоторых владельцев видеокарт Nvidia
Несколько дней назад началось распространение нового обновления для операционной системы Windows 10. Буквально сразу же Microsoft попросила пользователей повременить с обновлением, сделав его недоступным для многих компьютеров. Всё дело в огромном количестве ошибок, которые обнаружились в первые же несколько часов. Как оказалось, одними ошибками не обошлось.
реклама
Точной статистики обновления драйверов для видеокарт Nvidia нет. Это внутренняя информация, которой не хотят делиться с прессой. Именно поэтому мы не знаем, сколько пользователей оказалось под ударом. Как сообщает Microsoft, если вы используете драйвера для видеокарт ревизии 358.00 или старше, после обновления до Windows 10 за номером 2004 вы получите синий экран.
Точно такая же ситуация с драйверами для некоторых звуковых карт. Конкретные модели не уточняются. Известно, что тем, кто не обновлял драйвера давно, не стоит и думать о новой версии Windows 10. В связи с этим Microsoft снова попросила тех, у кого на компьютере старые драйвера, не обновлять систему в ручном режиме. Софтверный гигант уже заблокировал автоматическое обновление для этих компьютеров и ищет решение проблемы. Особенно не рекомендуется использовать Media Creation Tool. После принудительного обновления через это приложения восстановить ОС до предыдущего состояния может быть уже невозможно.
реклама
Проще всего обновить драйвера, однако для некоторых пользователей это невозможно по причине устаревших комплектующих.
Geforce driver is crashing continuously on Windows 10
I have a laptop with an NVIDIA Geforce GT 740M inside, the newest driver is installed.
I am using windows 10 since the first insider preview, and I cant start any program what requires directx. When I try to, I face the following problems:
- Usually the video has black squares all around the screen like here
I get GPU driver related errors like this:
application.exe has been blocked from accessing graphics hardware.
Display driver stopped responding and has recovered
Display driver NVIDIA Windows Kernel Mode Driver, Version 361.43 stopped responding and sucessfully recovered.
Anybody has any solution for it? In the beginning there were discussions about this performance issues but not nowadays, so maybe it was fixed for the others but not for me. What could I do to solve this issue?

2 Answers 2
Mostly, this error is caused by GPU heat, Windows shuts down (block) the GPU to prevent it from heat damages. So, cooling the GPU and lowering some NVIDIA settings could fix this issue.
For the settings matter, you can follow the following instructions :
Setting up your Nvidia settings:
- Open Nvidia Control Panel and go to Manage 3D Settings
- Click on Global Settings
- Under the Preferred graphics processor drop-list, choose High-performance NVIDIA processor.
- Under the Settings, Set CUDA — GPUs to NVIDIA GPU.
- Under the Settings, TURN OFF vSync (Vertical sync).
- Click Apply
- Now go to Configure Surround, PhysX, and TURN ON PhysX (just choose your GPU under PhysX settings.)
- Click Apply, and CLOSE Nvidia Control Panel.
Setting up your Power Settings
- Go to Windows 10 Settings
- Click on System, and then go to Power & sleep.
- Click on Additional power settings.
- Change the power settings to High Performance.
- Close.
Another fix could solve this issue, is to turn off NVIDIA SHIELD (if you don’t use it), since there are people who experienced the same issue from NVIDIA Shield streaming services.
Turn off NVIDIA SHIELD
- Go to Windows Control Panel >Services
- Stop & Disable NVIDIA Streamer Network Service
- Stop & Disable NVIDIA Streamer Service
- Restart your computer.
Geforce driver is crashing continuously on Windows 10
I have a laptop with an NVIDIA Geforce GT 740M inside, the newest driver is installed.
I am using windows 10 since the first insider preview, and I cant start any program what requires directx. When I try to, I face the following problems:
- Usually the video has black squares all around the screen like here
I get GPU driver related errors like this:
application.exe has been blocked from accessing graphics hardware.
Display driver stopped responding and has recovered
Display driver NVIDIA Windows Kernel Mode Driver, Version 361.43 stopped responding and sucessfully recovered.
Anybody has any solution for it? In the beginning there were discussions about this performance issues but not nowadays, so maybe it was fixed for the others but not for me. What could I do to solve this issue?
2 Answers 2
Mostly, this error is caused by GPU heat, Windows shuts down (block) the GPU to prevent it from heat damages. So, cooling the GPU and lowering some NVIDIA settings could fix this issue.
For the settings matter, you can follow the following instructions :
Setting up your Nvidia settings:
- Open Nvidia Control Panel and go to Manage 3D Settings
- Click on Global Settings
- Under the Preferred graphics processor drop-list, choose High-performance NVIDIA processor.
- Under the Settings, Set CUDA — GPUs to NVIDIA GPU.
- Under the Settings, TURN OFF vSync (Vertical sync).
- Click Apply
- Now go to Configure Surround, PhysX, and TURN ON PhysX (just choose your GPU under PhysX settings.)
- Click Apply, and CLOSE Nvidia Control Panel.
Setting up your Power Settings
- Go to Windows 10 Settings
- Click on System, and then go to Power & sleep.
- Click on Additional power settings.
- Change the power settings to High Performance.
- Close.
Another fix could solve this issue, is to turn off NVIDIA SHIELD (if you don’t use it), since there are people who experienced the same issue from NVIDIA Shield streaming services.
Turn off NVIDIA SHIELD
- Go to Windows Control Panel >Services
- Stop & Disable NVIDIA Streamer Network Service
- Stop & Disable NVIDIA Streamer Service
- Restart your computer.
Windows 10 Creators Update Crashes and Freezes
Folks from all over the world are reporting a wide variety of different issues with their Windows 10 computers following the release of the Windows 10 Creators Update. As is the case with most Windows updates, the aftermath of the release of the Creators Update hasn’t been pleasant from Microsoft as they have been bombarded with negative feedback and reports of problems, issues and bugs. It seems that one of the most prevalent issues affecting Windows 10 computers that the Creators Update has been installed on is spontaneous crashes and rebooting.
A significant amount of Windows 10 users who have installed the Creators Update on their computers are reporting their computers crashing at completely odd times and rebooting. Reports suggest that computers affected by this problem can crash and reboot even when its hardware is not being particularly stressed and CPU temperatures, GPU temperatures and all other attributes are completely optimal. Checking the Windows Event Logs on computers affected by this issue isn’t any help as the only events recorded in the logs state that the previous system shutdown was unexpected.
The leading causes of this problem have been determined to be problematic third-party applications, network and internet connection issues, and problems with device drivers (which, more often than not, turn out to be GPU drivers). If your Windows 10 computer has been spontaneously crashing and rebooting without any apparent reason following the Creators Update, we have listed the most effective solutions that you can use to try and resolve the problem
Note: The crashing issue after the Fall Creators Update (1709) is addressed in the end.
Repair Corrupt System Files
Download and run Restoro to scan and restore corrupt and missing files from here, once done proceed with the solutions below. It is important to ensure that all system files are intact and not corrupt before proceeding with the solutions below.
Solution 1: Uninstall any problematic third-party programs
Some third-party applications – such as Speccy, Acronis True Image, the Office Hub App and most third-party security programs (antivirus, antimalware and firewall applications) – can clash with Windows 10 post-Creators Update, leading to the user experiencing this problem. If such a third-party program is the cause of this issue in your case, simply uninstall any problematic third-party programs installed on your computer, and your computer should no longer be suffering from this issue.
Solution 2: Reset your computer’s Winsock catalog
If your Windows 10 computer is experiencing this problem because of internet connection or network issues, resetting its Winsock catalog is a good place to start. In order to reset a Windows 10 computer’s Winsock catalog, you need to:
- Press the Windows Logo key + X to open the WinX Menu, and click on Powershell (Admin)
 to launch an elevated Powershell that has administrative privileges. Alternately, the same result can be achieved by opening the Start Menu, search for “cmd”, right-clicking on the search result titled cmd and clicking on Run as administrator.
 - Type the following into the elevated Command Prompt and press Enter:
 to launch an elevated Powershell that has administrative privileges. Alternately, the same result can be achieved by opening the Start Menu, search for “cmd”, right-clicking on the search result titled cmd and clicking on Run as administrator.
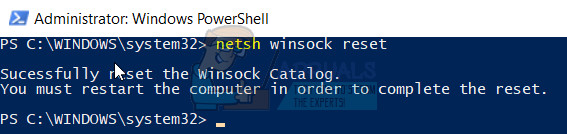
- Wait for the command to be successfully executed.
- Close the elevated Command Prompt.
- Restart your computer. When the computer boots up, continue using it and check to see whether or not the issue has been resolved.
Solution 3: Ensure that your chipset drivers and BIOS firmware are up to date
Once the Creators Update has been installed on a Windows 10 computer, issues such as this one can come to life if the computer in question has outdated chipset drivers or outdated BIOS firmware. To make sure that’s not the case, make your way to the Downloads section of the official website of your computer’s manufacturer (or the manufacturer of your computer’s motherboard) and check to see whether or not the chipset drivers and BIOS firmware installed on your computer are the latest versions. If you find that a newer version of the BIOS firmware for your computer or any of your computer’s chipset drivers is available, immediately download and install it as an outdated one could’ve been the cause of your sorrows.
Solution 4: Update the drivers for your computer’s network adapter
Outdated network adapter drivers can also turn out to be the cause of this problem in many cases. To make sure that the drivers for your computer’s network adapter are up to date, first, you need to press the Windows logo key + X to open the WinX Menu, click on Device Manager, double-click on the Network adapters section to expand it, determine which one is your computer’s active network adapter and note the name of its manufacturer. Once that’s done, simply navigate to the Downloads section of the official website of the manufacturer of your computer’s network adapter and check for the newest version of the drivers available for your specific network adapter.
If it turns out that you have an older version of the drivers, simply download and install the latest version of the network adapter’s drivers and that should get the job done.
Solution 5: Turn Link State Power Management off
- Open the Start Menu.
- Search for “power options”.
- Click on the search result titled Power Options.
- Click on Change plan settings in front of the power plan your computer is currently using.
- Click on Change advanced power settings.
- Scroll down, locate the PCI Express section and double-click on it to expand it.
- Double-click on the Link State Power Management sub-section to expand it and reveal its Setting.
- Open the dropdown menu in front of Setting and click on Off to select it.
- Click on Apply and then on OK, close the Power Options window and restart your computer.
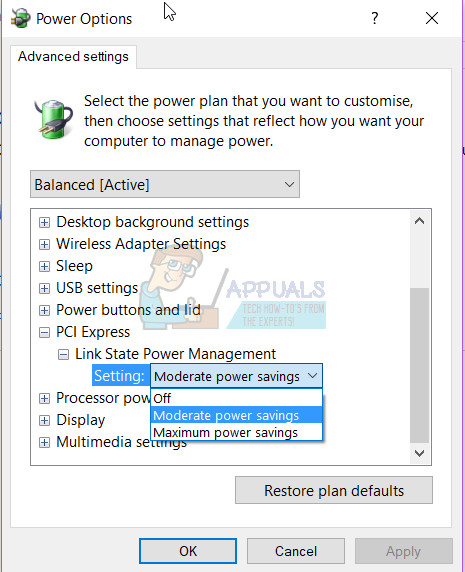
Check to see whether or not the issue has been fixed as soon as the computer boots up.
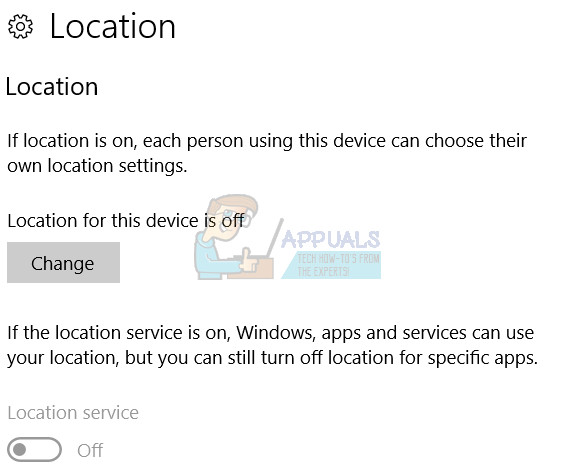
Solution 6: Turn off your computer’s Location Service
Many Windows 10 users affected by this problem have reported success in getting rid of it by simply turning off their computer’s Location Service. To disable the Location Service on a Windows 10 computer, you need to:
- Open the Start Menu.
- Click on Settings.
- Click on Privacy in the left pane.
- In the right pane, locate the Location toggle and slide it to Off.
- Close the Settings
- Restart the computer. When the computer boots up, you may check to see whether or not the issue still persists and whether or not the fix actually worked.
Solution 7: Disable and then re-enable your computer’s graphics card
For many Windows 10 users affected by this issue, simply disabling and then re-enabling their computer’s GPU from the Device Manager has done the trick and resolved this issue. To disable and then re-enable a Windows 10 computer’s graphics card, you need to:
- Press the Windows Logo key + X to open the WinX Menu.
- Click on Device Manager.
- Double-click on the Display adapters section to expand it.
- Right-click on your computer’s graphics card and click on Disable in the context menu.
- In the resulting popup, click on Yes to confirm the action.
- Once your computer’s GPU has been disabled, wait for a couple of minutes, and then repeat steps 1–4, but this time you are going to click on Enable instead of Disable.
- Close the Device Manager and restart your computer.
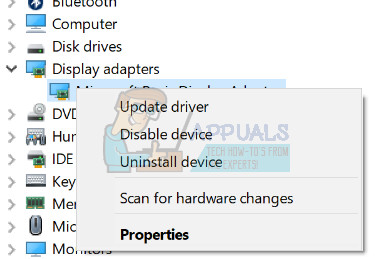
Wait for the computer to boot up and check to see whether or not this solution did the trick. While you’re at it, you should also go to the Downloads section of the official website of the manufacturer of your computer’s graphics card and make sure that you have the latest version of the drivers for your specific GPU and OS installed. If there is a newer version of drivers available for your GPU/OS combination, the outdated version is installed on your computer could be the culprit behind this problem, so be sure to download and install the latest version of the drivers.
Solution 8: Update your GPU drivers to version 382.05 (For NVIDIA users only)
Many Windows 10 users with NVIDIA GPUs who were affected by this problem were able to get rid of it by simply updating their GPU’s drivers to version 382.05. Version 382.05 of the drivers for NVIDIA graphics cards are much more compatible with the Windows 10 Creators Update than older versions and don’t cause Windows 10 computers to spontaneously crash and reboot. To update your NVIDIA GPU’s drivers to version 382.05, you need to:
- Go to the Downloads section of NVIDIA’s official website with an internet browser of your choice.
- Put in the details of your NVIDIA GPU, your Operating System and your preferred language, and click on Search.
- See if a version 382.05 of the drivers for your specific NVIDIA graphics card and Operating System combo are available. If version 382.05 is available, download the installation package for it.
- Wait for the installation package for version 382.05 of your NVIDIA GPU’s drivers to be downloaded.
- Once the installation package has been downloaded, navigate to where it was downloaded, locate it and run it.
- Go through the installation process until the very end to successfully install version 382.05 of the drivers for your NVIDIA GPU.
Once the drivers have been installed, simply restart your computer and check to see whether or not the problem has been fixed once it boots up.
Solution 9: Install GeForce Hotfix driver 381.78 (For NVIDIA users only)
When NVIDIA was informed that a significant amount of their graphics cards’ users who updated their computers to the Windows 10 Creators Update started experiencing an issue where their computers would spontaneously crash and reboot, they developed and released a Hotfix driver for the problem. A Hotfix driver is NVIDIA’s way of dealing with a vulnerability or problem with the drivers for their NVIDIA GPUs that are causing the user base grief and creating issues. If you are an NVIDIA user and are experiencing this problem, you should definitely download and install GeForce Hotfix driver 381.78. To install GeForce Hotfix driver 381.78, you need to:
- Click here to be taken to the official Download page for GeForce Hotfix driver 381.78 on your default internet browser.
- From the Download page, download either the 32-bit or the 64-bit version of GeForce Hotfix driver 381.78 (depending on the version of the Windows 10 Operating System that’s installed on your computer).
- Wait for the download to be completed.
- Once the installation package for GeForce Hotfix driver 381.78 has been downloaded, navigate to where it’s been downloaded, locate it and run it.
- Go through the installation process and install GeForce Hotfix driver 381.78.
- Once GeForce Hotfix driver 381.78 has been successfully installed on your computer, restart Check to see whether or not the Hotfix driver resolved the problem once your computer boots up.
Solution 10: Disable AMD Cool’n’Quiet and/or Fast Boot in BIOS
AMD Cool’n’Quiet is a CPU dynamic frequency scaling and power-saving technology designed by AMD and introduced by the company with its Athlon 64 line of processors. The technology basically reduces the processor’s clock rate and voltage when it is idle to save power. The Fast Boot option that comes with most Windows computers that have UEFI motherboards does exactly what its name suggests – it allows computers to boot up faster than they normally would. Both of these options which can be enabled and disabled in a Windows 10 computer’s BIOS have been identified as the cause of this issue in many cases.
If you are experiencing this problem and have one or both of these features in your computer’s BIOS, disabling them just might rid your computer of the problem. In order to disable these features in a Windows 10 computer’s BIOS, you need to:
- Shut the computer down.
- Boot the computer up.
- At the very first screen you see during startup, press the key that will get you into your computer’s BIOS settings (this key varies from one computer manufacturer to the other but is always displayed on the first screen you see during startup).
- Go through the entirety of your computer’s BIOS settings, looking for the AMD Cool’n’Quiet feature and the Fast Boot option. If you find anyone of these two options, disable If you find both of these two options, disable them both.
- Once done, be sure to save your changes, and then exit your computer’s BIOS settings.
- Allow your computer to boot up normally, and check to see whether or not the issue has been resolved once it boots up.
Solution 11: If you are using an SSD, update its firmware
Many Windows 10 users who have Windows 10 running out of SSDs (which, all things considered, is definitely a good idea) fall victim to this problem once they install the Creators Update because the firmware for their SSDs is outdated. Yes – whether or not the firmware for your SSD is up to date can be the difference between you having no problem with the Windows 10 Creators Update and you having a pretty big problem with it.
To make sure that the firmware for your SSD is up to date, simply go to the Downloads section of the official website of your SSD’s manufacturer and check to see whether or not the firmware you have for your SSD is the latest one. If a newer version of your SSD’s firmware is available, you should immediately download and install it. Once your SSD’s firmware has been updated, restart your computer and check to see whether or not this solution gets the job done once it boots up.
Solution 12: If Nothing Works, Go Back to the Previous Build
Until such time when Microsoft releases a stable version, patch or update to address these issues.
By going back to the previous build or doing a system restore, you’re going to defer the update. Taking Windows 10 back to the point before the Anniversary Update was installed will get you rid of the update. Chances are that in a few days, Microsoft will release patches and further updates to counter this issue so if you do a system restore or go back to the previous build, you can wait for a few days until further news from Microsoft and hopefully, by then an update or a patch should be available to address the issue and keep the AU.
- To do this, at the login screen HOLD the SHIFT key and click the Power (icon) located on the lower right corner. Whilst still holding the SHIFT key choose Restart.
- Once the system boots into the Advanced Mode, choose Troubleshoot and then choose Advanced Options. From Advanced Options, choose the option titled Go back to the previous build.
- After a few seconds, you will be asked to choose your User Account. Click on the User Account, key in your password and choose Continue. Once done, choose the option Go Back to the Previous Build again.
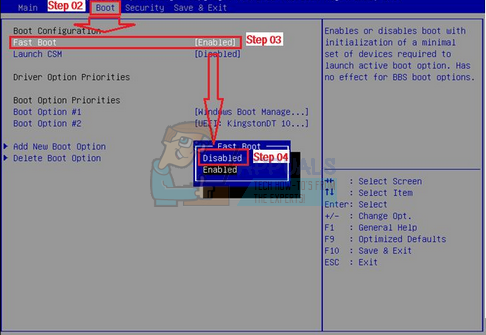
Solution 13: Disabling Fast Boot from your BIOS (Post 1709 Update)
A major problem faced by many users after the Fall Creators Update was their computer crashing every once in a while. Many people reported that the computer crashed randomly with no set time. We traced back the problem to fast boot and hibernation. It seems that the new update contains some bad configurations that due to the fast boot, the computer crashes. If you have already gone through all the steps mentioned above, we can try disabling the fast boot option from your BIOS (motherboard).
Most of the computers have different BIOS and have different configurations. Look around for “boot options” on your BIOS and make sure that fast boot (also known as the quick boot, MSI fast boot etc) is disabled. After disabling the option, restart your computer and check if the problem got solved.
Solution 14: Disabling Fast Boot from your Computer (Post 1709 Update)
Windows 10’s Fast Startup (also called fast boot) works similarly to the hybrid sleep modes of previous versions of windows. It combines the elements of cold shutdown and the hibernate feature. When you shut down your computer, Windows logs off all users and closes all applications similar to the cold boot. At this point, Window’s state is similar to when it is freshly booted up (as all users are logged off and applications are closed). However, the system session is running and the kernel is already loaded up.
This feature makes Windows boot faster so you don’t have to wait the traditional time. However, this feature is also known to cause problems in the recent update by not loading the required drivers properly each time. As it doesn’t reload the drivers, some drivers might not be already be loaded. Due to this, your Windows might be crashing from time to time.
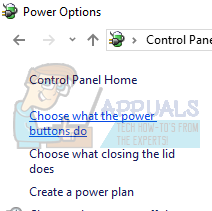
- Press Windows + R to launch the Run application. In the dialogue box type “control panel” and hit Enter. This will launch your computer’s control panel.
- Once in the control panel, click on Power Options.

- Once in the Power Options, click on “Choose what the power buttons do” present at the left side of the screen.
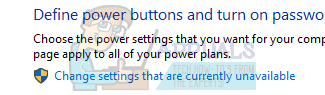
- Now you will see an option that requires administrative privileges named as “Change Settings that are currently unavailable”. Click it.
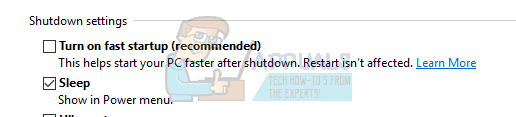
- Now head to the bottom of the screen and uncheck the box which says “Turn on fast startup”. Save changes and exit.
- You might need to restart your computer. Check if the problem at hand got fixed.
Note: For some users, disabling and then re-enabling the fast startup option also did the trick. You can try this. If it doesn’t work, disable fast startup completely.
Solution 15: Disabling Hibernation Mode (Post 1709 Update)
Another workaround that worked for most of the users were disabling hibernation from the computer. During hibernation, the computer goes into a semi-sleep state where some of the information is still preloaded into your computer. We can try disabling this feature. If it doesn’t do the trick you can always revert back the changes.
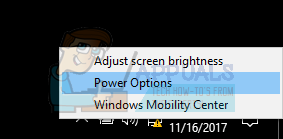
- Right-click on the power icon present at the bottom right side of the screen and select “Power Options”.
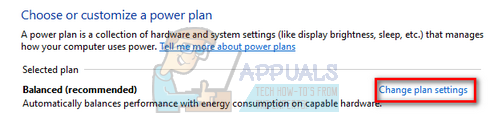
- Once in the Power Options, select “Change plan settings” in front of the power plan you are currently using on your computer.
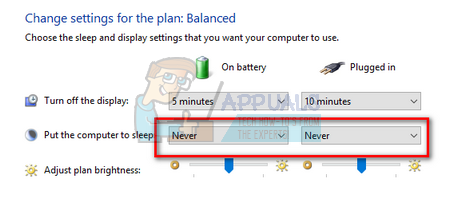
- Now select “Never” in “Put the computer to sleep” in both cases; on battery and plugged. Press “Save Changes” to update the power plan and back to the previous window.
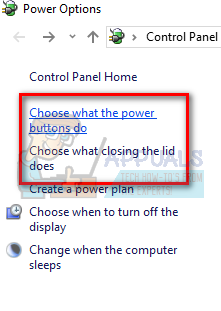
- Once in the main window of power options, make the following changes in both options; choose what closing the lid does and choose what the power buttons do.
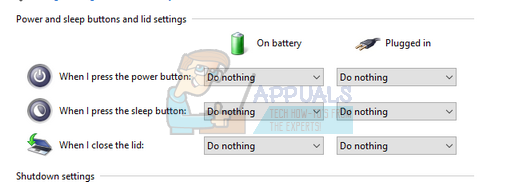
- Change all the settings to “Do nothing”. Press Apply to save changes and exit. You can also change the setting of “When I press the power button” to “Shut Down”. Just refrain from using the options of hibernating and sleep in any setting.
- Restart your computer and check if the problem got solved.
Note: If your computer still goes into hibernate mode, you can execute the following command in PowerShell as an administrator.


