- Install Windows 10 on your Mac with Boot Camp Assistant
- What you need to install Windows 10 on Mac
- How to install Windows 10 on Mac
- 1. Check your Secure Boot setting
- 2. Use Boot Camp Assistant to create a Windows partition
- 3. Format the Windows (BOOTCAMP) partition
- 4. Install Windows
- 5. Use the Boot Camp installer in Windows
- How to switch between Windows and macOS
- Learn more
- Windows 10 теперь можно запускать на устройствах с Apple M1 с помощью Parallels Desktop 16.5
- Новая версия Parallels Desktop 16.5
- Download and install Windows support software on your Mac
- Install the latest macOS updates
- Format a USB flash drive
- Download the Windows support software
- Install the Windows support software
- Learn more
- Ставим Windows 10 на Mac с чипом Apple M1. Советы и разбор проблем
- Как скачать Windows 10 для ARM
- Как скачать Parallels Desktop 16 для Mac на M1 (ARM)
- Установка Windows 10 на Mac с М1
- Как установить (обновиться) до Windows 10 Insider Preview Build 21277
- Тонкая настройка Parallels Desktop 16 для Mac на М1
- Как работает Mac на М1 с Windows 10?
Install Windows 10 on your Mac with Boot Camp Assistant
With Boot Camp, you can install Microsoft Windows 10 on your Mac, then switch between macOS and Windows when restarting your Mac.
What you need to install Windows 10 on Mac
- MacBook introduced in 2015 or later
- MacBook Air introduced in 2012 or later
- MacBook Pro introduced in 2012 or later
- Mac mini introduced in 2012 or later
- iMac introduced in 2012 or later 1
- iMac Pro (all models)
- Mac Pro introduced in 2013 or later
The latest macOS updates, which can include updates to Boot Camp Assistant. You will use Boot Camp Assistant to install Windows 10.
64GB or more free storage space on your Mac startup disk:
- Your Mac can have as little as 64GB of free storage space, but at least 128GB of free storage space provides the best experience. Automatic Windows updates require that much space or more.
- If you have an iMac Pro or Mac Pro with 128GB of memory (RAM) or more, your startup disk needs at least as much free storage space as your Mac has memory. 2
An external USB flash drive with a storage capacity of 16GB or more, unless you’re using a Mac that doesn’t need a flash drive to install Windows.
A 64-bit version of Windows 10 Home or Windows 10 Pro on a disk image (ISO) or other installation media. If installing Windows on your Mac for the first time, this must be a full version of Windows, not an upgrade.
- If your copy of Windows came on a USB flash drive, or you have a Windows product key and no installation disc, download a Windows 10 disk image from Microsoft.
- If your copy of Windows came on a DVD, you might need to create a disk image of that DVD.

![]()
How to install Windows 10 on Mac
To install Windows, use Boot Camp Assistant, which is included with your Mac.
1. Check your Secure Boot setting
Learn how to check your Secure Boot setting. The default Secure Boot setting is Full Security. If you changed it to No Security, change it back to Full Security before installing Windows. After installing Windows, you can use any Secure Boot setting without affecting your ability to start up from Windows.
2. Use Boot Camp Assistant to create a Windows partition
Open Boot Camp Assistant, which is in the Utilities folder of your Applications folder. Follow the onscreen instructions.
- If you’re asked to insert a USB drive, plug your USB flash drive into your Mac. Boot Camp Assistant will use it to create a bootable USB drive for Windows installation.
- When Boot Camp Assistant asks you to set the size of the Windows partition, remember the minimum storage-space requirements in the previous section. Set a partition size that meets your needs, because you can’t change its size later.
3. Format the Windows (BOOTCAMP) partition
When Boot Camp Assistant finishes, your Mac restarts to the Windows installer. If the installer asks where to install Windows, select the BOOTCAMP partition and click Format. In most cases, the installer selects and formats the BOOTCAMP partition automatically.
4. Install Windows
Unplug any external devices that aren’t necessary during installation. Then click Next and follow the onscreen instructions to begin installing Windows.
5. Use the Boot Camp installer in Windows
After Windows installation completes, your Mac starts up in Windows and opens a ”Welcome to the Boot Camp installer” window. Follow the onscreen instructions to install Boot Camp and Windows support software (drivers). You will be asked to restart when done.
- If the Boot Camp installer never opens, open the Boot Camp installer manually and use it to complete Boot Camp installation.
- If you have an external display connected to a Thunderbolt 3 port on your Mac, the display will be blank (black, gray, or blue) for up to 2 minutes during installation.
How to switch between Windows and macOS
Restart, then press and hold the Option (or Alt) ⌥ key during startup to switch between Windows and macOS.
Learn more
If you have one of these Intel-based Mac models using OS X El Capitan or later, you don’t need a USB flash drive to install Windows:
- MacBook introduced in 2015 or later
- MacBook Air introduced in 2017 or later 3
- MacBook Pro introduced in 2015 or later 3
- iMac introduced in 2015 or later
- iMac Pro (all models)
- Mac Pro introduced in late 2013 or later
For more information about using Windows on your Mac, open Boot Camp Assistant and click the Open Boot Camp Help button.
1. If you’re using an iMac (Retina 5K, 27-inch, Late 2014) or iMac (27-inch, Late 2013) or iMac (27-inch, Late 2012) with a 3TB hard drive and macOS Mojave or later, learn about an alert you might see during installation.
2. For example, if your Mac has 128GB of memory, its startup disk must have at least 128GB of storage space available for Windows. To see how much memory your Mac has, choose Apple menu > About This Mac. To see how much storage space is available, click the Storage tab in the same window.
3. These Mac models were offered with 128GB hard drives as an option. Apple recommends 256GB or larger hard drives so that you can create a Boot Camp partition of at least 128GB.
Information about products not manufactured by Apple, or independent websites not controlled or tested by Apple, is provided without recommendation or endorsement. Apple assumes no responsibility with regard to the selection, performance, or use of third-party websites or products. Apple makes no representations regarding third-party website accuracy or reliability. Contact the vendor for additional information.
Windows 10 теперь можно запускать на устройствах с Apple M1 с помощью Parallels Desktop 16.5
Работа ПО Parallels на компьютерах, оснащенных чипами M1, отличается высокой производительностью и энергоэффективностью по сравнению с устройствами на базе процессоров Intel.
Благодаря нативной поддержке процессоров Apple M1, пользователи теперь могут беспрепятственно устанавливать Windows 10 на ноутбуки MacBook.
Новая версия Parallels Desktop 16.5
Новая версия Parallels Desktop получила следующие улучшения:
- Снижение энергопотребления до 250%: на Mac с процессором Apple M1 Parallels Desktop 16.5 потребляет в 2,5 раза меньше энергии, чем на компьютере MacBook Air 2020 на базе Intel.
- Повышение производительности DirectX 11 до 60%: Parallels Desktop 16.5 на устройствах Mac с процессорами M1 обеспечивает прирост производительности DirectX 11 до 60 процентов, чем на MacBook Pro на базе Intel с графическим процессором Radeon Pro 555X.
- Повышение производительности виртуальной машины до 30% (Windows): запуск виртуальной машины Windows 10 на ARM Insider Preview на Parallels Desktop 16.5 выполняется быстрее до 30% по сравнению с виртуальной машиной Windows 10 на MacBook Pro с процессором Intel Core i9.
Компания Parallels позаботилась о том, чтобы лучшие функции Parallels Desktop работали с процессорами Apple M1, включая «режим когерентности», общие профили, поддержку Touch Bar, а также возможность настраивать меню клавиатуры и горячие клавиши.
Если вы являетесь обладателем лицензии Parallels Desktop 16 для Mac, то вы можете перейти на Parallels Desktop 16.5 без дополнительной платы. Новая подписка стоит 80 долларов в год, а новая бессрочная лицензия продается за 100 долларов. Также предусмотрены скидки для пользователей, обновляющихся с Parallels Desktop 14 или 15.
Download and install Windows support software on your Mac
After using Boot Camp Assistant to install or upgrade Microsoft Windows on your Mac, you might also need to install the latest Windows support software (drivers) from Apple.
When you install Microsoft Windows on your Mac, Boot Camp Assistant automatically opens the Boot Camp installer, which installs the latest Windows support software (drivers). If that doesn’t happen, or you experience any of the following issues while using Windows on your Mac, follow the steps in this article.
- Your Apple mouse, trackpad, or keyboard isn’t working in Windows.
Force Touch isn’t designed to work in Windows. - You don’t hear audio from the built-in speakers of your Mac in Windows.
- The built-in microphone or camera of your Mac isn’t recognized in Windows.
- One or more screen resolutions are unavailable for your display in Windows.
- You can’t adjust the brightness of your built-in display in Windows.
- You have issues with Bluetooth or Wi-Fi in Windows.
- You get an alert that Apple Software Update has stopped working.
- You get a message that your PC has a driver or service that isn’t ready for this version of Windows.
- Your Mac starts up to a black or blue screen after you install Windows.
If your Mac has an AMD video card and is having graphics issues in Windows, you might need to update your AMD graphics drivers instead.
Install the latest macOS updates
Before proceeding, install the latest macOS updates, which can include updates to Boot Camp.
Format a USB flash drive
To install the latest Windows support software, you need a 16GB or larger USB flash drive formatted as MS-DOS (FAT).
- Start your Mac from macOS.
- Plug the USB flash drive into your Mac.
- Open Disk Utility, which is in the Utilities folder of your Applications folder.
- Choose View > Show All Devices from the menu bar.
- From the sidebar in Disk Utility, select your USB flash drive. (Select the drive name, not the volume name beneath it.)

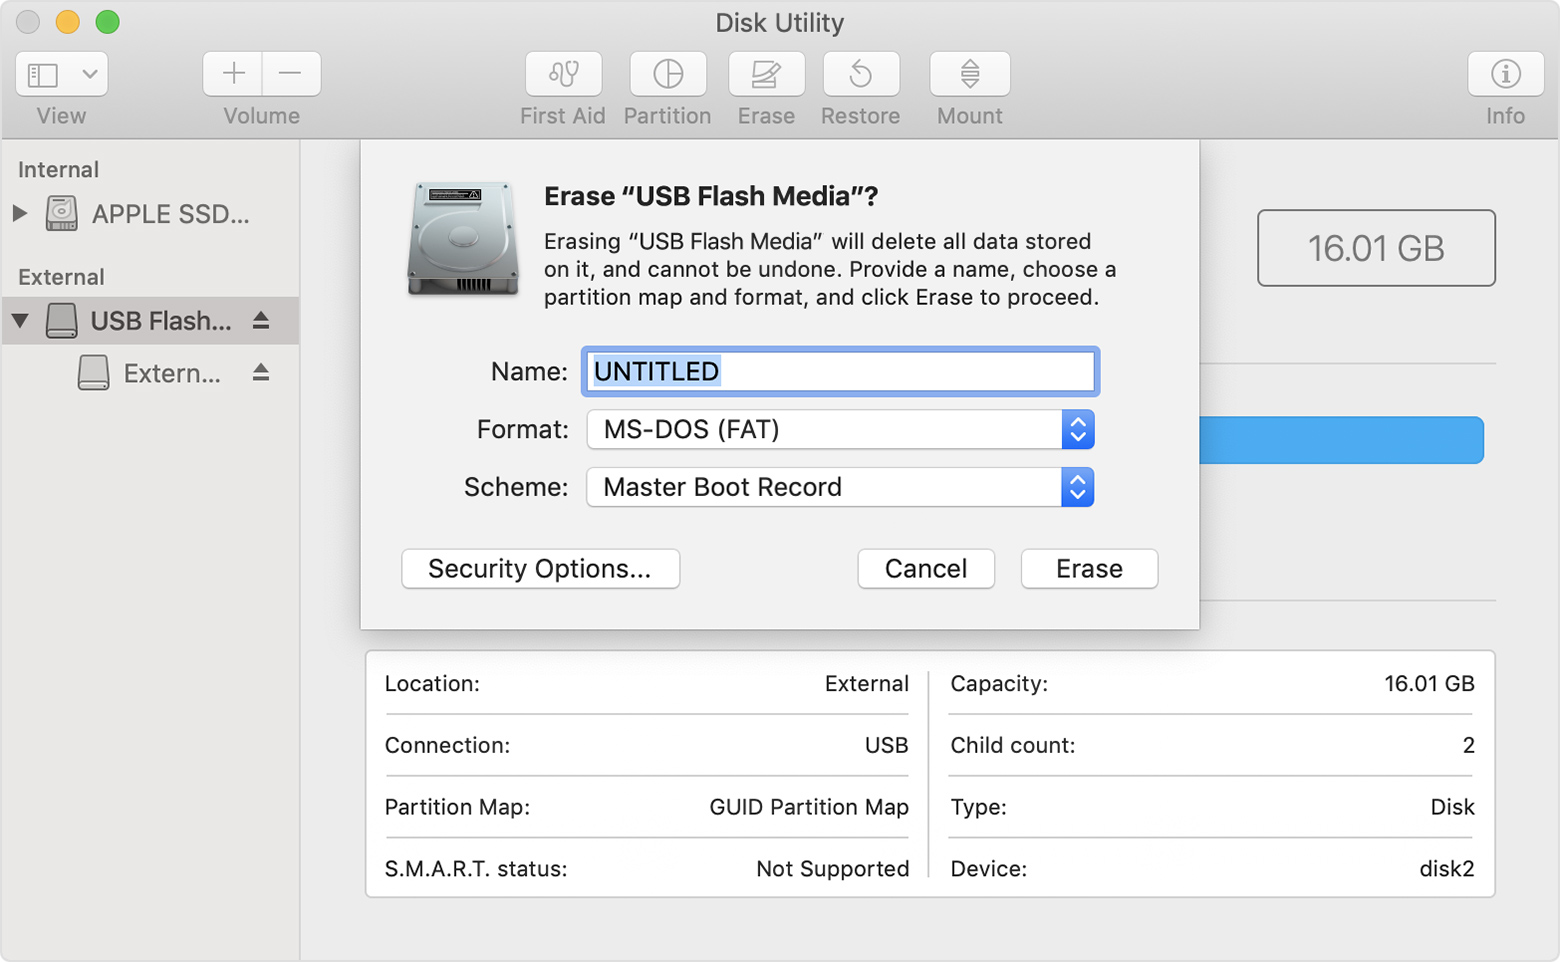
- Click the Erase button or tab.
- Choose MS-DOS (FAT) as the format and Master Boot Record as the scheme.
- Click Erase to format the drive. When done, quit Disk Utility.
Download the Windows support software
- Make sure that your Mac is connected to the Internet.
- Open Boot Camp Assistant, which is in the Utilities folder of your Applications folder.
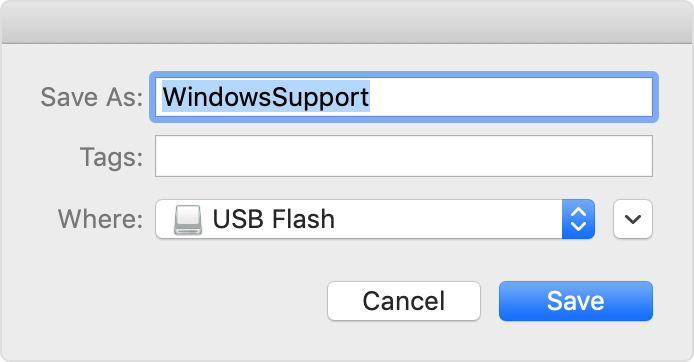
- From the menu bar at the top of your screen, choose Action > Download Windows Support Software, then choose your USB flash drive as the save destination. When the download completes, quit Boot Camp Assistant.
Install the Windows support software
After downloading the Windows support software to your flash drive, follow these steps to install the software. (If you’re attempting to resolve issues with a Bluetooth mouse or keyboard, it might be easier to use a USB mouse or keyboard until these steps are complete.)
- Make sure that the USB flash drive is plugged into your Mac.
- Start up your Mac in Windows.
- From File Explorer, open the USB flash drive, then open Setup or setup.exe, which is in the WindowsSupport folder or BootCamp folder. When you’re asked to allow Boot Camp to make changes to your device, click Yes.
- Click Repair to begin installation. If you get an alert that the software hasn’t passed Windows Logo testing, click Continue Anyway.
- After installation completes, click Finish, then click Yes when you’re asked to restart your Mac.
Learn more
If you can’t download or save the Windows support software:
- If the assistant says that the Windows support software could not be saved to the selected drive, or that the USB flash drive can’t be used, make sure that your USB flash drive has a storage capacity of at least 16GB and is formatted correctly.
- If the assistant doesn’t see your USB flash drive, click Go Back and make sure that the drive is connected directly to the USB port on your Mac—not to a display, hub, or keyboard. Disconnect and reconnect the drive, then click Continue.
- If the assistant says that it can’t download the software because of a network problem, make sure that your Mac is connected to the Internet.
- Make sure that your Mac meets the system requirements to install Windows using Boot Camp.
If a Mac feature still doesn’t work after updating the Windows support software, search for your symptom on the Apple support website or Microsoft support website. Some features of your Mac aren’t designed to work in Windows.
Information about products not manufactured by Apple, or independent websites not controlled or tested by Apple, is provided without recommendation or endorsement. Apple assumes no responsibility with regard to the selection, performance, or use of third-party websites or products. Apple makes no representations regarding third-party website accuracy or reliability. Contact the vendor for additional information.
Ставим Windows 10 на Mac с чипом Apple M1. Советы и разбор проблем
Автор Ольга Питель · 12:14 24.12.2020

Здравствуйте, уважаемые читатели сайта Uspei.com. С переходом на собственные процессоры Apple у пользователей отвалились виртуальные машины и главное Boot Camp. Этой утилиты на macOS Big Sur для M1 просто нет.
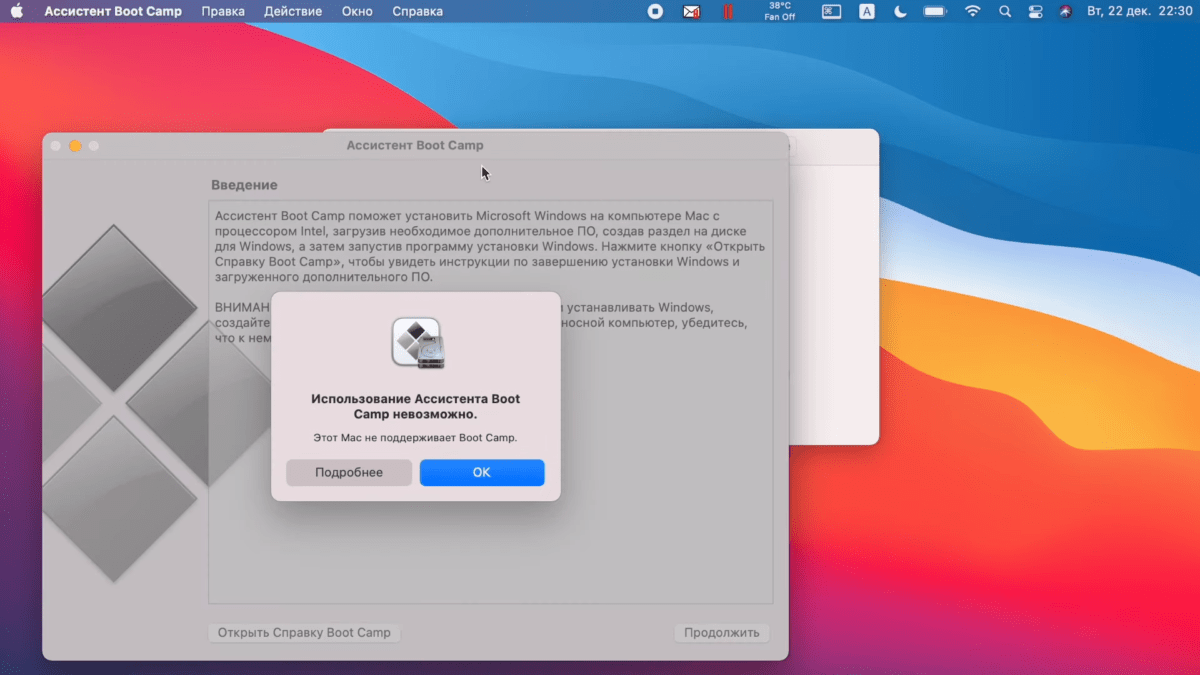
Boot Camp — это утилита для переключения между macOS и Windows, то есть возможность установки операционной системы в качестве второй полноценной и их раздельного запуска. Причем утилита мега крутая, она подтягивает скачанный образ и в пару кликов позволяет накатить Windows, а после установки также в пару кликов позволяет обновить все драйвера.
И если отсутствующий Boot Camp — это вопрос, который относится не к Apple, то вот виртуальные машины начали обновляться. На простом языке, это когда в macOS запускается программа, в которую можно накатить Windows.
К недостаткам такого решения можно отнести существенно снижающуюся производительность. Это логично, ведь помимо винды ресурсы нужно тратить еще и на саму macOS, в которой собственно виртуальная машина запускается. К достоинствам можно отнести возможность работать в двух операционках одновременно, причем практически бесшовно.
Первопроходцем стала компания Parallels, которая теперь позволяет накатить Windows на Mac с процессорами ARM, но есть нюансы, о которых я расскажу в этом обзоре.

Как скачать Windows 10 для ARM
Для начала нужно зарегистрироваться в программе Windows Insider, чтобы вы могли скачивать и устанавливать предварительные версии тестируемых операционок. Для этого необходимо перейти на специальную страничку. Далее войдите в свою учётную запись и согласитесь с условиями программы.
Важный момент: виртуальная машина Parallels не поддерживает обычную версию Windows под архитектуру x86 (то есть для процессоров intel и AMD), а только специальную версию Windows 10 для ARM. Она запускает приложения, разработанные для ARM, то есть под мобильные процессоры, а также запускает через эмулятор только 32-битные программы разработанные под x86.
64-битные программы (а их большинство) не работают. То есть тот же VLS плеер с пометкой win64 не запустится, а с win32 пожалуйста.

Но есть и хорошая новость Microsoft уже выпустила свежий билд 21277 Windows 10 для ARM, в котором есть возможность запускать через эмулятор программы разработанные под 64 бита. Если будете качать эту сборку, количество поддерживаемых программ вырастет в разы и в этом обзоре я тоже расскажу как это все дело накатить.

Итак, нам нужна специальная версия Windows 10 для ARM — Insider Preview. После того, как вы залогинились и зарегистрировались в программе Insider Preview у вас не возникнет никаких проблем при скачивании. Образ весит чуть больше 8 Гб.
Как скачать Parallels Desktop 16 для Mac на M1 (ARM)
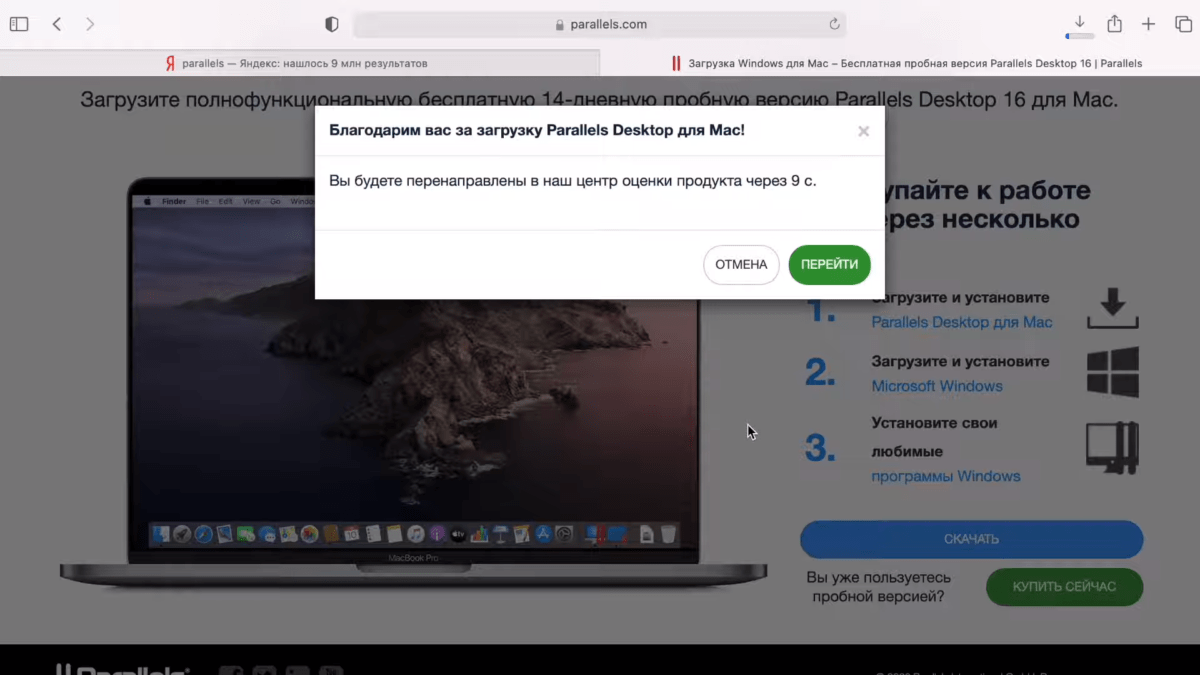
Теперь необходимо скачать виртуальную машину Parallels Desktop 16. Программа платная, но имеет бесплатный 14-дневный триальный период, чтобы вы могли все попробовать и протестировать, чем мы собственно и займемся.

После скачивания установите программу и если во время установки у вас появится сообщение «Эта версия Parallels Desktop не поддерживаться на компьютерах Mac на платформе Apple Silicon» это значит, что разработчики еще не выпустили финальную общедоступную версию для Mac на M1.
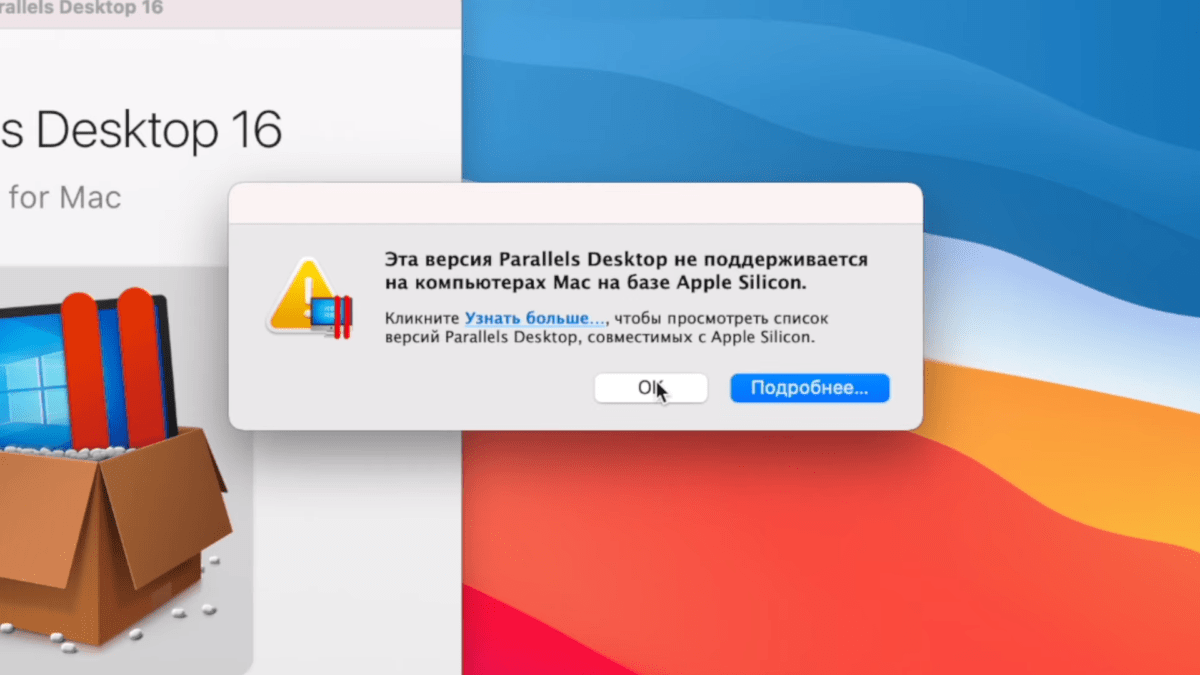
Не беда, есть работающая версия со статусом technical preview, там разработчики оставили и ключик для тестирования. В таком случае во время установки никаких проблем уже быть не должно и вы увидите сообщение о том, что эта версия программы предназначена именно для Mac на платформе Apple Silicon.


Установка Windows 10 на Mac с М1
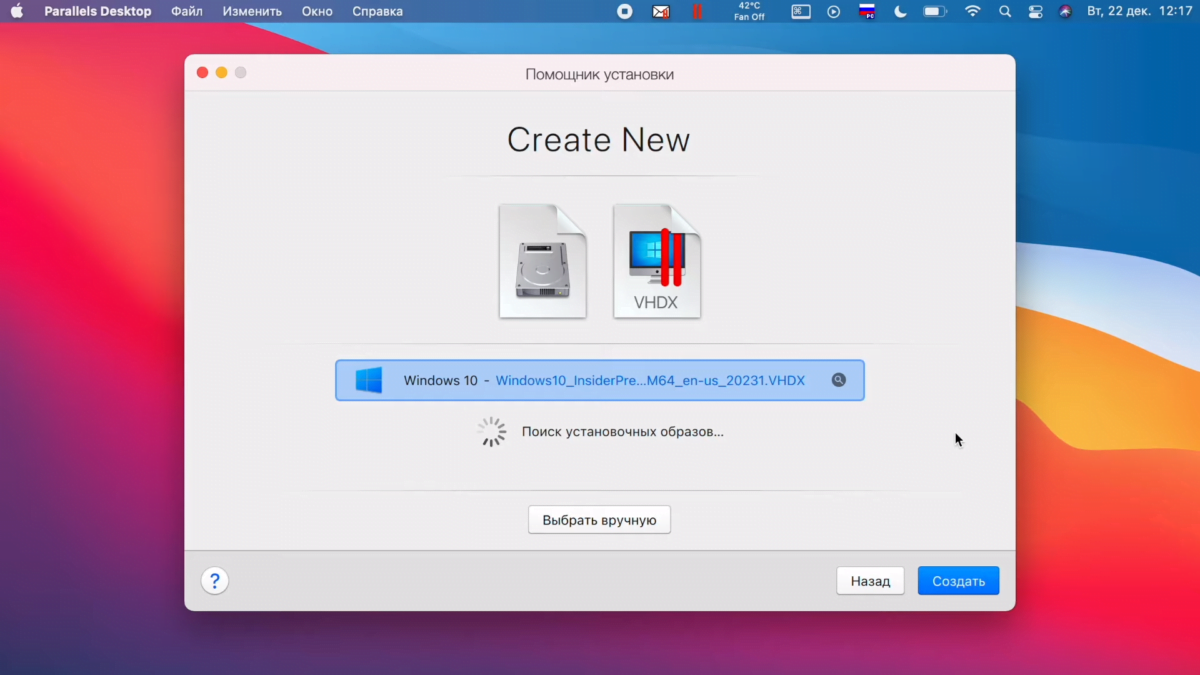
После установки Parallels Desktop программа предложит установить виртуальную машину. Обычно образ Windows 10 для ARM подтягивается автоматически, но в случае чего путь к нему можно указать вручную.
Приложение предложит войти в учетную запись Parallels и активироваться. Если вы скачивали тестовую версию Parallels Desktop для M1, то ключ есть на страничке, где вы скачивали программу.

Далее начнется автоматический процесс установки Windows, который у меня занял меньше 10 минут. Драйвера на внешнюю периферию, например, на мышку или клавиатуру, установятся автоматическим и все будет работать без какого-либо участия пользователя.
Как установить (обновиться) до Windows 10 Insider Preview Build 21277
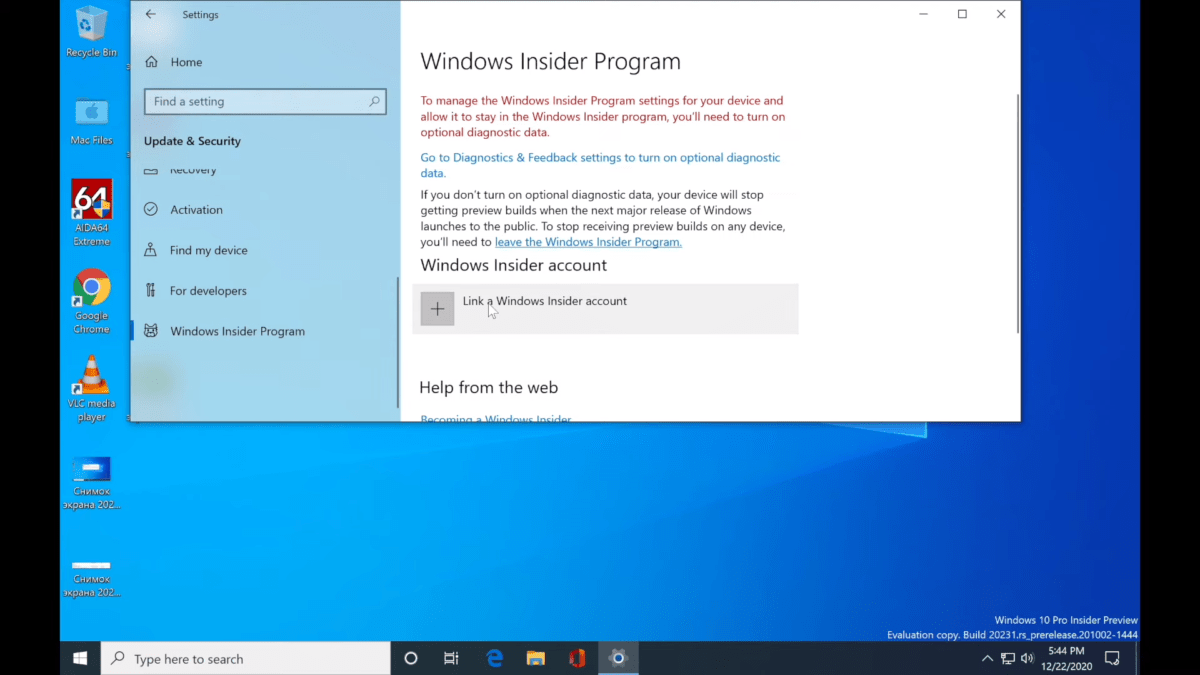
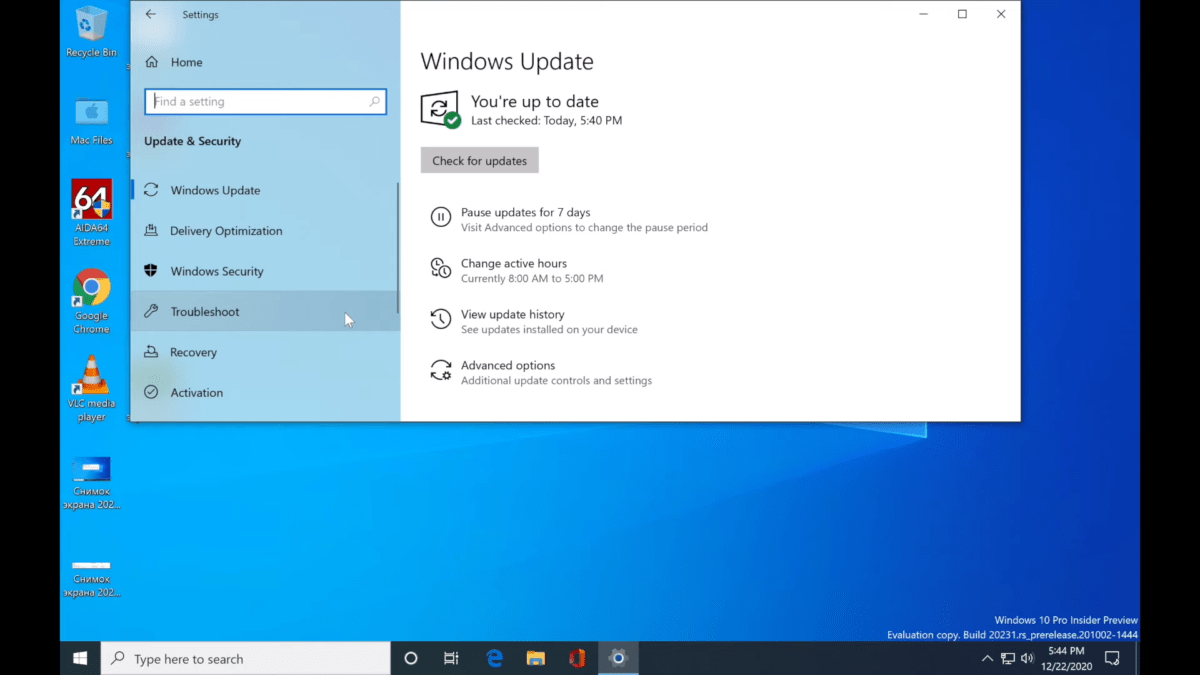
Ну а для того, чтобы установить самую последнюю сборку, которая поддерживает 64 битные программы (а их сейчас большинство) необходимо выполнить обновление. Пройдя в меню: Пуск-Параметры-Обновление-Безопасность. При проверке обновления сборка 21277 поддерживающая запуск через эмулятор программ разработанных под 64 бита будет недоступна. Идем в раздел Windows Insider Program и добавляем зарегистрированный аккаунт.
Дальше необходимо в разделе диагностика и обратная связь активировать пункт Optional diagnostic data. Остальное можете не включать.

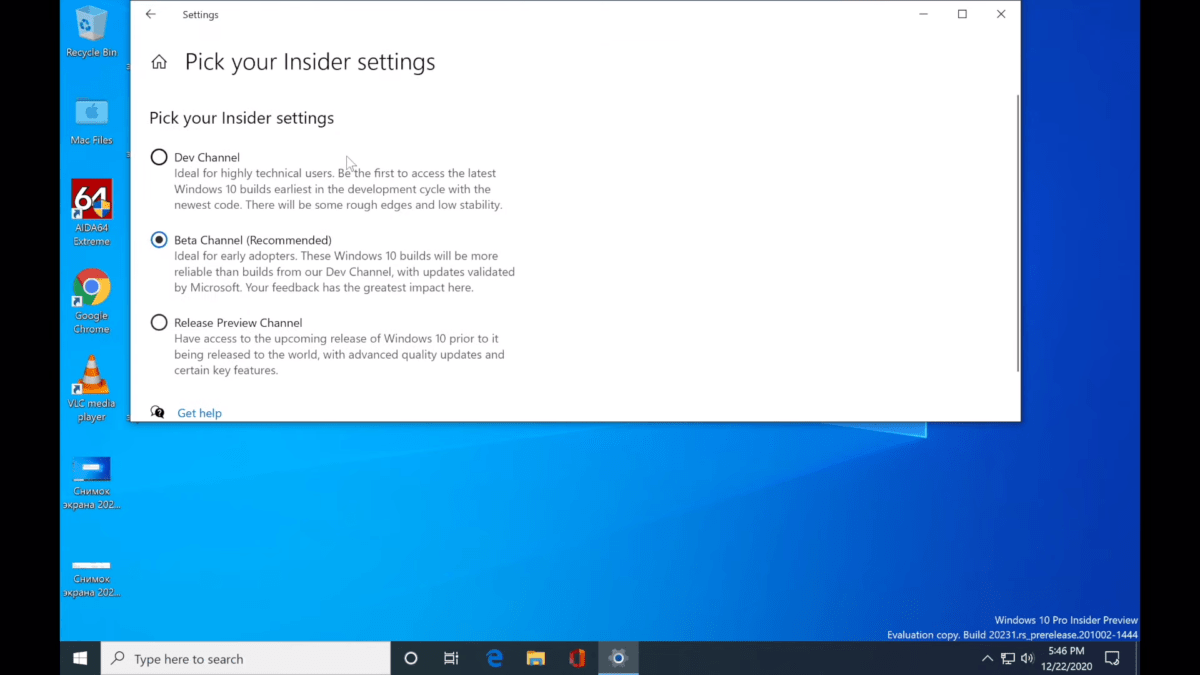
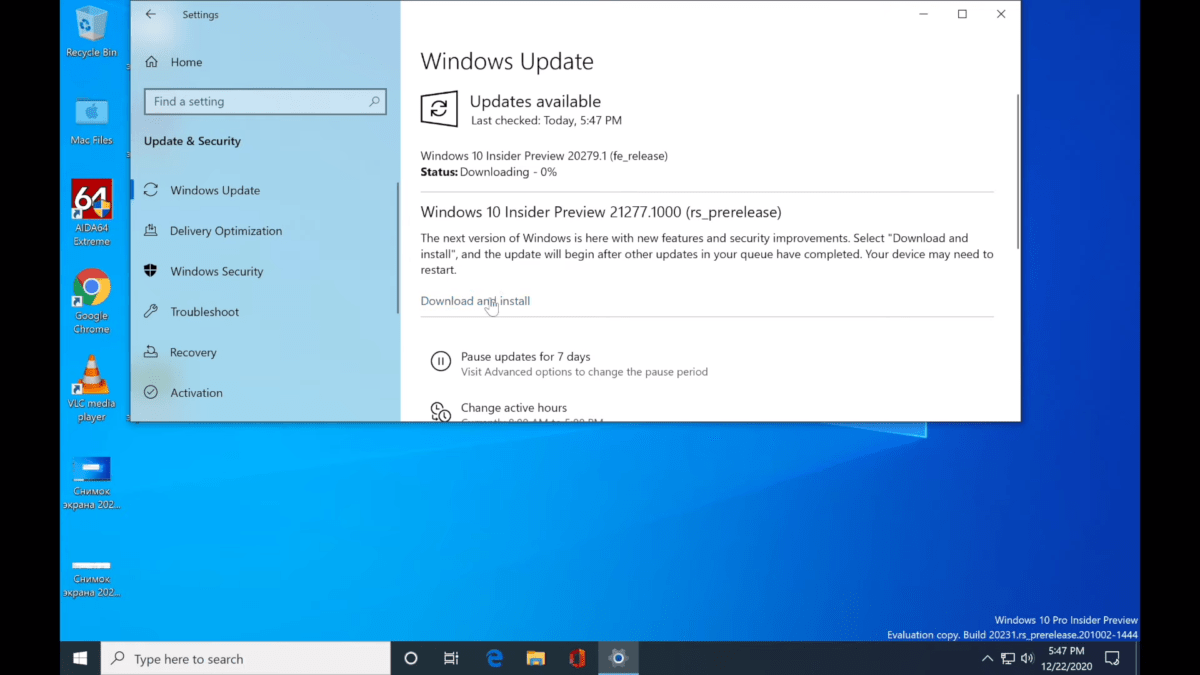
Возвращаемся в раздел Windows Insider Program и меняем beta канал на канал для разработчиков Dev Channel. После этого в разделе Windows Update жмем проверить обновление и скачиваем заветную сборку с поддержкой x64.
Тонкая настройка Parallels Desktop 16 для Mac на М1
Версия Windows 10 под ARM пока доступна только на английском языке, если вам удастся накатить и русский языковой пакет — пишите в комментариях.
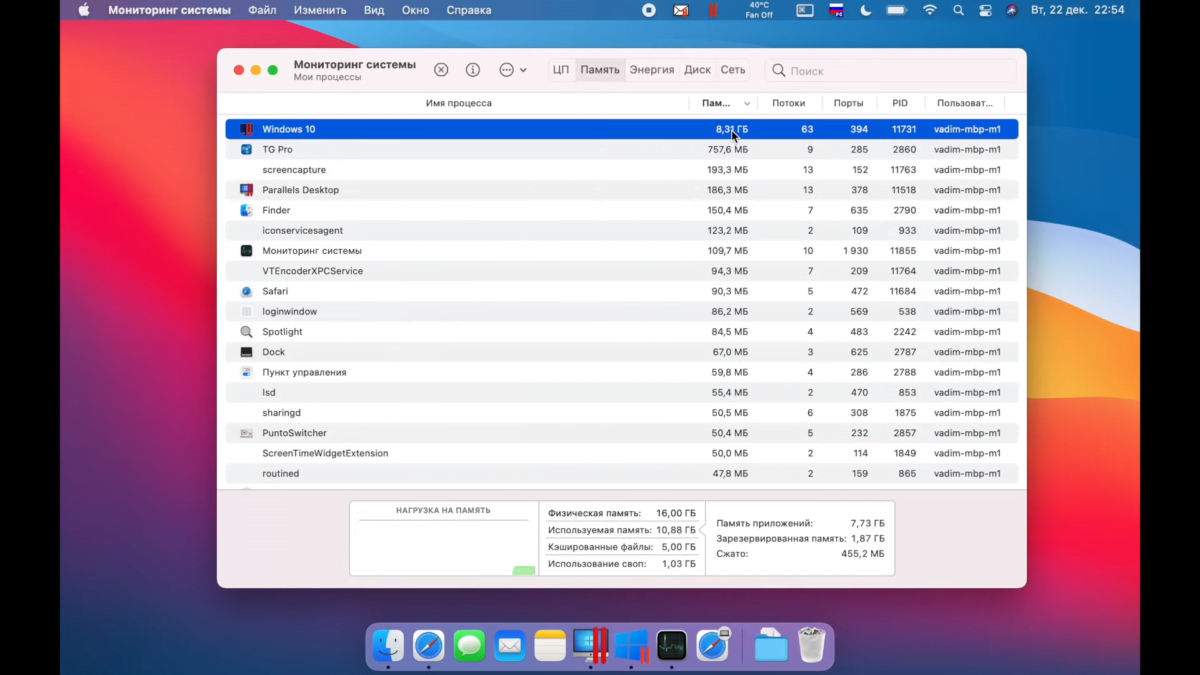
Parallels выделила для Windows в автоматическом режиме 2-х ядерный процессор с частотой в 1,5 Ггц, 4 Гб оперативной памяти и 256 Гб пользовательской памяти. Сведений о видюхе нет совсем.

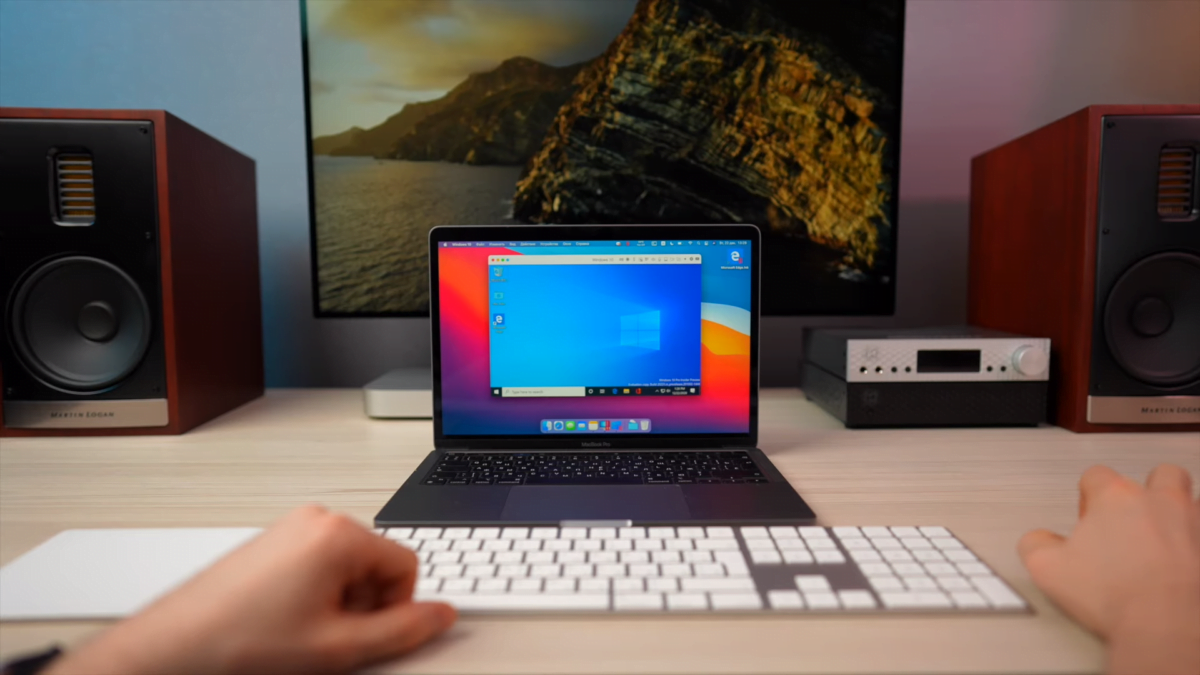
На Macbook Pro 13 дюймов 2020 года на M1 монитор в винде был настроен в нативном разрешении 2560/1600 точек. Windows в виртуальной машине вне режима паузы и без каких-либо запущенных программ практически не сжирает мощность чипа.
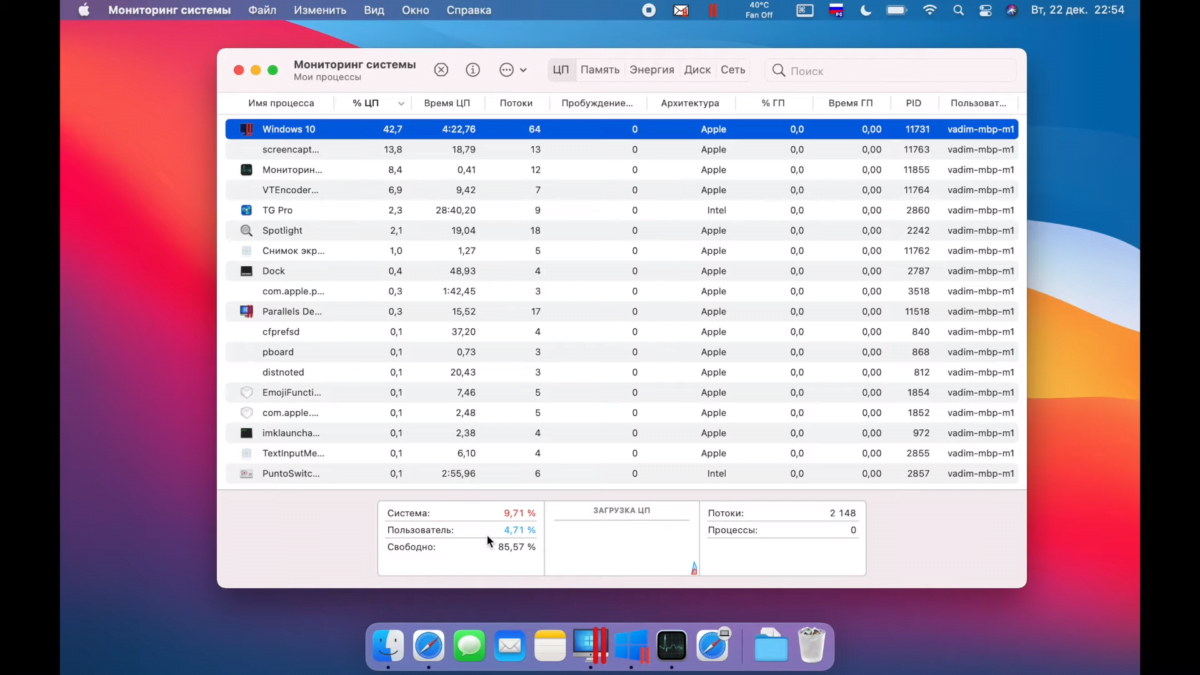
А вот оперативку потребляет будь здоров — больше 8 гигов из 16 доступных, а на версии с 8 гигабайтами оперативки съест больше 6, еще и в своп неплохо залезет. Так что если планируете баловаться с виндой обязательно берите Mac с 16 гигабайтами оперативки.
Если покажется мощности мало, чтобы выделить больше ресурсов необходимо выключить виртуальную машину и перед новым запуском открыть меню «действия» пункт «настроить». Во вкладке «оборудование» вы сможете самостоятельно увеличивать производительность процессора и графики, которые будут использоваться в Windows.

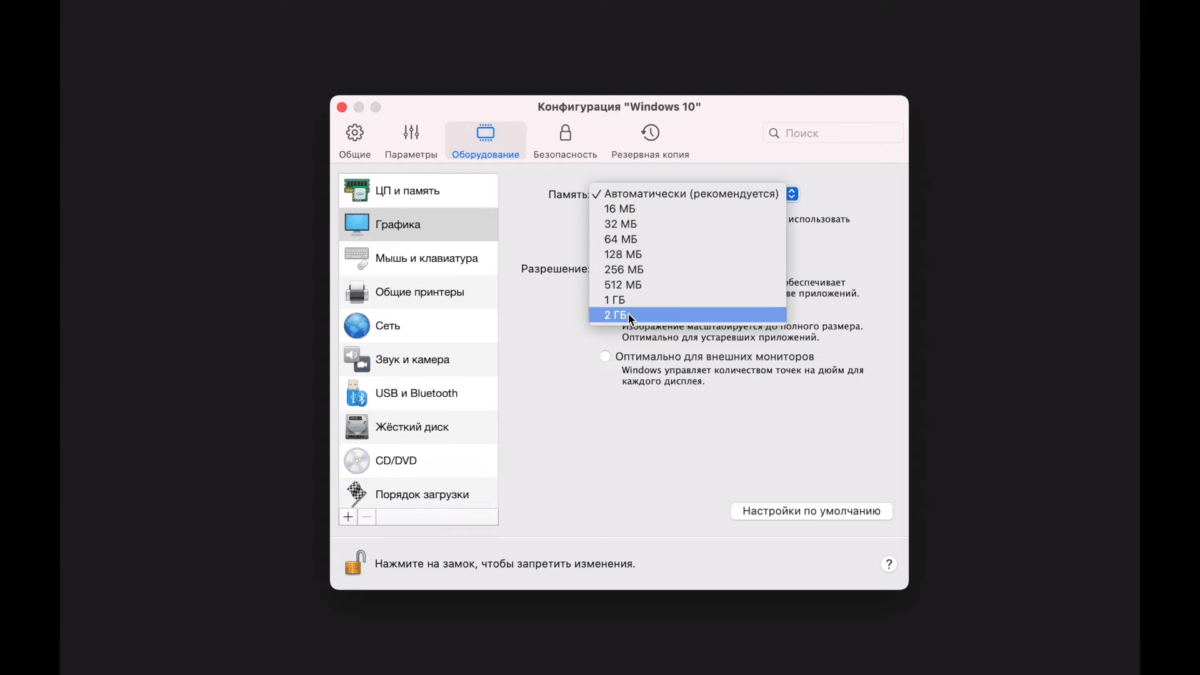
Предупреждаю: некоторые значения могут привести к не запуску винды, придется ставить некоторые параметры по умолчанию.
Как работает Mac на М1 с Windows 10?
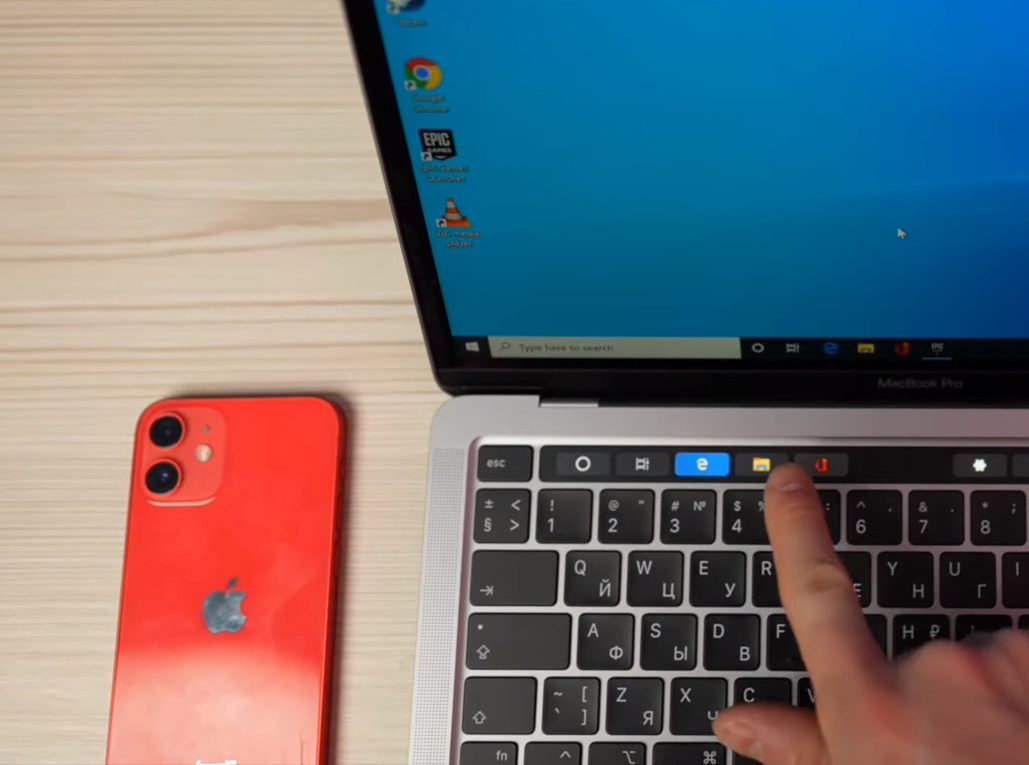
Тачбар в винде запущенный из под спад Parallels выглядит куда лучше, чем на macOS. В него опущена панель задач и как же я там тоже хочу увидеть Doc на macOS. А если запустить программу, то отобразятся классические F1-F12, а также вспомогательные необходимые клавиши, которых нет на клавиатуре макбука. Ну, например, PrtScn.

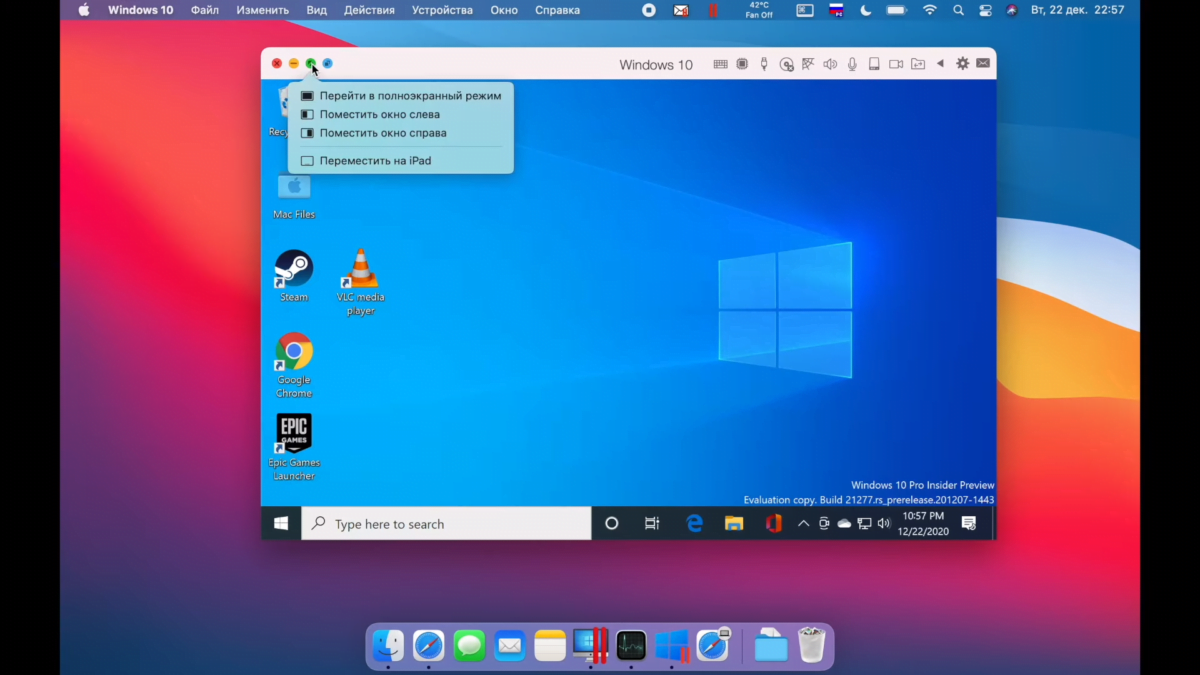
Парочка советов по работе. Чтобы запустить окно на весь экран, нажмите на зеленую кнопку в левом верхнем углу или сочетание клавиш Ctrl + Cmd + F, таким образом вы сможете быстро переключаться между двумя операционными системами нажатием Cmd + Tab.
И да, не путайте этот режим с голубой кнопкой переводящий в режим Conference, он позволяет запускать окно приложения Windows в интерфейсе MacOS. Это очень прикольная штука, когда ты одновременно можешь пользоваться программами Mac и Windows. Чтобы выйти из этого режима нажмите «Вид» и «Выйти из conference» или сочетание клавиш Ctrl + Cmd + С.
Если вы временно не пользуйтесь виртуальной машиной вы можете поставить ее на паузу, чтобы она не потребляла ресурсы Mac. Делается это через иконку Parallels в строке меню. Также виртуалка через какой-то период времени бездействия автоматически это сделает. Выключить виртуальную машину можно как через сам Windows, так через строку состояния, но это менее безопасный вариант, чем обычное выключение винды.

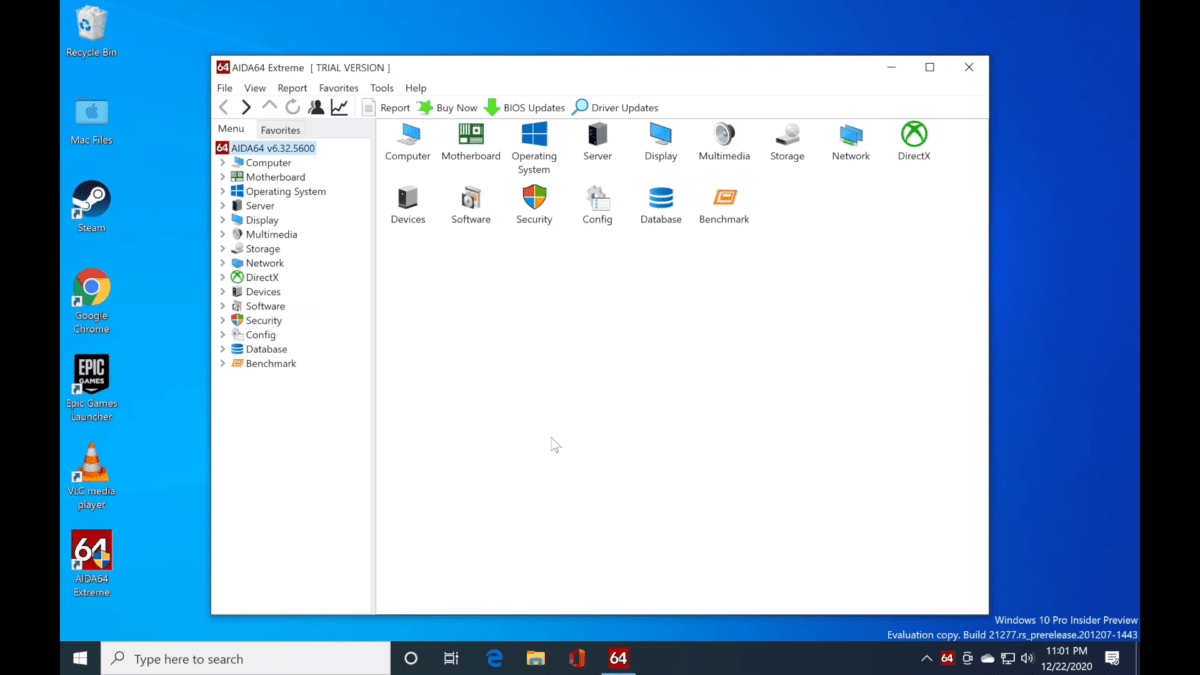
На рабочем столе есть папка Mac Files открывающая пользовательскую папку macOS и вы можете иметь доступ ко всем файлам. После установки любых программ на Windows Parallels по умолчанию создает их иконки на рабочем столе macOS.

Правда режим конференции они сразу не запускают, а открывают просто окно виртуальной машины. Суть в том, что рабочий стол виртуальной машины и macOS становится общим и файлы размещенные на рабочем столе Mac будут отображаться и на столе Windows.
В целом операционка работает, но стабильной ее работу назвать нельзя, особенно все, что касается запуска тяжелых 64-битных программ и уж тем более игр — тут все надо индивидуально тестировать. Если с древним GTA: San Andreas проблем не будет, то запустить что-то современное на данный момент не получится.

Это нормально — у нас по сути бета виртуальной машины Parallels, бета винды и все это пока выглядит как дикие костыли. Что же, для старта неплохо, будем следить за развитием событий. В идеале, чтобы Microsoft дала добро на работу полноценного буткемп и начала интенсивно развивать Windows 10 для ARM. А подвижки уже есть, видимо за этим и в правду будущее, что же, поживем увидим.
Не забудьте подписаться на YouTube канал источника!


