- Fix: Imaging Devices is Missing in Device Manager
- Method 1: Restart your computer
- Method 2: Check if your webcam is on
- Method 3: Add Imaging Devices Manually
- Method 4: Use the Windows Troubleshooter (Windows 10)
- Доступен инструмент для создания образов Windows 10X
- Device Image Generator – инструмент для быстрого создания FFU-образов Windows 10X
- Важная информация
- Windows 10 imaging devices
- Installing Windows 10X (from cabs with Device Image Generator) on real hardware
- Overview
- Prerequisites
- Target
- Peripherals
- Common: Files & Tools
- Workspace
- Install Tools
- Configure Your BSP
- Prepare DCHU Drivers for Your Hardware
- [Optional] Edit A BSP for Your Hardware
- [Optional] Configure Your Image
- Build Your Image
- Prepare USB Drive for Flashing
- Apply Your Image
- Apply Your Image on Machine Without Windows 10X Installed On It
- Apply Your Image on Machine With Windows 10X Installed On It
- Load Windows 10X
Fix: Imaging Devices is Missing in Device Manager
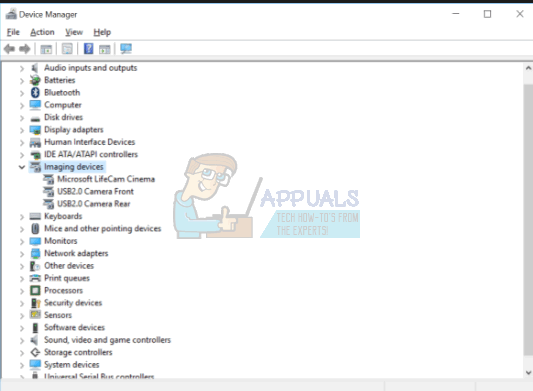
Imaging Devices is a Windows Device Manager feature that lists all the imaging devices you have under it, this section allows you to update drivers for existing imaging devices and also disable/install them. A fairly common error with certain webcams is getting a “No driver found” error message when you try to use the webcam. However, when you go to the Control Panel, and open the Device Manager to update or install the driver, you will find no Imaging Devices there, which means that your webcam isn’t even recognized and any other imaging devices you may have will not be visible.
Fortunately, this is a fairly known problem, and there is a solution for it. Try the methods below, and see if any one of them will help you.
Method 1: Restart your computer
The situation you’re in might mean that when Windows booted, it skipped loading the driver for some reason. Restarting your computer will give Windows another chance to load the driver, and may very well solve the problem. However, if it doesn’t, move on to the other method below.
Method 2: Check if your webcam is on
Many laptops, due to the need for additional functionality on the keyboard, but no room for separate keys, come with an FN key, which activates additional functions when you press some of the keys. One of these additional functions might be the webcam. You might’ve, purposely, or by mistake, disabled the webcam, and it will not open, no matter what you do.
The solution for this is to re-enable the webcam using the key. You will find the key in the top row, among the Function keys. Look for a key that either says something like “cam”, or has an icon that resembles a camera. Simultaneously press the FN key, and the key that you found. Hold the key until you see that the LED besides your camera turns on. This should let you know that the camera is on. If there is no webcam LED, hold it for around two seconds. Your webcam should be working now.
Method 3: Add Imaging Devices Manually
- Hold the Windows Key and Press R.
- Type hdwwiz.cpl and Click OK
- Click Action and choose Add Legacy Hardware

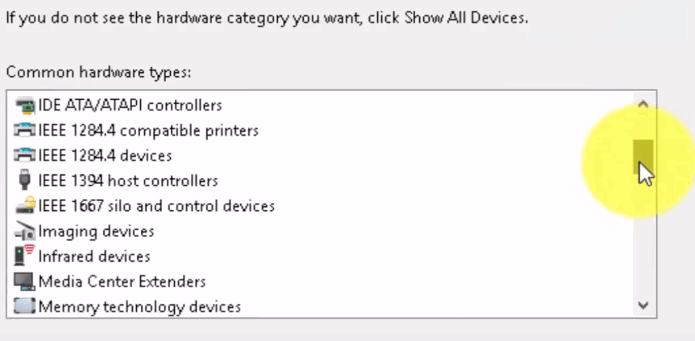
- Click Next, and choose “Install the hardware that i manually select from the list” and click Next, scroll down to choose Imaging Devices and Click Next.
- Locate the missing device through the manufacturer’s tab and add it.


Method 4: Use the Windows Troubleshooter (Windows 10)
The Windows Troubleshooter is pretty useful in situations like this. You can use it to solve quite a lot of problems, and in the last few versions of Windows, it works great. Follow the steps below to fix the problems you might be having with your imaging devices.
1. Press the Start button on your keyboard, and type in Troubleshoot.
2. From the menu, choose Hardware and Devices. This is the option that scans your computer for connected devices (such as your webcam), and potentially fixes any problems you might be having with them.
3. Press Run the troubleshooter. Wait for it to finish, and take a look at the result – it will tell you whether it has fixed your issue or not.
Important Note: Press “Fn” + “F6” and check if that solves this issue for your MSI Laptop. This has reportedly fixed the issue for a lot of MSI Laptop Users.
Доступен инструмент для создания образов Windows 10X
Операционная система Windows 10, разработанная компанией Microsoft, занимает львиную долю рынка операционных систем для настольных ПК благодаря тому, что ее можно установить практически на любой современный компьютер.
Однако Windows 10X – это уникальная разновидность операционной системы Microsoft, которая изначально была разработана исключительно для складных устройств и устройств с двумя экранами, но затем была переработана для поддержки устройств с одним экраном.
Интересно, что вся архитектура Windows 10X радикально отличается от операционной системы Windows 10. Универсального установщика для Windows 10X не существует, поскольку компания Microsoft не намерена позволять конечным пользователям устанавливать данную систему на свои ПК.
Если вы уже видели обзоры Windows 10X или даже протестировали систему, установив её на на виртуальную машину Microsoft Hyper-V, то возможно вы захотите установить Windows 10X в качестве основной операционной системы. В таком случае вы будете рады узнать, что независимый разработчик выпустил инструмент под названием «Device Image Generator», который упрощает процесс создания установочного образа Windows 10X.
Device Image Generator – инструмент для быстрого создания FFU-образов Windows 10X
Инструмент Device Image Generator, созданный инсайдером Albacore, призван стать простой и удобной утилитой для создания полнофункционального пакета Full Flash Update (FFU) для сборки Windows 10X с поддержкой обычных ПК. Device Image Generator позволяет отказаться от инструментов командной строки и пользователи теперь могут экспортировать все необходимые драйверы из существующей установки Windows 10 и вставить их в базовый образ Windows 10X.
Кроме того, утилита автоматически создает набор пакетов конфигурации, необходимых для построения окончательного образа. Имейте в виду, что инструмент Device Image Generator не загружает набор файлов Unified Update Platform (UUP) сборки Windows 10X, поэтому пользователи должны будут воспользоваться утилитой UUPMediaCreator для самостоятельной загрузки UUP файлов. Подробная инструкция с описанием работы утилиты UUPMediaCreator доступна по ссылке.
Вы можете скачать инструмент Device Image Generator для генерации образов Windows 10X по ссылке ниже. После загрузки разархивируйте архив 7Z и запустите файл DevImgGen.exe.
Важная информация
Инструмент отмечен как «бета версия», что означает, что нет никакой гарантии в том, что он сможет создать образ при использовании определенных аппаратных компонентов. Например, операционная система Windows 10X требует DHCU-драйверы, которые доступны только для новых устройств. Более того, сама Windows 10X еще не достигла стадии RTM, поэтому стоит ожидать случайных ошибок на любом этапе, от создания образа до установки и эксплуатации системы.
Windows 10 imaging devices

Новое меню «Пуск», в новой Windows 10 X отказались от плиток и теперь меню больше похоже на кнопки приложений как в смартфонах на Android или iOS. В верхней части появится строка поиска, которая будет искать как по ПК, так и совершать поиск по интернету. Внизу меню Пуска будет список рекомендаций, например последние открытые файлы, или посещенные веб-сайты, в зависимости от настроек, данный список можно настроить под свои нужды и выбрать там то, что нужно отображать именно пользователю.
|
|

Новый центр уведомлений, в котором делается акцент на быстрых действиях, которые не требуют перехода в меню «Параметры». Быстрые действия отделены визуально от панели уведомлений. Центр уведомлений включает в себя — Регулятор громкости, параметры энергопотребления и процент заряда аккумулятора.
|
|

Не забыли так же и про первоначальную настройку Windows 10 X, теперь она переработана под более современный интерфейс. В ней по сути будет тот же выбор языка системы и предложение войти в учетную запись Microsoft. Голосовой помощник Cortana судя по всему в первоначальной настройке теперь недоступна.
|
|

По заявлению Microsoft установка обновлений теперь не будет занимать много времени и будет выполняться в фоновом режиме, не прерывая работу пользователя. Для применения обновления нужно будет перезагрузиться, но по заявлениям — теперь это будет занимать не более 15 минут.
|
|

В Windows 10 X будут доступны динамические обои, как это реализовано в MacOS. Например в системе уже присутствуют обои с видом на горы, в зависимости от системного времени на компьютере они будут сменяться на утро, день, вечер и ночь. Пока не известно сколько таких динамических обоев будет доступно в итоговом релизе.
Пока это все, что известно о Windows 10 X, в будущем система будет дополняться функционалом, более полный обзор данной версии Windows 10 X будет только после его окончательного релиза, когда будет выпущен в продажу Surface Neo.
— x64 Windows 10 Pro, Enterprise или Education
— Процессор Intel, минимум 4 ядра для выделения под эмулятор Windows 10 X. Процессоры Amd временно не поддерживаются.
— 8гб оперативной памяти. Для выделения под эмулятор минимум 4гб ОЗУ.
— 15гб свободного места на жестком диске.
— Рекомендуется использовать дискретную видеокарту с DirectX 11.0 или новее.
— В Вашем Биос/UEFI должно быть включены следующие опции: 1) Аппаратная виртуализация. 2) Трансляция адресов второго уровня (SLAT) 3) Аппаратное предотвращение выполнения данных (DEP).
— Должна быть включена системная виртуальная машина Hyper-V. Есть два способа: Открываете PowerShell от имени администратора (можете его найти через поиск в системе => правой кнопкой мыши => открыть от им. администратора) => Скопируйте в окно консоли следующую команду: Enable-WindowsOptionalFeature -Online -FeatureName Microsoft-Hyper-V -All
Второй способ — Панель управления => Программы => Программы и компоненты => Включение или отключение компонентов Windows => Поставить галку рядом на пункте «Hyper-V»
Сообщение отредактировал M|A|G — 13.02.21, 23:29
- Windows 10 X — это та же самая система, которая упоминалась ранее как Windows Lite и Santorini? Да, это было кодовое название проекта.
Windows 10 X на данный момент представлена как модульная структура операционной системы, которая будет оптимизирована под устройство со складным экраном (Surface Neo), продажа данного устройства запланировано на конец 2020 года, там эта операционная система будет уже предустановлена. А так же, Microsoft заявила, что устройства с двойным экраном будут выпускать партнеры Майкрософта — Dell, Lenovo, HP, Asus и др.
Какое правильное название у Windows 10 X? Это не Windows 10 10, а именно Windows 10 X (Икс), взято из термина «expression».
Поддержка приложений — Microsoft заявляет, что никаких проблем со стандартными приложениями не будет. Система будет поддерживать UWP, Win32 и PWA, т.е никаких ограничений нет. В системе останется возможность устанавливать приложения как из Mictosoft Store, так и обычные сторонние приложения Win32. Но с одним нюансом, приложения будут запускаться в изолированном контейнере, обеспечивания дополнительную безопасность для пользователя.
Сообщение отредактировал DarkJS — 19.04.20, 20:17
Installing Windows 10X (from cabs with Device Image Generator) on real hardware
| Created: February 2, 2021 | Last Update: February 4, 2021 |
|---|---|
| Authors: | NT Authority, Albacore, Gustave Monce, Rafael Rivera, Daniel Kornev |
| Status: | Draft |
| Supported Windows 10X Version: | 20279 |
Disclaimer: Some drivers may fail to load, the guide will be updated with extra tips on extending driver compatibility later
Overview
Here’s some quick notes on installing Windows 10X on real hardware from cabs using the user-friendly Device Image Generator made by Albacore. For this example, we’re assuming a system with no other critical disks installed, and a helpful host system being around to set up the initial image.
This guide has been created for the 20279 version of Windows 10X.
Prerequisites
- Windows 10 Iron or Cobalt (20279 or 21xxx+) — though 20H2 can also work just fine
- Utility USB flash drive of
Target
- Graphics card with DCHU drivers available
- UEFI system firmware with the ability to disable Secure Boot
- Boot drive larger than 100 GiB
- Learn how to disable Secure Boot in your device, and change its boot order to allow booting from the USB Flash Drive
Peripherals
Note: If your device doesn’t have a built-in Ethernet adapter, prepare an external Ethernet adapter (USB/USB-C/USB-C Hub with Ethernet). You won’t be able to pass through the OOBE without internet connection.
Common: Files & Tools
Workspace
- Create a folder called 10X in the root of your drive, e.g, C:\10X
- Create a subfolder called Sources
- If you are running on a machine that is not the target machine (the one you want to flash Windows 10X onto) create a subfolder called DCHUDrivers
- Use v0.3.0.0. release of the Gus’s UUPMediaCreator(https://github.com/gus33000/UUPMediaCreator)) to download bits by typing this command in the Command Prompt (where dlfolder is the place to put downloaded bits, e.g., C:\10X\dlfolder , and amd64 specifies the architecture; you can specify arm64 for ARM64 build of Windows 10X):
Note: you must use -z Test param to download Test build of Windows 10X which includes non-production components.
- Put them into Sources folder (e.g., C:\10X\Sources )
- Make sure that bits are in Sources folder directly ( \10X\Sources\*compdb*.cab should be at this level)
- Download overlay.zip from Rafael
- Unpack it to your Sources folder (e.g., C:\10X\Sources )
- Open command line in the Sources folder and run fixup.cmd in it
- Copy the appx folder from the downloaded folder (with bits) to the root of your packages folder (e.g., C:\10X\Sources )
- Create Tools folder
- Create Devices folder
- Create FFUs folder
- Create FMFiles folder
- Extract FM.xml files from all CABs that contain FM
in their name into a folder called FMFiles by using this command (thanks to Steve Troughton-Smith (Tweet)):
- Your resulting folder structure should look like this:
Install Tools
Note: Both ADK and WinPE should have the same or higher version as your Windows 10X Image.
- [Optional] If you have previous kits (e.g., WP8 Tools), remove them
- Download the ADK Insider Preview ISO for your host OS version (only tested with Windows_InsiderPreview_ADK_en-us_20279.iso )
- Install Deployment Tools, ICD, Configuration Designer, and uncheck the rest if possible/as needed
- Download the Windows Preinstallation Environment ISO for your host OS version (only tested with 20279 version)
- Install Windows Preinstallation Environment
- Download Windows Image Generator (see tweet)
- Unpack it to (disk root)\10X\Tools
- Download updates to it
- Unpack it over the existing files to (disk root)\10X\Tools
Configure Your BSP
Board Support Packages (BSP) is a collection of drivers/settings required to run Windows 10X on a hardware platform. The BSP also includes a set of device drivers that are specific to the components/silicon used in the device, mostly in the form of .inf files and their associated .sys/.dll files.
You will need a BSP for your device if you want it to use all of its devices (WiFi, Cameras, etc.).
To configure your BSP, you need to obtain DCH (Universal) Drivers for your device, and then prepare the OEMDriversFM.xml feature manifest XML file with the links to your drivers.
Prepare DCHU Drivers for Your Hardware
Common Steps
- Go to (disk root)\10X\Tools\ and open DevImgGen.exe
Extracting Drivers From Your Target Machine
This is the case when your target machine is the same you’re building this image on.
Example: you have Surface Pro 6 and you want to flash it with Windows 10X. You use Device Image Generator to extract current drivers from your Windows 10 machine.
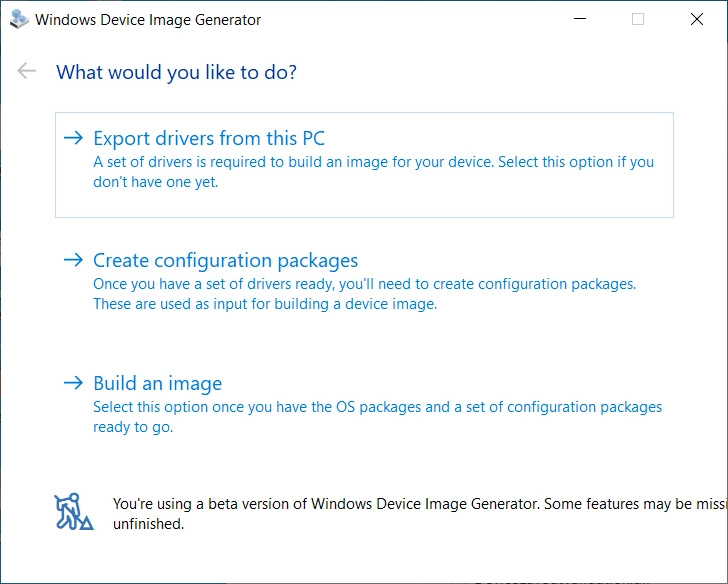
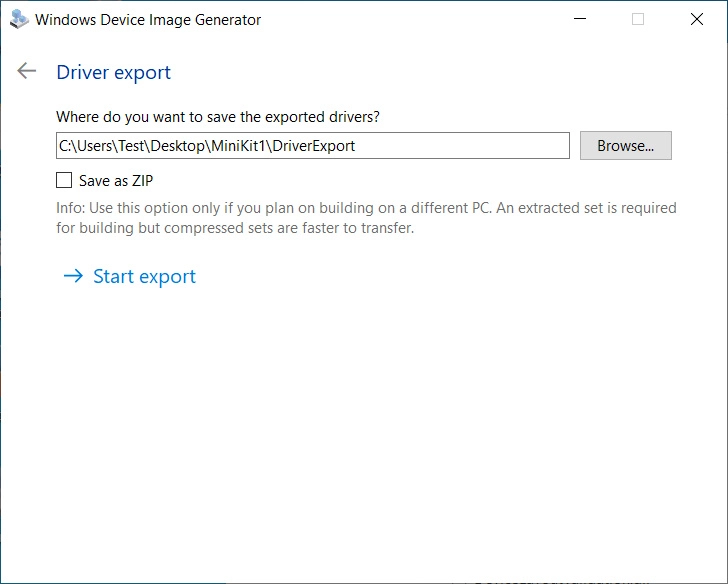
- In the Windows Device Image Generator use the first menu option («Export drivers from this PC») to extract drivers from the current machine
- Specify location for storing your drivers package in the opened window to 10X\Devices
Using Downloaded Drivers
This is the case when your target machine is different from the one you’re building this image on.
Example: you have Surface Pro 6 and Surface Go. You want to flash your Surface Go with Windows 10X. You use Device Image Generator to generate device driver package from the drivers you’ve downloaded for your Surface Go.
- Obtain DCHU Drivers for your hardware (especially GPU)
- In the Windows Device Image Generator use the second menu option to generate device drivers package from your DCHU drivers folder
- In the «Create configuration packages» specify location of your DCHU drivers ( (disk root)\10X\DCHUDrivers ), and specify location for storing your drivers package in the opened window to 10X\Devices
- Click «Process drivers»
[Optional] Edit A BSP for Your Hardware
This is only needed if some of the devices shall not be used.
- Use DeviceDriversPackageFM.xml generated by the Device Image Generator, located at (disk root)\10X\Devices and comment out items that shall not be used:
Note: If your target machine is Surface Go, remove reference to SurfaceACPIBattery.inf .
[Optional] Configure Your Image
Note: Not yet supported by the tool ( OEMInput.xml is generated on the fly currently).
- Edit OEMInput.xml if needed.
Build Your Image
Start > open elevated *Deployment and Imaging Tools Environment
- In that window, type this (where C:\ is the drive where your Windows 10 Insider Preview ADK is installed):
- Unless you use a non-prod machine, run this command to unregister the imaging toolchain overrides:
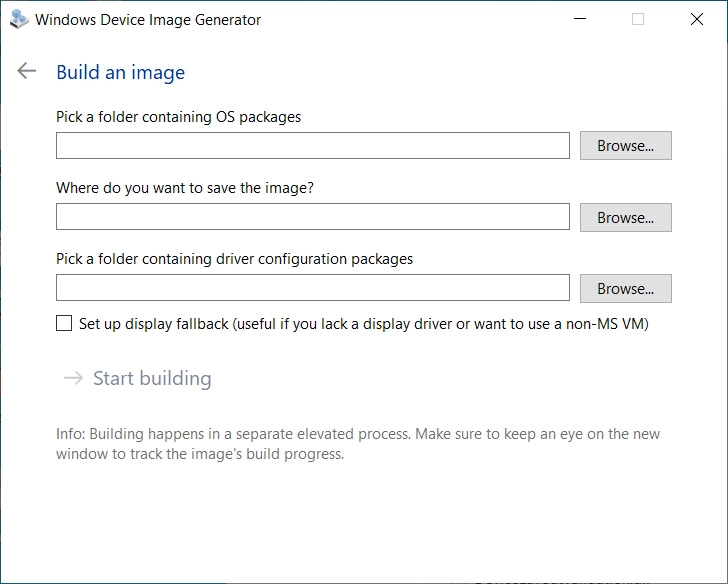
- Use third option in the Windows Device Image Generator to begin generation of your Image (ffu). Use (disk root)\10X\Sources as the location of OS packages. Use (disk root)\10X\FFUs folder for storing your resulting FFU. Use (disk root)\10X\Devices as the location of your driver configuration packages.
- Click on «Start building», and make sure to allow the separate elevated process to start. It will start the process of building the image.
Prepare USB Drive for Flashing
Note: You can follow Microsoft docs (Part I: Create Multipartition USB Drive, Part II: Install WinPE), or you can follow these instructions (taken from the docs):
- Get an empty Flash drive (with size at least 8GB)
- In the same Deployment and Imaging Tools Environment‘s elevated Command Prompt window open diskpart and press Enter
- Follow these instructions to create two disks:
- Create Working WinPE files by using this command (where C:\WinPE_amd64 is the location of your choice):
- Create bootable media with it (where P: is the letter of the FAT32 partition of your USB Flash drive):
- Copy your Image ( .ffu file) to the I: drive (the second partition of your Flash drive formatted with NTFS)
- Download and add gdisk64.exe file to the root of your WinPE partition ( P: in this example)
Apply Your Image
Apply Your Image on Machine Without Windows 10X Installed On It
- Boot from WinPE drive
- Open diskpart
- Type this:
Take a note of the name of your device’s main disk drive, e.g., disk 0 4. Type exit to leave diskpart 5. Use this command (and specify the correct path to the ffu that you created above, as well the id of your physical drive):
- Once complete, remove your USB flash drive
- Type exit in the Command Prompt window
Apply Your Image on Machine With Windows 10X Installed On It
- Boot from WinPE drive
- Type notepad to open notepad
- Use File—>Open to find the name of your WinPE disk
- Type this to identify the id of your physical drive:
- Type this (where D:\ is the name of your WinPE disk and 0 in the end of physicaldrive0 is the id of your physical drive):
- Make sure that it contains OSPool and other partitions of Windows 10X
- Type this to clean up the drive (where 0 in the end of physicaldrive0 is the id of your physical drive):
and press Enter
- Use this command (and specify the correct path to the ffu that you created above, as well the id of your physical drive):
- Once complete, remove your USB flash drive
- Type exit in the Command Prompt window
Load Windows 10X
At this time, your Windows 10X will boot. If everything is correct you should see the OOBE.


