- Microsoft рассказывает о новой функции планирования GPU в Windows 10
- How to find graphics card information on a Windows 10 PC
- How to find out graphics card details using Settings
- How to find out graphics card details using Device Manager
- How to find out graphics card details using System Information
- How to find out graphics card details using DirectX Diagnostic Tool
- How to find out graphics card details using Task Manager
- How to find out graphics card details using control panel
- More Windows 10 resources
- The Dell XPS 15 is our choice for best 15-inch laptop
- Halo: MCC’s live service elements make it better, not worse
- Microsoft’s Surface Duo is not ‘failing up’
- These are the best PC sticks when you’re on the move
- Узнать, какие приложения используют GPU в Windows 10
- Почему у меня нет GPU в диспетчере задач?
- Включить графу GPU в диспетчере задач
- Просмотр общей производительности графического процессора
Microsoft рассказывает о новой функции планирования GPU в Windows 10
Аппаратное ускорение планирование графических процессоров, которое было представлено в обновлении Windows 10 May 2020 Update, недавно получило поддержку драйверов от NVIDIA и AMD. Intel также подтвердила, что они работают над новыми драйверами на базе WDDM 2.7, чтобы включить новую функцию повышения производительности в Windows 10.
С выпуском WDDM 1.0 Microsoft включила поддержку планировщика графического процессора, части программного обеспечения, которая в основном назначает задачи графическому процессору. Планировщик GPU всегда полагался на CPU как на высокоприоритетный поток для координации и планирования работы различных приложений.
Microsoft значительно расширила планировщик GPU, добавив в него дополнительные функции, но интенсивное использование CPU планировщиком осталось неизменным, и этот подход вводит задержку для «работы по достижению GPU».
Хотя буферизация команд GPU обеспечивает хороший параллелизм выполнения CPU-GPU, побочным эффектом такого подхода является увеличение общей задержки или задержки ввода пользователя. Например, когда процессор находится под большой нагрузкой, несколько кадров будут находиться в буфере, так как процессор регистрирует пользовательские входные кадры до того, как графический процессор сможет их отобразить.
Это не заметно на высокопроизводительных процессорах, поскольку кадры графического процессора – не самая сложная задача для вашего процессора.
Благодаря аппаратному ускорению планирования графического процессора Windows 10 теперь может передавать управление памятью выделенному процессору планирования на основе графического процессора, что теоретически должно немного освободить процессор и уменьшить задержку ввода.
Аппаратное ускорение планирование GPU может оказаться полезным в играх с применением процессоров низкого и среднего уровня.
По мнению Microsoft, планирование GPU с аппаратным ускорением должно также сократить накладные расходы на планирование GPU и модернизировать фундаментальную опору графической подсистемы, чтобы подготовить почву для будущих событий.
Однако на данный момент пользователи могут не заметить каких-либо существенных улучшений после включения этой функции.
Если вы хотите протестировать аппаратное ускорением планирования GPU, вот что вам нужно сделать:
- Загрузите и установите обновление для Windows 10 May 2020 (версия 2004 или сборка 19041). Вы можете набрать «Winver» в поиске Windows, чтобы подтвердить, что вы используете обновление за май 2020 года. Если нет, зайдите в Центр обновления Windows и проверьте наличие обновлений. Вы можете не увидеть обновления на своем ПК, если Microsoft обнаружила несовместимые параметры, драйверы или оборудование.
- Загрузите бета-драйвер NVIDIA GeForce 451.48 или Adrenalin 2020 Edition 20.5.1. Intel планирует обновить свои драйверы WDDM 2.7 с поддержкой аппаратного ускорения графического процессора в ближайшем будущем.
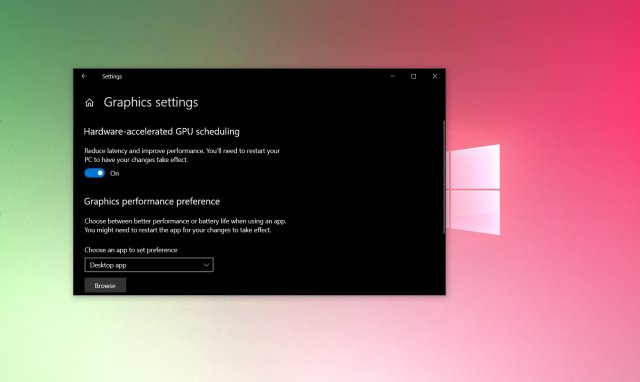
После обновления до Windows 10 версии 2004 и совместимых драйверов перейдите в «Система» –> «Дисплей» –> «Настройки графики» и включите опцию «аппаратного ускорения планирования GPU» и перезагрузите компьютер.
How to find graphics card information on a Windows 10 PC
 Source: Windows Central
On computers, the graphics card is an essential component that makes it possible to render every pixel you see on the screen when you’re navigating the Windows 10 desktop, running an app, playing a game, etc. Usually, devices have a graphics card from one of the three leading manufacturers, including NVIDIA, AMD, or Intel. Check out our very best graphics cards roundup for tons of options.
Although for the most part, if you’re a regular user, you don’t need to worry about the graphics specifications on your device, it might be something important for users who work with graphics-intensive applications or play games. Typically, because if you don’t have a card with a powerful graphics processing unit (GPU), it may not be possible for an application to perform correctly. Or, if you’re a gamer, you may not be able to play games, or you may need to determine the hardware to adjust the settings accordingly to prevent affecting performance.
Whatever your reasons might be, Windows 10 includes multiple ways to quickly find out the graphics card specifications using Settings, Device Manager, System Information, DirectX Diagnostic Tool, and Task Manager, and, of course, using the card’s control panel software.
In this Windows 10 guide, we’ll walk you through the steps to check which graphics card is currently installed on your computer.
How to find out graphics card details using Settings
To find out the graphics card manufacturer and model using the Settings app, use these steps:
- Open Settings.
- Click on System.
- Click on Display.
Under the «Multiple displays» section, click the Advanced display settings option.
 Source: Windows Central
Under the «Display information» section, confirm the graphics card vendor and model.
Source: Windows Central
Once you complete the steps, you will now have an understanding of the video card installed on your device.
How to find out graphics card details using Device Manager
To determine the graphics card installed on your computer with Device Manager, use these steps:
- Open Start.
- Search for Device Manager and click the top result to open the tool.
- Expand the Display adapters branch.
Confirm the manufacturer and model of the video card.
 Source: Windows Central
After you complete the steps, the graphics card information will be revealed.
How to find out graphics card details using System Information
To check the graphics card on Windows 10 with System Information, use these steps:
- Open Start.
- Search for System Information and click the top result to open the tool.
- Expand the Components branch.
- Click on Display.
Under the «Adapter Description» field, determine the graphics card installed on your device.
Source: Windows Central
Once you complete the steps, you’ll know the graphics card make and model, as well as driver information and more.
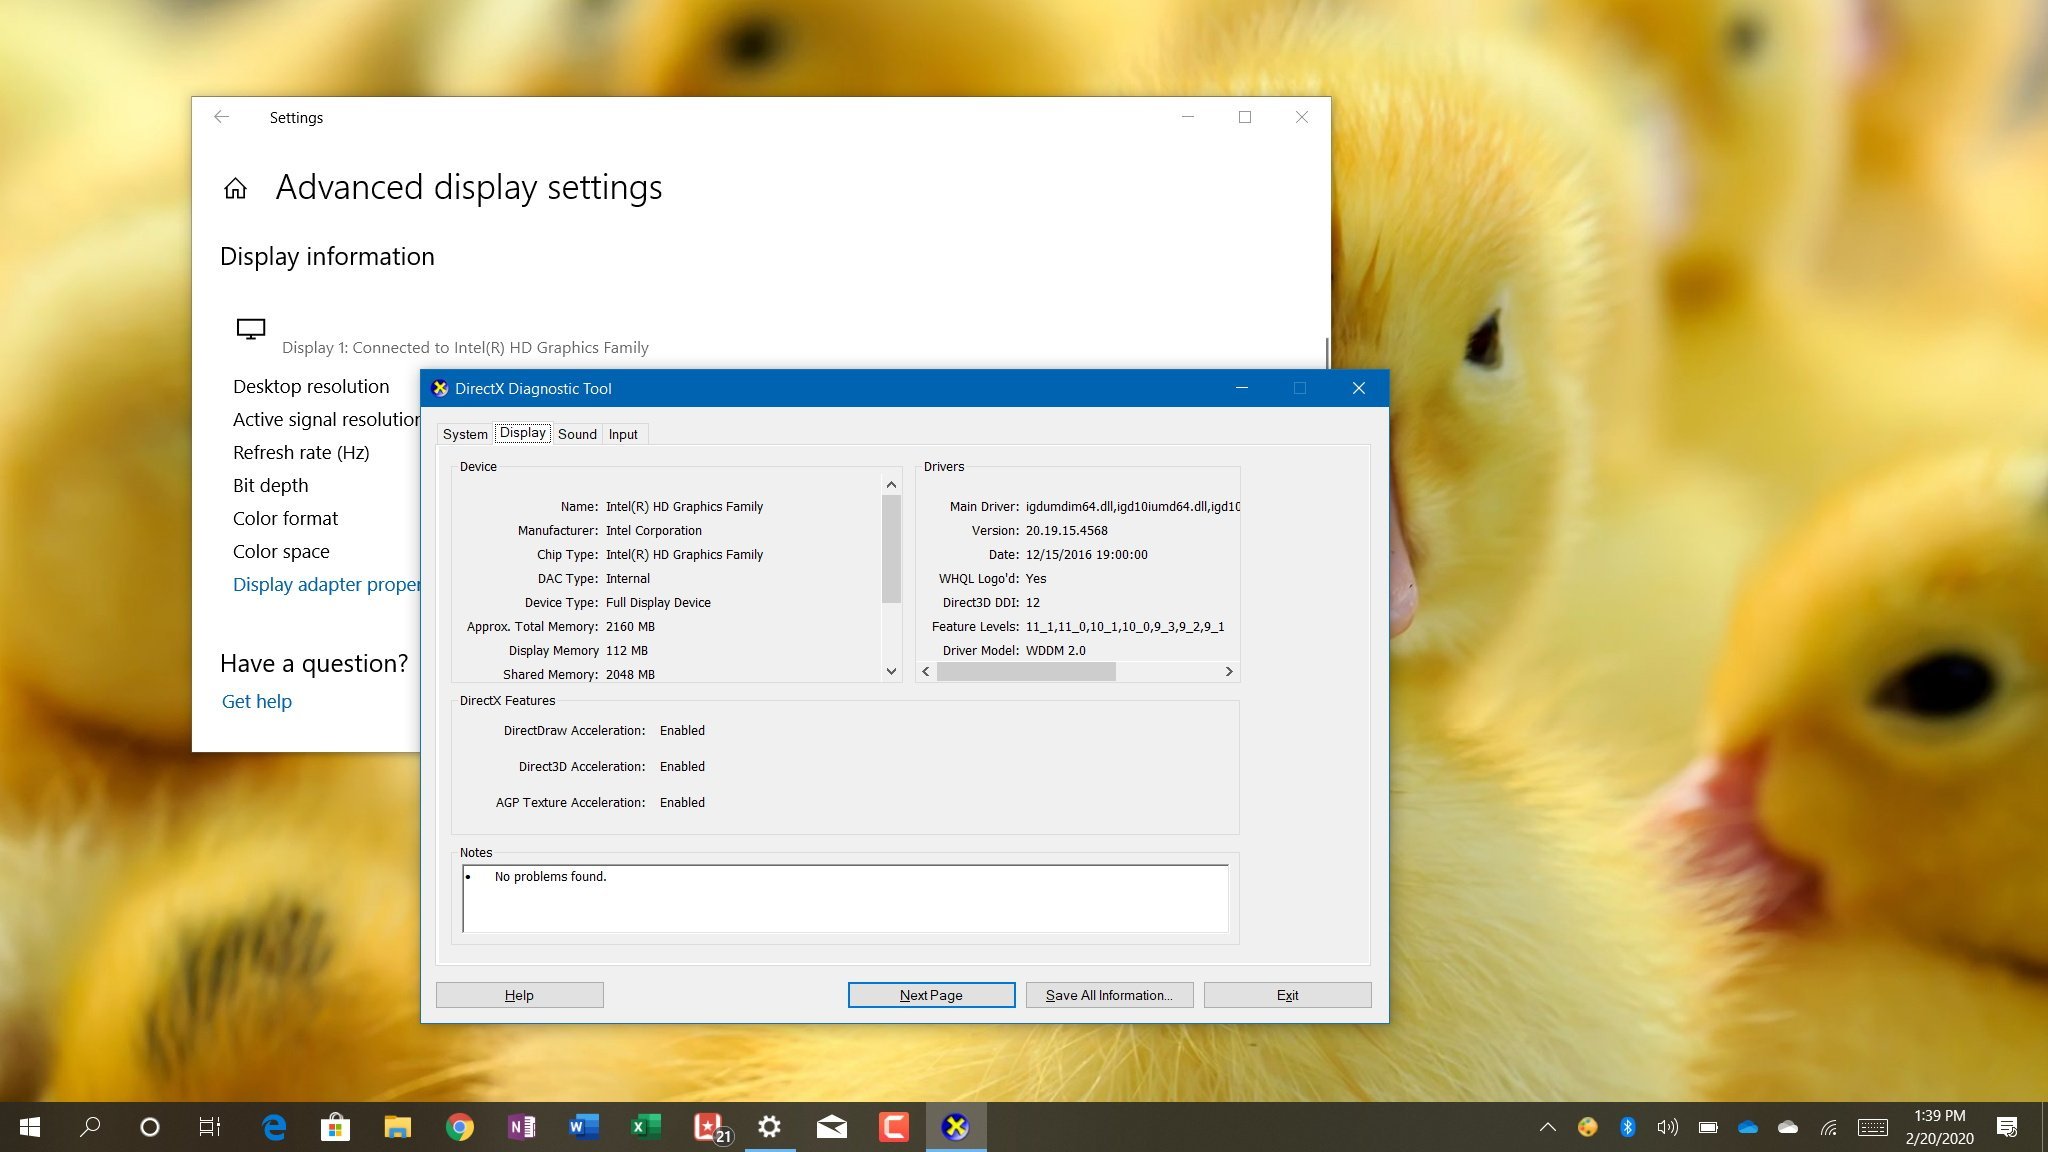
How to find out graphics card details using DirectX Diagnostic Tool
To find out the video card installed on your PC using DirectX Diagnostic Tool, use these steps:
- Open Start.
- Search for dxdiag and click the top result to open the tool.
- Click the Yes button (if applicable).
- Click the Display tab.
Under the «Device» section, check the manufacturer and processor type of the graphics card.
Source: Windows Central
After you complete the steps, you’ll be not only able to understand the basic information about the video card, but also other details, such as the amount of memory built into the device and driver information.
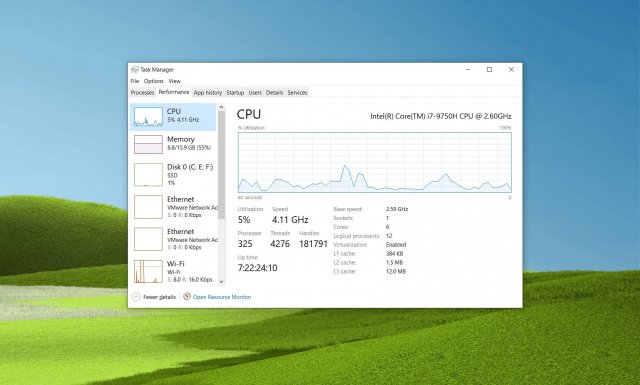
How to find out graphics card details using Task Manager
To figure out the graphics card available on Windows 10 with Task Manager, use these steps:
- Open Start.
Search for Task Manager and select the top result to open the tool.
Quick tip: You can also use the Ctrl + Shift + Esc keyboard shortcut to open Task Manager.
Click on GPU.
Source: Windows Central
Once you complete the steps, the Task Manager will display the manufacturer name and model, as well as a dedicated amount of memory, DirectX version, physical location in the motherboard, and current utilization details.
How to find out graphics card details using control panel
Alternatively, if you have a GPU from Intel, NVIDIA, or AMD, you can also use their control panel software that allows you to check the graphics card specifications, including settings to adjust many preferences.
To check the specifications using the NVIDIA Control Panel, use these steps:
- Open Control Panel.
- Click on Hardware and Sound.
- Click on NVIDIA Control Panel.
Click the System Information option from the bottom-left corner.
Source: Windows Central
Under the «Graphics card information» section, confirm the graphics model on the left side.
![]() Source: Windows Central
Source: Windows Central
Once you complete the steps, you’ll know the exact graphics card model. On the right side, you’ll also find various other details, such as the number of CUDA cores, clock speed of the processor, memory data rate, bandwidth, type, amount, and the video BIOS version.
More Windows 10 resources
For more helpful articles, coverage, and answers to common questions about Windows 10, visit the following resources:
![]()
The Dell XPS 15 is our choice for best 15-inch laptop
For a lot of people, a 15-inch laptop is a perfect size that offers enough screen for multitasking, and in a lot of cases, some extra performance from powerful hardware. We’ve rounded up the best of the best at this size.
![]()
Halo: MCC’s live service elements make it better, not worse
Halo: The Master Chief Collection is more popular than ever, but some fans don’t agree with the live service approach 343 Industries has taken with it. Here’s why those elements are, at the end of the day, great for the game and for Halo overall.
![]()
Microsoft’s Surface Duo is not ‘failing up’
Microsoft announced this week that it was expanding Surface Duo availability to nine new commercial markets. While Surface Duo is undoubtedly a work in progress, this is not a sign of a disaster. It’s also doesn’t mean that Surface Duo is selling a ton either. Instead, the reason for the expansion is a lot more straightforward.
![]()
These are the best PC sticks when you’re on the move
Instant computer — just add a screen. That’s the general idea behind the ultra-portable PC, but it can be hard to know which one you want. Relax, we have you covered!
Узнать, какие приложения используют GPU в Windows 10
Одной из наиболее скрытых функций, в недавнем обновлении Windows 10, является возможность проверить, какие приложения используют ваш графический процессор (GPU). Если вы когда-либо открывали диспетчер задач, то наверняка смотрели на использование вашего ЦП, чтобы узнать, какие приложения наиболее грузят ЦП. В последних обновлениях добавлена аналогичная функция, но для графических процессоров GPU. Это помогает понять, насколько интенсивным является ваше программное обеспечение и игры на вашем графическом процессоре, не загружая программное обеспечение сторонних разработчиков. Есть и еще одна интересная функция, которая помогает разгрузить ваш ЦП на GPU. Рекомендую почитать, как выбрать другой GPU для разных приложений в Windows 10 .
Почему у меня нет GPU в диспетчере задач?
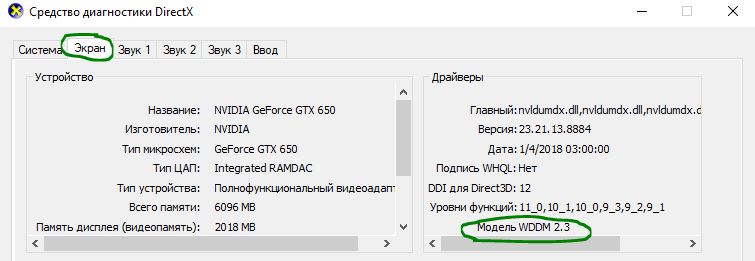
К сожалению, не все видеокарты смогут предоставить системе Windows статистику, необходимую для чтения графического процессора. Чтобы убедиться, вы можете быстро использовать инструмент диагностики DirectX для проверки этой технологии.
- Нажмите «Пуск» и в поиске напишите dxdiag для запуска средства диагностики DirectX.
- Перейдите во вкладку «Экран», справа в графе «драйверы» у вас должна быть модель WDDM больше 2.0 версии для использования GPU графы в диспетчере задач.
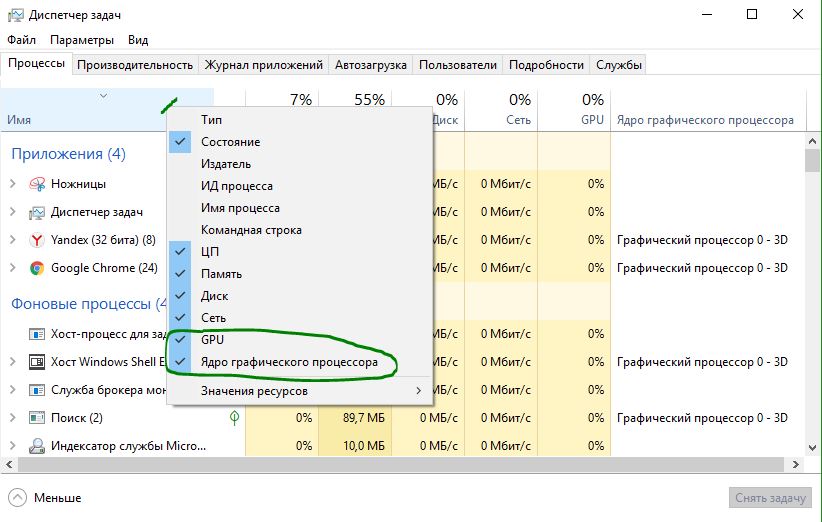
Включить графу GPU в диспетчере задач
Чтобы увидеть использование графического процессора для каждого приложения, вам нужно открыть диспетчер задач.
- Нажмите сочетание кнопок Ctrl + Shift + Esc, чтобы открыть диспетчер задач.
- Нажмите правой кнопкой мыши в диспетчере задач на поле пустое «Имя» и отметьте из выпадающего меню GPU. Вы также можете отметить Ядро графического процессора, чтобы видеть, какие программы используют его.
- Теперь в диспетчере задач, справа видна графа GPU и ядро графического процессора.
Просмотр общей производительности графического процессора
Вы можете отслеживать общее использование GPU, чтобы следить за ним при больших нагрузках и анализировать. В этом случае вы можете увидеть все, что вам нужно, на вкладке «Производительность«, выбрав графический процессор.

Каждый элемент графического процессора разбивается на отдельные графики, чтобы дать вам еще больше информации о том, как используется ваш GPU. Если вы хотите изменить отображаемые графики, вы можете щелкнуть маленькую стрелку рядом с названием каждой задачи. На этом экране также отображается версия вашего драйвера и дата, что является хорошей альтернативой использованию DXDiag или диспетчера устройств.


