- Управление приоритетом сетевых адаптеров в Windows 10
- Как изменить приоритеты сетевого адаптера с помощью панели управления
- Как изменить приоритеты сетевого адаптера с помощью PowerShell
- Configure the Order of Network Interfaces
- Настройка порядка сетевых интерфейсов Configure the Order of Network Interfaces
- How do I change wireless network priority in Windows 10?
- Replies (15)
- Change Network Connection Priority in Windows 10
- Part 1: check network card priority with command in Windows 10
- Part 2: Change wired/wireless network connection priority
- 2 ways for wired network connection:
- 2 ways for wireless network connection:
Управление приоритетом сетевых адаптеров в Windows 10
В Windows 10, если у вас есть устройство с более чем одним сетевым адаптером (например, Ethernet и Wi-Fi), каждый интерфейс получает значение приоритета автоматически на основе его сетевой метрики, которая определяет основное соединение, которое ваше устройство будет использовать для отправки и получать сетевой трафик.
Хотя, по большей части, Windows 10 делает довольно хорошую работу, выбирая оптимальное соединение для доступа к сети, иногда вам может потребоваться настроить порядок сетевых адаптеров вручную. Например, если вы хотите использовать Wi-Fi через интерфейс Ethernet, когда оба адаптера подключены к сети.
Вы можете отключить те адаптеры, которые вы не используете, но это может быть не лучшее решение, поскольку они могут понадобиться вам в качестве резервных копий. Вместо этого более простым решением является настройка метрики интерфейса, чтобы указать, в каком порядке ваше устройство должно использовать каждый сетевой адаптер, который вы можете использовать с помощью панели управления и PowerShell.
В этом руководстве по Windows 10 мы проверим вас по шагам, чтобы изменить приоритеты сетевого адаптера, чтобы оставаться на связи, используя ваш предпочтительный адаптер при использовании нескольких интерфейсов.
Как изменить приоритеты сетевого адаптера с помощью панели управления
Если вы хотите изменить порядок, в котором Windows 10 использует сетевые адаптеры, выполните следующие действия:
- Откройте настройки.
- Нажмите «Сеть и Интернет».
- Нажмите Статус.
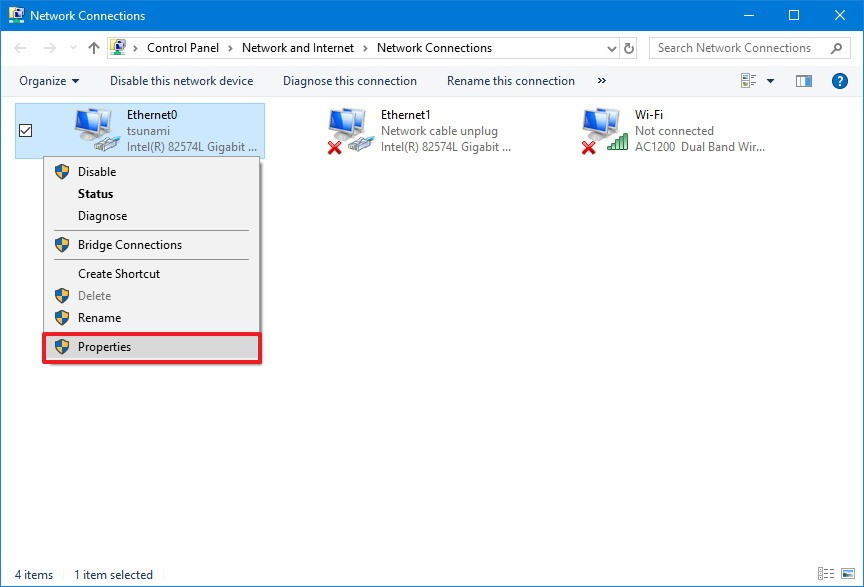
- Нажмите кнопку «Изменить параметры адаптера».

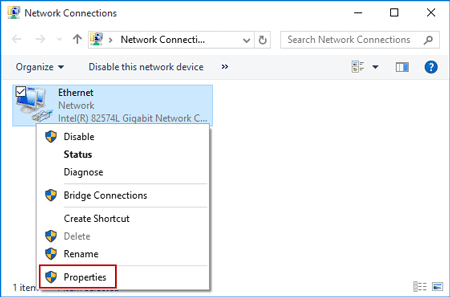
- Щелкните правой кнопкой мыши сетевой адаптер, который вы хотите установить приоритет, и выберите «Свойства».
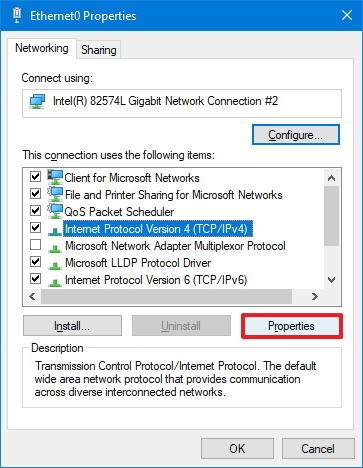
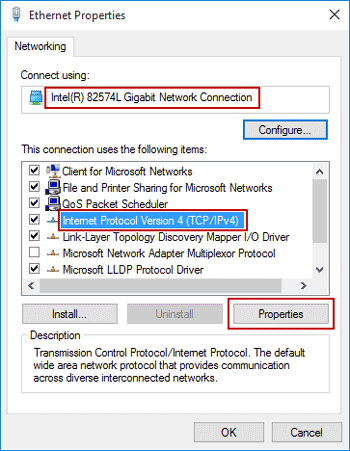
- Выберите пункт «Протокол Интернета версии 4 (TCP / IPv4)».
- Нажмите кнопку «Свойства».
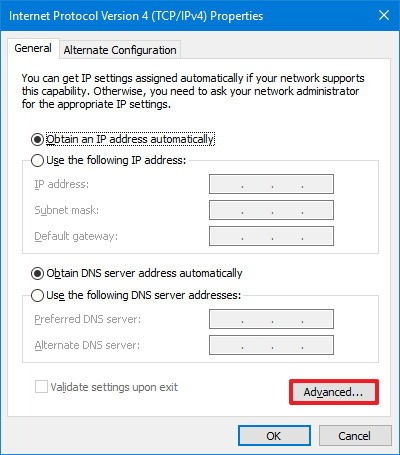
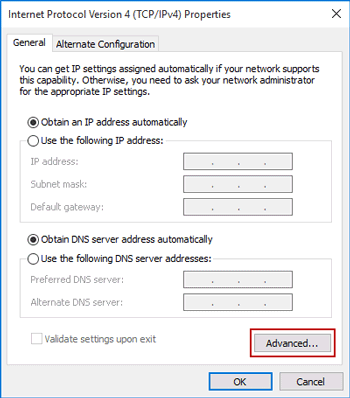
- На вкладке «Общие» нажмите кнопку «Дополнительно».
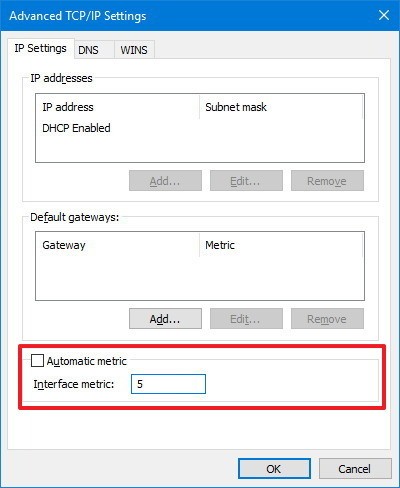
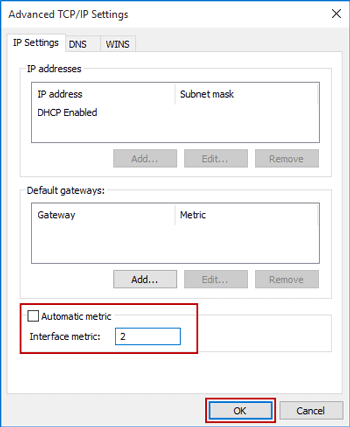
- Снимите флажок Автоматическая метрика.
- В поле «Interface metric» укажите значение приоритета для адаптера.
Быстрый совет. Чем ниже показатель метрики, тем выше приоритет, а большее число указывает на более низкий приоритет. - Нажмите кнопку OK.
- Нажмите кнопку OK еще раз.
- Нажмите кнопку «Закрыть».

После того, как вы выполнили эти шаги, Windows 10 будет определять приоритет сетевого трафика в зависимости от вашей конфигурации.
Единственное предостережение, связанное с использованием панели управления, заключается в том, что в зависимости от настройки сети вам может потребоваться настроить метрику для протокола 6 (TCP / IPv6) в Интернете, если это протокол, который вы используете. (Обычно вы будете использовать протокол TCP / IPv4.)
В любое время вы можете отменить изменения, используя те же инструкции, но на шаге 9 обязательно проверьте параметр «Автоматическая метрика».
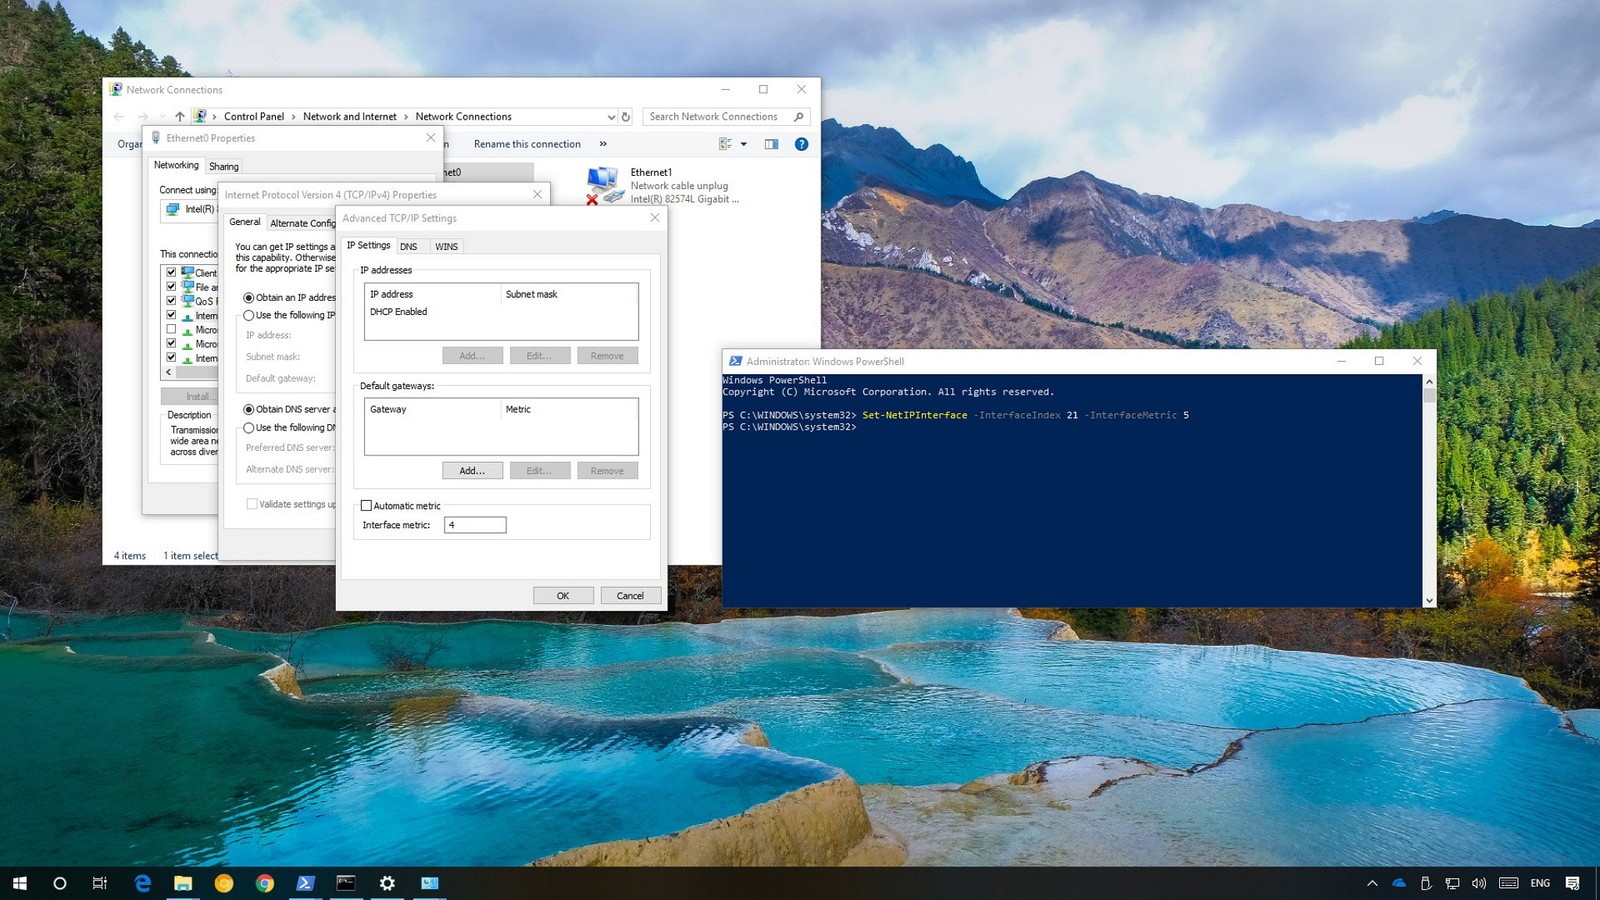
Как изменить приоритеты сетевого адаптера с помощью PowerShell
В качестве альтернативы вы можете изменить приоритеты сетевых адаптеров на устройстве с несколькими интерфейсами с помощью PowerShell следующими шагами:
- Откройте «Пуск».
- Найдите Windows PowerShell , щелкните правой кнопкой мыши верхний результат, выберите « Запуск от имени администратора».
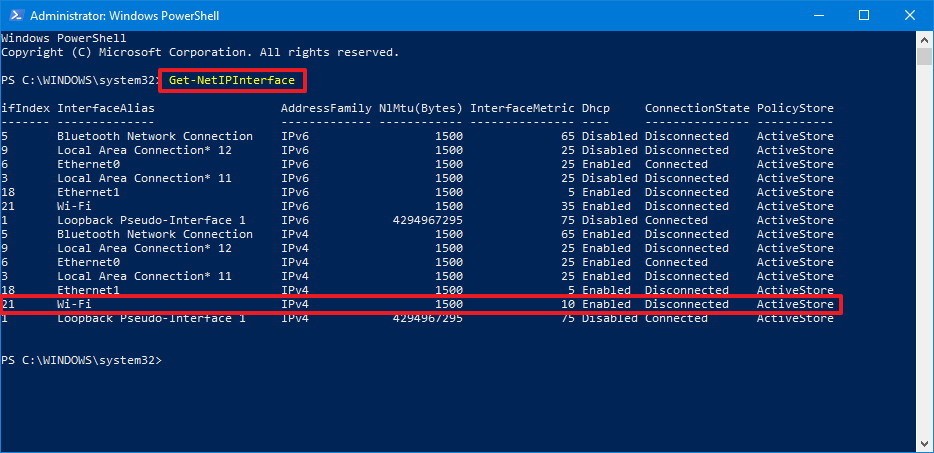
- Введите следующую команду для идентификации текущего метрика интерфейса и номера индекса интерфейса и нажмите Enter:
Get-NetIPInterface - Введите следующую команду, чтобы изменить порядок приоритета сетевого адаптера и нажмите Enter:
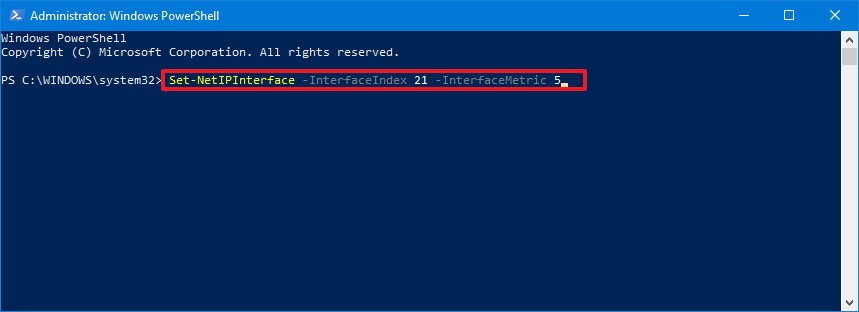
Set-NetIPInterface -InterfaceIndex 21 -InterfaceMetric 10
В команде обязательно измените значение -InterfaceIndex, чтобы отобразить сетевой адаптер, у которого вы хотите установить приоритет, и измените значение -InterfaceMetric, чтобы назначить приоритет. Кроме того, помните, что более низкий метрический номер означает более высокий приоритет, а более высокий метрический номер означает более низкий приоритет. - Введите следующую команду, чтобы увидеть новую метрику, применяемую к сетевому адаптеру, и нажмите Enter:
Get-NetIPInterface
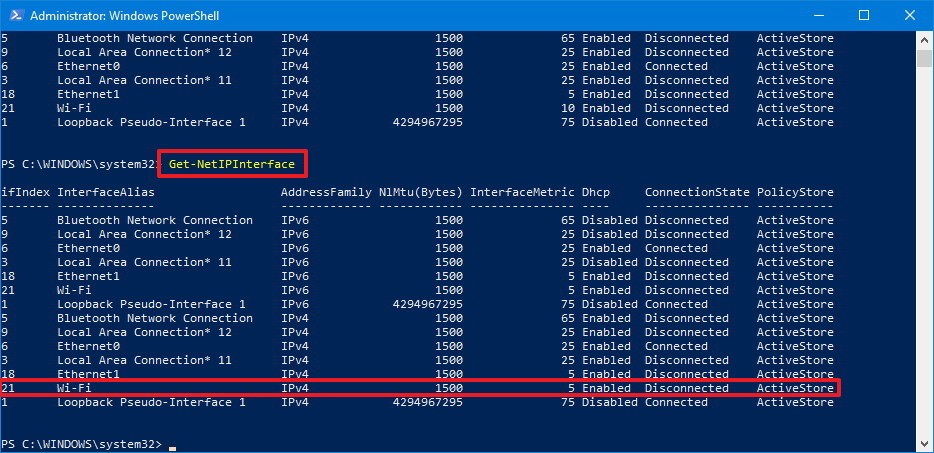
По завершении шагов Windows 10 будет определять приоритет сетевого трафика в зависимости от вашей конфигурации, когда к сети подключаются несколько сетевых адаптеров.
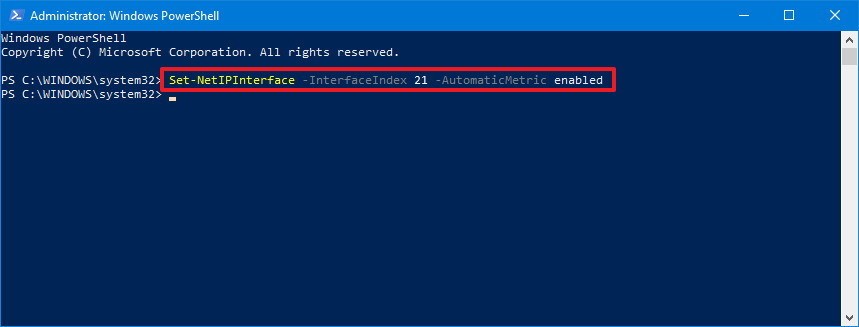
В любое время вы можете вернуться к предыдущему поведению, позволяя Windows 10 определить приоритет сетевого адаптера, используя следующие шаги:
- Откройте «Пуск».
- Найдите Windows PowerShell, щелкните правой кнопкой мыши верхний результат, выберите «Запуск от имени администратора».
- Введите следующую команду для идентификации текущего метрика интерфейса и номера индекса интерфейса и нажмите Enter:
Set-NetIPInterface -InterfaceIndex 21 -AutomaticMetric enabled
В команде обязательно измените значение -InterfaceIndex с правильным номером сетевого адаптера, к которому вы хотите применить автоматическую метрику.
Configure the Order of Network Interfaces
Applies to: Windows Server (Semi-Annual Channel), Windows Server 2016
In Windows Server 2016 and Windows 10, you can use the interface metric to configure the order of network interfaces.
This is different than in previous versions of Windows and Windows Server, which allowed you to configure the binding order of network adapters by using either the user interface or the commands INetCfgComponentBindings::MoveBefore and INetCfgComponentBindings::MoveAfter. These two methods for ordering network interfaces are not available in Windows Server 2016 and Windows 10.
Instead, you can use the new method for setting the enumerated order of network adapters by configuring the interface metric of each adapter. You can configure the interface metric by using the Set-NetIPInterface Windows PowerShell command.
When network traffic routes are chosen and you have configured the InterfaceMetric parameter of the Set-NetIPInterface command, the overall metric that is used to determine the interface preference is the sum of the route metric and the interface metric. Typically, the interface metric gives preference to a particular interface, such as using wired if both wired and wireless are available.
The following Windows PowerShell command example shows use of this parameter.
The order in which adapters appear in a list is determined by the IPv4 or IPv6 interface metric. For more information, see GetAdaptersAddresses function.
For links to all topics in this guide, see Network Subsystem Performance Tuning.
Настройка порядка сетевых интерфейсов Configure the Order of Network Interfaces
Применяется к: Windows Server (Semi-Annual Channel), Windows Server 2016 Applies to: Windows Server (Semi-Annual Channel), Windows Server 2016
В Windows Server 2016 и Windows 10 можно использовать метрику интерфейса для настройки порядка сетевых интерфейсов. In Windows Server 2016 and Windows 10, you can use the interface metric to configure the order of network interfaces.
Это отличается от предыдущих версий Windows и Windows Server, которые позволяли настраивать порядок привязки сетевых адаптеров с помощью пользовательского интерфейса или команд инеткфгкомпонентбиндингс:: мовебефоре и Инеткфгкомпонентбиндингс:: мовеафтер. This is different than in previous versions of Windows and Windows Server, which allowed you to configure the binding order of network adapters by using either the user interface or the commands INetCfgComponentBindings::MoveBefore and INetCfgComponentBindings::MoveAfter. Эти два метода упорядочения сетевых интерфейсов недоступны в Windows Server 2016 и Windows 10. These two methods for ordering network interfaces are not available in Windows Server 2016 and Windows 10.
Вместо этого можно использовать новый метод для задания перечисленного порядка сетевых адаптеров, настроив метрику интерфейса для каждого адаптера. Instead, you can use the new method for setting the enumerated order of network adapters by configuring the interface metric of each adapter. Метрику интерфейса можно настроить с помощью команды Windows PowerShell Set-нетипинтерфаце . You can configure the interface metric by using the Set-NetIPInterface Windows PowerShell command.
При выборе маршрутов сетевого трафика и настройке параметра интерфацеметрик команды Set-нетипинтерфаце общая метрика, используемая для определения предпочтения интерфейса, является суммой метрики маршрута и метрики интерфейса. When network traffic routes are chosen and you have configured the InterfaceMetric parameter of the Set-NetIPInterface command, the overall metric that is used to determine the interface preference is the sum of the route metric and the interface metric. Как правило, метрика интерфейса дает предпочтение конкретному интерфейсу, например использование проводной сети, если доступны как проводные, так и беспроводные сети. Typically, the interface metric gives preference to a particular interface, such as using wired if both wired and wireless are available.
В следующем примере команды Windows PowerShell показано использование этого параметра. The following Windows PowerShell command example shows use of this parameter.
Порядок, в котором адаптеры отображаются в списке, определяется метрикой интерфейса IPv4 или IPv6. The order in which adapters appear in a list is determined by the IPv4 or IPv6 interface metric. Дополнительные сведения см. в разделе функция жетадаптерсаддрессес. For more information, see GetAdaptersAddresses function.
Ссылки на все разделы данного руководства см. в разделе Настройка производительности сетевой подсистемы. For links to all topics in this guide, see Network Subsystem Performance Tuning.
How do I change wireless network priority in Windows 10?
For example, in Windows 7 there is a «Manage wireless networks» option where you can simply move wireless networks up and down to specify which should be given priority when more than one is available:
How do I do this in Windows 10?
Replies (15)
* Please try a lower page number.
* Please enter only numbers.
* Please try a lower page number.
* Please enter only numbers.
![]()
Thank you for using Windows 10.
I would like to inform you that managing wireless network option is not available by default but you can use the commands mentioned by «wpcoe» in the following link and check if that helps:
Note: Although the link is for previous version of Windows, but we can give it a try.
Hope the information is useful. Let us know if you need more information and we’ll be glad to assist you.
1 person found this reply helpful
Was this reply helpful?
Sorry this didn’t help.
Great! Thanks for your feedback.
How satisfied are you with this reply?
Thanks for your feedback, it helps us improve the site.
How satisfied are you with this reply?
Thanks for your feedback.
I totally agree I want to know the answer to the above question. I dislike very much that my wifi keeps connecting to the office network next door when it is weak rather than my home network when I get home.
I would totally like to set the home network as a network of higher priority when they are both in range. In my case I’m at home most of the time & not at the office next door. Unfortunately Windows 10 constantly chooses to connect to the weaker office signal first & the internet from that network is much slower than the home network, simply because signal strength is weaker.
Another place this is inconvenient: when I setup multiple wifi networks at public events. I want password to all saved, but as an event sponsor, I want my laptop to connect to the private network in the room so that I can get business done faster on the less bogged down network.. Windows 10 does not allow me to tell it to prefer one network or the other until I manually override it when I return to the event.
Every OS I have used prior to Windows 10 has given us this option. (XP, Windows 7, Android, etc.) I can’t for the life of me imagine why microsoft would think removing control of this could be an improvement.. Please return control of this to your users!
Change Network Connection Priority in Windows 10
Generally, we have no reason to change network connection priority, because Windows computer has chosen the right network connection. But if you want to select the preferred one network and want to automatically connect to it, or you just want to make the connection sequence different, this article could help you.
Firstly, let’s see the current network card priority or network connection priority. And then move the network you like to the preferred place in Network Advanced Settings or prioritize the wireless network with command.
Part 1: check network card priority with command in Windows 10
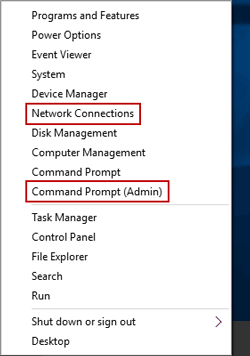
1. Press Win + X keys and select Command Prompt (Admin) in menu.
2. Enter command «netstat –rn | more» and press Enter button.
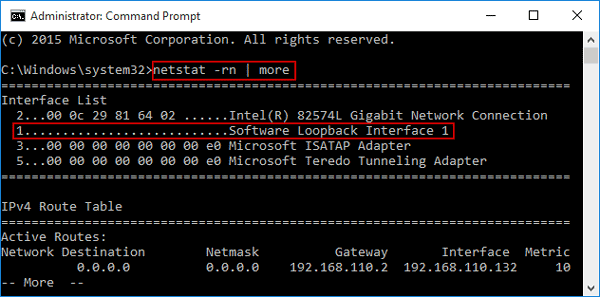
In the following results, you can see the Interface List in CMD window. Under Interface List, the number in the left side means that order of network card. So we can see now the first connection network is «Software Loopback Interface», followed by «Gigabit Network Connection».
Part 2: Change wired/wireless network connection priority
2 ways for wired network connection:
Way 1: Change Network connections advanced settings
1. Press Windows key + X and select Network Connections from the menu.
2. Press the Alt key in keyboard and click Advanced Advanced Settings.
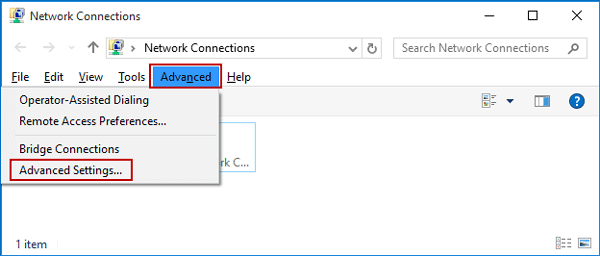
3. Select the network connection and click the arrows in the right side to change the network connection priority.
![]()
4. Click OK at last when you think you have organized the priority of the network connection.
Then the computer will follow the order to connect to network. Besides the simple and direct way, you could also change network priority through Internet Protocol.
Way 2: Change Internet Protocol settings
1. Open Network Connections and right click the network you want to change its priority.
2. Select Properties and click “»nternet Protocol Version 4 (TCP/IPv4)» in network Properties. Click «Properties» again.
3. In the Protocol Properties dialog, click Advanced button.
4. In Advanced TCP/IP Settings dialog, uncheck the option Automatic metric and enter the connection sequence for the network. Click OK to save priority changes.
2 ways for wireless network connection:
Way 1: Change the automatic connected network
- 1. Click the wireless icon in the notification area.
- 2. Connect to a network and choose connect automatically, to move the network up in the priority list.
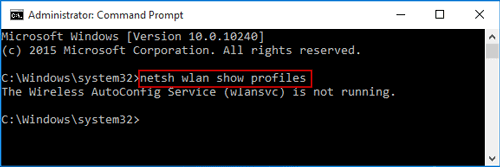
Way 2: Command prompt
1. Run Command Prompt (Admin).
2. Display all the connections that linked to your computer.
netsh wlan show profiles
Note: If there is no wireless network, the command would prompt you that «The Wireless AutoConfig Service is not running».
3. Chang the order of precedence with command below.
netsh wlan set profileorder name=»Guest1″ interface=»Wi-Fi» priority=1
Note: Guest1 is the name of the active network which you want to prioritize. You substitute this name with the one whose precedence is to be changed.


