- Windows 10 File Explorer hangs when trying to load Quick Search
- Replies (2)
- Internet Explorer has stopped working, freezes, crashes, hangs in Windows 10
- Internet Explorer Freezes Or Crashes
- Как включить режим Internet Explorer в Microsoft Edge Chromium.
- Как включить режим Internet Explorer в Microsoft Edge.
- Открытие сайта в режиме IE.
- How to fix File Explorer problems in Windows 10
- How can I fix File Explorer problems on Windows 10?
- 1. Run netsh and winsock reset
- 2. Uninstall KB3081449 and KB3081448 updates
- 3. Hide hidden files and folders
- 4. Enable Launch folder windows in a separate process
- 5. Disable Quick Access and File Preview features
- 6. Perform a clean boot
- 7. Reset the file associations
- 8. Remove IDT Audio
- 9. Change scaling settings
- 10. Make sure that your PC is set for dual monitors
Windows 10 File Explorer hangs when trying to load Quick Search
This is what I had to do to resolve this issue:
I could not even open File Explorer to change this setting. I did find another way to change the File Explorer Options:
1. Open the Start Menu, and click on the Gear to go to Settings
2. Type File Explorer in the Search. You should then get an option to select File Explorer Options.
3. Click on File Explorer Options. Change the «Open File Explorer To» dropdown to «This PC».
4. Click Apply, then OK.
Replies (2)
You mean the Quick Access view?
Do you have a lot of network drive connections, mapped drives?
This can cause network browsing to hang if you are not connected to your VPN or network.
Try this first. to rule out corruption.
You can try a couple things.
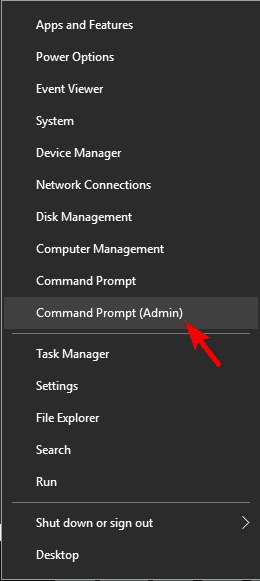
Right click your start button and select Command prompt (Admin) to bring up elevated Command prompt.
In Command prompt type sfc /scannow and press enter.
Restart the computer.
If that doesn’t work then try this,
Right click your start button and select Command prompt (Admin) to bring up elevated Command prompt.
In the Administrator: Command Prompt window, type the following commands.
Press Enter key after each command:
DISM.exe /Online /Cleanup-image /Scanhealth
DISM.exe /Online /Cleanup-image /Restorehealth
Important: When you run this command, DISM uses Windows Update to provide the files that are required to fix corruptions.
To close the Administrator: Command prompt window, type Exit, and then press Enter.
Restart your computer.
3 people found this reply helpful
Was this reply helpful?
Sorry this didn’t help.
Great! Thanks for your feedback.
How satisfied are you with this reply?
Thanks for your feedback, it helps us improve the site.
How satisfied are you with this reply?
Thanks for your feedback.
I’m Diego Rios, an Independent Advisor willing to help other Microsoft customers.
Regarding your question:
Try these procedures:
Option 1: Close Programs like Anti-viruses
If you are using the anti-virus then it may be the cause of this error. In which case, you just have to use your task manager to close the program. Once closed, the file explorer will start working properly. To close your anti-virus, do the following:
1. Press CTRL, SHIFT and ESC key simultaneously (CTRL + SHIFT + ESC).
2. This should open the Task Manager.
3. In the Task manager, click the Processes
4.. The Processes tab has a number of columns, look at the Description column and find the process that is related to the anti-virus.
5.Select the anti-virus process from the list and click End Process (bottom right corner).
6. Click Yes when prompted for confirmation.
Once done check if the problem is solved or not. If you are still experiencing the problem then make sure there aren’t any other security related programs running in the background. There might be programs other than the security programs that might be causing this issue. Try to turn off as many applications as you can to see if the problem is solved.
option 2: Restart the File Explorer
Some of the technical problems can be solved by a simple restart, It does tend to solve the problem from time to time; to do so, follow these steps:
1. Press CTRL, SHIFT and ESC key simultaneously (CTRL + SHIFT + ESC).
2. This should open the Task Manager.
3. In the Task manager, click the Processes
4. Locate and select the Windows Explorer.
5. Click the Restart bottom at the bottom right corner
This will restart the file explorer and that will be the end of the problem.
Option 3: Change File Explorer Options
Changing the File Explorer’s “Open File Explorer To:” option has helped solve the issue for a lot of users. The problems seems to appear if this option isn’t set to “This PC” option. Follow the steps given below to change this setting.
1. Press and Hold Windows key and press R
2. Type control panel and press Enter or click Ok
3. Type File Explorer Options in the search bar
4. Select File Explorer Options
5. This will open the Folder Options
6. Select the General tab if it isn’t already
7. Select This PC from the drop down menu in Open File Explorer To:
Once done, click Ok and the problem should be resolved.
Option 4: Clear the Cache & Create New Path
Clearing the cache or history of the Windows Explorer and creating a new path has solved the issue for a lot of users. So, here are the steps for clearing cache and creating a new path.
1. In the toolbar, right click the File Explorer icon and select Unpin from toolbar.
2. Press and Hold Windows key and press R
3. Type control panel and press Enter or click Ok
4. Type File Explorer Options in the search bar
5. Select File Explorer Options
6. This will open the Folder Options
7. Select the General tab if it isn’t already
8.In the General tab, click the Clear button in the Privacy section.
9.Now, close the Windows Explorer by clicking the X at the top right corner of the window
10. Right click on the Desktop at any empty space.
11. Click New and then click Shortcut.
12. This will open the Create new shortcut
13, In the dialog box, type C:\Windows\explorer.exe and click Next.
14. Rename this file to File Explorer and click Finish.
Note: This is a non-Microsoft website. The page appears to be providing accurate, safe information. Watch out for ads on the site that may advertise products frequently classified as a PUP (Potentially Unwanted Products). Thoroughly research any product advertised on the site before you decide to download and install it.
In case the steps above didn’t works you can reference to these Links below:
Internet Explorer has stopped working, freezes, crashes, hangs in Windows 10
Internet Explorer 11 is a pretty stable browser and runs very well on Windows. But there maybe be times when you may find that, for some unknown reasons, your Internet Explorer freezes, crashes or frequently hangs in Windows 10/8/7 – or that it does not load or start at all. You may even see a Internet Explorer has stopped working message.
Internet Explorer Freezes Or Crashes
Here are some troubleshooting steps you may want to try if you find that your Internet Explorer freezes or crashes frequently:
1] To begin with, clear Internet Explorer Cache via it Settings or by using Disk Cleanup Tool or run CCleaner. Next, run your antivirus software to check for malware infections. Run sfc /scannow and at the end, reboot if asked for. This will replace corrupted system files if any. Finally, Open IE, click Tools > Internet Options > Security > Reset all Zones to Default level, and see if it helps.
2] If still, you find your IE giving problems, close it and run IE (No Add-ons). This opens up the browser without loading any add-ons, toolbars or plug-ins. If it works fine, then it is obviously one of your add-ons that may be causing problems. Use the Manage Add-ons tool, and disable each one after the other to find out which one is causing the problem.
Try to narrow down and identify the offending add-on and then disable or remove it completely.
3] In Internet Options, go to Advanced Tab and click on Reset tab. Restart IE. The Reset Internet Explorer option deletes all temporary files disables any add-ons, plug-ins, toolbars, and resets all changed settings to default. Although this is a quick-fix, you will have to re-install the add-ons.
4] Use Software Rendering instead of GPU Rendering and see if stops the crashes. You will find the setting under Internet Options > Advanced tab.
5] You may want to read this article on how to Repair Internet Explorer and see if something helps you.
6] You can also see if the Internet Explorer Troubleshooter Fix It helps in resolving your problems. It fixes issues like IE freezes, running slow, security issues, etc.
7] However if you find that the problem persists, you may have to make a few changes in the Registry. Do back up your registry and create a System Restore Point, before making any changes.
Run regedit and navigate to the following key:
Right-click in the right side and select New.
Create a New DWORD value called “MaxConnectionsPerServer”
Double-click “MaxConnectionsPerServer” and give the value as “10”
Create another new DWORD with the name “MaxConnectionsPer1_0Server”
Double-click it and give the value as “10“.
Save and Exit from the registry.
Additionally, also see if the following registry subkey is enabled:
If it is absent, no issues. But if it is present and of its DWORD value is set at 1, change this value to 0, Click OK and Exit.
Как включить режим Internet Explorer в Microsoft Edge Chromium.
Публикация: 22 Июль 2019 Обновлено: 31 Июль 2019
Microsoft тестирует режим Internet Explorer 11 в версии браузера Edge на основе Chromium. Режим ориентирован в первую очередь на корпоративных клиентов и требуется при посещении сайтов, оптимизированных для работы в IE. Это решение продиктовано удобством для пользователей, которым не придется переключаться между браузерами в случае необходимости. В данном руководстве рассмотрим, как включить и использовать эту функцию.
Наряду со всеми функциями и улучшениями в новых выпусках Microsoft Edge на движке Chromium, Microsoft планирует включить режим совместимости с использованием механизма визуализации Internet Explorer для загрузки старых веб-сайтов и сервисов.
Функция известна как режим IE, и предназначена для организаций, которые загружают внутренние сайты без необходимости использовать отдельный браузер или переделывать сайт. Новый подход позволяет загружать страницы в Microsoft Edge так же, как в Internet Explorer, без необходимости использовать несколько браузеров.
Если вы хотите начать использовать эти новые функции, версия Microsoft Edge, доступная по каналу Developer и Canary, уже содержит экспериментальные настройки для включения этой функции.
В этом руководстве вы узнаете, как включить режим IE для загрузки устаревших веб-сайтов с помощью механизма рендеринга Internet Explorer для Microsoft Edge Chromium в Windows 10.
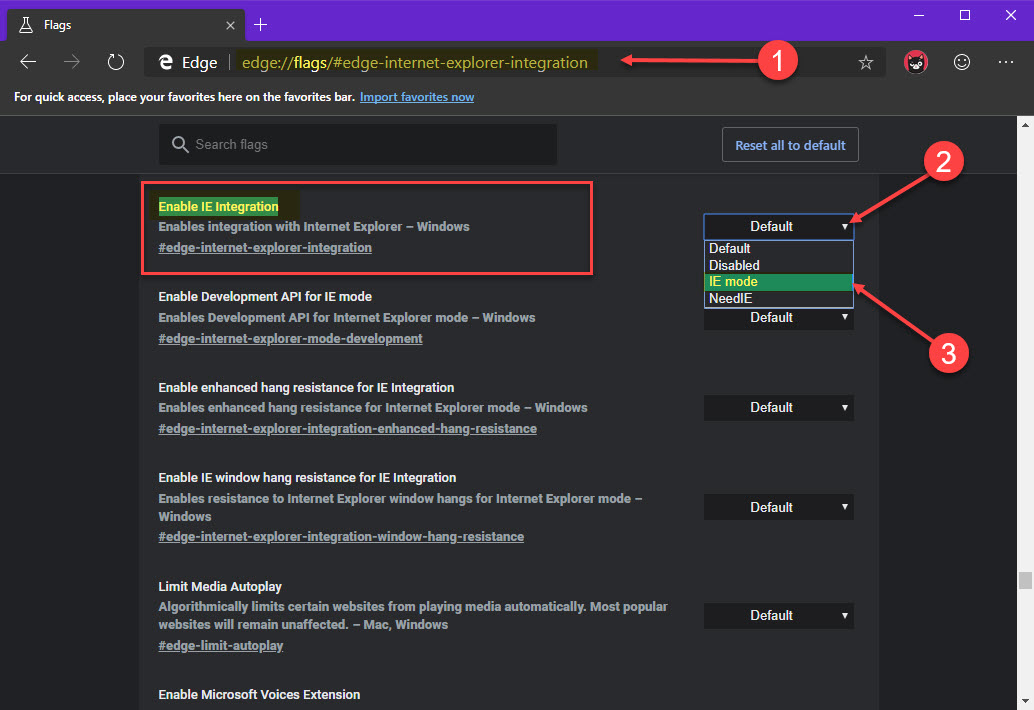
Как включить режим Internet Explorer в Microsoft Edge.
Вы можете использовать любой выпуск браузера версии 77.0.217.1 или выше.
Используйте эти шаги, чтобы включить режим IE в Microsoft Edge:
Шаг 1: Откройте Microsoft Edge.
Шаг 2: Введите следующий путь в адресной строке:
Шаг 3: Используйте раскрывающееся меню справа и выберите опцию «IE Mode».
Шаг 4: (Необязательно) Введите следующий путь в адресной строке:
Шаг 5: Используйте раскрывающееся меню справа и выберите параметр «Enabled».
Шаг 6: (Необязательно) Введите следующий путь в адресной строке:
Шаг 7: Используйте раскрывающееся меню справа и выберите параметр «Enabled».
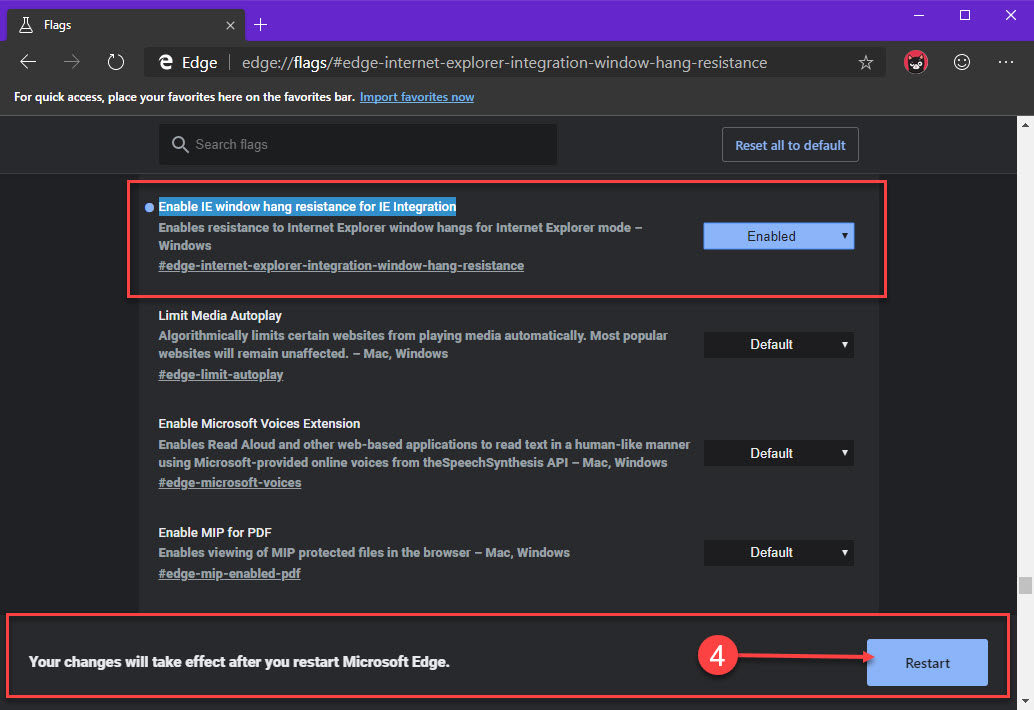
Шаг 8: Нажмите кнопку «Restart».
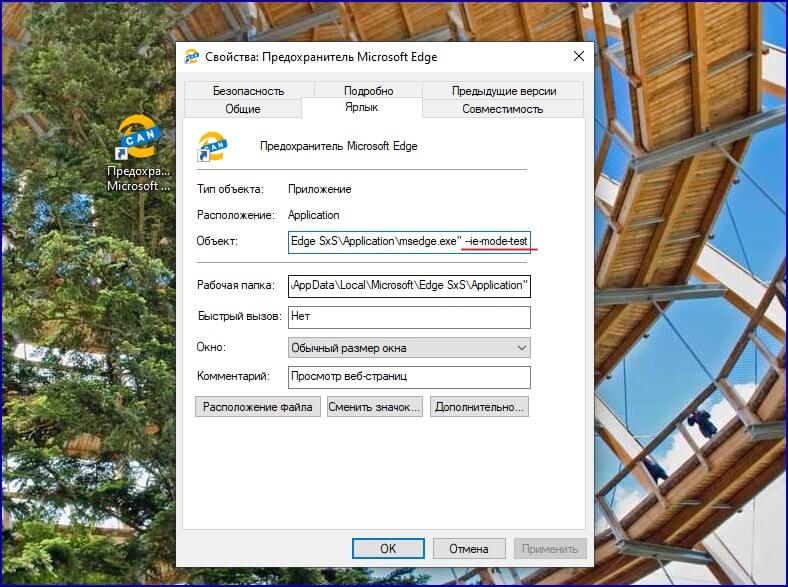
Шаг 9: Кликните правой кнопкой мыши на ярлык Edge на рабочем столе и выберите в контекстном меню «Свойства».
Шаг 9: На вкладке «Ярлык», измените значение в текстовом поле «Объект:», добавьте параметр —ie-mode-test после msedge.exe.
После выполнения этих шагов Microsoft Edge сможет загружать старые веб-сайты с помощью механизма рендеринга Internet Explorer.
Открытие сайта в режиме IE.
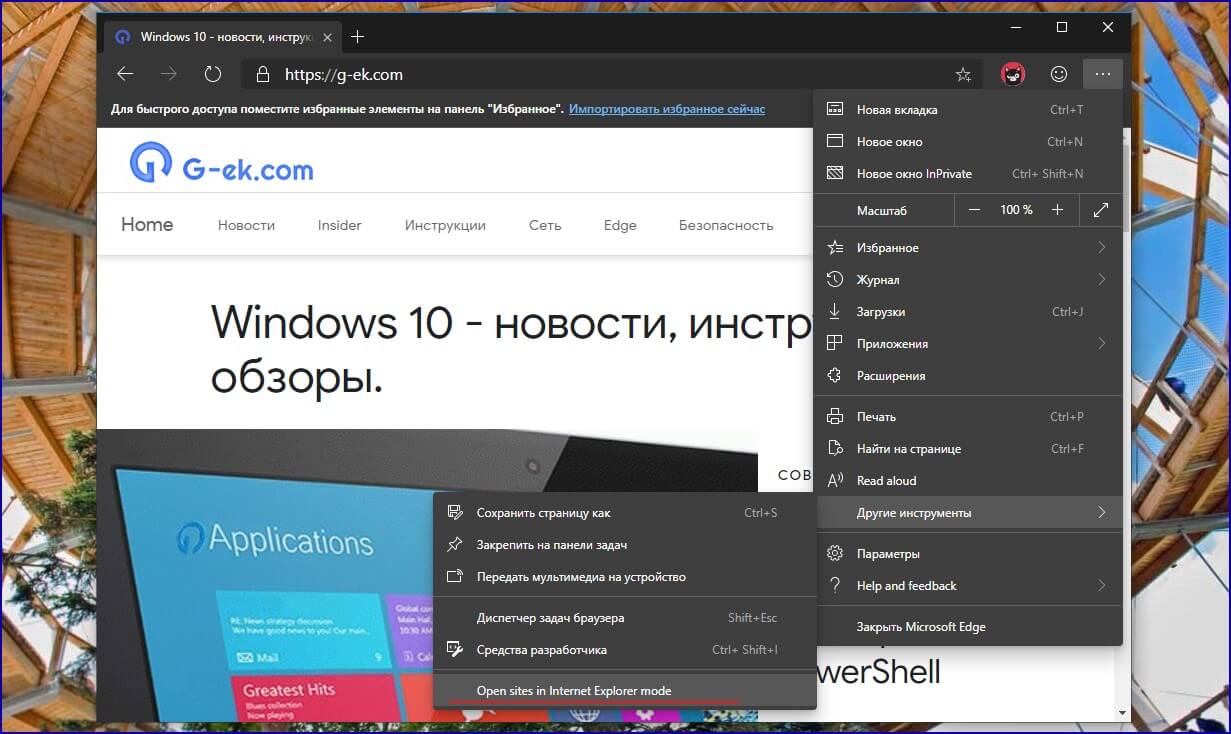
Используйте эти шаги для загрузки сайта в режиме IE:
Шаг 1: Откройте Microsoft Edge с помощью ярлыка в который мы внесли изменения.
Шаг 2: Загрузите любой веб-сайт, новый режим предназначен для старых страниц с отсутствием современных функций.
Шаг 3: Нажмите кнопку «Настройки» (три точки) в правом верхнем углу.
Шаг 4: Нажмите на «Дополнительные инструменты» и выберите «Показать эту страницу, используя Internet Explorer» (Show this page using Internet Explorer).
Во время анонса заявлялось, что функция будет работать немного иначе, страницы в режиме Internet Explorer, должны запускаться в новой вкладке Edge.
После того как вы выполните эти шаги, веб-сайт будет отображаться в режиме совместимости, и вы увидите знакомый значок IE в левой части адресной строки, указывающий, что веб-сайт использует Internet Explorer.
Режим IE — это чисто корпоративная функция. То есть тот, кто использует обычный Microsoft Edge в Canary, Dev или Beta, скоро не найдет режим IE. Это возможно будет только в версии Enterprise, которая предлагается дополнительно, ссылка ниже:
How to fix File Explorer problems in Windows 10

- The File Explorer is a useful tool meant to enable easy browsing and management of files and folders stored on a PC running Windows.
- If one day, the file mangement app decides not to work properly as in not open, not load or crash, your workflow will surely get interrupted. Check out the solutions below to quickly get the file manager up and running again.
- Looking for in-depth infos on the topic? Go straight to the File Explorer page and get all the right fixes in one place.
- Whenever you’re ready, dig into our Windows 10 errors hub and keep your Windows PC in perfect condition at all times.
Many users have already switched to Windows 10, but it seems that some of the users that have switched to Windows 10 are experiencing certain issues.
Some users are having file explorer problems with Windows 10, but fortunately, there are few solutions that you can try.
How can I fix File Explorer problems on Windows 10?
File Explorer problems can be rather annoying, and in this article, we’re going to cover the following issues:
- File Explorer Windows 10 not responding, working, opening, loading, showing – There are various problems with File Explorer that can occur, and in this article, we’re going to show you how to fix most of these problems.
- Windows 10 File Explorer hangs – Many users reported that File Explorer hangs on their PC. This can be an annoying problem, but you might be able to solve it by using one of our solutions.
- Windows 10 File Explorer won’t open, keeps closing – According to users, they are unable to start File Explorer on their PC. According to them, File Explorer keeps closing and won’t stay open at all.
- File Explorer Windows 10 slow, crashes – Many users reported crashes and slowdowns while using File Explorer. We already covered File Explorer crashes and File Explorer slowdowns, so be sure to check those articles for more information.
- File Explorer freezes Windows 10 – Many users reported that File Explorer freezes on their PC. We already covered this issue in our File Explorer freezes article, so be sure to check it out for more solutions.
Users report problems with Windows Explorer saying that Windows Explorer crashes, or that it hangs when the user right-clicks something.
As you can see, this is a big problem since it can drastically limit your user experience, so here are few solutions that you might want to try.
1. Run netsh and winsock reset
- Run Command Prompt as administrator. You can do so by pressing Windows key + X and choosing Command Prompt (Admin) from the menu. In addition, you can type cmd in the Search bar and right click the Command Prompt and choose Run as administrator.

- Type netsh in Command Prompt and press Enter.
- Next type winsock reset into Command Prompt and hit Enter to run it.
- After the process is completed you’ll be notified and then you just need to restart the computer for changes to take effect.
2. Uninstall KB3081449 and KB3081448 updates
Several users reported that update KB3081449 was the cause of the issue, so let’s see how to delete it.
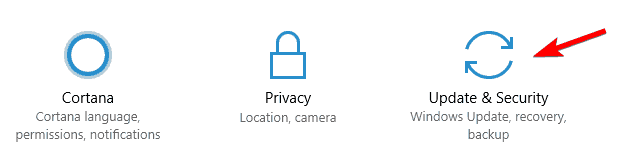
- Go to Settings and navigate to Update & Security section.
- Next, go to View installed update history > Uninstall Updates.
- Find update KB3081449 and uninstall it. If this doesn’t help, find update KB3081448 and uninstall it as well.

3. Hide hidden files and folders
If you’re having problems with File Explorer such as crashes, you might be able to fix the issue simply by hiding hidden files and folders. Some files are hidden by default, but you can reveal them by changing your settings.
If hidden folders are revealed, you might experience issues with File Explorer, so you should revert these settings by doing the following:
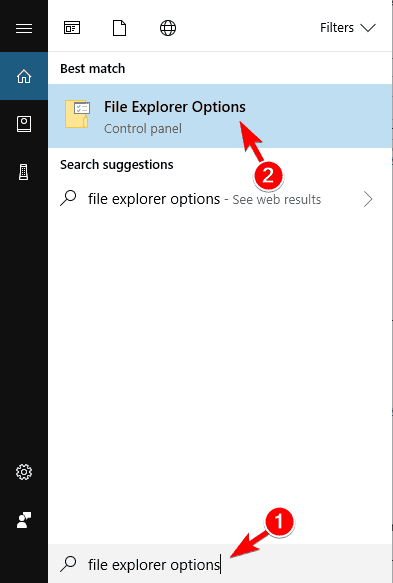
- Press Windows Key + S and enter file exploreroptions. Select File Explorer Options from the list of results.
- When File Explorer Options window opens, go to the View tab and select Don’t show hidden files, folders or drives. Click on Apply and OK to save changes.
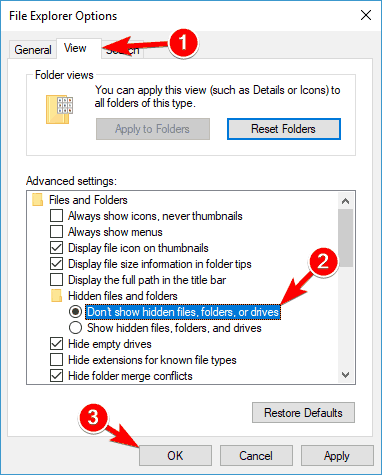
After making these changes, the problem with File Explorer should be resolved. Many users reported that this solution worked for them, so be sure to try it out.
4. Enable Launch folder windows in a separate process
Another way to fix File Explorer problems on Windows 10 is to enable Launch folder windows in a separate process option. This is rather simple and you can do it by following these steps:
- Open File Explorer Options like we showed you in the previous solution.
- Now navigate to the View tab and check Launch folder windows in a separate process. Click Apply and OK to save changes.
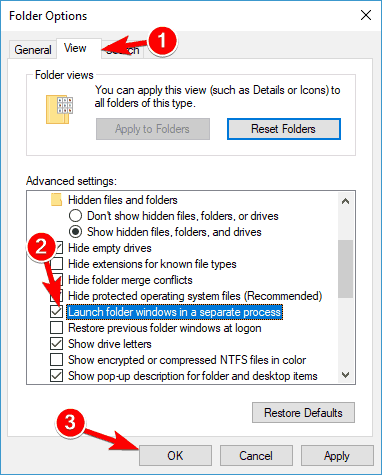
This solution reportedly worked for many users, so we strongly encourage you to try it out.
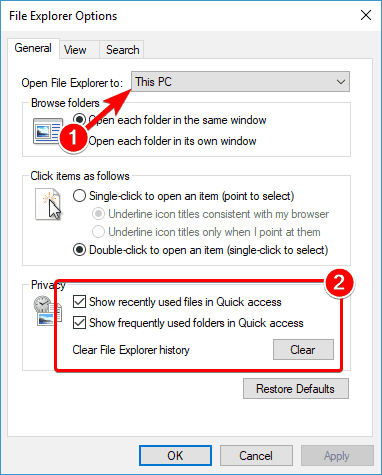
5. Disable Quick Access and File Preview features
If you’re having File Explorer problems, you might be able to fix them simply by changing a few settings. According to users, you just have to disable Quick Access and File Preview features.
This is rather simple, and to do it, you just need to follow these steps:
- Open File Explorer Options.
- In the General tab, set Open File Explorer toThis PC. Now uncheck Show recently used files in Quick access and Show frequently used folders in Quick access options. If you want, you can click the Clear button to clear the history, but it’s not mandatory.
- Now go to the View tab and uncheck Show preview handlers in preview pane. Now click on Apply and OK to save changes.
- Lastly, make sure that preview pane is disabled. You can disable it once you open File Explorer by pressing Alt + P on your keyboard.
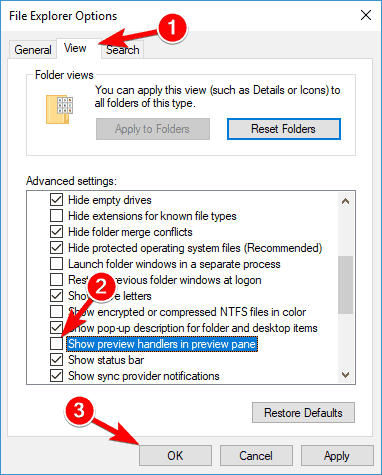
After changing these options, check if the problems with File Explorer still appear.
6. Perform a clean boot
Sometimes certain startup applications can interfere with your PC and cause File Explorer problems to occur. However, you can easily find the problematic application by performing a clean boot.
To do that, you need to follow these steps:
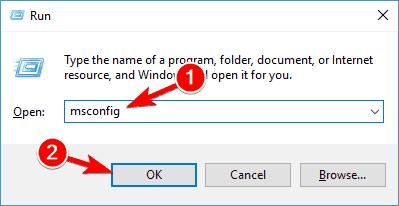
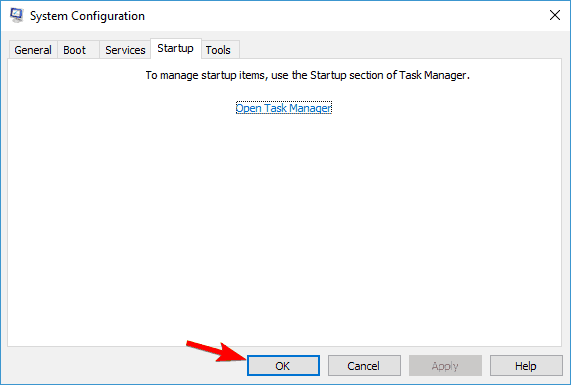
- Press Windows Key + R to open the Run dialog. Now enter msconfig and press Enter or click OK.
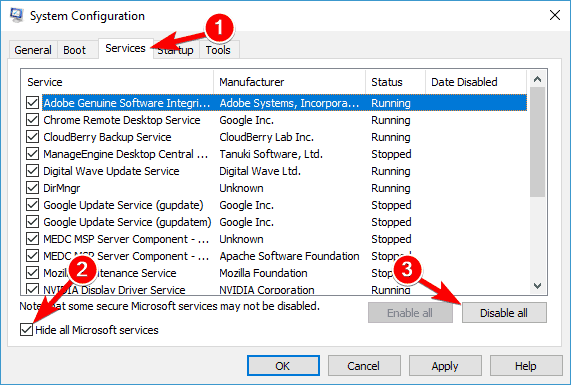
- Navigate to Services tab, check Hide all Microsoft services and click on Disable all button.
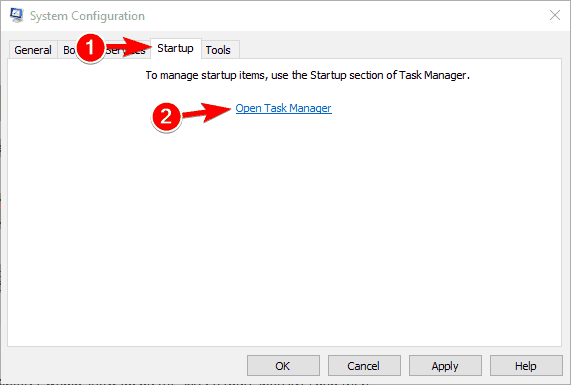
- Go to the Startup tab and click on Open Task Manager.
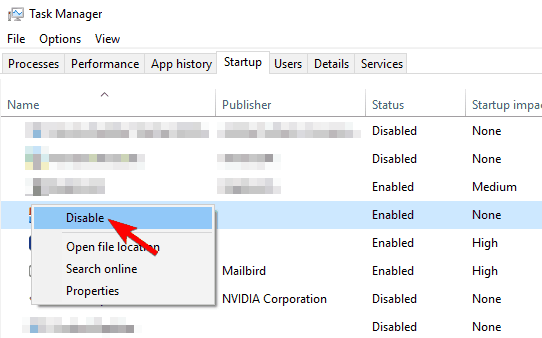
- A list of startup applications will now appear. Right-click the first entry on the list and choose Disable from the menu. Repeat this step for all entries on the list.
- Once you disable all startup applications, go back to System Configuration window. Now click on Apply and OK to save changes.
- When asked to restart your PC, choose the option to restart it now.
Once your PC restarts, check if the problem with File Explorer still appears. If not, it means that one of your disabled applications or services was causing the issue.
To find the problematic application, you need to repeat the steps above and enable applications and services one by one or in groups.
Keep in mind that you need to save changes and restart your PC in order to apply them. Once your PC restarts, check if the issue appears. Keep enabling applications and services until you find the problematic application.
Once you find the problematic application, you can disable it, uninstall it or update it and check if that solves the issue.
Many users reported that disabling startup applications fixed the problem for them, so be sure to try this solution.
In case this solution is too complicated for you, you can try to do your file management work by using Frigate3, a great file manager that has some extra features to successfully replace File Explorer.
It will archive and compresses your files, will find them in advance, and will quickly help you edit, delete or move them. This tool is designed to work fast even on slow PCs and its compatible with Windows 10.
7. Reset the file associations
If you have File Explorer problems such as freezing, the problem might be related to your file associations.
However, you can easily fix that problem by resetting file associations to default. To do that, follow these steps:
- Open the Settings app. You can do that quickly by pressing Windows Key + I.
- Once the Settings app opens, navigate to Apps section.
- From the menu on the left select Default apps. In the right pane, scroll down to the Reset to the Microsoft recommended defaults and click the Reset button.

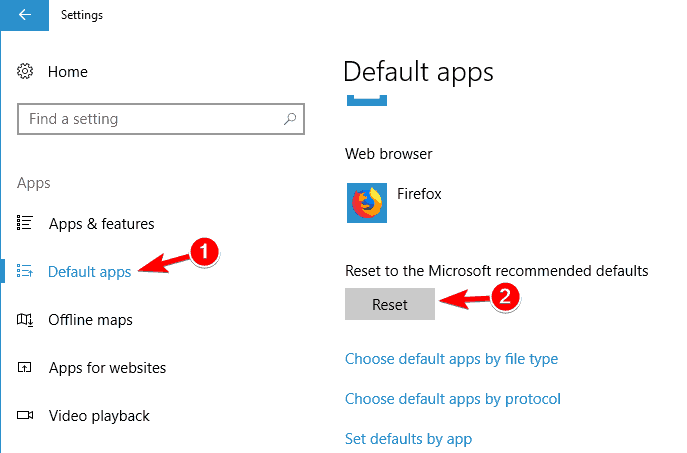
After resetting file associations to default, the problem with unresponsive File Explorer should be resolved.
8. Remove IDT Audio
According to users, many File Explorer problems can be caused by IDT Audio, and in order to fix them, you need to remove this application. Once you remove it, it’s advised to delete all files and registry entries associated with it.
This is too complicated to do manually, so it might be a good idea to remove IDT Audio using an uninstaller software.
There are many great uninstaller tools available, but many users reported that they removed this application and all its files by using IObit Uninstaller (free download), so feel free to download it and try it.
It is a great software from IObit and it will help you remove all the leftovers of an app or program so they won’t interfere with your system’s functionalities.
Once you remove IDT audio, the problem should be completely resolved and your File Explorer will start working again.
9. Change scaling settings
File Explorer problems can occur sometimes due to your scaling settings. Users reported that their File Explorer isn’t responding, but they managed to fix that issue with this simple trick.
Keep in mind that this solution only works if you’re using scaling higher than 100%. To change the scaling, do the following:
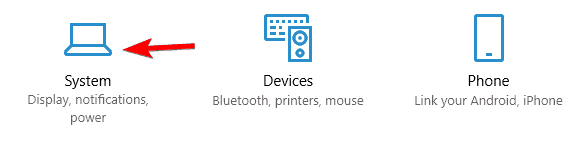
- Open the Settings app and go to the System section.
- Set Change the size of text apps, and other items to 100%.
- Check if File Explorer works. If it does, resize it and make it smaller than usual.
- Now restore scaling back to the original value.
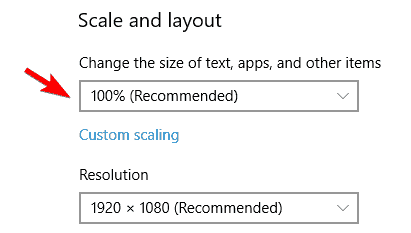
After doing that, the problem should be resolved and you’ll be able to use File Explorer without any problems. Keep in mind that this might not be a permanent solution, so you’ll have to repeat it if the problem reappears.
10. Make sure that your PC is set for dual monitors
According to users, File Explorer can become missing if your PC is configured for dual monitors. Apparently, File Explorer can open on a second monitor, that isn’t currently attached, so it might seem that File Explorer isn’t working for you.
However, you can easily fix that simply by changing your computer configuration and setting your PC to work with only a single monitor.
Looking for the best dual-monitor software for Windows? Look no further as here are the best options.
As you can see, problems with file explorer can seriously limit your Windows 10 user experience but we hope that these solutions were helpful to you.
If you have any comments, questions, or suggestions, just reach for the comments section below.


