- LoadImageA function (winuser.h)
- Syntax
- Parameters
- Return value
- Remarks
- Examples
- CCBoot Wiki Database
- Upload Windows 10 Image
- Installing Windows 10X (from cabs with Device Image Generator) on real hardware
- Overview
- Prerequisites
- Target
- Peripherals
- Common: Files & Tools
- Workspace
- Install Tools
- Configure Your BSP
- Prepare DCHU Drivers for Your Hardware
- [Optional] Edit A BSP for Your Hardware
- [Optional] Configure Your Image
- Build Your Image
- Prepare USB Drive for Flashing
- Apply Your Image
- Apply Your Image on Machine Without Windows 10X Installed On It
- Apply Your Image on Machine With Windows 10X Installed On It
- Load Windows 10X
LoadImageA function (winuser.h)
Loads an icon, cursor, animated cursor, or bitmap.
Syntax
Parameters
A handle to the module of either a DLL or executable (.exe) that contains the image to be loaded. For more information, see GetModuleHandle. Note that as of 32-bit Windows, an instance handle (HINSTANCE), such as the application instance handle exposed by system function call of WinMain, and a module handle (HMODULE) are the same thing.
To load an OEM image, set this parameter to NULL.
To load a stand-alone resource (icon, cursor, or bitmap file)—for example, c:\myimage.bmp—set this parameter to NULL.
The image to be loaded. If the hinst parameter is non-NULL and the fuLoad parameter omits LR_LOADFROMFILE, lpszName specifies the image resource in the hinst module. If the image resource is to be loaded by name from the module, the lpszName parameter is a pointer to a null-terminated string that contains the name of the image resource. If the image resource is to be loaded by ordinal from the module, use the MAKEINTRESOURCE macro to convert the image ordinal into a form that can be passed to the LoadImage function.
For more information, see the Remarks section below.
If the hinst parameter is NULL and the fuLoad parameter omits the LR_LOADFROMFILE value, the lpszName specifies the OEM image to load. The OEM image identifiers are defined in Winuser.h and have the following prefixes.
| Prefix | Meaning |
|---|---|
| OBM_ | OEM bitmaps |
| OIC_ | OEM icons |
| OCR_ | OEM cursors |
В
To pass these constants to the LoadImage function, use the MAKEINTRESOURCE macro. For example, to load the OCR_NORMAL cursor, pass MAKEINTRESOURCE(OCR_NORMAL) as the lpszName parameter, NULL as the hinst parameter, and LR_SHARED as one of the flags to the fuLoad parameter.
If the fuLoad parameter includes the LR_LOADFROMFILE value, lpszName is the name of the file that contains the stand-alone resource (icon, cursor, or bitmap file). Therefore, set hinst to NULL.
The type of image to be loaded. This parameter can be one of the following values.
| Value | Meaning |
|---|---|
| IMAGE_BITMAP 0 | Loads a bitmap. |
| IMAGE_CURSOR 2 | Loads a cursor. |
| IMAGE_ICON 1 | Loads an icon. |
The width, in pixels, of the icon or cursor. If this parameter is zero and the fuLoad parameter is LR_DEFAULTSIZE, the function uses the SM_CXICON or SM_CXCURSOR system metric value to set the width. If this parameter is zero and LR_DEFAULTSIZE is not used, the function uses the actual resource width.
The height, in pixels, of the icon or cursor. If this parameter is zero and the fuLoad parameter is LR_DEFAULTSIZE, the function uses the SM_CYICON or SM_CYCURSOR system metric value to set the height. If this parameter is zero and LR_DEFAULTSIZE is not used, the function uses the actual resource height.
This parameter can be one or more of the following values.
| Value | Meaning |
|---|---|
| LR_CREATEDIBSECTION 0x00002000 | When the uType parameter specifies IMAGE_BITMAP, causes the function to return a DIB section bitmap rather than a compatible bitmap. This flag is useful for loading a bitmap without mapping it to the colors of the display device. |
| LR_DEFAULTCOLOR 0x00000000 | The default flag; it does nothing. All it means is «not LR_MONOCHROME«. |
| LR_DEFAULTSIZE 0x00000040 | Uses the width or height specified by the system metric values for cursors or icons, if the cxDesired or cyDesired values are set to zero. If this flag is not specified and cxDesired and cyDesired are set to zero, the function uses the actual resource size. If the resource contains multiple images, the function uses the size of the first image. |
| LR_LOADFROMFILE 0x00000010 | Loads the stand-alone image from the file specified by lpszName (icon, cursor, or bitmap file). |
| LR_LOADMAP3DCOLORS 0x00001000 | Searches the color table for the image and replaces the following shades of gray with the corresponding 3-D color.
Do not use this option if you are loading a bitmap with a color depth greater than 8bpp. |
| LR_LOADTRANSPARENT 0x00000020 | Retrieves the color value of the first pixel in the image and replaces the corresponding entry in the color table with the default window color (COLOR_WINDOW). All pixels in the image that use that entry become the default window color. This value applies only to images that have corresponding color tables. Do not use this option if you are loading a bitmap with a color depth greater than 8bpp. If fuLoad includes both the LR_LOADTRANSPARENT and LR_LOADMAP3DCOLORS values, LR_LOADTRANSPARENT takes precedence. However, the color table entry is replaced with COLOR_3DFACE rather than COLOR_WINDOW. |
| LR_MONOCHROME 0x00000001 | Loads the image in black and white. |
| LR_SHARED 0x00008000 | Shares the image handle if the image is loaded multiple times. If LR_SHARED is not set, a second call to LoadImage for the same resource will load the image again and return a different handle. When you use this flag, the system will destroy the resource when it is no longer needed. Do not use LR_SHARED for images that have non-standard sizes, that may change after loading, or that are loaded from a file. When loading a system icon or cursor, you must use LR_SHARED or the function will fail to load the resource. This function finds the first image in the cache with the requested resource name, regardless of the size requested. |
| LR_VGACOLOR 0x00000080 | Uses true VGA colors. |
Return value
If the function succeeds, the return value is the handle of the newly loaded image.
If the function fails, the return value is NULL. To get extended error information, call GetLastError.
Remarks
If IS_INTRESOURCE(lpszName) is TRUE, then lpszName specifies the integer identifier of the given resource. Otherwise, it is a pointer to a null-terminated string. If the first character of the string is a pound sign (#), then the remaining characters represent a decimal number that specifies the integer identifier of the resource. For example, the string «#258» represents the identifier 258.
When you are finished using a bitmap, cursor, or icon you loaded without specifying the LR_SHARED flag, you can release its associated memory by calling one of the functions in the following table.
| Resource | Release function |
|---|---|
| Bitmap | DeleteObject |
| Cursor | DestroyCursor |
| Icon | DestroyIcon |
В
The system automatically deletes these resources when the process that created them terminates; however, calling the appropriate function saves memory and decreases the size of the process’s working set.
Examples
The winuser.h header defines LoadImage as an alias which automatically selects the ANSI or Unicode version of this function based on the definition of the UNICODE preprocessor constant. Mixing usage of the encoding-neutral alias with code that not encoding-neutral can lead to mismatches that result in compilation or runtime errors. For more information, see Conventions for Function Prototypes.
CCBoot Wiki Database
Upload Windows 10 Image
Starting from CCBoot version 20180411, we have changed the way for uploading Windows 10 image
Important: Please make sure that you have sharing enabled on client as well as server. Windows 10 upload uses shared folder to make the image thus if sharing is disabled the upload will fail.
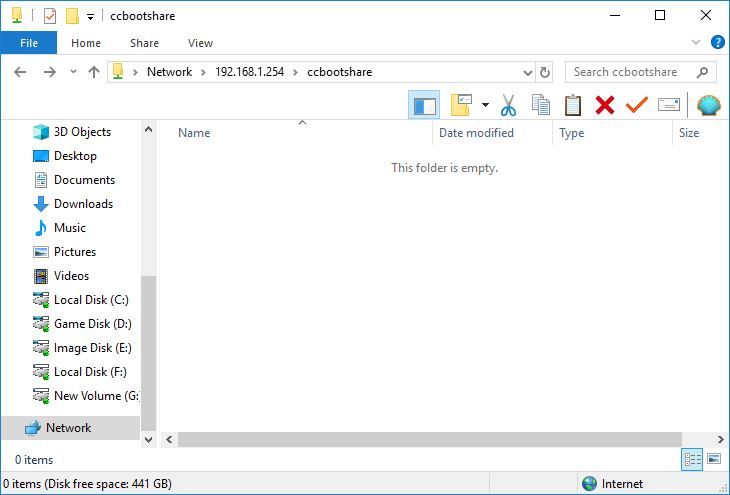
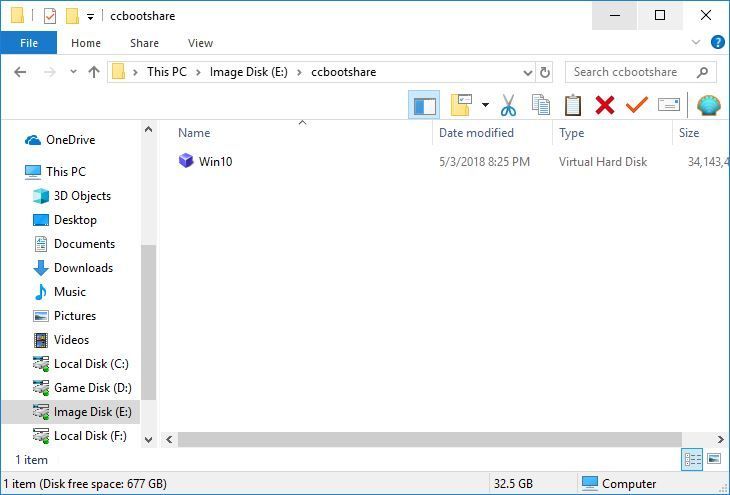
1. Before starting share a folder on the image disk which can be access from client PC, for this tutorial, «ccbootshare» folder in the image disk is shared and accessible from client PC (Figure 1).
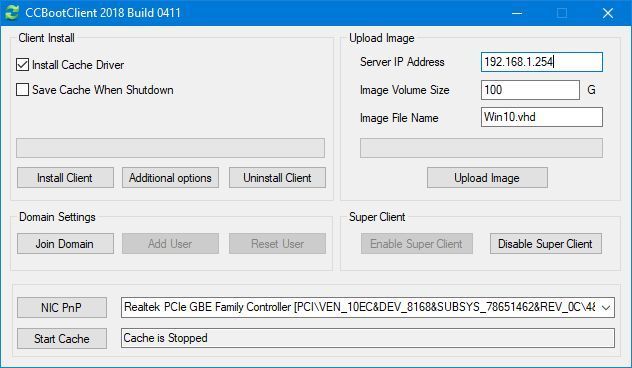
2. Install newest version CCBoot and then one the CCBoot Client UI, enter the «Server IP Address» and the «Image File Name» then click the «Upload Image» button (Figure 2).
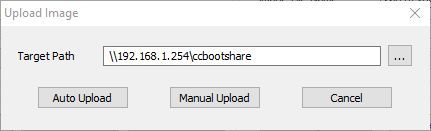
3. It will open «Upload Image» window, in it you will see «Target Path», in this field you will enter the shared folder path. example «\\192.168.1.254\ccbootshare» (Figure 3)
4. Now, if you click «Auto upload» button then it will create and image on the specified folder with the name entered earlier (Figure 4).
5. Let the upload complete, then check the shared folder, you will see your new image file (Figure 5)
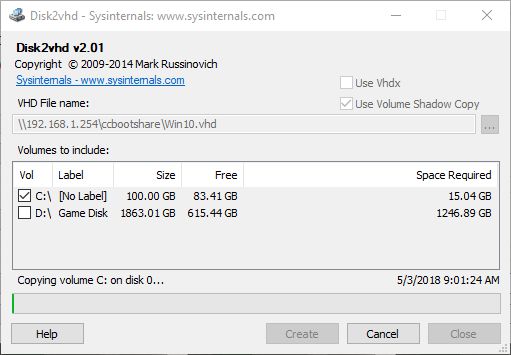
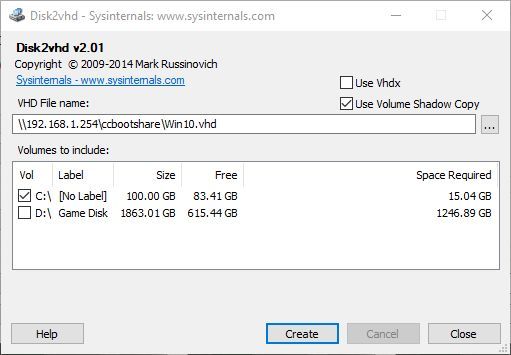
6. If you clicked «Manual Upload» button on step 2, then you will be able to select which partitions or drive to use while making image. Once ready click «Create» button to create the image to the shared folder (Figure 6).
Note: You can choose either way to upload image.
Just make sure you can access any shared folder on server from client PC before trying to upload the image.
Installing Windows 10X (from cabs with Device Image Generator) on real hardware
| Created: February 2, 2021 | Last Update: February 4, 2021 |
|---|---|
| Authors: | NT Authority, Albacore, Gustave Monce, Rafael Rivera, Daniel Kornev |
| Status: | Draft |
| Supported Windows 10X Version: | 20279 |
Disclaimer: Some drivers may fail to load, the guide will be updated with extra tips on extending driver compatibility later
Overview
Here’s some quick notes on installing Windows 10X on real hardware from cabs using the user-friendly Device Image Generator made by Albacore. For this example, we’re assuming a system with no other critical disks installed, and a helpful host system being around to set up the initial image.
This guide has been created for the 20279 version of Windows 10X.
Prerequisites
- Windows 10 Iron or Cobalt (20279 or 21xxx+) — though 20H2 can also work just fine
- Utility USB flash drive of
Target
- Graphics card with DCHU drivers available
- UEFI system firmware with the ability to disable Secure Boot
- Boot drive larger than 100 GiB
- Learn how to disable Secure Boot in your device, and change its boot order to allow booting from the USB Flash Drive
Peripherals
Note: If your device doesn’t have a built-in Ethernet adapter, prepare an external Ethernet adapter (USB/USB-C/USB-C Hub with Ethernet). You won’t be able to pass through the OOBE without internet connection.
Common: Files & Tools
Workspace
- Create a folder called 10X in the root of your drive, e.g, C:\10X
- Create a subfolder called Sources
- If you are running on a machine that is not the target machine (the one you want to flash Windows 10X onto) create a subfolder called DCHUDrivers
- Use v0.3.0.0. release of the Gus’s UUPMediaCreator(https://github.com/gus33000/UUPMediaCreator)) to download bits by typing this command in the Command Prompt (where dlfolder is the place to put downloaded bits, e.g., C:\10X\dlfolder , and amd64 specifies the architecture; you can specify arm64 for ARM64 build of Windows 10X):
Note: you must use -z Test param to download Test build of Windows 10X which includes non-production components.
- Put them into Sources folder (e.g., C:\10X\Sources )
- Make sure that bits are in Sources folder directly ( \10X\Sources\*compdb*.cab should be at this level)
- Download overlay.zip from Rafael
- Unpack it to your Sources folder (e.g., C:\10X\Sources )
- Open command line in the Sources folder and run fixup.cmd in it
- Copy the appx folder from the downloaded folder (with bits) to the root of your packages folder (e.g., C:\10X\Sources )
- Create Tools folder
- Create Devices folder
- Create FFUs folder
- Create FMFiles folder
- Extract FM.xml files from all CABs that contain FM
in their name into a folder called FMFiles by using this command (thanks to Steve Troughton-Smith (Tweet)):
- Your resulting folder structure should look like this:
Install Tools
Note: Both ADK and WinPE should have the same or higher version as your Windows 10X Image.
- [Optional] If you have previous kits (e.g., WP8 Tools), remove them
- Download the ADK Insider Preview ISO for your host OS version (only tested with Windows_InsiderPreview_ADK_en-us_20279.iso )
- Install Deployment Tools, ICD, Configuration Designer, and uncheck the rest if possible/as needed
- Download the Windows Preinstallation Environment ISO for your host OS version (only tested with 20279 version)
- Install Windows Preinstallation Environment
- Download Windows Image Generator (see tweet)
- Unpack it to (disk root)\10X\Tools
- Download updates to it
- Unpack it over the existing files to (disk root)\10X\Tools
Configure Your BSP
Board Support Packages (BSP) is a collection of drivers/settings required to run Windows 10X on a hardware platform. The BSP also includes a set of device drivers that are specific to the components/silicon used in the device, mostly in the form of .inf files and their associated .sys/.dll files.
You will need a BSP for your device if you want it to use all of its devices (WiFi, Cameras, etc.).
To configure your BSP, you need to obtain DCH (Universal) Drivers for your device, and then prepare the OEMDriversFM.xml feature manifest XML file with the links to your drivers.
Prepare DCHU Drivers for Your Hardware
Common Steps
- Go to (disk root)\10X\Tools\ and open DevImgGen.exe
Extracting Drivers From Your Target Machine
This is the case when your target machine is the same you’re building this image on.
Example: you have Surface Pro 6 and you want to flash it with Windows 10X. You use Device Image Generator to extract current drivers from your Windows 10 machine.
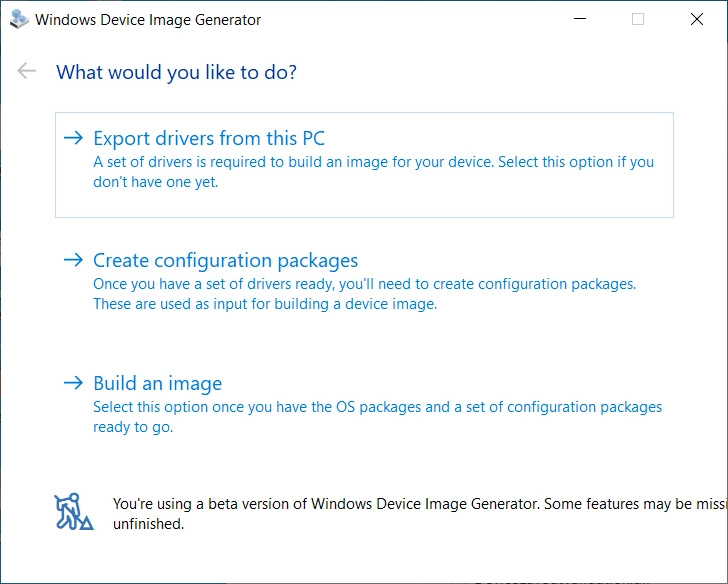
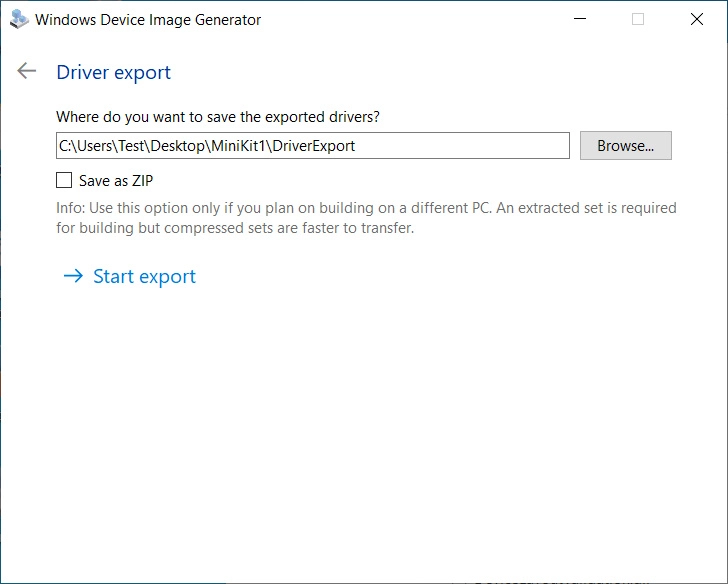
- In the Windows Device Image Generator use the first menu option («Export drivers from this PC») to extract drivers from the current machine
- Specify location for storing your drivers package in the opened window to 10X\Devices
Using Downloaded Drivers
This is the case when your target machine is different from the one you’re building this image on.
Example: you have Surface Pro 6 and Surface Go. You want to flash your Surface Go with Windows 10X. You use Device Image Generator to generate device driver package from the drivers you’ve downloaded for your Surface Go.
- Obtain DCHU Drivers for your hardware (especially GPU)
- In the Windows Device Image Generator use the second menu option to generate device drivers package from your DCHU drivers folder
- In the «Create configuration packages» specify location of your DCHU drivers ( (disk root)\10X\DCHUDrivers ), and specify location for storing your drivers package in the opened window to 10X\Devices
- Click «Process drivers»
[Optional] Edit A BSP for Your Hardware
This is only needed if some of the devices shall not be used.
- Use DeviceDriversPackageFM.xml generated by the Device Image Generator, located at (disk root)\10X\Devices and comment out items that shall not be used:
Note: If your target machine is Surface Go, remove reference to SurfaceACPIBattery.inf .
[Optional] Configure Your Image
Note: Not yet supported by the tool ( OEMInput.xml is generated on the fly currently).
- Edit OEMInput.xml if needed.
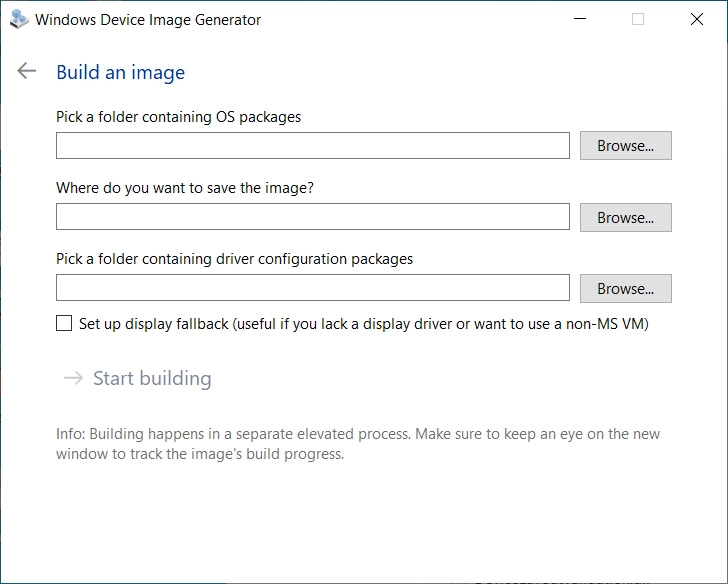
Build Your Image
Start > open elevated *Deployment and Imaging Tools Environment
- In that window, type this (where C:\ is the drive where your Windows 10 Insider Preview ADK is installed):
- Unless you use a non-prod machine, run this command to unregister the imaging toolchain overrides:
- Use third option in the Windows Device Image Generator to begin generation of your Image (ffu). Use (disk root)\10X\Sources as the location of OS packages. Use (disk root)\10X\FFUs folder for storing your resulting FFU. Use (disk root)\10X\Devices as the location of your driver configuration packages.
- Click on «Start building», and make sure to allow the separate elevated process to start. It will start the process of building the image.
Prepare USB Drive for Flashing
Note: You can follow Microsoft docs (Part I: Create Multipartition USB Drive, Part II: Install WinPE), or you can follow these instructions (taken from the docs):
- Get an empty Flash drive (with size at least 8GB)
- In the same Deployment and Imaging Tools Environment‘s elevated Command Prompt window open diskpart and press Enter
- Follow these instructions to create two disks:
- Create Working WinPE files by using this command (where C:\WinPE_amd64 is the location of your choice):
- Create bootable media with it (where P: is the letter of the FAT32 partition of your USB Flash drive):
- Copy your Image ( .ffu file) to the I: drive (the second partition of your Flash drive formatted with NTFS)
- Download and add gdisk64.exe file to the root of your WinPE partition ( P: in this example)
Apply Your Image
Apply Your Image on Machine Without Windows 10X Installed On It
- Boot from WinPE drive
- Open diskpart
- Type this:
Take a note of the name of your device’s main disk drive, e.g., disk 0 4. Type exit to leave diskpart 5. Use this command (and specify the correct path to the ffu that you created above, as well the id of your physical drive):
- Once complete, remove your USB flash drive
- Type exit in the Command Prompt window
Apply Your Image on Machine With Windows 10X Installed On It
- Boot from WinPE drive
- Type notepad to open notepad
- Use File—>Open to find the name of your WinPE disk
- Type this to identify the id of your physical drive:
- Type this (where D:\ is the name of your WinPE disk and 0 in the end of physicaldrive0 is the id of your physical drive):
- Make sure that it contains OSPool and other partitions of Windows 10X
- Type this to clean up the drive (where 0 in the end of physicaldrive0 is the id of your physical drive):
and press Enter
- Use this command (and specify the correct path to the ffu that you created above, as well the id of your physical drive):
- Once complete, remove your USB flash drive
- Type exit in the Command Prompt window
Load Windows 10X
At this time, your Windows 10X will boot. If everything is correct you should see the OOBE.


