- 4 Ways to Lock the Screen in Windows 10
- Option 1 – Ctrl + Alt + Delete then Enter
- Option 2 – Windows Key + L
- Option 3 – Start Menu
- Option 4 – Create Shortcut
- You Might Also Like
- How to Quickly Lock Screen In Windows 10
- Lock Screen in Windows 10
- 1. Lock Screen Using Ctrl +Alt +Delete Keys
- 2 Lock Screen Using Windows + L Keys
- 3. Lock Screen Using Start button
- 4. Create Shortcut to Lock Screen in Windows 10
- 5. Automatically Lock Screen Using Screen Saver
- 4 ways to lock your Windows 10 PC
- 1. Windows-L
- 2. Ctrl-Alt-Del
- 3. Start button
- 4. Auto lock via screen saver
- How to Disable or Turn Off Windows 10 Lock Screen
- Disable or Turn Off Windows 10 Lock Screen
- 1] From Accounts Settings
- 2] Through User accounts
- 3] Via Screen saver settings
- 4] By Regedit or Registry Editor Turn Off Windows 10 Lock Screen
- 5] With help of Gpedit or Group Policy Editor
- 6] Turn Off Windows 10 Lock Screen using Task Scheduler
4 Ways to Lock the Screen in Windows 10
By Mitch Bartlett 2 Comments
Locking your Microsoft Windows 10 computer screen is important for protecting your data from wandering eyes. This is especially true in the workplace. Nobody you work with needs to see that photo from when you dressed as Ulala from Space Channel 5 for Halloween 2000. Most of us already lock our screens whenever we leave our cubicle to attend a meeting or gossip about the awful dress Trisha is wearing today. But did you know there are 4 different ways you can lock your Windows 10 screen?
Option 1 – Ctrl + Alt + Delete then Enter
This is the common one most people already know about. Hold “Ctrl” and “Alt“, then press “Delete“. After options appear on the screen, press “Enter“.
Option 2 – Windows Key + L
Since the Windows Key has been introduced, it has largely been ignored. Hold down Windows Key and press “L” for a quicker way of locking your screen.
Option 3 – Start Menu
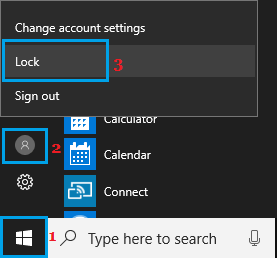
- Select the “Start” button.
- Select your Windows Account profile picture icon, then choose “Lock Screen“.
Option 4 – Create Shortcut
If keystrokes are way too much for you to handle, you can make an icon that will lock your screen.
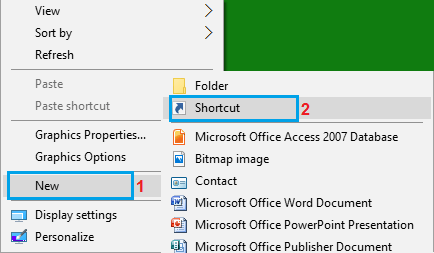
- Right-click any blank area of the Desktop.
- Select “New” > “Shortcut“.

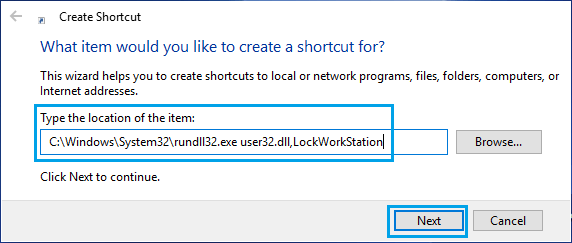
- For the location of the item type “C:\Windows\System32\rundll32.exe user32.dll,LockWorkStation” and click “Next“.
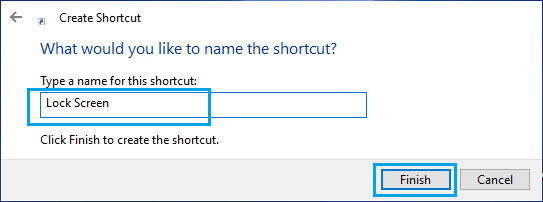
- Give the icon a name, like “Lock Screen“, then click “Finish“.
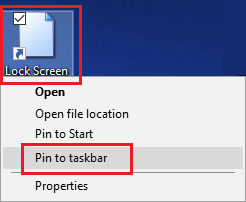
Now you have a Screen Lock icon you can double-click whenever you leave your desk.You can even take it a step further and pin it to your taskbar. Click it once and lock your screen.

You Might Also Like
Filed Under: Windows Tagged With: Windows 10
How to Quickly Lock Screen In Windows 10
By: Waseem Patwegar
In order to protect your privacy, it is important that master at least one method to quickly Lock the screen of your Windows computer. You will find below 5 different methods to Lock Screen in Windows 10.

Lock Screen in Windows 10
When you are at a workplace, there will be other people around you, which increases the possibility of personal data being exposed.
This can happen when you leave your cubicle, work table or work corner for a coffee break and also happen when someone unexpectedly shows up in your cubicle.
An easy way to prevent your personal information and other stuff from being seen by others is to get into the habit of locking the Screen on your computer, whenever you step away from it.
Hence, we are providing below 5 different ways to quickly Lock Screen in Windows 10.
1. Lock Screen Using Ctrl +Alt +Delete Keys
Press Ctrl + Alt + Delete Keys at the same time on the keyboard of your computer and click on the Lock option in the pop-up screen that appears.
While this is probably the most commonly used method to quickly Lock Screen in Windows 10, it is not fast as the second method as provided below.
2 Lock Screen Using Windows + L Keys
Press the Windows Logo + L Keys at the same time on the Keyboard of your computer and this will immediately Lock you out of the current screen and take you to the Login Screen.
3. Lock Screen Using Start button
Click on the Start button > User Icon and then click on the Lock Option.
This method is suitable for those who have a hard time remembering Keyboard Shortcuts.
4. Create Shortcut to Lock Screen in Windows 10
If you find it difficult to remember keyboard shortcuts, you can create a shortcut that can allow you to Lock Screen in Windows 10 by clicking on it.
1. Right-click in any blank space on the Desktop > click on New > Shortcut .
2. On Create Shortcut screen, enter C:\Windows\System32\rundll32.exe user32.dll,LockWorkStation as location for the item and click on the Next button .
3. On the next screen, type a Name for the shortcut (you can call it “Lock Screen”) and click on Finish .
4. Next, right-click on the newly created Shortcut and select Pin to taskbar option.
This will add the Lock Screen Shortcut to the taskbar, making it easy to Lock Screen on your computer at any time by double-clicking on the Shortcut .
5. Automatically Lock Screen Using Screen Saver
Using Screen Saver Settings, you can make your computer to automatically Lock Screen as soon as the screen saver pops up.
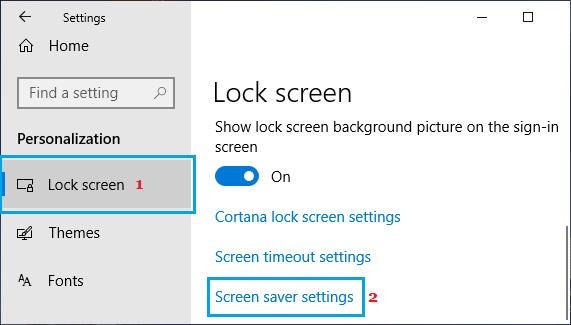
1. Go to Settings > Personalization > Lock Screen > scroll down in the right pane and click on Screen Saver Settings link.
2. On the Screen Saver Settings screen, select On resume, display logon screen option.
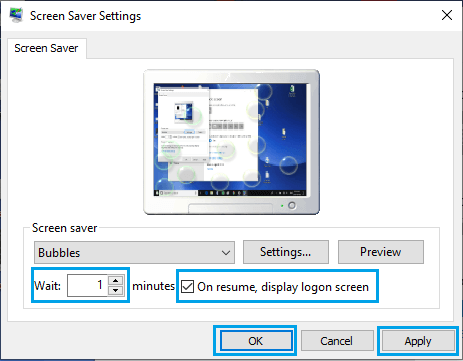
3. Click on Apply and OK .
As you can see in above image, the Wait option allows you to set the wait time, after which the screen Saver becomes active on your computer.
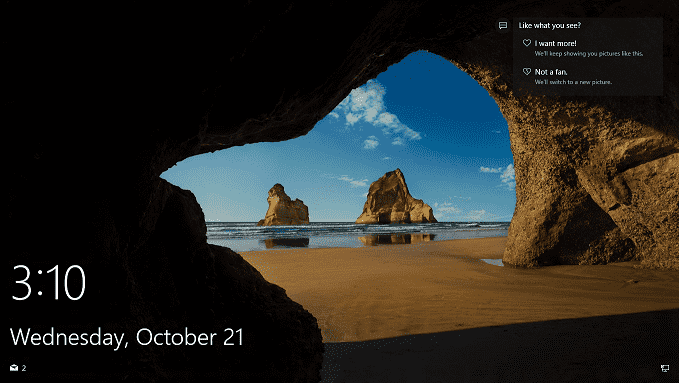
After the Screen Saver gets triggered, you can exit the Screen Saver by tapping on the track pad (or pressing any key) and enter your Login Password to get your User Screen.
4 ways to lock your Windows 10 PC
No Dynamic Lock? No problem.

Maybe you haven’t installed the Windows 10 Creators Update yet. Or maybe you have but don’t want to rely on Bluetooth and the new Dynamic Lock feature to lock your PC when you leave its vicinity. No matter your reason for locking your PC manually, you should know that you’ve got four ways to lock your PC. They are:
1. Windows-L
Hit the Windows key and the L key on your keyboard. Keyboard shortcut for the lock!
2. Ctrl-Alt-Del
Press Ctrl-Alt-Delete. On the menu that pops up, click Lock. Boom, done.
3. Start button
Tap or click the Start button in the bottom-left corner. Click your user icon and then select Lock.
 Screenshot by Matt Elliott/CNET
4. Auto lock via screen saver
You can set your PC to lock automatically when the screen saver pops up. Go to Control Panel > Appearance & Personalization > Change screen saver and then check the box for On resume, display logon screen. You can also set a time for how long your PC should wait before starting the screen saver. Now, when you exit out of the screensaver, you’ll need to enter your system password to get back in.
With Windows 10 Creators Update, Microsoft moved this screen saver setting from the Control Panel to Settings. You can find it by going to Settings > Personalization > Lock screen > Screen saver settings.
How to Disable or Turn Off Windows 10 Lock Screen
7 ways to Disable / Turn Off Windows 10 Lock Screen – using Settings, regedit, gpedit, task scheduler, secpol, and other.
Windows 10 Lock Screen is the first screen you find after powering on the PC. This greets you with an awesome high-quality image but at the same time, it becomes a hindrance to reaching the desktop quickly. As you click the lock screen, the sign-in screen appears that requires username and password or PIN to allow you to access the desktop. This is somewhat a bothersome process so there are users who don’t like the concept of the Lock Screen. By default, the version does not provide any method to Turn Off Windows 10 Lock Screen.
To unlock the Lock Screen is again a process in itself and may be due to this reason, some users avoid this in Windows 10. This article will help those who want to Disable or Turn Off Windows 10 Lock Screen. Here are 7 ways and applying anyone will help you with this work.
Disable or Turn Off Windows 10 Lock Screen
Here is How to Disable or Turn Off Windows 10 Lock Screen –
1] From Accounts Settings
- First of all, press – Win+I.
- Select the – Accounts.
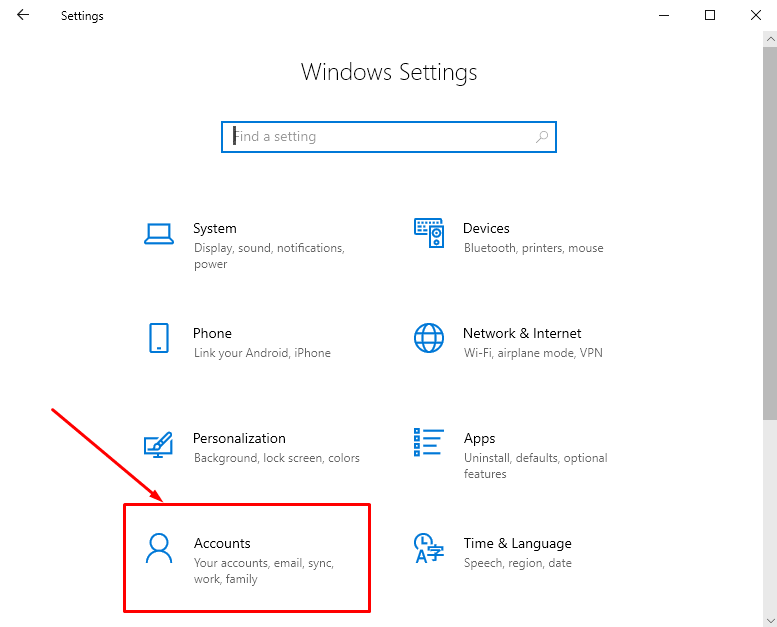
- Click the – Sign-in options.
- Next, click the dropdown under – Require Sign-in.
- Select – Never.

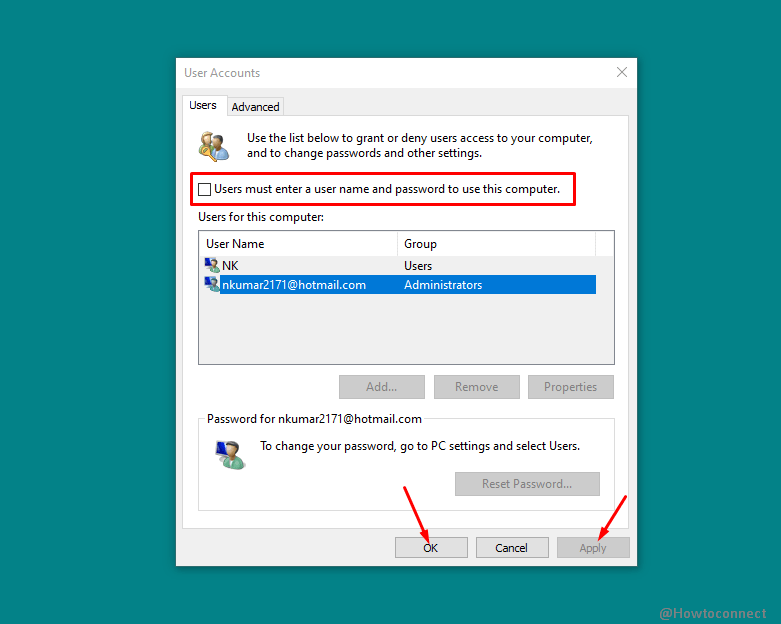
2] Through User accounts
- Click the Search on the taskbar.
- Type – control userpasswords2.
- Press the – Enter.
- Uncheck the box for – Users must enter a user name and password to use this computer.
- Hit the – Apply and then OK.
3] Via Screen saver settings
The method is applicable to the whom who use Screensaver.
- Press the – Windows key.
- Type – lock screen.
- Hit – Enter.
- Select – Screen saver settings.
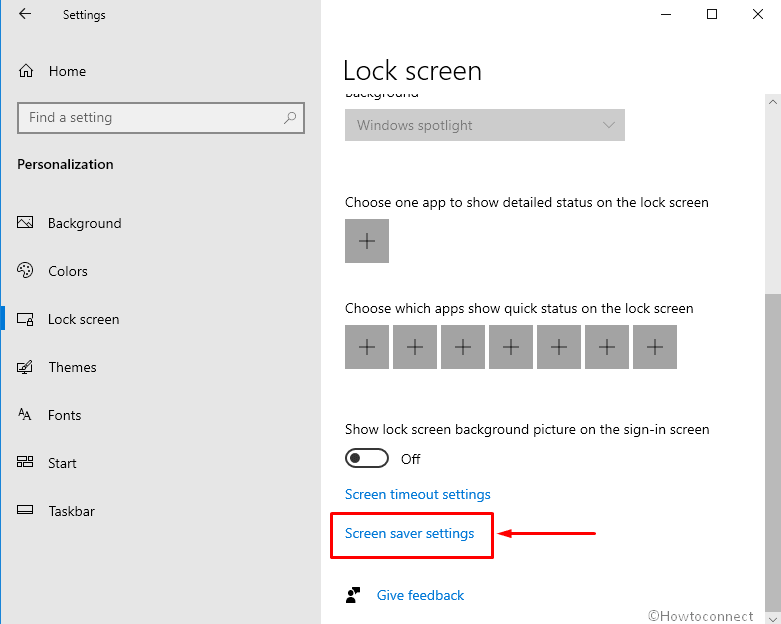
- Next, uncheck the box before – On resume, display logon screen.
4] By Regedit or Registry Editor Turn Off Windows 10 Lock Screen
- To open the Registry Editor, first, you have to open the Run Command.
- And to do so jointly press Windows and R keys on your keyboard.
- Type regedit on the text field provided.
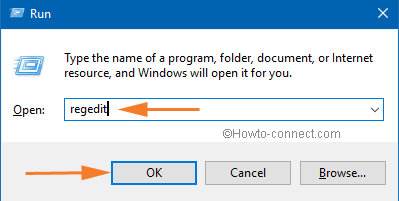
- Click Ok to go to the next step.
- A User Account Control will prompt up asking for your permission.
- Click Yes and allow the Registry Editor to appear on your screen.
- Now you have to navigate the path below to do the changes –
HKEY_LOCAL_MACHINE \ SOFTWARE \ Policies \ Microsoft \ Windows \ Personalization
- Now on the right pane of the Personalization key, create a new DWORD value.
- To do so go to the right pane and right click on the empty area.
- Select the option – DWORD (32-bit) value.
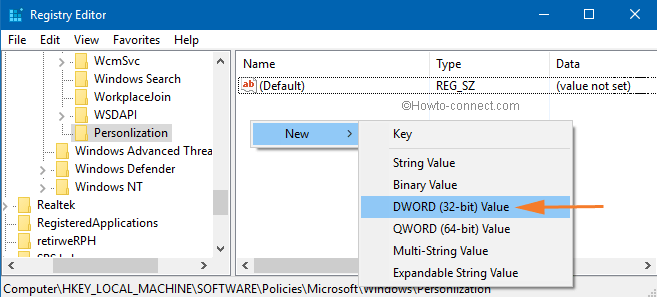
- And name it – NoLockScreen.
- Double click it and on the Edit DWORDValue window set its value data 1.
- Click Ok to save the changes.
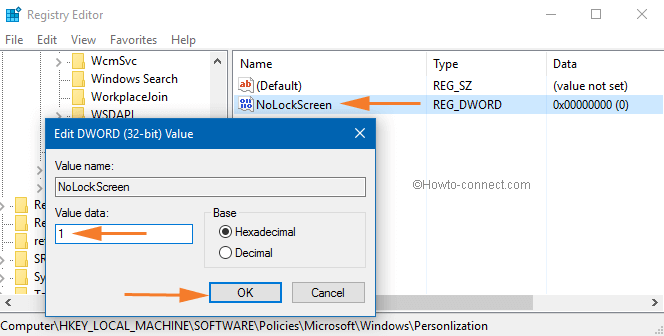
- Follow the string –
HKEY_LOCAL_MACHINE\SOFTWARE\Microsoft\Windows\CurrentVersion\Authentication\LogonUI\SessionData
- Double click – AllowLockScreen.
- Put in 0 to disable or turn off Windows 10 Lock Screen.
- Exit the Registry Editor.
- Restart the system.
- Lock Screen will be totally disabled now.
5] With help of Gpedit or Group Policy Editor
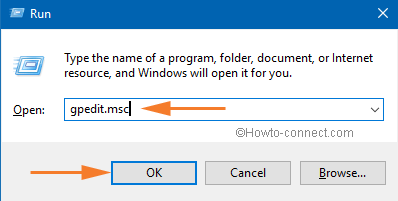
- Open the Run Command window using the shortcut keys as mentioned above.
- Type gpedit.msc in the command field and click Ok to proceed.
- Local Group Policy Editor window is now in front of you.
- Follow this path –
Computer Configuration \ Administrative Templates \ Control Panel \ Personalization
- Now on the right pane, you can see an option that says – Do not display the lock screen.
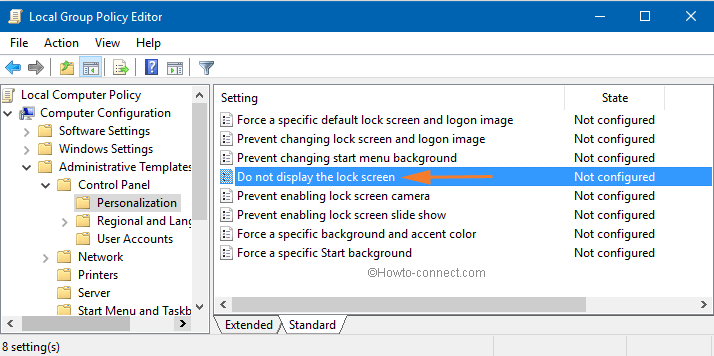
- Double click that option.
- Check – Enabled.
- Click – Apply then – Ok.
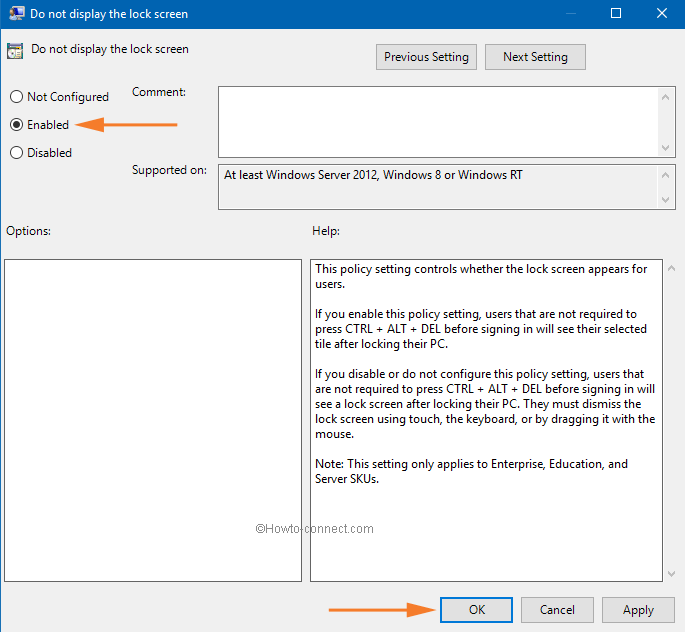
- Restart the system to see the result.
6] Turn Off Windows 10 Lock Screen using Task Scheduler
- Click the start and type in – taskschd.
- Press Enter to open Task Scheduler.
- Select – Create Task from the right pane.
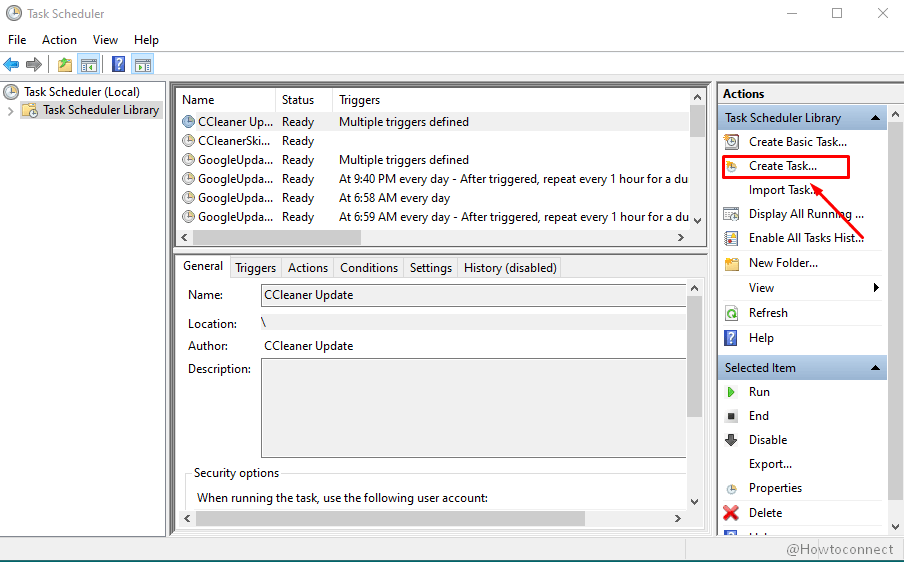
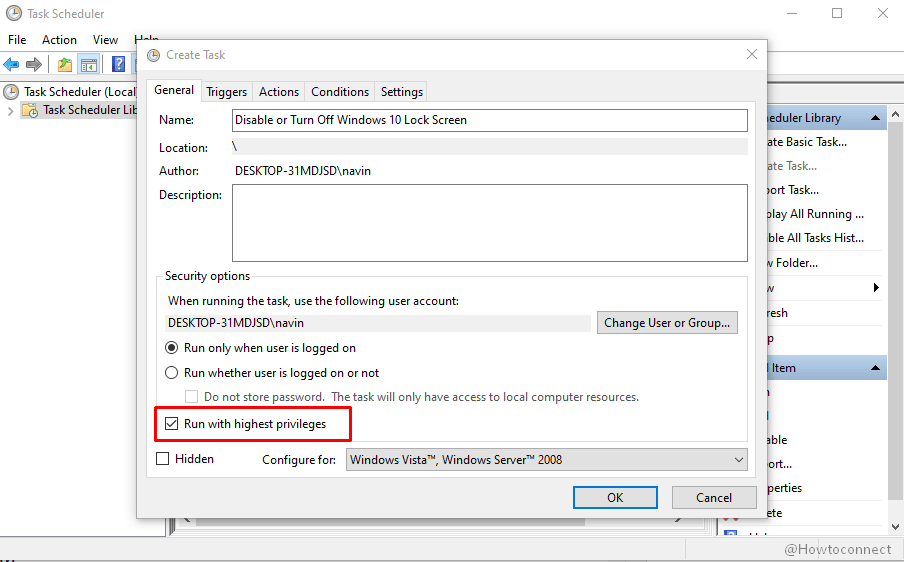
- Name the task – Disable or Turn Off Windows 10 Lock Screen.
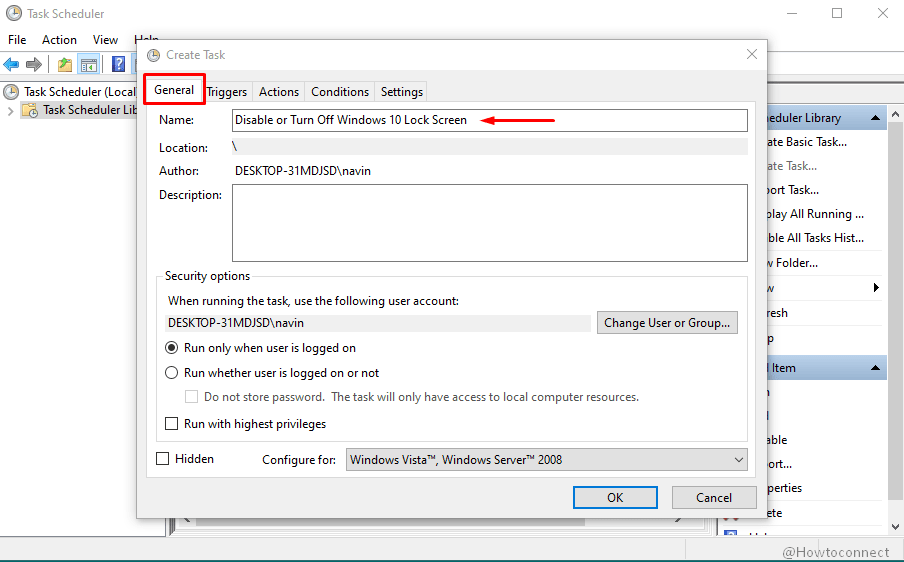
- Check – Run with highest privileges.
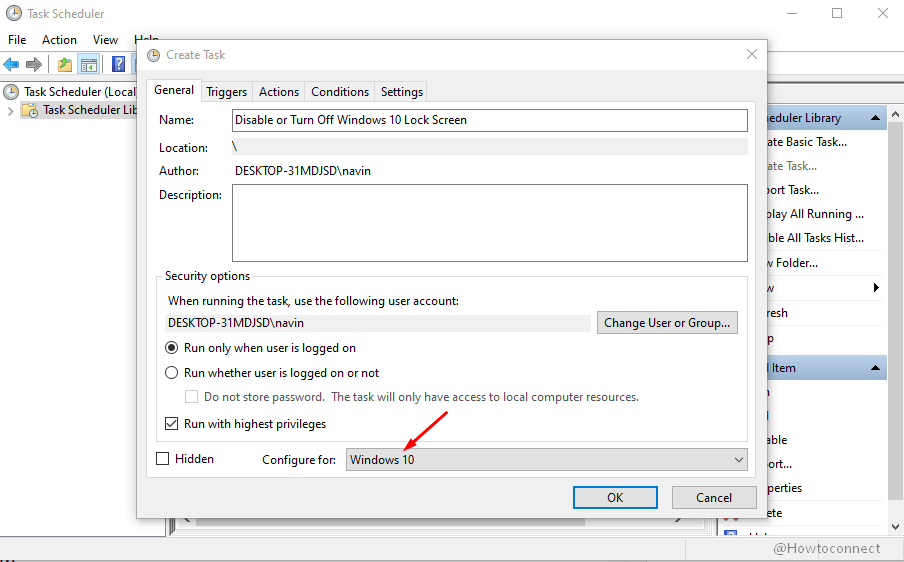
- Click the drop-down after – Configure for: and select – Windows 10.
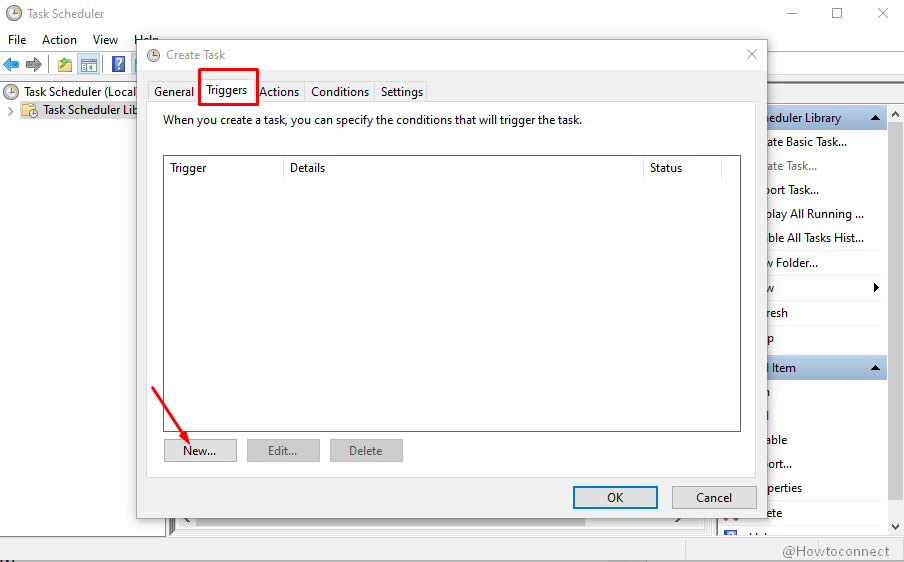
- Next, click the – Triggers tab.
- Select – New.
- On the New Trigger window click the dropdown for – Begin the task.
- Select – At logon.
- Click – OK.
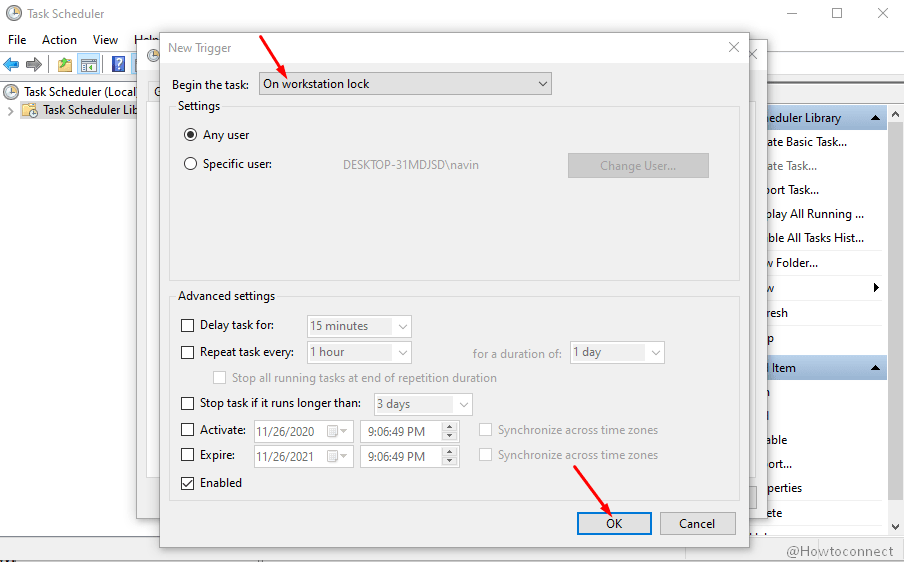
- Again, click – New.
- Next, click the dropdown beside – Begin the task:.
- Choose – On workstation lock.
- Select – OK.
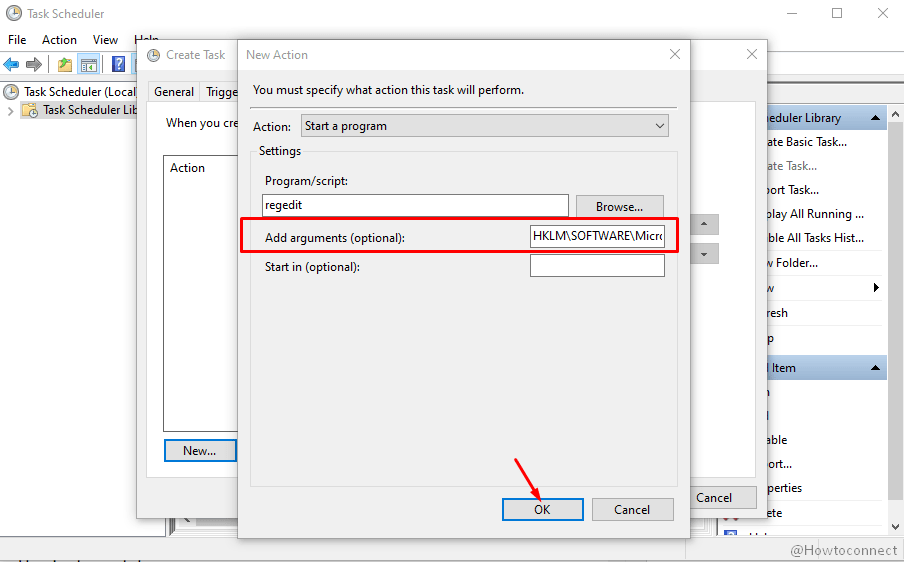
- Click – Actions tab.
- Hit – New.
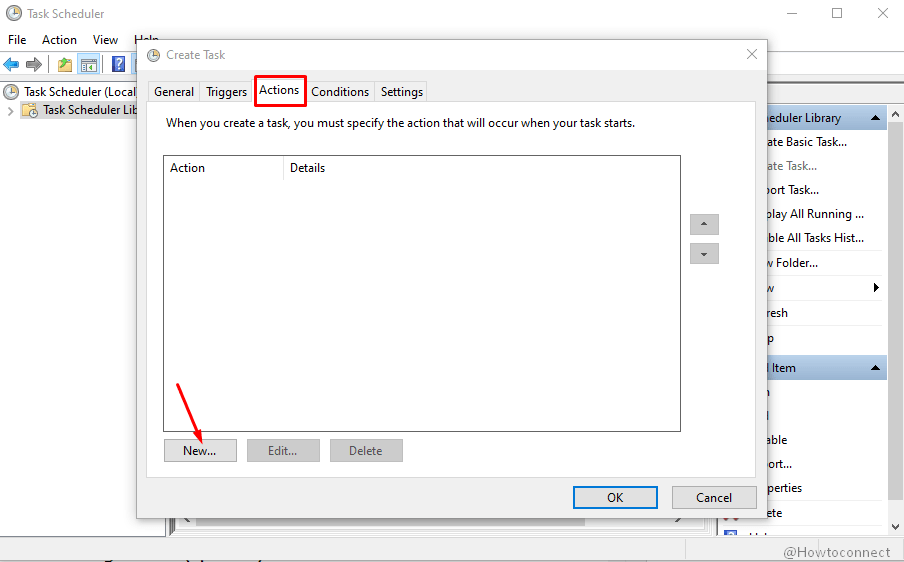
- In the box for Program/script, type – regedit.
- Copy the following path –
add HKLM\SOFTWARE\Microsoft\Windows\CurrentVersion\Authentication\LogonUI\SessionData /t REG_DWORD /v AllowLockScreen /d 0 /f
- Paste in the field for – Add arguement (optional):.
- Click – OK.
- Select – Conditions tab.
- Unselect the box for – Start the task only if the computer is on AC power.
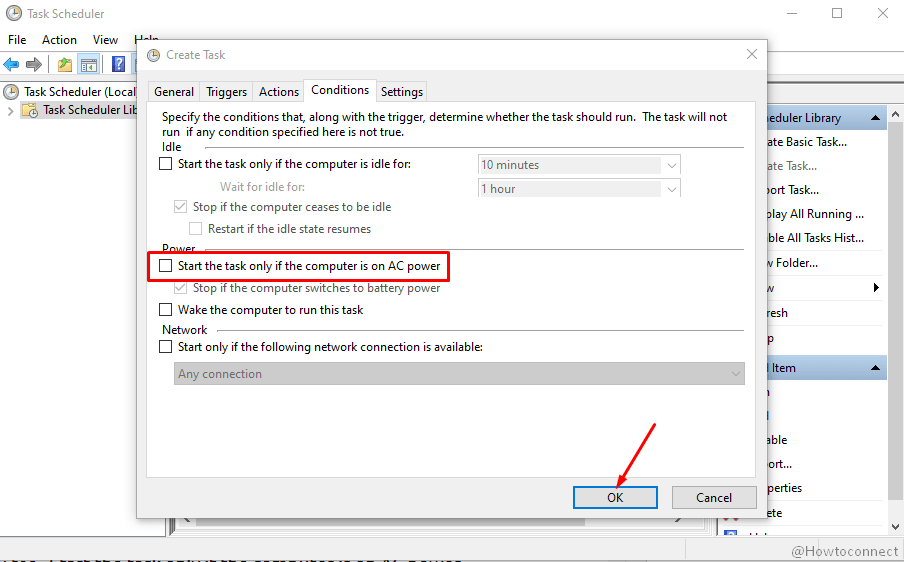
- Hit – OK and close the Task scheduler.
- Restart your system and the method will be effective.


