- How to turn on microphone in Windows 10 [Simple Guide]
- How can I re-enable the microphone on Windows 10?
- 1. Use a third-party software
- DriverFix
- 2. Enable the microphone from the Device Manager
- 3. Enable microphone from the Sound Settings
- 4. Enable the microphone from Windows Settings
- Test Microphone Windows 10 [Step by Step]
- Try these tips
- Tip 1: How to test microphone on Windows 10?
- To install a new microphone:
- To test a microphone that has already been installed:
- Tip 2: How to fix microphone not working on PC?
- Solution 1: Update your audio driver
- Solution 2: Set microphone as default device
- How to Setup and Test a Microphone on your Windows 10 PC
- Setting Up and Testing Microphones on your Windows 10 PC
- Setting up a Microphone on a Windows PC
- Testing Microphone on your Windows 10 PC
- Conclusion
How to turn on microphone in Windows 10 [Simple Guide]

- It can happen that the microphone is not working after installing Windows 10 updates.
- In this article, we will see how you can fix this, so keep on reading.
- We covered even more common issues in our Windows 10 Hub as well, so don’t forget to have a look.
- In our dedicated How-To section you will find more useful articles, so check it out.

- Download Restoro PC Repair Tool that comes with Patented Technologies (patent available here).
- Click Start Scan to find Windows issues that could be causing PC problems.
- Click Repair All to fix issues affecting your computer’s security and performance
- Restoro has been downloaded by 0 readers this month.
After installing Windows 10, the microphone can be disabled. If this happens, there are a few things you can troubleshoot before going out and buying an external or internal sound card.
The free upgrade for Windows 10 was available to everyone at one point. This gift did not come with no strings attached. The upgrade disabled microphone in PCs across the world.
Some users will get frustrated easily and go out to buy an external sound card but for those users who would like to troubleshoot the issue take a look at the following solutions.
How can I re-enable the microphone on Windows 10?
1. Use a third-party software
It can be the case that the problem with the microphone occurs because of some kind of issues with the microphone drivers. In order to fix this, we recommend that you use DriverFix.
This tool will easily scan your PC for missing and out-of-date device drivers and automatically update them.
Due to its incorporated library, you can rest assured that you will get the latest version of the drivers, all you need to make sure is your device is connected to the Internet.

DriverFix
2. Enable the microphone from the Device Manager
- Access the Winx Menu by simultaneously pressing the Windows+X key.
- Select Device Manager from the list.

- Click on Sound Video and Game Controllers.
- Click on the sound card that is currently installed on the PC.
- Right click and choose Enable.
- Restart the computer to finish the process.

Note: If there is a yellow warning icon beside the name of the sound controller, the drivers for that controller are either damaged or uninstalled.
3. Enable microphone from the Sound Settings
- At the bottom right corner of the windows menu Right Click on the Sound Settings Icon.
- Scroll up and select Recording Devices.
- Click on Recording.
- If there are devices listed Right Click on the desired device.
- Choose enable.
- Right Click anywhere in the screen and select Show Disabled Devices
- Select the microphone from the generated list.
- Click on Properties.
- Under Device Usage select Use this Device (Enable).
- Click on Apply and OK.

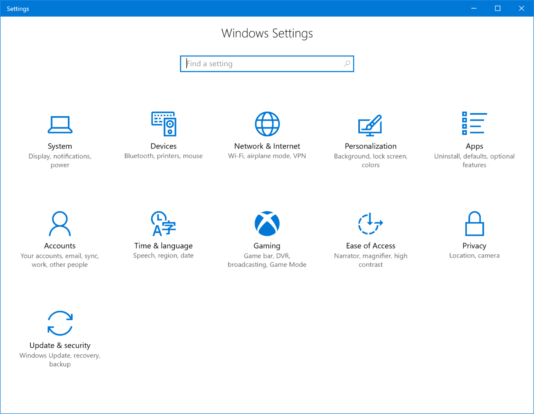
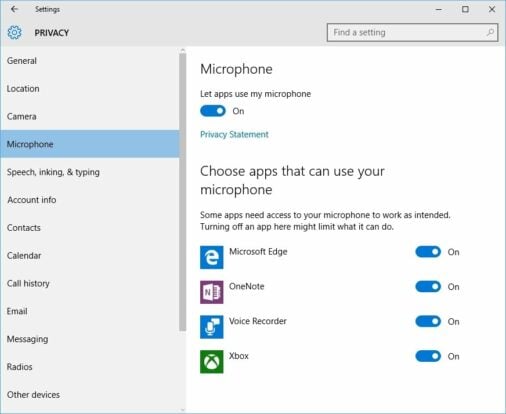
4. Enable the microphone from Windows Settings
- Access Windows Settings by simultaneously pressing the Windows Key and I.
- Click on Privacy.
- On the left menu choose Microphone.
- Under Let apps use my microphone ensure that the indicator is set to On.
If these solutions do not work to resolve the issues with the microphone there may be damage to the computer’s hardware.
Hardware issues can be resolved by buying external components or having new internal components installed.
Buying external components to resolve this issue may be the inexpensive way to fix the issue. Resolving sound issues can take a few restarts and re-installations.
Be sure to exhaust all options before buying new hardware.
If you have any other suggestions or questions, don’t hesitate to leave them in the comments section below and we’ll be sure to check them out.
Test Microphone Windows 10 [Step by Step]
Last Updated: 2 years ago
 You’ve plugged in your microphone and want to know if it’s working at all? Here’re some tips for you to test microphone on Windows 10. Easily and quickly.
Try these tips
Tip 1: How to test microphone on Windows 10?
Is this the first time you’ve connected the microphone to Windows 10? If so, you can follow the steps below to install the mic; If not, you can click here to see how to test a microphone that has already been installed.
To install a new microphone:
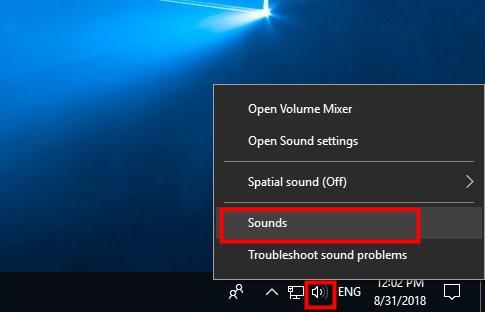
- Right-click the speaker icon on the bottom left of your screen, then select Sounds.
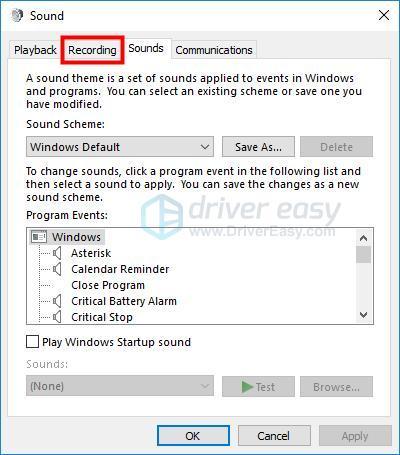
- Click the Recording tab.
- Select the microphone you want to set up, and click the Configure button in the lower left.

To test a microphone that has already been installed:
- Right-click the speaker icon in the bottom-right part of your screen, then select Sounds.
- Click the Recording tab.
- Try speaking into your microphone to test if it’s working properly. If it is, you should see a green bar rising next to it while you talk.

Another way to test microphone on Windows 10 is — if you want to speak something and quickly listen to your voices, you can use the pre-installed app Voice Recorder to test your microphone — you can refer to this article: Voice Recorder Windows 10 — How to use it & fix issues with it?
Tip 2: How to fix microphone not working on PC?
Solution 1: Update your audio driver
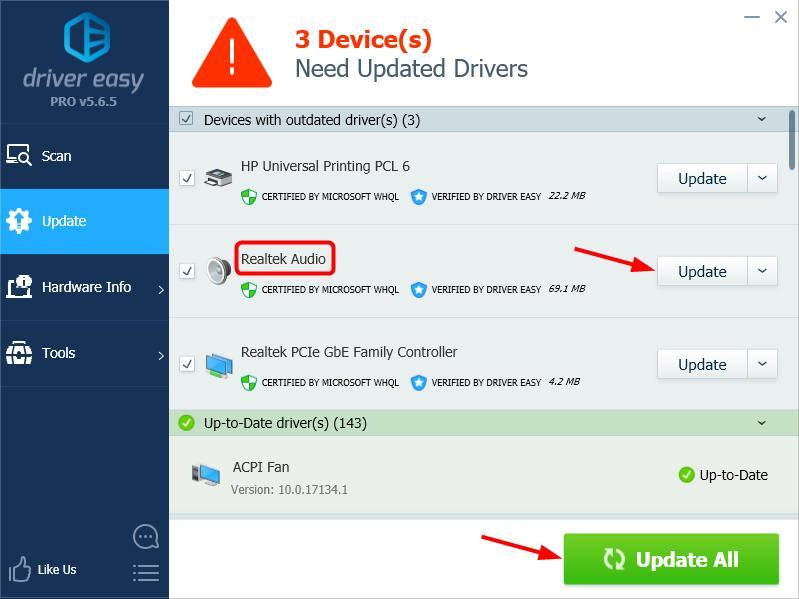
A missing or outdated audio driver may stop mic from working on PC. If you don’t have the time, patience or computer skills to update your audio driver manually, you can, instead, do it automatically with Driver Easy.
Driver Easy will automatically recognize your system and find the correct drivers for it. You don’t need to know exactly what system your computer is running, you don’t need to be troubled by the wrong driver you would be downloading, and you don’t need to worry about making a mistake when installing. Driver Easy handles it all.
- Download and install Driver Easy.
- Run Driver Easy and click Scan Now. Driver Easy will then scan your computer and detect any problem drivers.
Click the Update button next to your audio device to automatically download the correct version of its driver, then you can manually install it (you can do this with the FREE version).
Or click Update All to automatically download and install the correct version of all the drivers that are missing or out of date on your system. (This requires the Pro version which comes with full support and a 30-day money back guarantee. You’ll be prompted to upgrade when you click Update All.)
Note: If you need assistance, please contact Driver Easy’s support team at support@drivereasy.com.
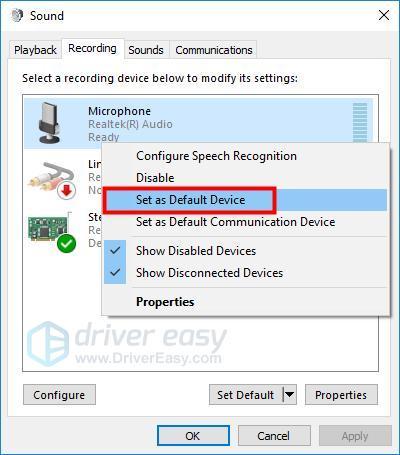
Solution 2: Set microphone as default device
- Right-click the volume icon in the bottom-right part of your screen, then select Sounds.
- Click the Recording tab.
- Right-click on the device you want to use, and select Set as Default Device.
- Click OK.
If you have any question or suggestion, please feel free to leave a comment below.
How to Setup and Test a Microphone on your Windows 10 PC
The microphone is indeed a very useful input device and it lets you save your audio in order to be used for any desired purposes. It takes your voice as input and then you can hear this voice as output through your speakers or headphones. However, there are many people who do not know how to configure and use this device. In this article, we will explain to you the method through which you can set up and test the microphone on your Windows 10 PC.
Setting Up and Testing Microphones on your Windows 10 PC
In the first part of this article, we will tell you how to set up the microphone on your Windows 10 PC and then we will tell you how you can test your microphone on your Windows 10 PC.
Setting up a Microphone on a Windows PC
In order to set up the microphone on your Windows 10 PC, you will need to perform the following steps:
First, you will need to connect a microphone with your Windows 10 PC. As soon as you will do this, Windows 10 will start installing the appropriate drivers for your newly connected microphone.
Once the installation is complete, right click on the Speaker icon located on your taskbar in order to launch a menu as shown in the following image:
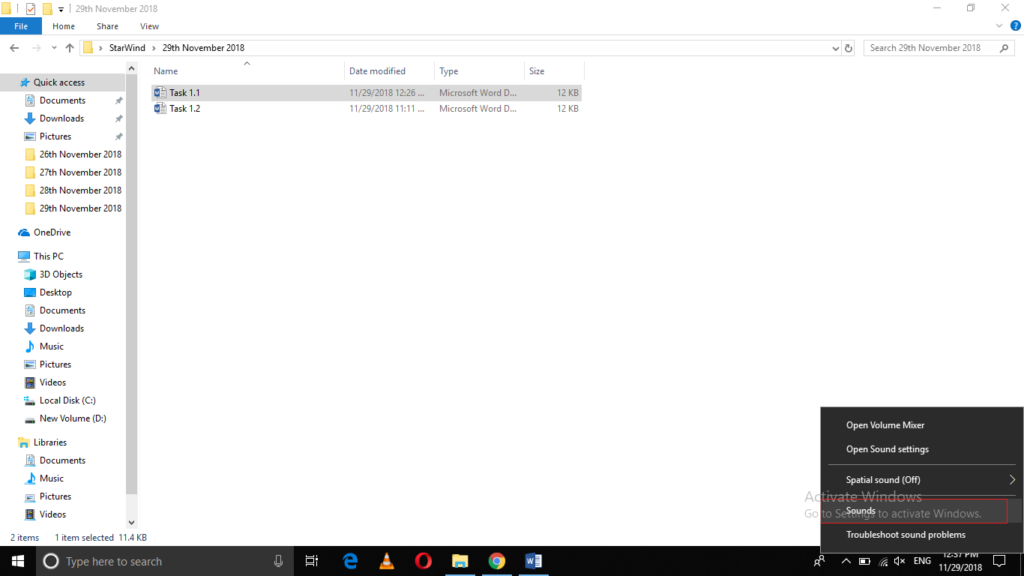
Click on the Sounds option from this menu as highlighted in the image shown above.
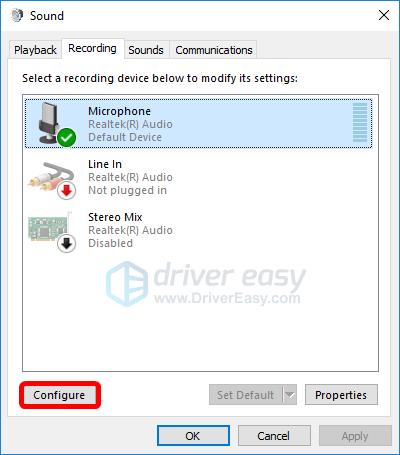
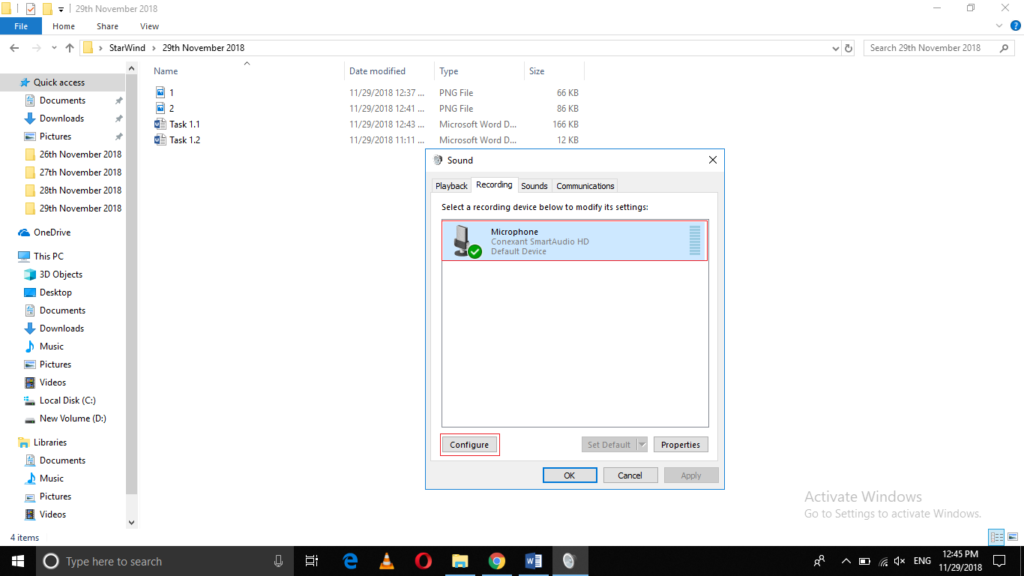
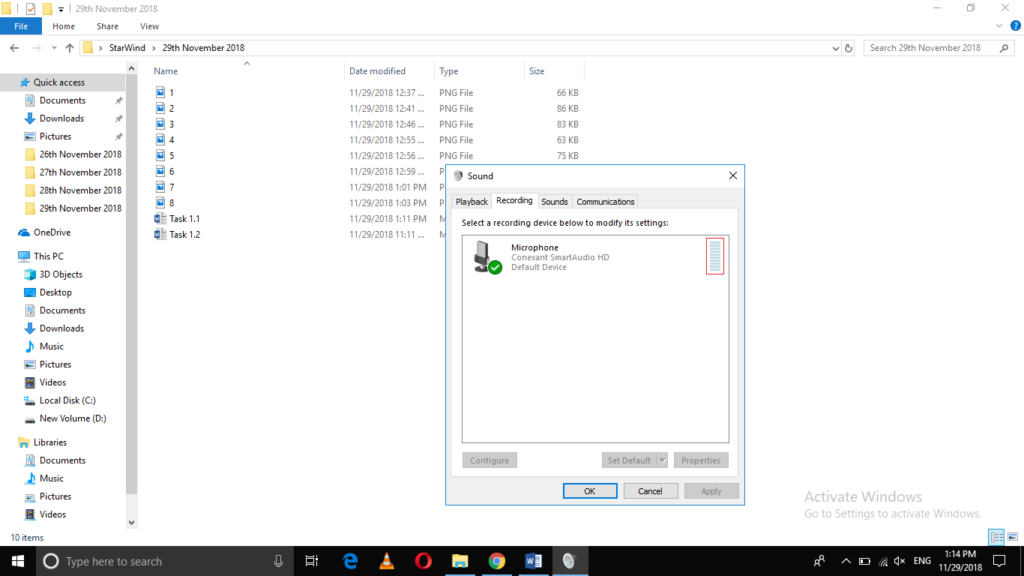
As soon as you will click on it, the Sound window will appear on your screen as shown in the image below:

Switch to the Recording tab as highlighted in the image shown above.
In the Recording tab, select your Microphone by clicking on it and then click on the Configure button as highlighted in the image shown below:
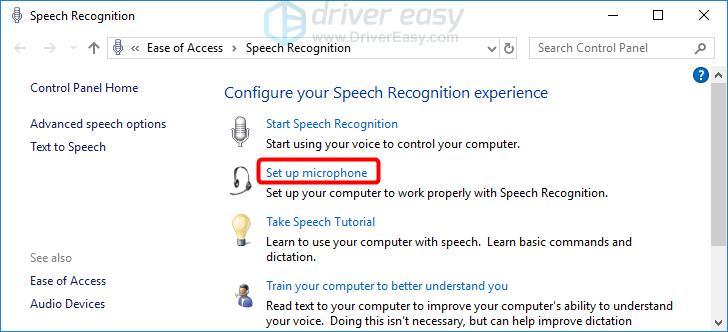
After clicking on the Configure button, the Speech Recognition window will appear on your screen as shown in the following image:
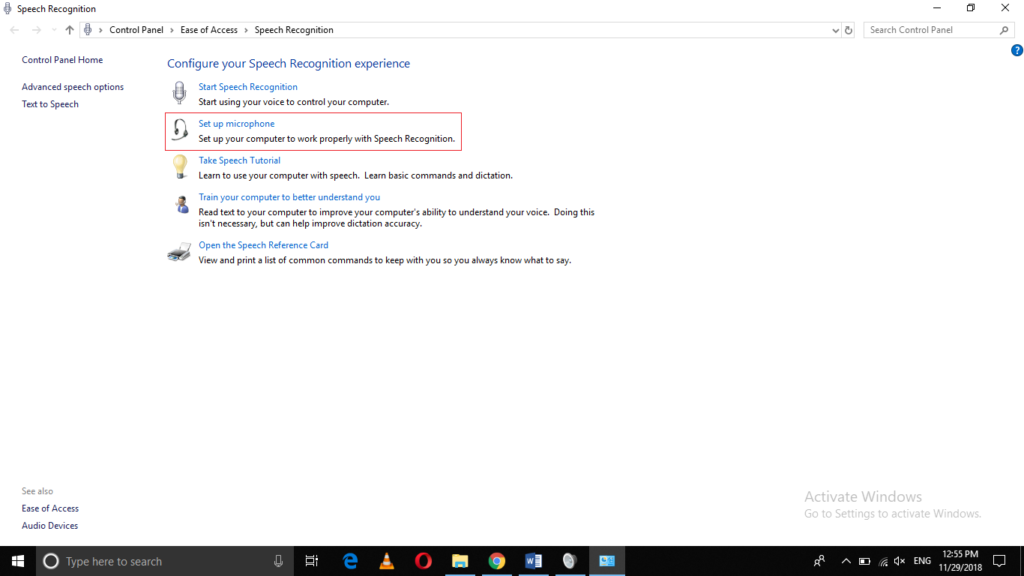
Now click on the «Set up microphone» tab as highlighted in the image shown above.
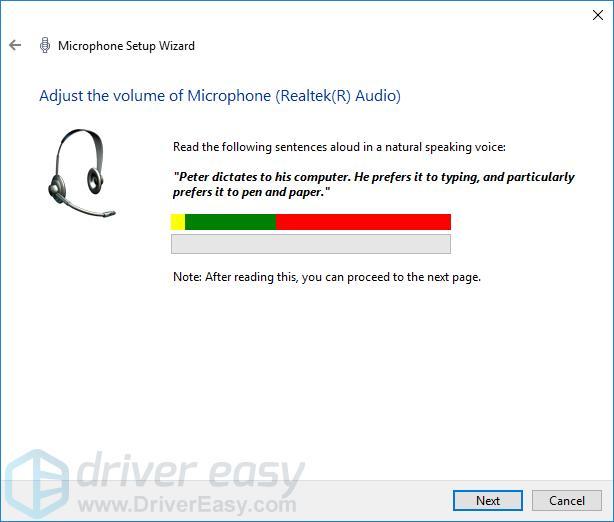
As soon as you will click on it, the Microphone Setup Wizard will appear on your screen as shown in the image below:
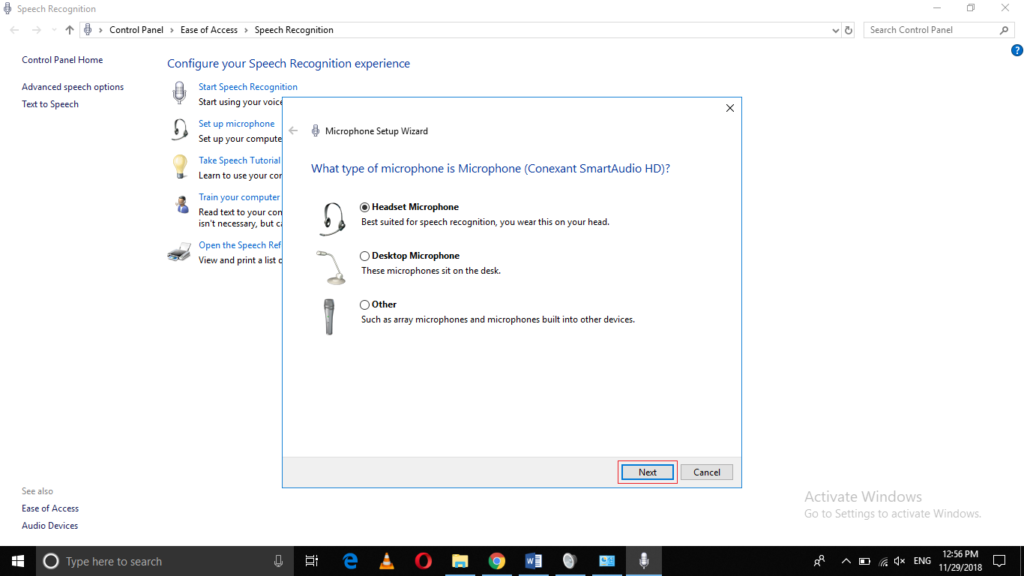
Select your Microphone type from this wizard and then click on the Next button as highlighted in the image shown above.
When you will click on the Next button, the Microphone Setup Wizard will display some instructions of using your microphone. Read these instructions carefully and then click on the Next button as highlighted in the following image:
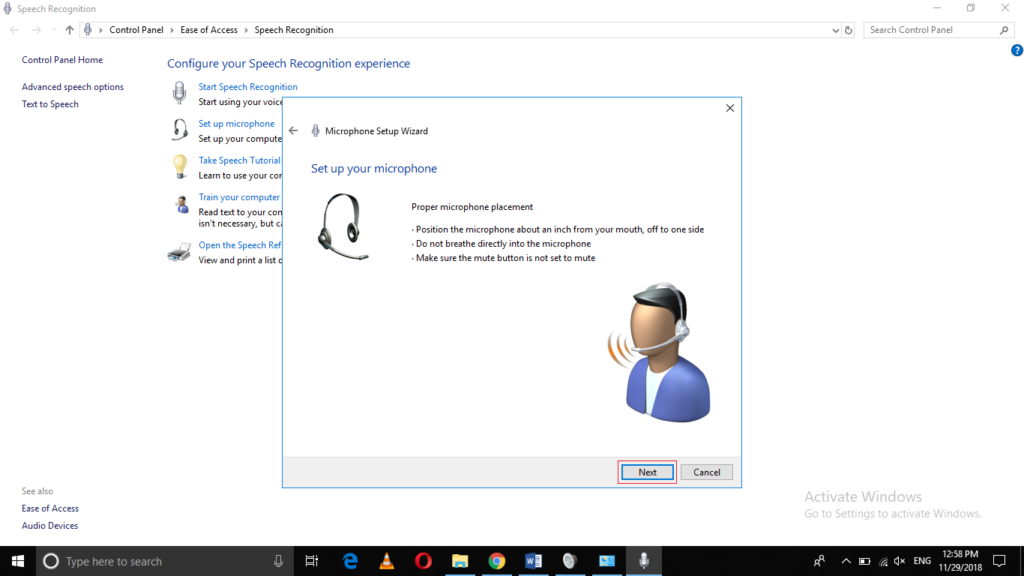
After clicking Next, you will be asked to read out a statement after which you can click on the Next button as shown in the image below:

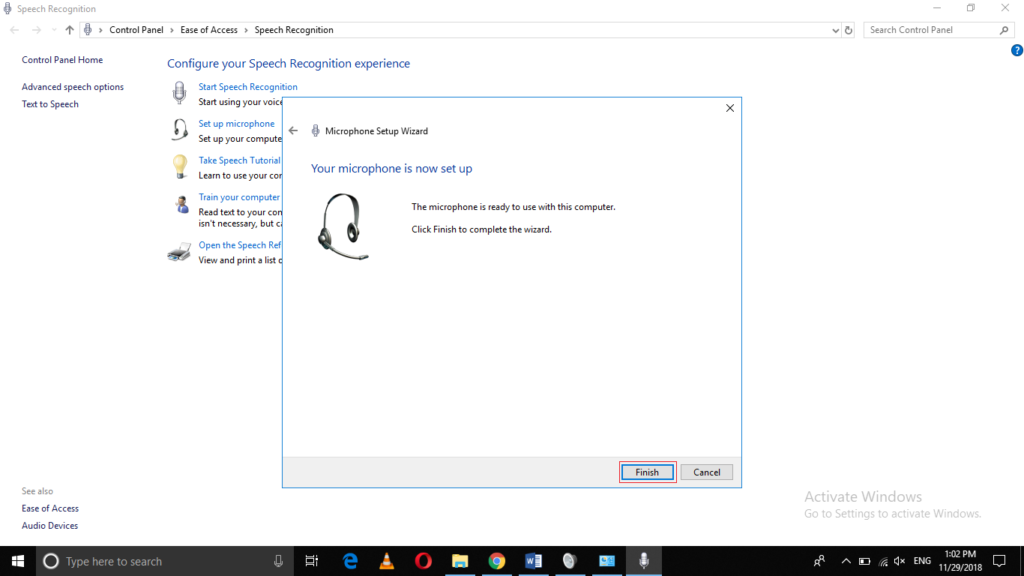
Once you manage to perform all these steps, your microphone will be all set to use. Finally, click on the Finish button in order to close the Microphone Setup Wizard as highlighted in the following image:
Testing Microphone on your Windows 10 PC
In order to test the microphone on your Windows 10 PC, you will need to perform the following steps:
Right click on the Speaker icon located at your taskbar in order to launch a menu as shown in the following image:

Click on the Sounds option from this menu as highlighted in the image shown above.
As soon as you will click on it, the Sound window will appear on your screen as shown in the image below:

Click on the Recording tab from this window as highlighted in the image shown above.
Select your Microphone from the Recording tab by clicking on it and then speak anything in your Microphone. If the volume bars corresponding to your Microphone rise up as you speak, then it means that your Microphone is working perfectly fine. These volume bars are highlighted in the following image:
Conclusion
By following the method discussed in this article, you can easily set up the microphone and test it in Windows 10. Although, while setting up the microphone, it is tested automatically but you can test it a level further to ensure the proper working of your microphone through the method prescribed in this article.


