- Мониторинг CPU, GPU, RAM, VRAM и FPS без программ в Windows 10
- Показ мониторинга Процессора, Видеокарты и FPS поверх окон в Windows 10
- Game Bar: Виджет Производительность не показывает FPS?
- How to use multiple monitors in Windows 10
- Video: Connecting a monitor
- Before you start
- Rearrange your displays
- Identify a display
- Detect a display
- Arrange your displays
- Change display options
- Change orientation
- Choose a display option
- Related topics
- Troubleshoot external monitor connections in Windows 10
- Troubleshoot issues that occur when setting up external monitors
- Troubleshoot issues that are occurring with an existing setup
- Панель мониторинга Windows 10 IoT Базовая Windows 10 IoT Core Dashboard
- Настройка нового устройства Set up a new device
- SD-карта SD card
- Имя устройства Device Name
- Пароль Password
- Сетевое подключение Wi-Fi Wi-Fi Network connection
- Первая загрузка First boot
- Подключение к Интернету Connecting to the internet
- Мои устройства My Devices
- Подключение к устройству Connect to your device
- Подключение к Azure Connect to Azure
- Примеры быстрого запуска Quick Run Samples
- Сетевой объемный принтер Network 3D Printer
- Интернет радио Internet radio
- Блокировка Интернета вещей (Core) IoT Core Blockly
Мониторинг CPU, GPU, RAM, VRAM и FPS без программ в Windows 10
Наверняка многие хотели бы видеть производительность компонентов процессора, видеокарты, оперативной памяти и показ FPS (кадров в секунду) на своем рабочем столе. В Windows 10 есть такое приложение как Game Bar, которое покажет вам мониторинг вашей системы. Не нужно больше скачивать сторонние программы для мониторинга CPU, GPU и RAM, так как в Windows 10 это уже есть по умолчанию.
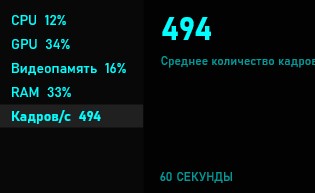
Таким образом, вы сможете во время игры посмотреть нагрузку на свой процессор (CPU), процессор видеокарты (GPU), оперативную память (RAM), память видеокарты (VRAM) и посмотреть количество кадров в секунду (FPS).
Показ мониторинга Процессора, Видеокарты и FPS поверх окон в Windows 10
- Нажмите Win+G, чтобы открыть Game Bar.
- Нажмите на меню «гамбургер» около часов (4 полосочки).
- Далее выберите из списка «производительность«.
- У вас откроется виджет.
- Нажмите на скрепку в окне «производительности» и окно будет закреплено поверх остальных.

В настройках виджета вы можете скрыть график, задать положение графика, переместить виджет в любое место на рабочем столе, выбрать определенные компоненты для показа производительности, задать полупрозрачность и цвет. Только вы должны это сделать перед тем, как нажмете на скрепку закрепления по верх окон.
Есть один момент по поводу отображения FPS. Когда вы перейдите на графу «кадров/с» вам нужно будет нажать на кнопку «Запросить доступ» и перезагрузить ПК. Если счетчик FPS не будет отображаться, то следуем способу ниже.
Game Bar: Виджет Производительность не показывает FPS?
Если у вас не показывается FPS, то это определенно недоработка Microsoft, которую я покажу как исправить, чтобы кадры в секунду отображались. Для этого,:
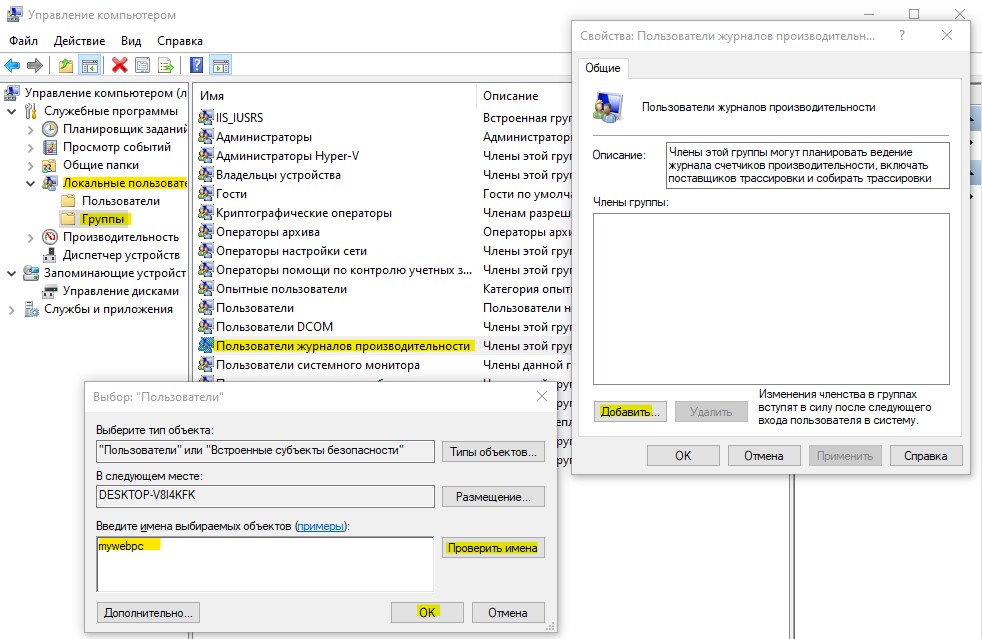
- Нажмите Win+X и выберите «Управление компьютером«.
- Далее перейдите «Локальные пользователи и группы» > «Группы» > и справа дважды щелкните по «Пользователи журналов производительности«.
- В новом окне нажмите «Добавить» и введите имя своей учетной записи, после чего нажмите «Проверить имена» и OK.
- Перезагрузите компьютер, запустите Game Bar и игру, после чего счетчик FPS начнет работать.
How to use multiple monitors in Windows 10
After you’ve connected your Windows 10 PC to external displays, you can adjust the settings for each one.
Video: Connecting a monitor
Here’s a video on the basics of connecting to an external monitor.

Before you start
Before changing settings for your external displays, make sure everything is connected properly. Here’s what you can do:
Make sure your cables are properly connected to your PC or dock.
Check for Windows updates. To check for updates, select Start > Settings > Updates & Security > Windows Update > Check for updates.
Tip: If you’re using a wireless display adapter, connect to an HDMI port on newer TVs, then wirelessly connect your PC to it. After connecting your wireless display adapter to your TV, go to your Windows 10 PC and select Start > Settings > System > Display, then select Connect to a wireless display.
Rearrange your displays
You’ll see this option when Windows detects more than one display. Each display will be numbered to help you identify them more easily.
Identify a display
To see which number corresponds to a display, select Start > Settings > System > Display > Rearrange your displays, then select Identify. A number appears on the screen of the display it’s assigned to.
Detect a display
If you connected another display and it isn’t showing in Settings, select Start > Settings > System > Display > Rearrange your displays, then select Detect.
Arrange your displays
If you have multiple displays, you can change how they’re arranged. This is helpful if you want your displays to match how they’re set up in your home or office. In Display settings, select and drag the display to where you want. Do this with all the displays you want to move. When you’re happy with the layout, select Apply. Test your new layout by moving your mouse pointer across the different displays to make sure it works like you expect.
Change display options
After you’re connected to your external displays, you can change settings like your resolution, screen layout, and more. To see available options, select Start > Settings > System > Display.
Change orientation
Windows will recommend an orientation for your screen. To change it in Display settings, go to Scale and Layout, then choose your preferred Display orientation. If you change the orientation of a monitor, you’ll also need to physically rotate the screen. For example, you’d rotate your external display to use it in portrait instead of landscape.
Choose a display option
To change what shows on your displays, press Windows logo key + P. Here’s what you can choose.
See things on one display only.
See the same thing on all your displays.
See your desktop across multiple screens. When you have displays extended, you can move items between the two screens.
See everything on the second display only.
Second screen only
Related topics
Simply Windows on Youtube — These videos are only available in English
Troubleshoot external monitor connections in Windows 10
Before considering troubleshooting options, make sure your device is up to date. Select Start > Settings > Update & Security > Windows Update , then select Check for updates. If you need help setting up your external monitors, see How to use multiple monitors in Windows 10.
Note: If you’re having trouble setting up multiple monitors on Surface, see Troubleshoot connecting Surface to a second screen.
Troubleshoot issues that occur when setting up external monitors
If you are trying to set up an external monitor and it’s not working, press the Windows logo key + P to make sure that the Extend option is selected. If the Extend option is selected, try the following troubleshooting tips.
If you’re not seeing what you expect on the external monitor, start with basic hardware troubleshooting:
Disconnect all accessories from your PC. Connected docks, dongles, adapters and other hardware can cause conflicts.
Make sure the cable connecting your PC to your external monitor is secure.
Try changing the cable connecting the external monitor. If the new one works, you know the previous cable was faulty.
Try using the external monitor with a different system. This can help to isolate whether the issue is with the monitor or the primary system
If those didn’t work, here are more possibilities:
If your system has more than one video output port, try plugging your external monitor into one of the other video output ports. Typical ports are HDMI, VGA, DVI, and DisplayPort.
If your system has more than one display adapter, also called a graphics card, you can try switching your system’s default display adapter. For example, on some systems, you can right click your desktop and select the software associated with your additional display adapter. Steps to change the default display adapter vary by device, so contact the manufacturer for more information.
First, to confirm that one external monitor does work with your system, see the above info about using only one.
If you’re able to use one external monitor, but have issues using more than one, it’s possible that your display adapter (also called a graphics card) can’t support more than one monitor. For information on how many monitors your display adapter can support, contact its manufacturer.
Note: If you are trying to use a display splitter extend your display to more than one external monitor, you won’t be able to. The splitter is duplicating the same signal instead of creating two independent signals.
If your device only has one video output port, then by default, you can only support a single external monitor. You’ll need one of the following to support more than one external monitor:
Docking station – To find out if there are docking stations available for your PC, contact the manufacturer of your PC.
USB adapter – If you have a USB-C port, you may be able to use a USB adapter to give your device an additional video output port.
Troubleshoot issues that are occurring with an existing setup
If your setup has been working well, then suddenly stopped, here are a few things you can try.
In some cases, pressing Windows logo Key + Ctrl + Shift + B may fix your issue. If this does not work, see if restarting helps.
To restart your device, select Start , then select Power > Restart.
If that doesn’t work, select Start , then select Power > Shut Down. Then, turn your device back on.
If you are experiencing issues after an update, returning, or rolling back, to a previous version of your display driver may solve the issue. To roll back the driver:
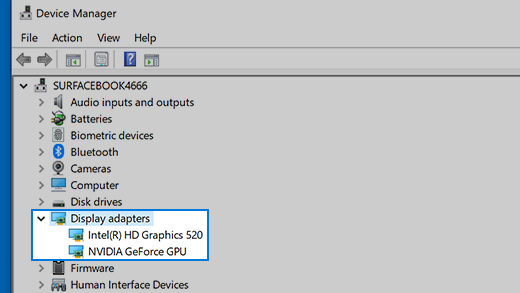
In the search box on the taskbar, enter device manager.
Select Device Manager from the list to open it. Then, select the arrow to expand the Display adapters section.
Right-click your display adapter and select Properties and the Driver tab, and then select Roll Back Driver. If you don’t see a roll back option, reinstall your display driver.
If none of the previous steps work, reinstall your display driver. Here’s how:
In the search box on the taskbar, enter device manager.
Select Device Manager from the list to open it. Then, select the arrow to expand the Display adapters section.
Right click your display adapter, and then select Uninstall device and delete the driver software for this device, then select Uninstall.
You may be asked to restart your computer. Make sure to write down the remaining instructions before you restart.
Open Device Manager again and expand the Display adapters section.
Right click your display adapter and select Update driver.
Select Search automatically for updated driver software and follow the remaining installation instructions.
In the search box on the taskbar, enter device manager.
Select Device Manager from the list to open it. Then, select the arrow to expand the Display adapters section.
You’ll see the manufacturer’s name and the name of your adapter or adapters.
If you’ve tried the steps in this article or don’t see a solution to the problem, use Windows Feedback Hub to file a bug.
Include details about what you were doing or specific steps you were taking when the issue occurred. Log in to the Feedback Hub and follow the instructions to summarize and describe your problem. Next, select your category and then add enough additional info to recreate the problem. Your information helps Microsoft determine the root cause of this issue.
Панель мониторинга Windows 10 IoT Базовая Windows 10 IoT Core Dashboard
Панель мониторинга Windows 10 IoT базовая — это лучший способ загрузки, установки и подключения устройств Windows 10 IoT Core на компьютере. Windows 10 IoT Core Dashboard is the best way to download, set up and connect your Windows 10 IoT Core devices, all from your PC.
Если вы обнаруживаете, что вы получаете белый экран при открытии панели мониторинга IoT после загрузки, это может быть вызвано проблемой с драйвером. If you’re finding that you’re getting a white screen when opening the IoT Dashboard after downloading, it may be due to a driver issue. Чтобы преодолеть эту ошибку, необходимо загрузить формат ZIP драйвера Intel Graphics и установить драйвер вручную. To overcome this issue, you’ll need to download the zip format of the Intel Graphics Driver and install the driver manually.
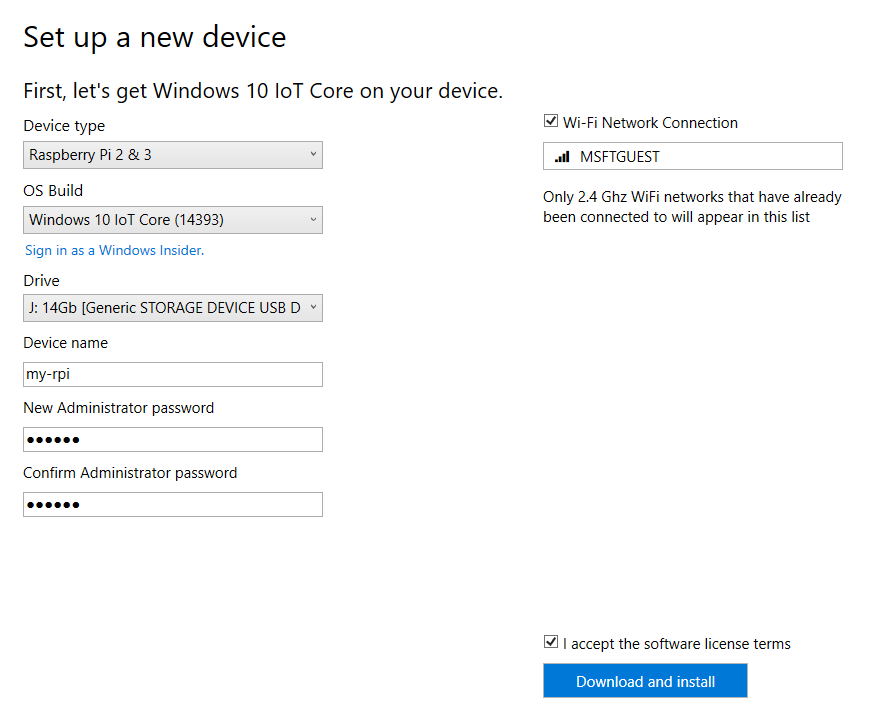
Настройка нового устройства Set up a new device
Нельзя установить ОС на Raspberry Pi 3B+ с помощью панели мониторинга. Dashboard cannot be used used to setup the Raspberry Pi 3B+. Для устройств 3B+ необходимо использовать бета-версию 3B+. If you have a 3B+ device, you must use the 3B+ technical preview. Ознакомьтесь с известными ограничениями бета-версии, чтобы выяснить, подходит ли она вам. Please view the known limitations of the technical preview to determine if this is suitable for your development.
В настоящее время существует известная ситуация, когда ОС проходит через разделы на SD-карте и запрашивает «Format..» There is currently a known issue where the OS goes through the partitions on the SD card and prompts a ‘Format ..’ сообщение для конкретной секции данных, которая не содержит ни одной файловой системы. message for a specific data partition that does not contain any file system. Закройте это приглашение, нажав кнопку «Отмена». Please dismiss this prompt by pressing cancel. Пока мы работаем над решением, мы рекомендуем использовать вариант «форматировать сейчас», чтобы снова удалить карту SD с изображением ФФУ, так как действие форматирования влияет на процесс обновления, и устройство не сможет обновиться. While we work on a solution, we recommend that if you click on ‘Format now,’ you reflash the SD card with the FFU image again as the format action impacts the update process and the device will fail to update.
Панель мониторинга Интернета вещей упрощает настройку нового устройства. The IoT Dashboard makes it easy to set up a new device. Подробные инструкции по началу работы см. на странице Приступая к работе . For detailed instructions on how to get started, see the Get Started page.
SD-карта SD card
Тип, Марка и модель SD-карты сильно влияют как на производительность, так и на качество центра Интернета вещей. The type, make, and model of the SD card greatly affects both the performance and the quality of IoT Core. Загрузка медленных карт может занять до пяти раз дольше, чем рекомендованные карты. A slow card can take up to five times longer to boot than our recommended cards. Более старая, менее надежная SD-карта может даже не работать. An older, less reliable SD card may not even work. Если по-прежнему возникают проблемы при установке, попробуйте заменить SD-карту. If you continue to run into problems installing, consider replacing the SD card.
Имя устройства Device Name
Имя устройства по умолчанию — минвинпк. The default device name is minwinpc. Рекомендуется изменить его на что-то уникальное, так как это упрощает поиск устройства в сети. We recommend changing it to something unique as this makes it easier to find the device on the network. Длина имени устройства не может превышать 15 символов и может содержать буквы, цифры и следующие символы: @ # $% ^ & ‘) (. The device name can be at most 15 characters long and can include letters, numbers, and the following symbols: @ # $ % ^ & ‘ ) ( . -_ <>
Если вы изменили имя устройства на панели мониторинга IoT при настройке устройства, автоматическая перезагрузка произойдет при первом включении устройства. — _
If you change the device name in IoT Dashboard when setting up your device, an automatic reboot will happen the first time when you power on the device.
Пароль Password
Пароль является обязательным и должен быть задан. Password is a mandatory field and must be set. Задание пароля на панели мониторинга IoT изменяет пароль пользователя администратора, который по умолчанию имеет значение » p@ssw0rd «. Setting a password in IoT Dashboard modifies the password for Administrator user, which by default is «p@ssw0rd».
Сетевое подключение Wi-Fi Wi-Fi Network connection
На панели мониторинга IoT отображаются все доступные сети, к которым компьютер ранее подключился. IoT Dashboard shows all available networks that your PC has previously connected to. Если вы не видите нужную сеть Wi-Fi в списке, убедитесь, что вы подключены к ней на компьютере. If you don’t see the desired Wi-Fi network on the list, ensure you’re connected to it on your PC. Если снять флажок, необходимо подключить кабель Ethernet к плате после мигания. If you uncheck the box, you must connect an Ethernet cable to your board after flashing.
Первая загрузка First boot
Первая загрузка всегда займет больше времени, чем все последующие загрузки. The first boot will always take longer than all subsequent boots. Установка операционной системы и подключение к сети займет некоторое время. The operating system will take some time to install and connect to your network. Время загрузки может сильно различаться в зависимости от SD-карты. Boot time can vary greatly based on your SD card. Например, Raspberry Pi 3, работающий на рекомендуемой SD-карте, занимает 3-4 минут при первой загрузке. For example, a Raspberry Pi 3 running on our recommended SD card takes 3-4 minutes for first boot. На том же устройстве PI с плохим качеством карты SD мы наблюдали время загрузки более 15 минут. On the same Pi with a poor quality SD card, we have seen boot times longer than 15 minutes.
Подключение к Интернету Connecting to the internet
Важно, чтобы ваше устройство IoT Core подключаться к Интернету. Having your IoT Core device connect to the internet is essential. Многие новые платы поставляются со встроенными адаптерами Wi-Fi. Many of the newer boards come with built-in Wi-Fi adapters. Если у вас возникли проблемы с подключением к сети, попробуйте выполнить следующие действия. If you have trouble getting connected to your network, try the following:
- Перезагрузка устройства Rebooting the device
- Подключение кабеля Ethernet Plugging in an Ethernet cable
- Подключение монитора к устройству. Plugging in a monitor to the device. Отобразятся диагностические сведения об устройстве This will show you diagnostic information about your device
Официальный адаптер Wi-Fi Raspberry Pi 2 может быть нестабильным при подключении к Wi-Fi. The official Raspberry Pi 2 Wi-Fi adapter can be unstable when connecting to Wi-Fi.
Мои устройства My Devices
Когда устройство будет подключено к Интернету, панель мониторинга IoT автоматически обнаружит ваше устройство. After your device is connected to the internet, the IoT Dashboard will automatically detect your device. Чтобы найти устройство, перейдите на страницу «Мои устройства«. To find your device, go to My Devices. Если устройство отсутствует в списке, попробуйте перезагрузить устройство. If your device is not listed, try rebooting the device. Убедитесь, что если в сети имеется несколько устройств, каждое из них имеет уникальное имя. Make sure that if there are more than one device on the network, they each have a unique name. Также убедитесь, что windows10iotcoredashboard.exe может взаимодействовать через брандмауэр Windows, выполнив следующие действия: Also make sure that your windows10iotcoredashboard.exe is allowed to communicate through Windows Firewall by following the steps below:
- Откройте центр управления сетями и общим доступом , а затем найдите тип сети (домен/частный/общедоступный), к которому подключен компьютер. Open Network and Sharing Center and then find the type of network (Domain/Private/Public) your PC is connected to.
- Откройте Панель управления и выберите система и безопасность. Open Control Panel and click System and Security.
- Щелкните Разрешить приложение через брандмауэр Windows в разделе Брандмауэр Windows. Click Allow an app through Windows Firewall under Windows Firewall.
- Щелкните Изменить параметры. Click Change settings.
- Найдите windows10iotcoredashboard.exe в списке Разрешенные приложения и компоненты , а затем установите флажок соответствующая сеть (т. е. тип сети, найденный на шаге 1). Find windows10iotcoredashboard.exe in Allowed apps and features and then enable the appropriate network check box (i.e. the network type you found in step 1).
Подключение к устройству Connect to your device
Если вы не можете найти устройство на панели мониторинга, попробуйте ввести [IP-адрес] и [: 8080] в браузере, чтобы запустить портал устройств Windows. If you are unable to find your device in the dashboard, try typing your [IP Address] and [:8080] into the browser to get Windows Device Portal up and running. Чтобы устройство отображалось на панели мониторинга, попробуйте перезагрузить устройство. To get your device to show in the dashboard, try rebooting your device.
Щелкните правой кнопкой мыши и выберите Открыть на портале устройств. Right-click and select Open in Device Portal. Это приведет к запуску страницы портала устройства Windows и является лучшим способом взаимодействия с устройством и управления им. This will launch the Windows Device Portal page and is the best way to interact and manage your device.
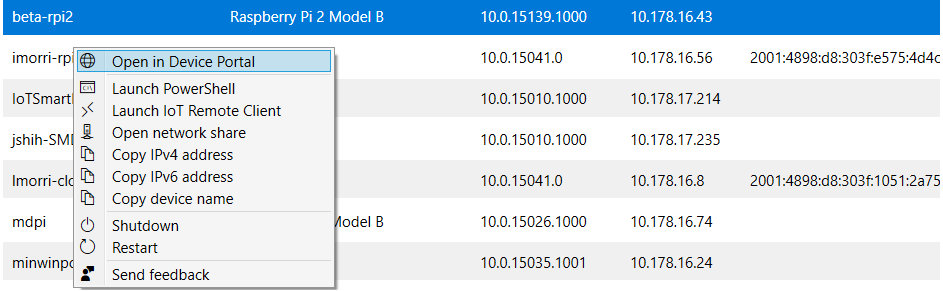
Вы также можете подключиться к устройству с помощью Windows PowerShell. You can also connect to the device using Windows PowerShell.
Подключение к Azure Connect to Azure
Панель мониторинга IoT позволяет подготавливать устройства Интернета вещей Core с помощью центра Интернета вещей Azure. IoT Dashboard lets you provision IoT Core devices with Azure IoT Hub. Дополнительные сведения о нем можно прочитать в этой записи блога. You can read more about it in this blog post.
Примеры быстрого запуска Quick Run Samples
Для примеров быстрого запуска не требуется компиляция кода, установка Visual Studio или Загрузка пакета SDK. Quick run samples do not require any code compilation, Visual studio installation, or SDK download. Они отлично подходят для быстрого извлечения того, что может сделать IoT Core. They are great for quickly checking out what IoT Core can do.
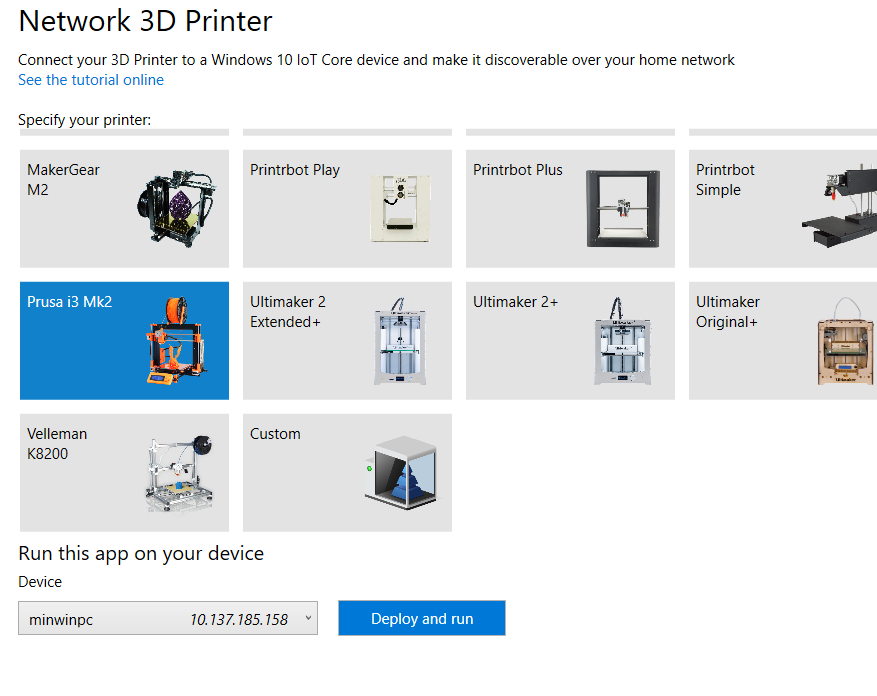
Сетевой объемный принтер Network 3D Printer
Используйте пример «сетевой объемный принтер», чтобы подключить 3D-принтер к доске, чтобы он мог быть обнаружен в домашней сети. Use the Network 3D Printer sample to connect your 3D Printer to your board can make it discoverable over your home network.
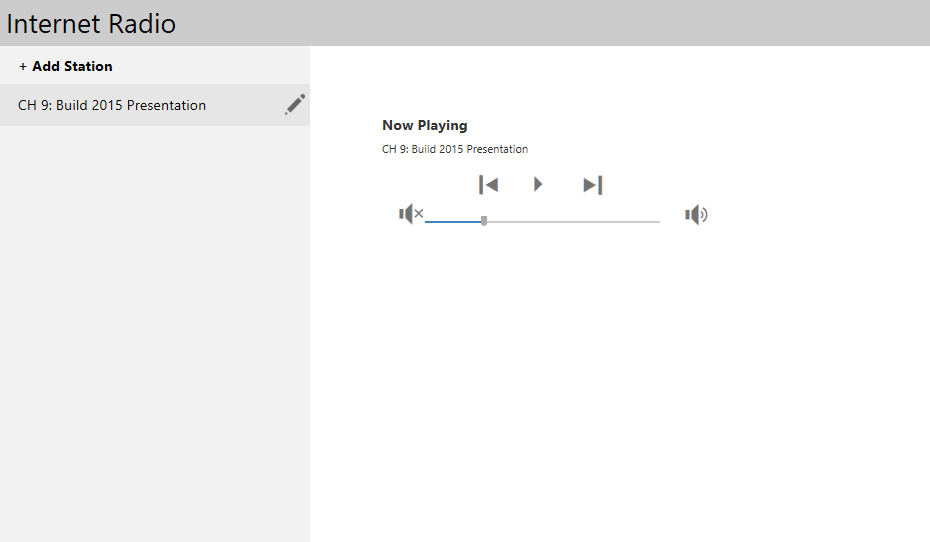
Интернет радио Internet radio
Превратите устройство Windows 10 IoT Core в Интернет Радио, который можно контролировать из любой точки дома. Turn your Windows 10 IoT Core device into an internet radio that can be controlled from anywhere in your home.
Блокировка Интернета вещей (Core) IoT Core Blockly
Пример блокирования Интернета вещей позволяет программе Raspberry Pi2 или 3, а также Raspberry Pi, используя редактор «Block» из браузера. IoT Core Blockly sample lets your program a Raspberry Pi2 or 3 and a Raspberry Pi Sense hat using a «block» editor from your browser.


