- How to Move Windows 10 Recovery Partition without Data Loss
- The recovery partition is in the way
- How to move the recovery partition in Windows 10
- Can you move recovery partition to USB?
- How to move the EFI and recovery partition in windows 10
- How to move partitions in Windows 10/8/7 without losing data
- Typical example why moving partitions in Windows 10/8/7
- Which tool to move Windows 10 partition?
- 1. How to move partition to the left or right
- 2. How to move volume to front or end of disk
- 3. How to move partition to another disk
- In Summary
- How to move the recovery partition on Windows 10?
- 3 Answers 3
How to Move Windows 10 Recovery Partition without Data Loss
If Windows 10 Recovery partition is in the way of extending C: partition, you can move recovery partition safely with a free tool.

By AOMEI  / Last Updated November 20, 2019
The recovery partition is in the way
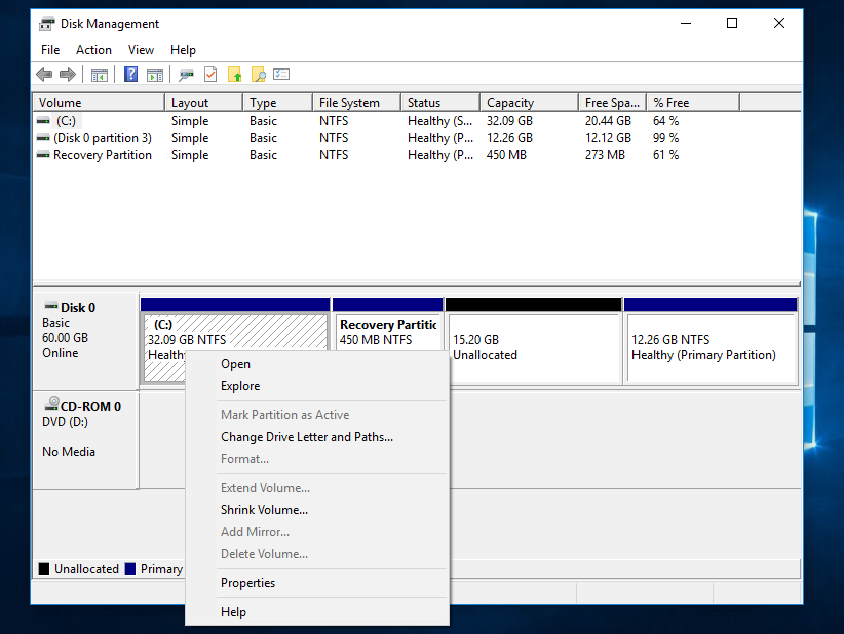
Many people find that after upgrading to Windows 10, it has created a 450MB recovery partition behind the C: drive. As you may know, the Windows Disk Management tool allows you to extend a partition when there is contiguous unallocated space behind it.
While the Windows recovery partition is located there, you will not be able to extend the system partition. You probably do not want to just delete the recovery partition because you may need to use the Windows recovery options in the future. Therefore, we recommend moving the Windows 10 recovery partition to a different location.
As well as the Windows recovery partition, the factory default recovery partition (called the OEM partition) may also get in the way of extending the system partition. As the OEM partition allows you to restore your PC to factory default settings. It is best to keep it and just move the recovery partition without losing any data to the end of the disk or to another location.
How to move the recovery partition in Windows 10
In order to move a partition without losing data, you will need specialist third party software: AOMEI Partition Assistant. The free edition will be ok for what we need. Before we can move the recovery partition, you must ensure that there is some unallocated space on the drive. If there is no unallocated space on the hard drive, you can shrink a partition to generate some. First download this free partition manager to get started.
1. Open AOMEI Partition Assistant. It’s compatible with Windows 10, 8, and 7.
2. If the recovery partition is between the partition you want to extend and the unallocated space, right click on the recovery partition and select Move Partition.
3. In the Move Partition screen, click and hold to drag the recovery partition towards the right hand side and then click OK.

4. Now you can preview the partition layout after moving recovery partition in Windows 10. If there is no problem, click Apply to save the changes.
If you need to add the unallocated space to the C: drive, you can right click on the C: drive and select Resize Partition to successfully extend system drive. You can do this before applying the changes. If you do not care about the inbuilt recovery options, you can simply delete recovery partition with DiskPart.exe.
Can you move recovery partition to USB?
If you really want to remove the recovery partition but still have the recovery options, you can move the Windows recovery partition to a USB flash drive and delete the recovery partition. In Windows 10, there is a built-in feature called Create a Recovery Drive.
A Windows 10 recovery drive allows you to troubleshoot and fix problems with your PC, even when it’s unable to boot. You can backup the system files to the recovery drive and you will then be able to use it to reinstall Windows when needed.
If you want to backup system files to the USB recovery drive, then the flash drive will need to have at 16GB of free space. Be aware that everything on the USB drive will have to be deleted before creating the recovery disk.
In the final step of creating the recovery drive, you will be given the option to delete the Windows recovery partition. Since you have just created a recovery drive that has all of the complete recovery options, you can safely delete the recovery partition.
In Windows 10, it is completely your choice if you want to move the recovery partition or remove it. If you follow the steps above, you will be able to safely move it without any problems. Plus, if you use the free professional software we mentioned you will be able to directly add unallocated space to system partition when the recovery partition is preventing you from extending your partition.
How to move the EFI and recovery partition in windows 10
First, Thanks for taking your time to read this (the only relevant information is probably in the second paragraph).
I was having trouble booting to the logon screen on my windows 10 computer and after calling Microsoft support they told me the best way forward was going somewhere, backing up all my data and doing a full reset (without keeping files) which I did do. Reset this PC didn’t work so I downloaded the windows 10 tool disk off of their website and used that to try and reinstall windows 10.
For some reason I was unable to install windows 10 because it said something like «the hard drive isn’t GPT and you can only install windows onto hard drives with GPT». Then I called Microsoft support again to see if they could help me out and I was sent a string of commands to type into command prompt and for some reason one of the commands he sent set up my C drive to only use 200Gb. I told him that I have a one terabyte Hard drive and that I should set it up to use the proper 931 Gb instead of 200 Gb but he assured me I could extend it later. after installing windows and downloading drivers/moving files/etc. I have a problem which is that I cant extend the C drive using the unallocated space. I looked this up online and I think it’s because the C drive partition is not next to the unallocated space partition, there is a recovery and EFI partition in between the C and unallocated space. My computer used the full 931 Gb before as the C drive before I reinstalled windows. Is there any way to move those two partitions out of the way so that I can extend the C drive using the unallocated space? At this point I’m willing to reinstall windows again just to fix this.
How to move partitions in Windows 10/8/7 without losing data
by John, Updated on: February 22, 2021
This article introduces how to move partitions in Windows 10/8/7 with safest tool. Move partition to the left or right, front or end of disk, or to another disk without reinstalling Windows or losing any data.
Typical example why moving partitions in Windows 10/8/7
Windows 10/8 inherited the same Shrink Volume and Extend Volume functions in Disk Management from previous Windows 7. With this native management tool you can decrease and increase partition size without reinstalling Operating System or losing data (in most cases). However, Disk Management cannot extend C drive by shrinking D or other partitions, because:
- Shrink Volume function can only make Unallocated space on the right when shrinking a partition.
- Extend Volume function can only extend partition by merging contiguous Unallocated space on the right.
After shrinking D drive, Unallocated space is nonadjacent to C drive and is on the left of E drive, so Extend Volume greyed out for both partitions.
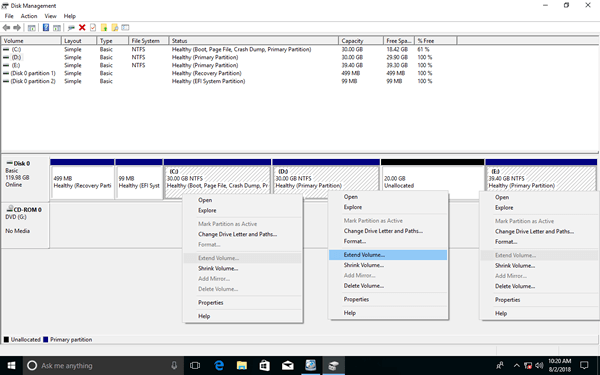
To solve this problem, you need to move partition D to the right, then Unallocated space is next to C drive, therefore, Extend Volume is enabled for C drive. You can move a partition to the left or right, to front or end of disk, or even move to another disk, but you’d better run a reliable partition tool.
Which tool to move Windows 10 partition?
Windows Disk Management and another native diskpart command tool cannot move partitions. To move partition in Windows 10/8/7/Vista/XP, you have to run third party software. There are many choices including free and commercial, Windows setup and Linux kernel based programs.
As I said above, you’d better run a reliable and safe tool, because there’s potential system damage and data loss risk while resizing and moving partitions for Windows laptop/desktop.
When you moving a partition, the start and end position of this partition will be changed, all files in it will be moved to new locations, too. Some unreliable software may modify the parameters or move files unsuccessfully. If it happens, this partition will be damaged and files will be lost.
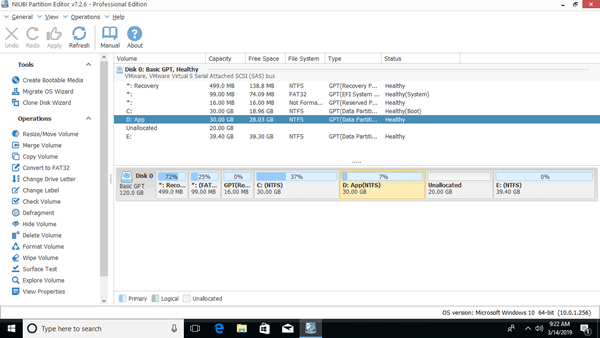
Better than other software, NIUBI Partition Editor has unique 1 Second Rollback technology to protect system and data. If anything goes wrong, it automatically reverts the computer to original status in a flash. In that case, nothing will be changed or lost. In addition, it has Virtual Mode and Cancel-at-well technologies to avoid incorrect operations, advanced file-moving algorithm to helps move partition 30% to 300% faster. It has free edition for Windows 10/8/7/Vista/XP home computer users.
Download this program, you’ll see all storage devices with partition structure and other information. In my test computer, there is 20GB Unallocated space which is shrunk from D drive.
1. How to move partition to the left or right
When there’s contiguous Unallocated space, it is very easy to move partition in Windows 10/8/7/Vista/XP, just drag and drop on the disk map and only 1 step is needed. If you use hardware RAID arrays such as RAID 0, 1, 5, do not break raid array, follow the same step below.
Steps to move partition to the right in Windows 10/8/7 with NIUBI Partition Editor:
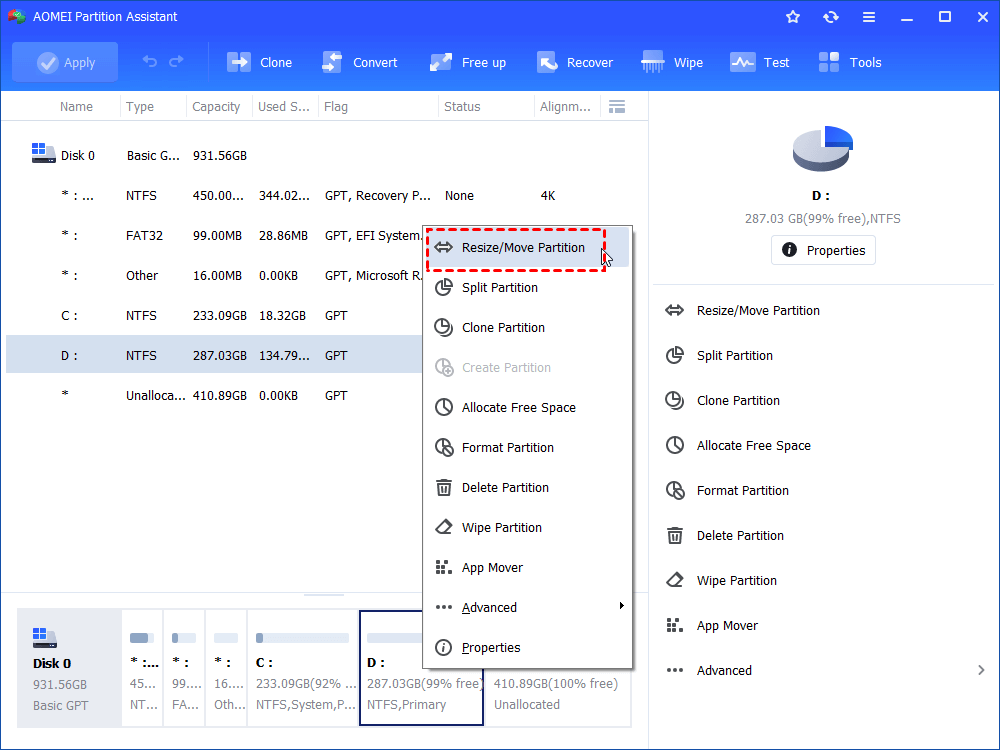
① Right click D: drive and select «Resize/Move Volume«, drag middle position towards right in the pop-up window
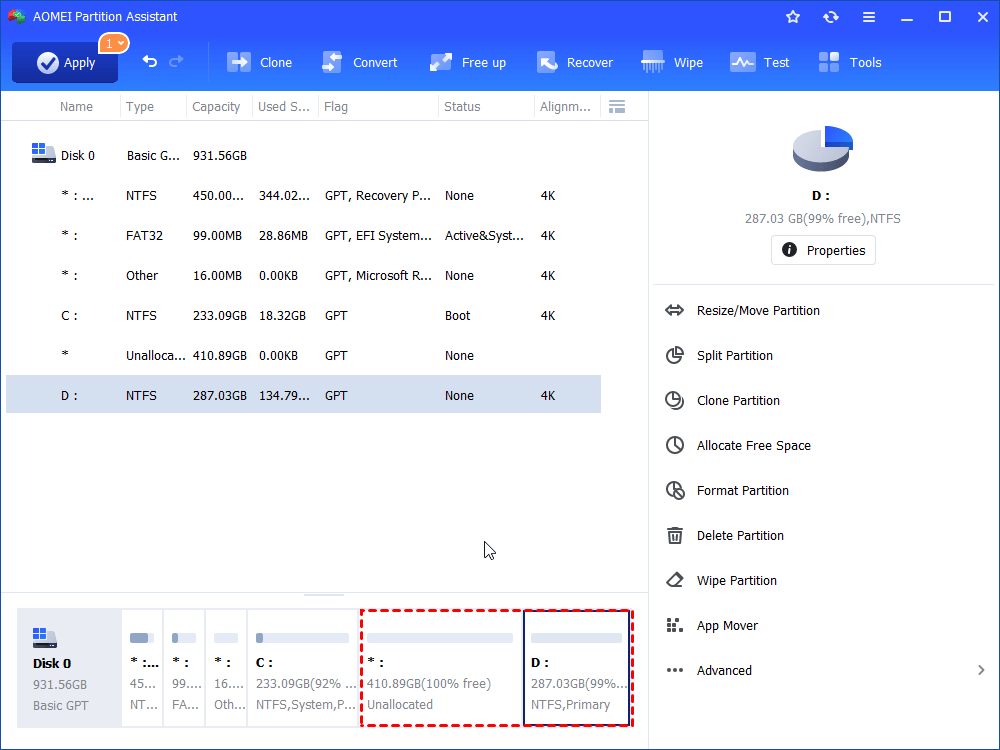
Then partition D is moved to the right and Unallocated space is moved to the left.
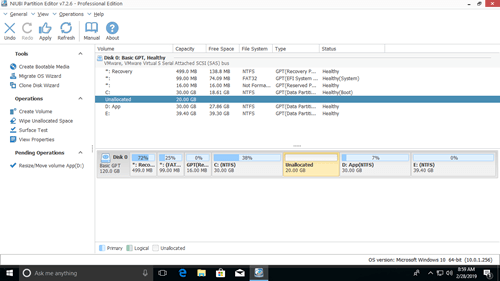
② Click Apply on top left to execute. (Real disk partitions won’t be changed until click Apply to confirm.)
- To extend C: drive, right click it and select the «Resize/Move Volume» again, drag right border towards right to combine Unallocated space.
- If you want to extend E: drive with this adjacent Unallocated space, you can achieve without moving partition. To do this, right click E and select «Resize/Move Volume», drag left border towards left in the pop-up window.
Video guide to move partitions in Windows 10/8/7 to the left or right:
2. How to move volume to front or end of disk
If the partitions are not in sequence, for example: C, E, and D, you can simply change the drive letters without moving partition.
Some computers or software require a specific partition to be at front (or end) of disk. In that case, you just need to follow the step above to move partitions one by one, or refer to this article.
3. How to move partition to another disk
If you want to move all partitions to another disk, follow the steps in the video. Here I’ll show you how to move single partition to another disk.
Steps to move a partition to another disk in Windows 10/8/7/Vista/XP:
Step 1: Shrink a partition on another disk (here is F:) and make Unallocated space with «Resize/Move Volume«. Ignore this step if there’s existing Unallocated space on this disk.
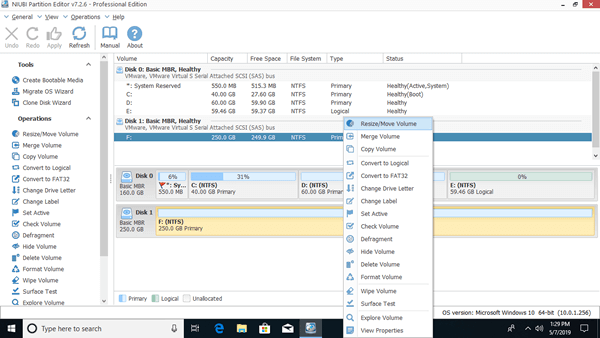
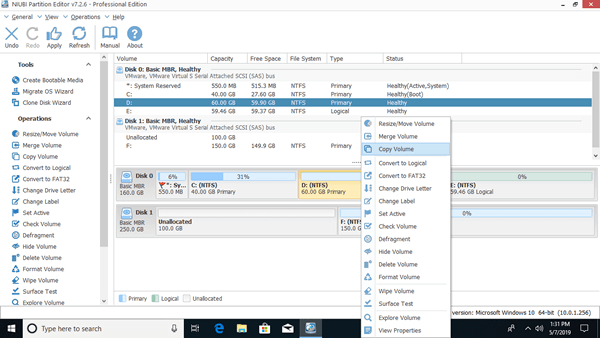
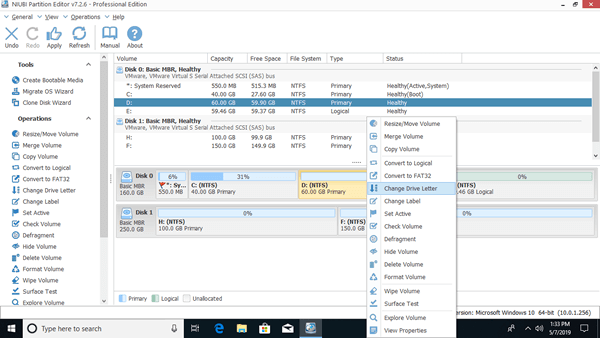
Step 2: Right click the partition that you want to move (here is D:) and select «Copy Volume«.
Step 3: Select the Unallocated space in target disk and click Next.
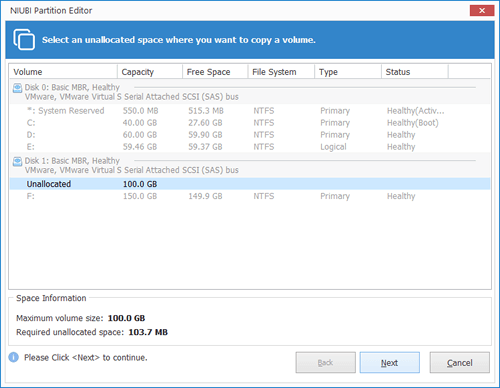
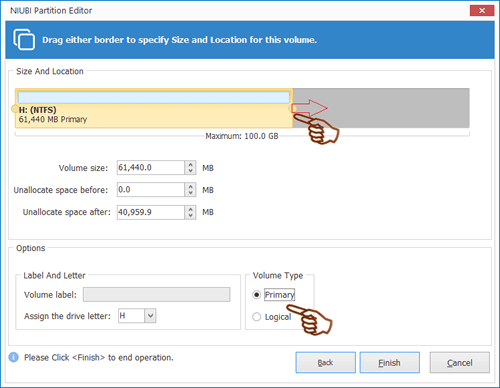
Drag right border towards right to combine extra Unallocated space.
Step 4: Right click original drive (D:) and select «Change Drive Letter«.
In the pop-up window, select any other drive letter.
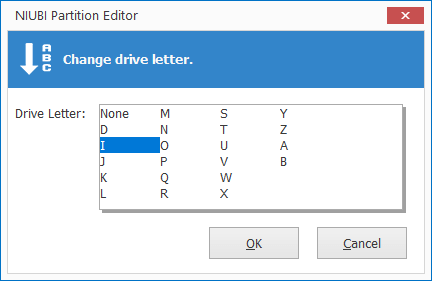
Step 5: Right click target drive (F:) and select «Change Drive Letter» again, select D in the pop-up window.
- If you installed programs in D drive or want to keep everything the same, Step 4 and 5 are required. If you just want to move files to other partition, you may ignore these 2 steps.
- If you want to move Operating System to another disk, copying single partition C cannot ensure Windows boot. Instead, you need to copy entire disk.
In Summary
Windows native Disk Management cannot move partition or Unallocated space, to move partition for Windows 10/8/7 laptop/desktop, you need 3rd party software. Among these tools, NIUBI Partition Editor is much safer and faster. Besides moving partition volume, it helps you do many other disk partition management operations.
How to move the recovery partition on Windows 10?
I upgraded to Windows 10 and a 450Mb Recovery partition was created on my disk. I would like to extend the system partition but the Recovery partition is in the way.
How can I move the Recovery partition to the end of the disk volume without installing third party software?

3 Answers 3
According to MS’s documentation, capture-and-apply-windows-system-and-recovery-partitions, the recovery partition can be captured and applied to a new partition. I have made it to work on my windows 10 PC.
Warning 1: You must know what the following commands do before you execute them. Check the link above and MS’s documentation for diskpart, dism and reagentc.
Warning 2: Check disk numbers, partition numbers and volume letters carefully before executing commands.
- Use diskpart to find current recovery partition and assign a driver letter(eg. O ) to it:
- Create an image file from current recovery partition:
- Apply the created image file to another partition(eg. N ) that will become the new recovery partition:
- Register the location of the recovery tools:
- Use diskpart to hide the recovery partition:
- For UEFI:
- For BIOS:
- Reboot the computer, now the new recovery partition should be working
- (Optional) Delete the old recovery partition:
- (Optional) Check if the recovery partition is working:
- Show the current status:
- Specifies that Windows RE starts automatically the next time the system starts:
- Reboot the computer and do your stuff in Windows RE (eg. enter CMD and run some tools)


