- Create a local user or administrator account in Windows 10
- How to manage users and groups in Windows 10
- Steps to manage users accounts in Windows 10
- Use a local account
- Edit sign-in options
- Set Work Access
- Family & Other Users
- Sync your Microsoft account settings
- Microsoft account options in the latest Windows 10 OS versions
- How to create a new User Account or Profile in Windows 10
- Create a new User Account in Windows 10
- Create a New User with Microsoft Account sign-in
- Windows 10
- Windows 8.1
- Create Local Account in Windows 10
- Windows 10
- Windows 8.1
- How to add a new user in Windows 10
- How to manage local users in Windows 10
- How to create a new local user in Windows 10
- How to make a local user an administrator in Windows 10
- How to remove a local user in Windows 10
- The Dell XPS 15 is our choice for best 15-inch laptop
- Halo: MCC’s live service elements make it better, not worse
- Microsoft’s Surface Duo is not ‘failing up’
- These are the best PC sticks when you’re on the move
Create a local user or administrator account in Windows 10
You can create a local user account (an offline account) for anyone who will frequently use your PC. The best option in most cases, though, is for everyone who uses your PC to have a Microsoft account.
If needed, the local user account can have administrator permissions; however, it’s better to just create a local user account whenever possible.
Caution: A user with an administrator account can access anything on the system, and any malware they encounter can use the administrator permissions to potentially infect or damage any files on the system. Only grant that level of access when absolutely necessary and to people you trust.
As you create an account, remember that choosing a password and keeping it safe are essential steps. Because we don’t know your password, if you forget it or lose it, we can’t recover it for you.
If you’re using Windows 10, version 1803 and later, you can add security questions as you’ll see in step 4 under Create a local user account. With answers to your security questions, you can reset your Windows 10 local account password. Not sure which version you have? You can check your version.
Create a local user account
Select Start > Settings > Accounts and then select Family & other users. (In some versions of Windows you’ll see Other users.)
Select Add someone else to this PC.
Select I don’t have this person’s sign-in information, and on the next page, select Add a user without a Microsoft account.
Enter a user name, password, or password hint—or choose security questions—and then select Next.
Change a local user account to an administrator account
Select Start > Settings > Accounts .
Under Family & other users, select the account owner name (you should see «Local Account» below the name), then select Change account type.
Note: If you choose an account that shows an email address or doesn’t say «Local account», then you’re giving administrator permissions to a Microsoft account, not a local account.
Under Account type, select Administrator, and then select OK.
Sign in with the new administrator account.
How to manage users and groups in Windows 10

Windows 8 was the first Windows version to introduce Microsoft accounts allowing you to sync your settings and files between different computers.
Windows 10 expanded this feature by allowing you to customize your accounts even more. In this guide, we’ll explain to you how you can manage users in Windows 10.
To start managing users in Windows 10, you need to open Settings and go to Accounts first. The first option in Accounts group is Your account that lets you manage your Microsoft account, customize your profile picture, your user name etc.
We just have to mention that if you want to manage your Microsoft account, you must do it online.
Steps to manage users accounts in Windows 10
Use a local account
If you don’t want to use Microsoft’s account and sync your settings, you can just click Sign in with local account instead to create a local account.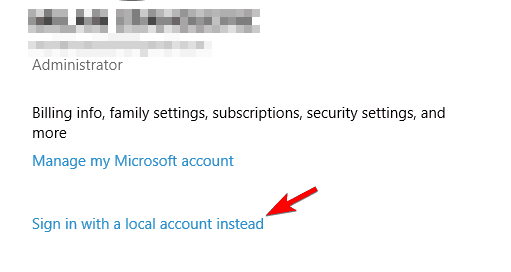
You won’t need to enter email account or phone number, just enter your username and password and you’re good to go. In addition, if you have your camera attached you can create a new profile picture as well.
In addition, if you want to add more Microsoft accounts, for example for your work or school, you can create them using the link at the bottom of the Your account page.
Edit sign-in options
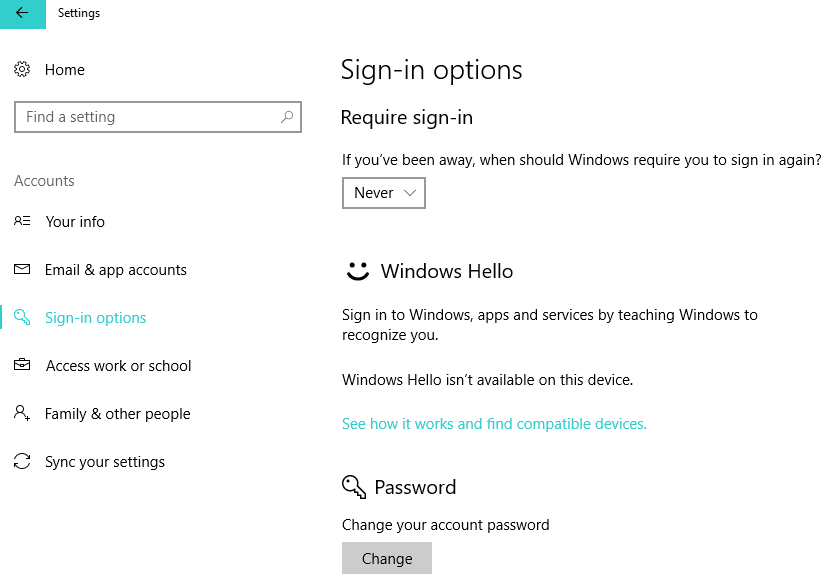
Next on our list are sign-in options, and from this section you can set if Windows 10 will require a password when your computer wakes from sleep mode or not.
In addition, you can also change your account password here as well. From this section you can also add a PIN password that you can use to unlock your account.
If you want, you can also add a picture password and use your favorite picture along with series of swipes and other gestures to unlock your PC. Last option is for fingerprint or card reader, so if you want maximum security this is probably the way to go.
Set Work Access
Next option is Work Access, and this option allows you to connect to a computer at work and access its apps, network and email.
Family & Other Users
Next we have Family & Other Users, and this section allows you to add new users. From this section you can create a user account for your child and monitor it using the Microsoft Family Safety.
That way you can make sure that your child visits only appropriate websites and respects time limits. In addition, you can also add other users from this section. Last option here is the Assigned access, and with this option you can allow a user to have access to only one Windows Store app.
Sync your Microsoft account settings
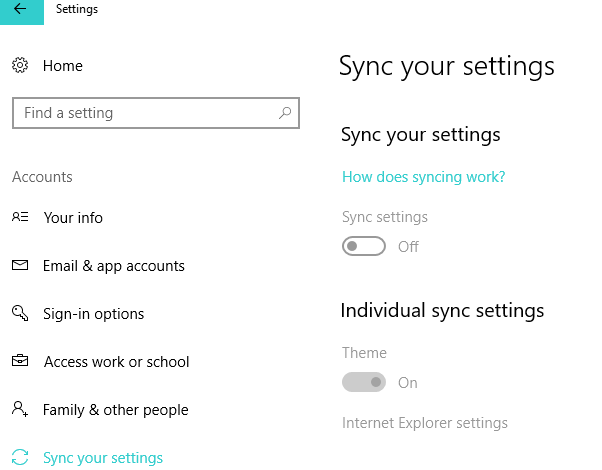
Last section is Sync your settings and it does just that. It syncs your settings with your Microsoft account across all Windows 10 devices. If you don’t want that, you can easily turn off syncing.
Microsoft account options in the latest Windows 10 OS versions
The newest Windows 10 versions, including the Fall Creators Update, the April 2018 Update and the October 2018 Update revamped the Microsoft account section of the Settings page. Here’s a screenshot of the available options:
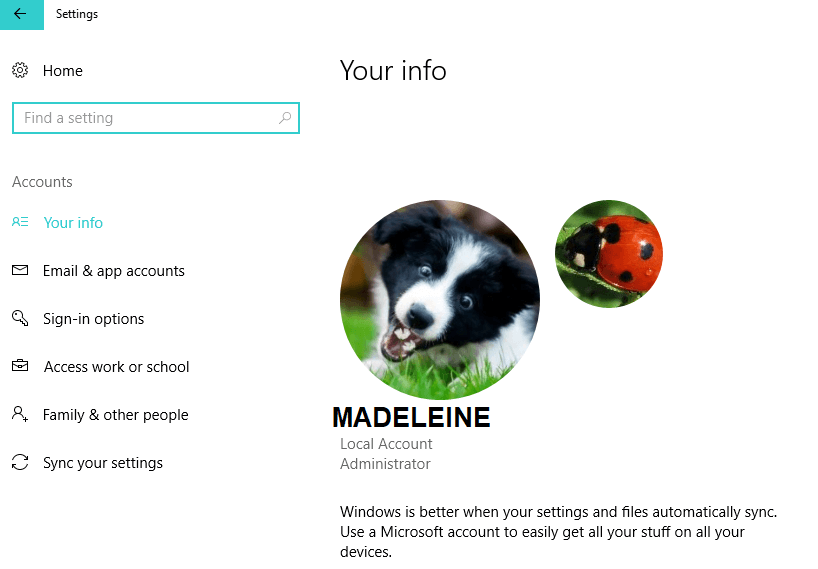
As you can see, the UI has changed a bit. For example, Microsoft added a new option called ‘Email & App accounts‘. This feature allows you to customize your email, calendar and contacts. You can add several emails accounts for faster access and see what apps use your account information.
Windows 10 brings a variety of options when it comes to managing users. We hope that managing users in Windows 10 is bit more clear to you now.
If you have any additional questions, feel free to the post them in the comment section.
RELATED POSTS TO CHECK OUT:
How to create a new User Account or Profile in Windows 10
In this post, we will see how to set up, add, configure and create a new User Account in Windows 10 and Windows 8.1. You can create a user account with a Microsoft Account login or you can create a Local Account by following this tutorial.
The Windows OS lets multiple users share the same computer under their accounts. This allows several people easily share a single computer and have their own location on the computer where they can store their personal documents, pictures, videos, saved games, and other personal data. You can have more than one user account per PC.
Each individual can have a separate user account with unique settings and preferences, such as a desktop background or screen saver. Every different User Account control which files and programs corresponding user can access and what types of changes he/she can make to the computer.
Create a new User Account in Windows 10
You can create a new user account in Windows 10 in two ways:
- Creating a Microsoft Account
- Creating a Local Account
When you sign into your PC with a Microsoft account, you connect your PC to the people, files, and devices you care about. As such Microsoft advises to create and use your Microsoft Account to sign into Windows.
Create a New User with Microsoft Account sign-in
Windows 10
In Windows 10, you can create a new user with a Microsoft account login as follows. From the WinX Menu, open Settings and then click on Accounts. Next, in the left menu, click on Family & other people.
Now under Other people, click on Add someone else to this PC.
A Microsoft account window will pop up. If you wish to use a Microsoft account to log in, enter the person’s email ID and click on Next to proceed and finish the formalities.
Windows 8.1
In Windows 8.1, to create Microsoft account, move the cursor to the lower right-hand corner of your computer screen, click ‘Settings’ and then ‘Change PC settings’. Next, click Accounts, and then choose ‘Other accounts’. Click Add an account.
Enter the account info for this person to sign into Windows. If the person you’re adding already has a Microsoft account, enter it. If the person you’re adding doesn’t have a Microsoft account, click Sign up for a new email address.
Follow the instructions to finish setting up the account.
In the end, you should see a screen like the one shown below. It indicates the process of signing up has been completed successfully.
Create Local Account in Windows 10
If you observe, Microsoft added some new security features for accounts. The feature though good and recommended, leaves little scope for personal choice. They force you to create a Microsoft Account first, giving it more preference over the local account. There appears no apparent way to move past Microsoft Account screen, especially when you are interested in creating just a local account.
Microsoft warns – If you create a local account, you’ll need a separate account for each PC you use. None of your settings will be synced between the Windows 8.1 PCs you use, and you won’t get the benefits of connecting your PC to your files, settings, apps, and services online in the cloud and accessible from anywhere. You also won’t be able to download apps from the Windows Store without a Microsoft account.
Windows 10
To create a Local Account in Windows 10, after you have clicked on Add someone else to this PC as mentioned above, and the Microsoft account window has popped up, you have to click on the I don’t have this person’s sign-in information link to open the following:
Next, click on Add a user without a Microsoft account link to open the following window:
Enter the username and password and click Next to complete the local account creation process.
Windows 8.1
In Windows 8.1, assuming you are on the ‘How this Person will Sign Up’ Screen, look for the link “Sign in without a Microsoft account.”
On being directed to a new screen, hit ‘Local Account’ tab.
Now, with the procedure to create your Microsoft Account skipped, you can go ahead and create a local account, similar to the one you created in previous Windows version. Enter your local account credentials, and you should be done in seconds. You will have created a new Local account that you can log into instead of your Microsoft account.
Users not quite familiar with Windows 10/8.1 might got caught by this changed login process and despite reservations and end up creating a Microsoft account.
Hope this clarifies things.
Incidentally, Quick User Manager is a freeware that lets you quickly manage users in Windows.
How to add a new user in Windows 10

If you plan to share your PC with other people, you can add accounts for them and share it. Because it’s always nice to share and your friends will have some personal space—including separate files, browser favorites, and a desktop they can call their own. This is one of the key differentiators for Windows 10 compared to Android or iOS.
How to create a new account in Windows 10?
Follow the below steps to add an account.
Go to Start  , then select Settings > Accounts > Your account.
Select Family & other users (or Other users, if you’re using Windows 10 Enterprise).
Under Other users, select Add someone else to this PC.
If the person you’re adding has a Microsoft account, enter their email address, select Next, and then select Finish. After they sign in, their online email, photos, files, and settings will be waiting for them.
If the person you’re adding doesn’t have a Microsoft account, select Sign in without a Microsoft account (it’s OK that it says “not recommended”), and then select Local account. Set their user name, temporary password, and password hint, and then select Next > Finish.
Some links in the article may not be viewable as you are using an AdBlocker. Please add us to your whitelist to enable the website to function properly.
How to manage local users in Windows 10
Windows 10 will let you make multiple accounts on your computer, so your friends or family can all share the same PC. You won’t have to worry about not being able to control the user accounts because as the system administrator of your Windows 10 computer or laptop, you add, change, and remove accounts as you please.
Just so you’re aware, a local user is the terminology Microsoft uses to describe someone who doesn’t already have a Microsoft account.
How to create a new local user in Windows 10
Creating an account for a person this way will also create them a Microsoft account, which means in the future they could transfer this account to another computer.
- Click on the Start menu. It’s the Windows logo in the bottom left of your screen.
Click on Settings.

Click on Family & other users.
Click on I don’t have this person’s sign-in information.
Enter their username, password, and password hint.
Click on Next.

How to make a local user an administrator in Windows 10
By default, any new local user you add to your PC will automatically be added as a standard user, meaning they won’t have certain permissions and will need the system administrator’s password to complete certain tasks. If you want the other user to have full access, you will need to make them an administrator.
- Click on the Start menu. It’s the Windows logo in the bottom left of your screen.
Click on Settings.
Click on Family & other users.
Click on the Change account type button.
Click on Administrator.
Click on the OK button.
How to remove a local user in Windows 10
- Click on the *Start menu**. It’s the Windows logo in the bottom left of your screen.
Click on Settings.
Click on Family & other users.
Click on the remove button.
Click on the Delete account and data button.
![]()
The Dell XPS 15 is our choice for best 15-inch laptop
For a lot of people, a 15-inch laptop is a perfect size that offers enough screen for multitasking, and in a lot of cases, some extra performance from powerful hardware. We’ve rounded up the best of the best at this size.
![]()
Halo: MCC’s live service elements make it better, not worse
Halo: The Master Chief Collection is more popular than ever, but some fans don’t agree with the live service approach 343 Industries has taken with it. Here’s why those elements are, at the end of the day, great for the game and for Halo overall.
![]()
Microsoft’s Surface Duo is not ‘failing up’
Microsoft announced this week that it was expanding Surface Duo availability to nine new commercial markets. While Surface Duo is undoubtedly a work in progress, this is not a sign of a disaster. It’s also doesn’t mean that Surface Duo is selling a ton either. Instead, the reason for the expansion is a lot more straightforward.
![]()
These are the best PC sticks when you’re on the move
Instant computer — just add a screen. That’s the general idea behind the ultra-portable PC, but it can be hard to know which one you want. Relax, we have you covered!


