- How to Quick Access Internet Options in Windows 10
- 3 Ways to Open Internet Options ( Internet Properties)
- Way 1: Open Internet Options from Search bar
- Way 2: Open Internet Options from Run Dialog
- Way 3: Open Internet Options from Control Panel
- Open Classic System Properties in Windows 10 version 20H2
- To Open Classic System Properties in Windows 10 version 20H2
- Create Classic System Properties Shortcut in Windows 10 version 20H2
- Add System Properties to the Navigation Pane in Windows 10
- About Sergey Tkachenko
- 3 thoughts on “ Open Classic System Properties in Windows 10 version 20H2 ”
- Leave a Reply Cancel reply
- Connect with us
- 6 Ways To Open System Properties in Windows 10
- Method #1: Open System Properties from This PC
- Method #2: Using Search
- Method #3: Windows 10 Shortcuts
- Method #4: Using Control Panel
- Method #5: Using About your PC
- Method #6: Get System Properties Online
- Wrapping Up: Open System Properties on Windows 10
- Open Advanced System Setting in Windows 10 (three solutions)!
- Find and open the Advanced System Setting in Windows 10 or Server 2016, to change important System Properties!
- 1.) . Start the Advanced System Setting in Windows 10 via RUN-Command. 2.) . Run Advanced System Setting via Windows-10 Desktop and This PC. 3.) . Open Advanced System Setting via Control Panel! ◄ Not for Win-10 from 2019 / 2020 4.) . Info About Advanced System Setting!
- 1.) Start the Advanced System Setting in Windows 10 via RUN-Command.
- 2.) Run Advanced System Setting via Windows-10 Desktop and This PC.
- 3.) Open Advanced System Setting via Control Panel!
- 4.) . Info About Advanced System Setting!
How to Quick Access Internet Options in Windows 10
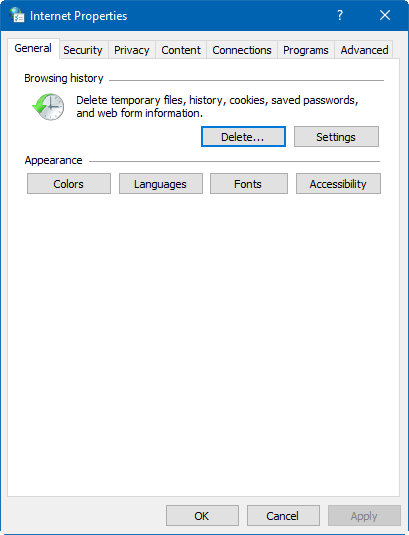
Internet Options contains many settings to allow you to configure your Internet display and connection settings. You’ll find it at Control Panel > Network and Internet > Internet Options. This guide describes another 3 quick ways to open Internet Options(Internet Properties) in Windows 10.

3 Ways to Open Internet Options ( Internet Properties)
Way 1: Open Internet Options from Search bar
Press Windows key to focus on the Search box. Then type Internet, and hit Enter key.
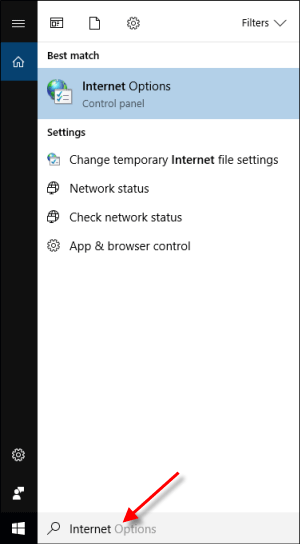
Internet Properties window shows.
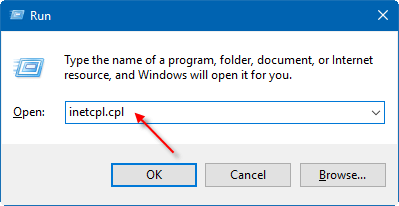
Way 2: Open Internet Options from Run Dialog
Press Win+R to bring up Run dialog, type inetcpl.cpl, then hit Enter key.
Way 3: Open Internet Options from Control Panel
1. Right-click on the Internet icon, select Open Network and Sharing Center option.
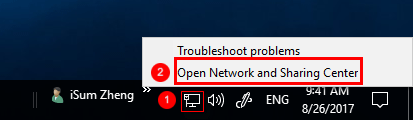
2. Then click on Internet Options in the left low corner of Control Panel.
Open Classic System Properties in Windows 10 version 20H2
How to Open Classic System Properties in Windows 10 version 20H2
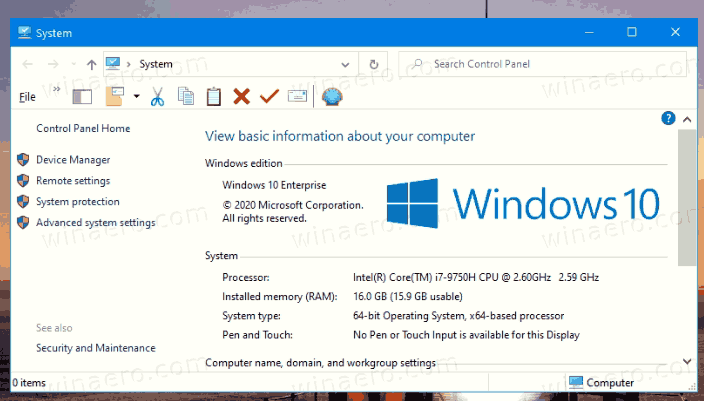
Windows 10 version 20H2, also known as ‘October 20H2 Update’, hammers one more nail in the coffin of the classic Control Panel. The System Properties applet that shows generic information about your PCs and also includes a few more links to other applets, is no longer accessible from anywhere in the GUI.
The System Properties applet is now hidden in Windows 10 version 20H2. Regardless of the method you use to open it, it doesn’t appear, bringing up the newest About page of Settings. If you click on the Properties context menu entry of This PC in File Explorer, or click on the System properties Ribbon command when This PC is opened, or press Win + Pause/Break on the keyboard, you’ll end up with the Settings page. The classic applet no longer opens.
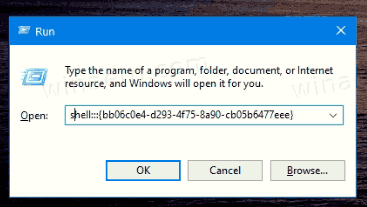
However, if you need to open the classic applet, it is actually still possible. As you may remember from my older article, Control Panel applets are available by CLSID (GUID) shell locations. So, for the system applet, all you need to do is to open the Run dialog and paste shell.
To Open Classic System Properties in Windows 10 version 20H2
- Press Win + R to open the Run box.
- Type shell.
and hit the Enter key. 
- Voila, the classic System Properties will open.
Note: The above works in Windows 10 version 20H2. However, from what I observed here, in Windows 10 build 20241 the applet is completely REMOVED. So recent Insider Preview builds doesn’t allow opening the applet anymore.
You can access the classic System Properties applet faster if you create a shortcut to open it. Here’s how.
Create Classic System Properties Shortcut in Windows 10 version 20H2
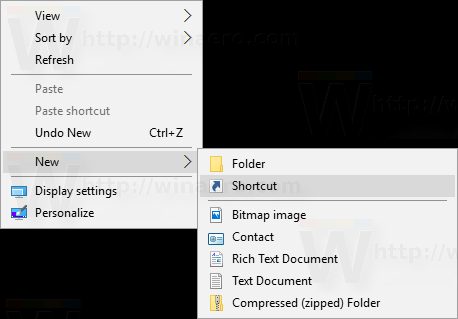
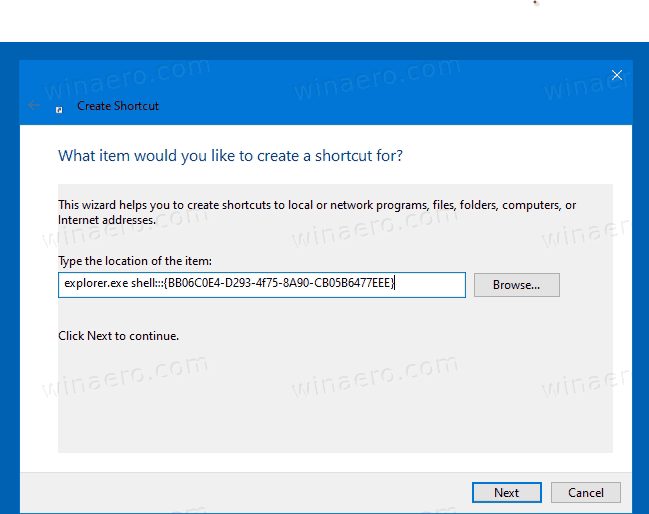
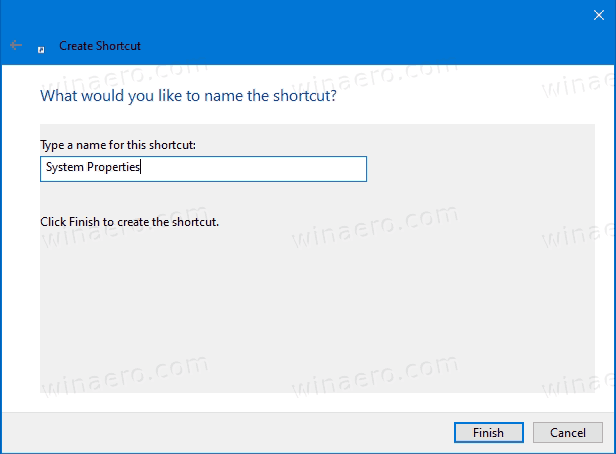
- Right click the empty space on your Desktop. Select New — Shortcut from the context menu (see the screenshot).
- In the shortcut target box, type or copy-paste the following: explorer.exe shell.
. - Type System Properties for the name of the shortcut. Actually, you can use any name you want. Click on the Finish button when done.
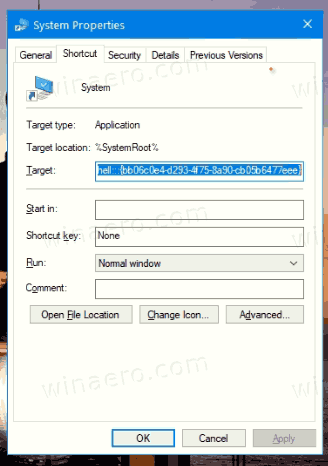
- Now, right click the shortcut you created and select Properties. Tip: See How to open file or folder properties quickly in Windows File Explorer.
- On the Shortcut tab, you can specify a new icon if you wish. You can use the icon from the c:\windows\system32\shell32.dll file. Click OK to apply the icon, then click OK to close the shortcut properties dialog window.
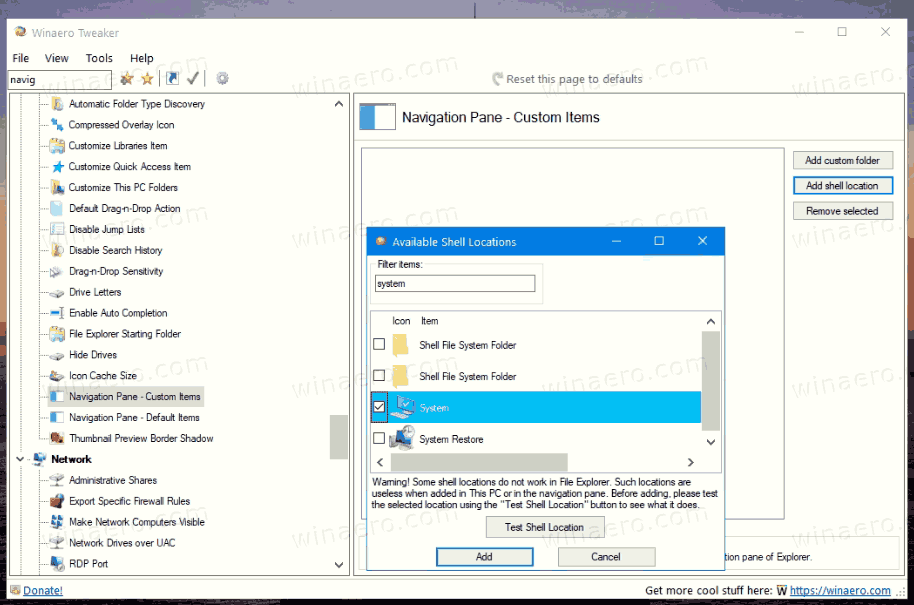
Pro tip: You can save a lot of your precious time by using Winaero Tweaker. Use it for System Properties with Winaero Tweaker > Shortcuts > Shell Folder (CLSID) Shortcuts. Click on Select Shell Folders. button and find the System item in the list.

Now, you can move this shortcut to any convenient location, pin it to taskbar or to Start, add to All apps or add to Quick Launch (see how to enable Quick Launch). You can also assign a global hotkey to your shortcut.
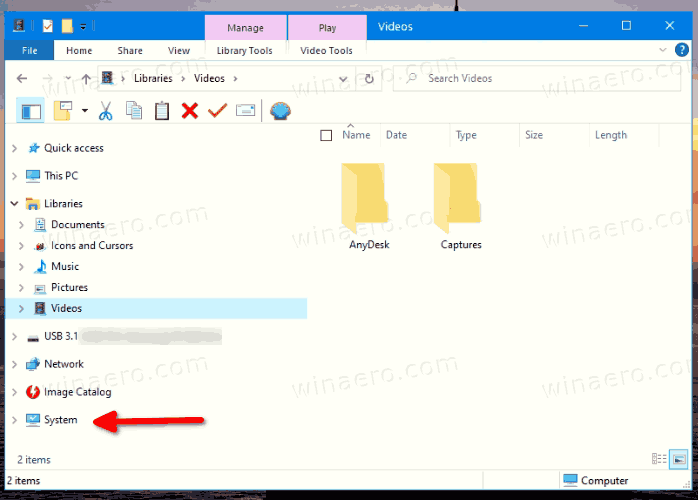
Finally, you can add System Properties to the Navigation pane in File Explorer, that is on the left. Then it will be available in File Explorer with one click! This can be quickly done with Winaero Tweaker.
Add System Properties to the Navigation Pane in Windows 10
- Run Winaero Tweaker.
- Go to File Explorer > Navigation pane — custom items.
- Click on Add Shell Location.
- Find the System item in the list.
- Click on the Add button.
- Re-open File Explorer, and you will see the classic System Properties on the left.
Winaero greatly relies on your support. You can help the site keep bringing you interesting and useful content and software by using these options:
Share this post
About Sergey Tkachenko
Sergey Tkachenko is a software developer from Russia who started Winaero back in 2011. On this blog, Sergey is writing about everything connected to Microsoft, Windows and popular software. Follow him on Telegram, Twitter, and YouTube.
3 thoughts on “ Open Classic System Properties in Windows 10 version 20H2 ”
Does the All Tasks shortcut, AKA Godmode folder, still work?
You could just go open Control Panel then add \All Control Panel Items\System in the address bar. 🙂
Leave a Reply Cancel reply
Connect with us
We discontinued Facebook to deliver our post updates.
6 Ways To Open System Properties in Windows 10
Do you need to get your computer specifications? On this post, I will show you several ways to open System Properties in Windows 10.
Since computers have become essential devices for most of us, it is necessary to know how we can access the different operating system configurations, so that you can always have your computer optimized correctly and productively.
One of the features offered by Windows 10 is to access the System Properties that is a fundamental part of the management and control of the system and the devices connected in your PC.

From System properties, you can see:
- System architecture
- RAM capacity
- Domain or workgroup
- Computer name and more
So let’s see practical methods to access these system properties in Windows 10.
Method #1: Open System Properties from This PC
- Open the File Explorer
- Rightclick on This PC and in the menu select the option: Properties
- Once you click there, on the left side menu, click on the option: Advanced system settings
- There you will have access to different information available in the system.


Method #2: Using Search
You can also open System Properties on Windows 10 using the Search feature.
Method #3: Windows 10 Shortcuts
You can also use keyboard shortcuts to open System Properties on Windows 10.
- Open System using the keyboard shortcut: Win + Pause
- Now, on the left side menu click on the option: Advanced system settings
Method #4: Using Control Panel
This option works from the Control Panel, you first you need to open it.
- Open the Windows Search and type the word control
- Click on the results that say: Control Panel
- Go to the section System and Security then click on System
- Finally, like the methods above, click on the left side menu: Advanced system settings


Method #5: Using About your PC
To access the System Properties using this method, follow these steps:
- Open the Windows 10 search and type the word: About
- Then click on the result: About your PC
- On the window that opens, scroll down until you find the section Device specifications
- There you can get detailed information about the system just like System Properties.


Method #6: Get System Properties Online
You can also get your System Properties online with a useful tool. System Requirements Lab is a website dedicated to offering these features, and that has different services.
- To get the System Properties of your Laptop or PC, you must go to the My Computer Details page .
- Click on the button View Computer Details
- Then a file download will start automatically. Wait until it finishes and run it.
- Now, wait for the tool to get your information.

Wrapping Up: Open System Properties on Windows 10
System Properties show you useful about the system, and now you know how to open it on Windows 10 using several ways.
If you know another way to get this information, let me know in the comment section below.
Open Advanced System Setting in Windows 10 (three solutions)!
Find and open the Advanced System Setting in Windows 10 or Server 2016, to change important System Properties!
1.) . Start the Advanced System Setting in Windows 10 via RUN-Command.
2.) . Run Advanced System Setting via Windows-10 Desktop and This PC.
3.) . Open Advanced System Setting via Control Panel! ◄ Not for Win-10 from 2019 / 2020
4.) . Info About Advanced System Setting!
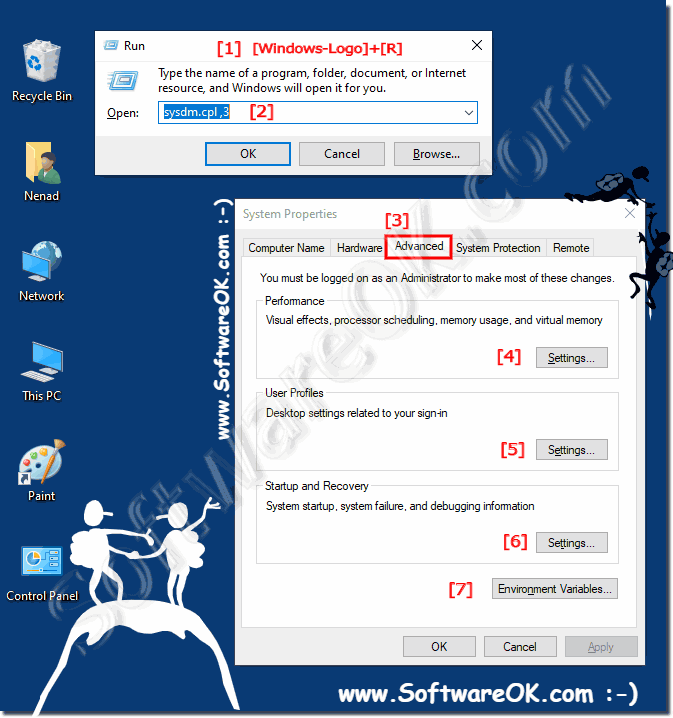
1.) Start the Advanced System Setting in Windows 10 via RUN-Command.
1. Please run the command sysdm.cpl via Run Dialog in Windows 10.
(For example via Windows-Logo + R Keyboard Shortcut)
2. In Window-10 System Properties , please select the Tab Advanced .
PS: You can also use the direct command sysdm.cpl ,3 to directly switch to Advanced Tab!
| (Image-1) RUN-Command-Advanced System Setting in Windows 10! |
 |

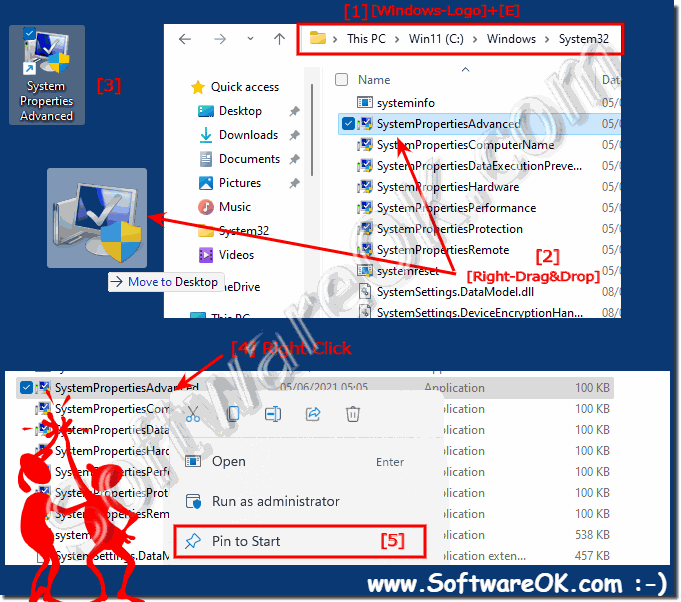
2.) Run Advanced System Setting via Windows-10 Desktop and This PC.
Please use Windows-Logo + D Keyboardschortcut to see thee Windows 10 Desktop and via mouse Right-Click on This-PC select properties in System click the text Advanced System Setting . (. see Image-2 Arrow-1 and 2)
| (Image-2) Windows-10 Advanced System Setting via Desktop and This PC! |
 |
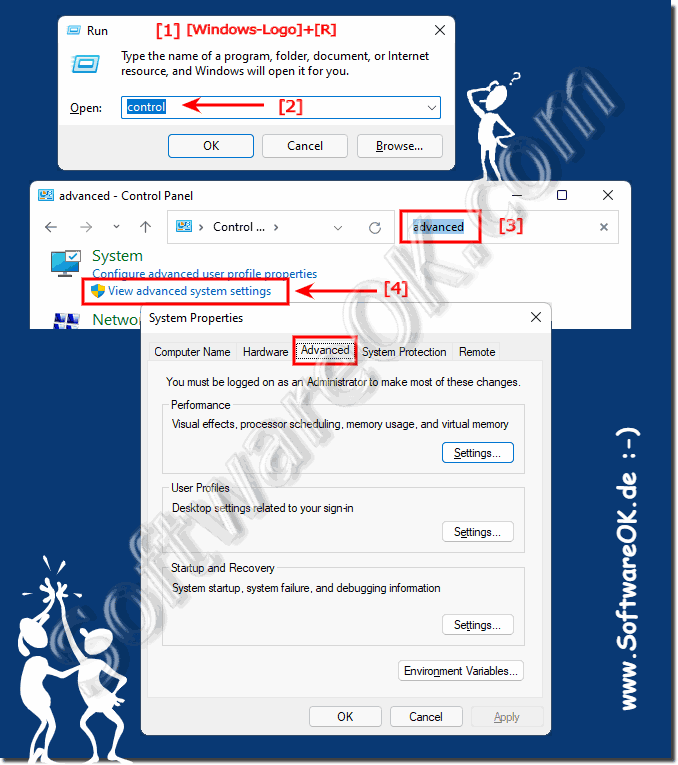
3.) Open Advanced System Setting via Control Panel!
1. Please click on Windows-10 Logo Button with right mouse or use Keyboard Shortcut Windows-Logo + X
2. And now in System click Advanced System Setting (. see Image-3 Arrow-3)
| (Image-3) Windows-10 Open Advanced System Setting via Control Panel! |
 |
The advanced system settings is the right tool to change the system properties, here are settings of visual effects, virtual memory, system startup, etc. this examples are also suitable for Windows Server 2016 and Web 2012 R2.
4.) . Info About Advanced System Setting!
You must be logged on as an Administrator on Windows to make most of these changes in system settings or as an account with admin rights. Here are three ways ergo solutions for Desktop PC, Tablets and famous MS Surface PRO or GO This is good if you non want to Create Desktop Shortcut for Advanced System Properties or Windows GodMode! The Advanced System is are almost as important as the advanced file management!


