- Установка Windows PowerShell Installing Windows PowerShell
- Поиск PowerShell в Windows 10, 8.1, 8.0 и 7 Finding PowerShell in Windows 10, 8.1, 8.0, and 7
- Консоль For Console
- ISE For ISE
- Поиск PowerShell в версиях Windows Server Finding PowerShell in Windows Server versions
- Выпуски Windows Server Core Windows Server Core editions
- Выпуски Windows Server Desktop Windows Server Desktop editions
- Проверка версии PowerShell How to check the version of PowerShell
- Обновление существующей версии Windows PowerShell Upgrading existing Windows PowerShell
- Необходимость Azure PowerShell Need Azure PowerShell
- PowerShell GUI – Howto get started
- The example project
- The basics of the PowerShell GUI
- Creating the form
- Adding elements to your form
- Using a dropdown list
- Adding buttons
- Adding a custom function to a button
- Result
- Adding the logic
- Reading and changing PowerShell GUI Elements
- Showing and hiding fields
- Online PowerShell GUI Editor PoshGUI
- Conclusion
Установка Windows PowerShell Installing Windows PowerShell
Windows PowerShell установлен по умолчанию в каждой ОС Windows, начиная с Windows 7 с пакетом обновления 1 (SP1) и Windows Server 2008 R2 с пакетом обновления 1 (SP1). Windows PowerShell comes installed by default in every Windows, starting with Windows 7 SP1 and Windows Server 2008 R2 SP1.
Если вас интересует PowerShell версии 6 или более поздней, вам нужно установить PowerShell Core вместо Windows PowerShell. If you are interested in PowerShell 6 and later, you need to install PowerShell Core instead of Windows PowerShell. Дополнительные сведения см. в статье Установка PowerShell Core в Windows. For that, see Installing PowerShell Core on Windows.
Поиск PowerShell в Windows 10, 8.1, 8.0 и 7 Finding PowerShell in Windows 10, 8.1, 8.0, and 7
Иногда найти консоль или ISE (интегрированную среду сценариев) PowerShell в Windows бывает непросто, так как их расположение в разных версиях Windows отличается. Sometimes locating PowerShell console or the Integrated Scripting Environment (ISE) in Windows can be difficult, as its location moves from one version of Windows to the next.
Следующие таблицы помогут найти PowerShell в вашей версии Windows. The following tables should help you find PowerShell in your Windows version. Все указанные версии являются оригинальными, сразу после выпуска и без обновлений. All versions listed here are the original version, as released, with no updates.
Консоль For Console
| Версия Version | Location Location |
|---|---|
| Windows 10 Windows 10 | Щелкните значок Windows в левом нижнем углу и начните вводить PowerShell. Click left lower corner Windows icon, start typing PowerShell |
| Windows 8.1, 8.0 Windows 8.1, 8.0 | На начальном экране начните вводить PowerShell. On the start screen, start typing PowerShell. Если вы находитесь на рабочем столе, щелкните значок Windows в левом нижнем углу и начните вводить PowerShell. If on desktop, click left lower corner Windows icon, start typing PowerShell |
| Windows 7 с пакетом обновления 1 (SP1) Windows 7 SP1 | Щелкните значок Windows в левом нижнем углу и в поле поиска начните вводить PowerShell. Click left lower corner Windows icon, on the search box start typing PowerShell |
ISE For ISE
| Версия Version | Location Location |
|---|---|
| Windows 10 Windows 10 | Щелкните значок Windows в левом нижнем углу и начните вводить ISE. Click left lower corner Windows icon, start typing ISE |
| Windows 8.1, 8.0 Windows 8.1, 8.0 | На начальном экране введите PowerShell ISE. On the start screen, type PowerShell ISE. Если вы находитесь на рабочем столе, щелкните значок Windows в левом нижнем углу и введите PowerShell ISE. If on desktop, click left lower corner Windows icon, type PowerShell ISE |
| Windows 7 с пакетом обновления 1 (SP1) Windows 7 SP1 | Щелкните значок Windows в левом нижнем углу и в поле поиска начните вводить PowerShell. Click left lower corner Windows icon, on the search box start typing PowerShell |
Поиск PowerShell в версиях Windows Server Finding PowerShell in Windows Server versions
Начиная с Windows Server 2008 R2, операционную систему Windows можно установить без графического пользовательского интерфейса (GUI). Starting with Windows Server 2008 R2, Windows operating system can be installed without the graphical user interface (GUI). Выпуски Windows Server без GUI называются выпусками Core , а выпуски с GUI — Desktop. Editions of Windows Server without GUI are named Core editions, and editions with the GUI are named Desktop.
Выпуски Windows Server Core Windows Server Core editions
Во всех выпусках Core при входе на сервер открывается окно командной строки Windows. In all Core editions, when you log to the server you get a Windows command prompt window.
Введите powershell и нажмите клавишу ВВОД , чтобы запустить PowerShell в сеансе командной строки. Type powershell and press ENTER to start PowerShell inside the command prompt session. Введите exit , чтобы завершить сеанс PowerShell и вернуться к командной строке. Type exit to terminate the PowerShell session and return to command prompt.
Выпуски Windows Server Desktop Windows Server Desktop editions
Во всех выпусках Desktop нужно щелкнуть значок Windows в левом нижнем углу и начать вводить PowerShell. In all desktop editions, click the left lower corner Windows icon, start typing PowerShell. Появятся параметры консоли и ISE. You get both console and ISE options.
Единственное исключение из этого правила — ISE в Windows Server 2008 R2 с пакетом обновления 1 (SP1). В этом случае щелкните значок Windows в левом нижнем углу и введите PowerShell ISE. The only exception to the above rule is the ISE in Windows Server 2008 R2 SP1; in this case, click the left lower corner Windows icon, type PowerShell ISE.
Проверка версии PowerShell How to check the version of PowerShell
Чтобы узнать, какая версия PowerShell установлена, запустите консоль PowerShell (или ISE), введите $PSVersionTable и нажмите клавишу ВВОД. To find which version of PowerShell you have installed, start a PowerShell console (or the ISE) and type $PSVersionTable and press ENTER. Найдите значение PSVersion . Look for the PSVersion value.
Обновление существующей версии Windows PowerShell Upgrading existing Windows PowerShell
В пакет установки для PowerShell входит установщик WMF. The installation package for PowerShell comes inside a WMF installer. Версия установщика WMF совпадает с версией PowerShell. Для Windows PowerShell нет отдельного установщика. The version of the WMF installer matches the version of PowerShell; there’s no stand alone installer for Windows PowerShell.
Если вам нужно обновить существующую версию PowerShell, в Windows используйте следующую таблицу, чтобы найти установщик для нужной версии PowerShell. If you need to update your existing version of PowerShell, in Windows, use the following table to locate the installer for the version of PowerShell you want to update to.
| Windows Windows | PS 3.0 PS 3.0 | PS 4.0 PS 4.0 | PS 5.0 PS 5.0 | PS 5.1 PS 5.1 |
|---|---|---|---|---|
| Windows 10 (см. примечание 1) Windows 10 (see Note1) Windows Server 2016 Windows Server 2016 | — | — | — | установлено installed |
| Windows 8.1 Windows 8.1 Windows Server 2012 R2 Windows Server 2012 R2 | — | установлено installed | WMF 5.0 WMF 5.0 | WMF 5.1 WMF 5.1 |
| Windows 8 Windows 8 Windows Server 2012 Windows Server 2012 | установлено installed | WMF 4.0 WMF 4.0 | WMF 5.0 WMF 5.0 | WMF 5.1 WMF 5.1 |
| Windows 7 с пакетом обновления 1 (SP1) Windows 7 SP1 Windows Server 2008 R2 с пакетом обновления 1 (SP1) Windows Server 2008 R2 SP1 | WMF 3.0 WMF 3.0 | WMF 4.0 WMF 4.0 | WMF 5.0 WMF 5.0 | WMF 5.1 WMF 5.1 |
Если в начальном выпуске Windows 10 включены автоматические обновления, PowerShell обновляется с версии 5.0 до 5.1. On the initial release of Windows 10, with automatic updates enabled, PowerShell gets updated from version 5.0 to 5.1. Если оригинальная версия Windows 10 не обновлена в Центре обновления Windows, версия PowerShell будет 5.0. If the original version of Windows 10 is not updated through Windows Updates, the version of PowerShell is 5.0.
Необходимость Azure PowerShell Need Azure PowerShell
Если вы ищете Azure PowerShell , можно начать с раздела Общие сведения об Azure PowerShell. If you’re looking for Azure PowerShell , you could start with Overview of Azure PowerShell.
PowerShell GUI – Howto get started
I have created many PowerShell scripts for the last couple of years. All with a single purpose to automate my IT work as much as possible. But this week I needed to create a script that could be run by the users themselves. And users and command line isn’t the best combination, so let’s take a look at using the PowerShell GUI.
We all love PowerShell for the simplicity and efficientness when it comes to scripting, but for normal users working with a CLI isn’t something they are used to. In this article, I will explain how you can create a simple GUI for your script and help you through the basic obstacles.
The example project
In this article I will use one of my own projects as an example, so let me first tell a bit about the problem I needed to solve.
I work for a construction company and our construction sites are connected over a 4G IPVPN network with the datacenter. Because of double natting, we can’t deploy printers with a print server.
Our users can install a printer themselves, but because they are not listed on the print server they can easily search for the printer. They will need to create a TCP/IP port, find the IP Address of the printer, select the driver and give a printer name.
I created a PowerShell script that I could run remotely to do this in the background, but that would require them to call me, so I could run the script in the background. Now I could just install all the printers, but that would only be confusing and resulting in a long list of printers.
So I figured, the PowerShell script only needs the printer model, Ip Address and a name. We can look up the Ip Address so if the user can select a model and fill in a name we are done. Saving me 2 calls a week.
The basics of the PowerShell GUI
Before we start creating a form is it important to know that the PowerShell script is run sequentially. So you define your form and show it. But any code after you displayed the form won’t be executed until you close the form.
This is something that took me 30 minutes to figure out… I simply thought I could show the form and handle the input below it in PowerShell.
Creating the form
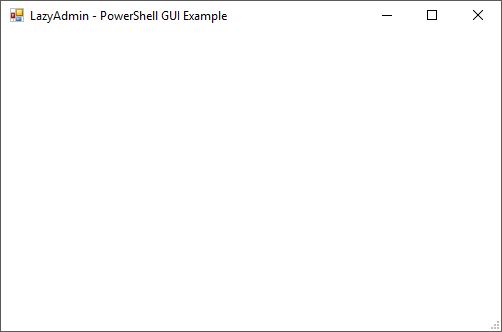
We start with a blank form. First, we add the .Net Windows. Forms. Also, we need to define a size for the form (width, height), title and background color. Just copy-paste the code below in the PowerShell ISE and click on run
You will see a simple form just like this one below:
Adding elements to your form
On our form, we can add elements. These can be used to display information and gather user input. The place of the input is based on points/pixels from the left side and the top side. So the location 20,50 is 20 pixels from the left side and 50 points from the top side.
We have the following elements that we can use on our forms:
- TextBox (to get user input)
- Label
- Button
- PictureBox
- CheckBox
- ComboBox (Dropdown list)
- ListView
- ListBox
- RadioButton
- Panel
- Groupbox (To group elements together)
- ProgressBar
- DataGridView
So let’s create some elements on our form. Add the code below to your script. Make sure that ShowDialog is at the end of your script.
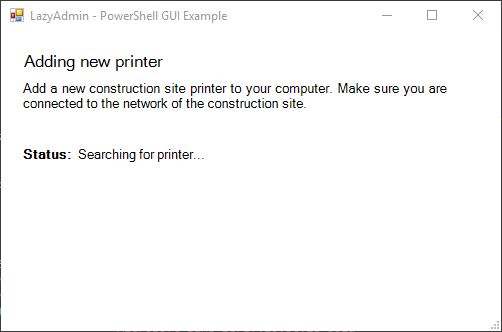
What you see here is that every element is created. These are all simple text or labels elements. You can define the width and height of each element, but if your content is longer then the element it will only be partially displayed. So by setting the Autosize to true, you are assured that the user can read the whole label.
Every element is given a location, the first digit is the number of pixels from the left side, the second the number of pixels from the top.
The result will look like this:
Using a dropdown list
Our user needs to select the printer manufacturer, we only use two brands, so I radio button could work too. We use generic print drivers so I don’t need to know the specific model of the printer.
The code above is pretty clear I think, we create the combo box and add the items with a single line foreach loop to the list. Again we also define the position and I have set a minimum width for the element.
You can set a default value for your dropdown list by selecting the index. Make sure you add the variable of the element to the $LocalPrinterForm.controls.AddRange, otherwise it won’t be displayed.
Adding buttons
We are also going to add some buttons to our form. A button can have a standard action, like (
OK, Cancel, Abort, Retry, Ignore, Yes, or No) or you can assign a custom function to it.
The buttons we are going to add are Cancel and Add Printer. Cancel will just close the form and does nothing else, while AddPrinter will run our logic to add the printer. Add the buttons with the code below, again make sure you add the variables of the buttons to the $LocalPrinterForm.controls.AddRange
Now a lot of examples on other websites discard the results of the dialog by using [void]$form.ShowDialog(). But the return value of the dialog should be used to tell how the user has closed the form.
So we are going to modify the ShowDialog cmd.
This way we can check if the user has pressed Cancel or any other default button in the form
Adding a custom function to a button
When the user clicks Add Printer a custom script should be executed. We can create a function with our logic and assign the function to the button with the following cmd
And our function
Result
So after we added all elements, and I added some extra-label, our final PowerShell GUI form looks like this:
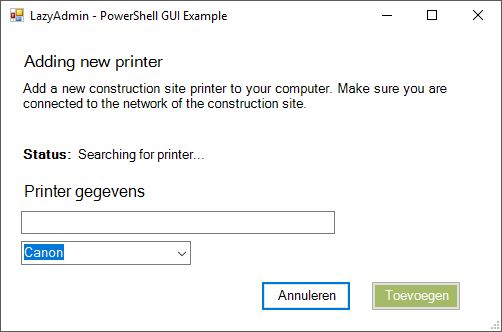
Now we only have to finish our script so a printer is added.
Adding the logic
So with our form in place, we can start by adding the logic. During the execution of your script, you might want to change text, show or remove fields or perform a specific action. Lets first start with outlining our PowerShell script.
In your functions or script section, you might want to give some feedback to the user or use the data from the input fields.
Reading and changing PowerShell GUI Elements
Reading data from the textbox is pretty straight forward. In our example, we want to use the name the users have entered and check if the printer name already exists. If the name exists we want to show an error.
In the example above we check the given printer name, if it exists we change the font color of the label “PrinterStatus” to read and change the text of the label to show a message to the users.
There is no need to refresh the form or input, you can just change the text as you go.
Showing and hiding fields
Before the form is loaded I check if there is a printer available on the expected network address. If not then there is no need for the user to continue. So when I initialize the form elements I have hidden some elements.
If we have a connection, then I show the elements or change the label of the buttons for example. Hiding and show elements in PowerShell GUI can be done with the following code:
Online PowerShell GUI Editor PoshGUI
Creating a bigger or complex form from the command line only can be a bit challenging. You will have to position all the elements in the correct place, create all the necessary code. Luckily there is an online PowerShell GUI editor PoshGUI.
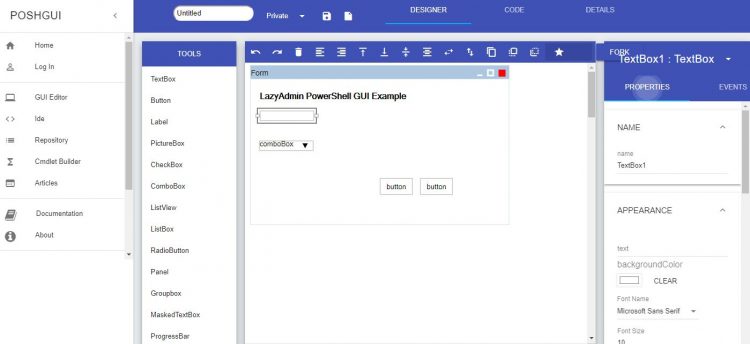
This is a great tool to create your initial form layout. You can download the PS1 file and continue working on your form in your favorite editor.
Conclusion
So I hope this article helpt you to get started creating your first PowerShell form. While PowerShell isn’t really meant for creating forms, it can be a great way to make a script more usable to your user or colleagues.
Subscribe to the newsletter to receive the latest article about PowerShell or Office 365 in your mailbox.


