- Windows 10 pro 64 bit downgrade to win7 pro 64
- How to Downgrade from Windows 10
- How to Downgrade from Windows 10: 5 Ways
- If you’re within 30 Days from the upgrade.
- 1. The Easy Recovery Method.
- 2. A Third-Party Backup.
- If you’re after 30 Days from the upgrade.
- 1. A Clean Install
- If your PC was not bought with Windows 10.
- If your PC was bought with Windows 10.
- 2. Downgrade by using previous backup.
- How to Windows 10 Pro OEM downgrade to Windows 7 Pro
- Replies (2)
Windows 10 pro 64 bit downgrade to win7 pro 64
 Профиль | Отправить PM | Цитировать
Приобретён новый компьютер с предустановленной и активированной Windows 10 pro 64-bit (чистая установка, другой системы на компьютере нет). На этот компьютер был установлен лицензионный Autodesk Inventor 2012, который официально в Windows 10, как оказалось, не поддерживается. Программа работает «коряво», поэтому возникла необходимость перейти на Windows 7 pro 64-bit. В связи с этим появились вопросы:
1. Как лицензию от Windows 10 применить к Windows7. Windows 10 имеет ключ активации электронный, он привязан к железу, будет ли активироваться Windows 7, установленная на это железо, автоматически или необходимо совершить какие-то действия по активации семёрки? Какие?
2. Покупать ли дистрибутив Windows 7 pro или скачать с официального сайта Microsoft? Каким ключом пользоваться при установке Windows 7? Не указывать?
3. Как «снести» Windows 10, семёрка просто не встанет на этот диск? Внешними средствами?
4. Что делать с разделами жёсткого диска: тоже снести?
В Интернете подробно описаны случаи возврата к ранее установленной младшей версии Windows, но как быть в моём случае, когда никакой системы на компьютере до Windows 10 не стояло и, соответственно, нет папок, необходимых для отката. Ну, и проблема лицензии: не покупать же, имея лицензионную Windows 10, ещё и не менее дорогую лицензионную Windows 7.
Спасибо.
How to Downgrade from Windows 10

There’s a lot of stuff about Windows 10 that’s not to like about.
From the forced updates (which you can’t turn off), peer-to-peer updates (which seems to use your own internet to distribute updates for strangers), and some are even getting the feeling that it is some form spyware.
You might also miss the simplicity that was on Windows 7 or Windows 8.1.
So whichever Windows version you are now deciding to downgrade from Windows 10, this guide is written to help you.
This guide will show you how you can downgrade from Windows 10 to Windows 7 or Windows 8.1 in just a few little steps that will not take longer than 10-20 minutes.
How to Downgrade from Windows 10: 5 Ways
One of the new things that did come with the Windows 10 was the option in the Settings app to easily go back to your previous version of Windows installed.
However, there’s only one rule about it: You only have a month (30 Days) from after you upgrade to your new Windows 10 to go back.
If you’re within 30 Days from the upgrade.
1. The Easy Recovery Method.
If you’re still within those 30 Days after you’ve upgraded to Windows 10, you can follow the steps below to downgrade from Windows 10.
Step 1: Go to the Settings app, or use this shortcut Windows + I
Step 2: Next, go to Update & Security
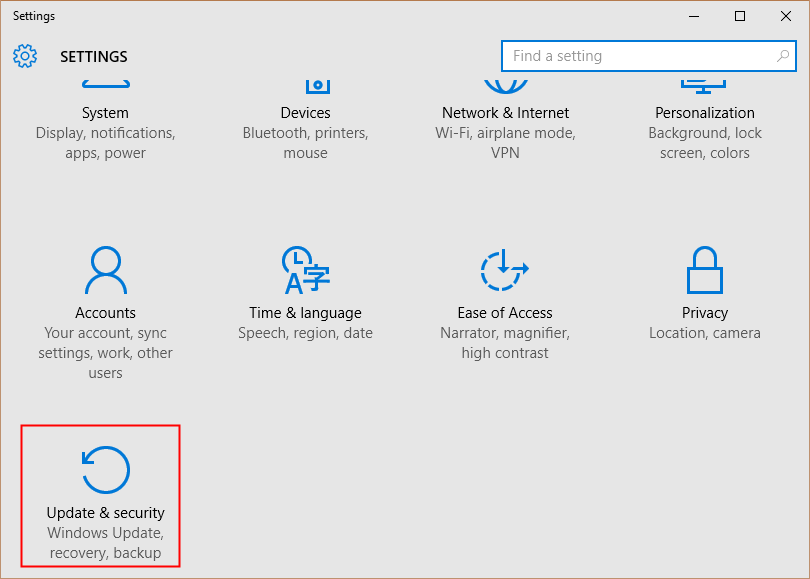
Step 3: Next, head over to Recovery.
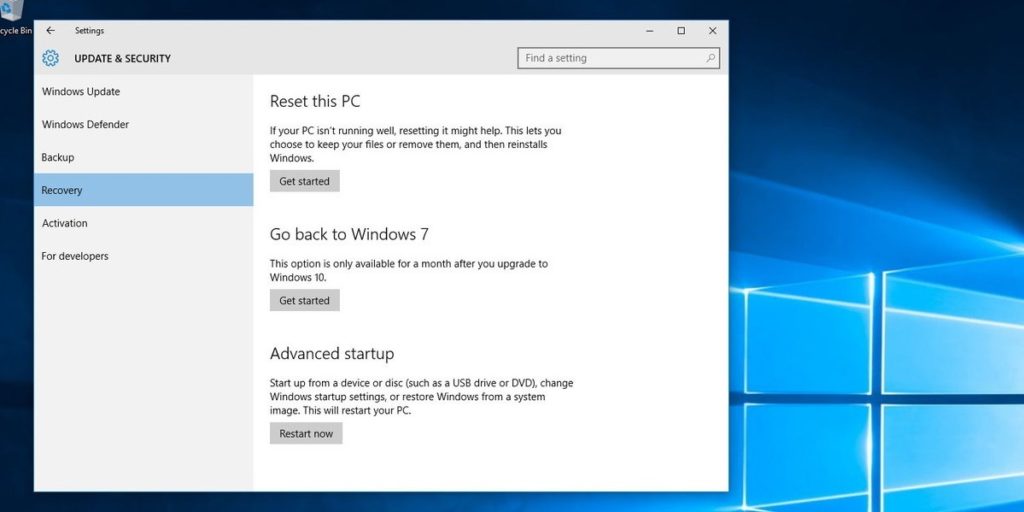
Now, if you’re within the 1 month (30 Days) from your upgrade to Windows 10, then you should be able to see the option Go back to Windows 7 or Go back to Windows 8.1 here.
Step 4: Click Get Started and this will get rid of your Windows 10 install and restore your previous install.
Step 5: Next select a reason why you’re downgrading to Windows 7 or Windows 8.1. After you have done that click Next.

Step 6: Now you will get a warning saying that you will need to reinstall some apps and programs and you’ll lose any changes made since making the upgrade to Windows 10.
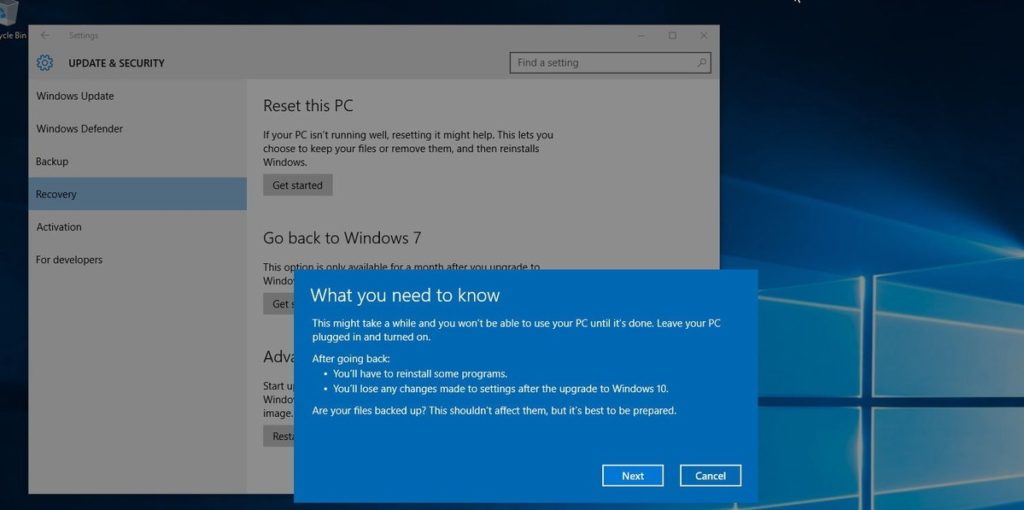
You don’t really have to backup all your files, but if you have important files that are too valuable for you to lose then it is recommended that you back up.
Step 7: Click Next
Step 8: Do make sure you know your password to Windows 7 or Windows 8.1. If you don’t, you are going to be locked out of your own system. Click Next

Step 9: Just one more step and you can then wave and kiss goodbye to your Windows 10. Finally, you need to click the Go back to Windows 7 or Go back to Windows 8.1 and to begin the downgrade process.
 Voila!
2. A Third-Party Backup.
Third-party backup is similar to the method of backing up by Downgrade by using previous backup (in the After 30 days section you can find below). However, for this case, you are going to be using other software.
These are some of the software that you can use
These tools allow you to make a complete copy of your hard drive.
This helps especially if something were to happen to your hard drive such as a hard drive failure. You can use this copy to get back to where you were.
Another software that you might like is EaseUs System GoBack which is specifically designed to let you get back to a previous version of Windows.
Again, you need to install this type of software and backup before you downgrade from Windows 10.
I will probably have tutorials written for these soon so that you can follow through step-by-step and downgrade from Windows 10 back to Windows 7 or 8.1 easily.
If you’re after 30 Days from the upgrade.
Here’s how you can downgrade from Windows 10 if you do not see the option to Go back to Windows 7 or Go back to Windows 8.1
I have included a number of methods here for you if you ever find that you prefer a certain method over the other, in order from easy to difficult.
1. A Clean Install
There are two ways you can go about this and it all depends on whether your computer was bought with Windows 10 in it or not since you’ll need the product key for the version of Windows7 or Windows 8.1 that you’ll be going back to for in order to use it.
Yeah, a clean installation is time-consuming but it is surely the most reliable and complete option you have if you’re out of the 30 day time period.
(So you can go to the appropriate subheading under this and go on from there)
If your PC was not bought with Windows 10.
If your PC was not bought with Windows 10 in it then you’ll have to find back the product key of your previous Windows 7 or Windows 8.1 version that you use to have.
To find that examine your PC for a “certificate of authenticity” sticker with a key on it. The sticker may be on the underside of your laptop, in the battery compartment under a removable battery, or even on a laptop’s power brick.
If you were on a Windows 8.1 PC, then you won’t need to search through your entire computer. The key may be embedded in your computer’s firmware and Windows 8.1 will automatically detect it and allow you to reinstall Windows 8.1 without even asking you to enter a key.
Did all of that? Alright, you can move on with the clean installation. Here’s how:
Step 1: Start off by heading over to Microsoft’s website and download either the Windows 7 or 8.1 ISO files.
Step 2: After you have done that, Download the Windows installation media and burn the ISO file to a disc or copy it to a USB drive using Microsoft’s Windows USB/DVD download tool.
Step 3: Reboot your computer with either the Windows 7 or Windows 8.1 installation files (make sure your PC is set to boot from the drive with installation files).
Step 4: You’re doing great! Just a little few steps and you’re done. During the Windows Setup, click Next, accept the licensing, and then click Next.
Step 5: Click the option Custom: Install Windows only (Advanced) option to do a clean installation.
Step 6: Here’s an important step. Now you have got to delete any partition created by your current installation of Windows. (Which would be your Windows 10)
Note: If you have a partition where you store files or a secondary hard drive, you don’t have to delete these partitions.
Step 7: Finally, Select the empty drive and click Next to start the installation process.
After you have followed those few little steps and once you’re done with the Windows Setup process, you will once again be back to your Windows 7 or Windows 8.1.
Do not panic if you find that all your files are empty, you do need to remember that you need to restore your files and reinstall and configure all the programs you have previously installed on your system. 🙂
If your PC was bought with Windows 10.
If your PC was bought with Window 10 in it and without any other Windows 7 or Windows 8.1 then it’ll be slightly tougher.
Why will it be tougher? Because you will need to get a brand new copy of either Windows 7/8.1 as you are going to need that product key in order for you to go back.
The steps are the same as how you normally install a brand new Windows version.
All you have got to do is install it from scratch and then follow up by entering the product key you purchased during the installation process.
2. Downgrade by using previous backup.
Keeping a backup of a computer before upgrading to a new operating system is recommended.
Not only keeps your data from being lost, but it’ll also help make things easier for you if you ever decide to downgrade from Windows 10 to any other operating systems in the future.
Now all you have got to do is now simply make a new backup of your new files since the last full backup or just make a copy of all your files to an external hard drive.
Also, take note of any new software installation since the last full backup, as you’ll need to reinstall them after you downgrade from Windows 10.
Here’s how you can do that:
Step 1: Go to Control Panel on your computer.
Step 2: Next, head over to Programs and Features
Step 3: Lastly, you can arrange the list of apps in your system by Installed On.
So once after you have the backup of your files and you know the apps you need to reinstall, reboot your computer using the “repair disc”, which you were prompted to create after creating the initial full backup.
Note: You don’t need to actually have a repair disk as you can also boot with the Windows 7 or Windows 8.1 installation media (check the A Clean Install section) to perform the recovery.
Now connect your external hard drive with the backup that you did and then reboot your PC.
Once you have done that, you can follow these steps:
Step 1: Firstly, While you’re in the Setup wizard, click Next, and then Repair your computer.
Step 2: Next, select Restore your computer using a system image that you create earlier, and then click Next.
Step 3: After you’ve done that, Select the backup to restore and then click Next.
Step 4: You’re almost there! Now select the image you want to use and again click Next.
Step 5: Click Next one more time and then Finish, to begin with the recovery process.
Annnd you’re done! Once you have finished these few little steps you’ll be brought back to your previous version of Windows 7 or Windows 8.1
How to Windows 10 Pro OEM downgrade to Windows 7 Pro
As a system builder, building and selling PC’s I can’t buy Windows 7 Pro anymore but I need it to run software that is not supported in windows 10.
What options do I have?
I have seen that Windows 10 Pro OEM has downgrade rights but what is the process to go through?
I have purchased a copy of Windows 10 Pro OEM and have it here but when I call Microsoft they seem to have no notion of what downgrade rights are and they tell me to enter windows 7 key (which I can’t buy).
I thought the process could be as simple as:
calling Microsoft activation line.
verifying my windows 10 code
Microsoft gives me one-time activation code to enter for Windows 7 activation.
Where am I going wrong?
Replies (2)
Downgrade rights to Windows 7 Professional would have to be supplied by you the OEM System Builder.
Downgrade rights are normally only available to name brand systems such as DELL, HP, LENOVO, Acer that come preinstalled with Windows 10 Pro at the factory.
If this is not an option available to you, you will have to purchase the Windows 7 Professional license.
You can find OEM System Builder software from dozens of online merchants. The current price for OEM Windows 7 Professional at Newegg , for example, is $140. When I checked a few minutes ago, Amazon was offering OEM Windows 7 Professional packages from multiple sellers at prices ranging from $101 to $150. When I checked just now, a package specifically intended for refurbished PCs cost only $50 for a 64-bit copy .
There are no technical limitations to prevent you from using OEM software on your own PC, although this software will work only for a clean installation and not for an upgrade. In the past, Microsoft has been remarkably inconsistent in its advice to customers about whether this practice is allowed. (See » Is it OK to use OEM Windows on your own PC? Don’t ask Microsoft .»)
9 people found this reply helpful
Was this reply helpful?
Sorry this didn’t help.
Great! Thanks for your feedback.
How satisfied are you with this reply?
Thanks for your feedback, it helps us improve the site.
How satisfied are you with this reply?
Thanks for your feedback.
Important: the information on this page is intended for system builders and the downgrade rights that apply to their customers. If you are a customer of a direct OEM, please contact your OEM for more information about downgrade rights. If you are a direct OEM, please contact your Microsoft Account Manager.
Downgrade and down-edition rights are an end-user right that Microsoft offers to customers for certain OEM products which meet the technical requirements for a Windows software downgrade. Downgrade rights are documented in the Microsoft Software License Terms that customers accept upon first running Windows and Windows Server software. Thanks to downgrade rights, end users who have acquired a later version of the software (such as Windows 10 Pro or Windows Server 2012 R2 Standard) can use an earlier version of the software until they are ready to migrate to a later version technology.
If a product includes downgrade rights, the license terms for that product will indicate which earlier versions of the software may be used.
Downgrade rights will vary depending on if the software was acquired via volume licensing, OEMs, or full packaged product (FPP).
Downgrade rights for Windows software
The following OEM versions of Windows software are eligible for downgrade rights.
Windows 10 Pro includes downgrade rights to:
| Windows 8.1 Pro includes downgrade rights to:
| Windows 7 Professional and Windows 7 Ultimate include downgrade rights to:
Note Other OEM Windows 7 versions (for example, Windows 7 Home Basic and Windows 7 Home Premium) do not include downgrade rights. |
Note downgrade rights are only available as long as Microsoft provides support for that earlier version, as outlined in the Windows lifecycle fact sheet.
Steps for an end user to downgrade Windows software
To downgrade eligible Windows software, end users must:
- Purchase a PC preinstalled with Windows software.
- Accept the Microsoft Software License Terms.
- Perform the downgrade process to the eligible downgrade product using the media/key from a genuine, previously licensed OEM or retail product.
The downgrade process
Follow these steps to downgrade to an earlier version of Windows software:
- Use genuine Windows media and a corresponding product key for the version of Windows that is eligible for downgrade. The media/key should come from a previously licensed product from the OEM or retail channel.
- End users who are licensed separately through Microsoft Volume Licensing (VL) may provide their VL media and key to a system builder to facilitate the downgrade on their own systems.
- Insert the downgrade-eligible version of Windows media and follow the installation instructions.
- Enter the product key.
- If the software was previously activated, it cannot be activated online. In this case, the appropriate local Activation Support phone number will be displayed. Call the number and explain the circumstances. When it is determined that the end user has an eligible Windows license, the customer service representative will provide a single-use activation code to activate the software. Please note that Microsoft does not provide a full product key in this scenario.
- Activate the software.
For scenarios involving large volume downgrades, end users are encouraged to consider VL which provides the benefits of reimaging rights and volume activation, which can make the process of downgrading much easier.
Authorizing a third party to exercise downgrade rights for an end user
Because downgrade rights apply to end users, they are not designed for third-party facilitation, which has many complications. Also, such facilitation is not suitable for carrying out on a large scale.


