- Set up a NAT network
- NAT Overview
- Create a NAT virtual network
- Connect a virtual machine
- Configuration Example: Attaching VMs and Containers to a NAT network
- Docker for Windows (Linux VM) and Windows Containers
- Multiple Applications using the same NAT
- Troubleshooting
- Multiple NAT networks are not supported
- Записки IT специалиста
- Настраиваем сеть NAT в Hyper-V
Set up a NAT network
Windows 10 Hyper-V allows native network address translation (NAT) for a virtual network.
This guide will walk you through:
- creating a NAT network
- connecting an existing virtual machine to your new network
- confirming that the virtual machine is connected correctly
- Windows 10 Anniversary Update or later
- Hyper-V is enabled (instructions here)
Note: Currently, you are limited to one NAT network per host. For additional details on the Windows NAT (WinNAT) implementation, capabilities, and limitations, please reference the WinNAT capabilities and limitations blog
NAT Overview
NAT gives a virtual machine access to network resources using the host computer’s IP address and a port through an internal Hyper-V Virtual Switch.
Network Address Translation (NAT) is a networking mode designed to conserve IP addresses by mapping an external IP address and port to a much larger set of internal IP addresses. Basically, a NAT uses a flow table to route traffic from an external (host) IP Address and port number to the correct internal IP address associated with an endpoint on the network (virtual machine, computer, container, etc.)
Additionally, NAT allows multiple virtual machines to host applications that require identical (internal) communication ports by mapping these to unique external ports.
For all of these reasons, NAT networking is very common for container technology (see Container Networking).
Create a NAT virtual network
Let’s walk through setting up a new NAT network.
Open a PowerShell console as Administrator.
Create an internal switch.
Find the interface index of the virtual switch you just created.
You can find the interface index by running Get-NetAdapter
Your output should look something like this:
The internal switch will have a name like vEthernet (SwitchName) and an Interface Description of Hyper-V Virtual Ethernet Adapter . Take note of its ifIndex to use in the next step.
Configure the NAT gateway using New-NetIPAddress.
Here is the generic command:
In order to configure the gateway, you’ll need a bit of information about your network:
IPAddress — NAT Gateway IP specifies the IPv4 or IPv6 address to use as the NAT gateway IP.
The generic form will be a.b.c.1 (e.g. 172.16.0.1). While the final position doesn’t have to be .1, it usually is (based on prefix length)
A common gateway IP is 192.168.0.1
PrefixLength — NAT Subnet Prefix Length defines the NAT local subnet size (subnet mask). The subnet prefix length will be an integer value between 0 and 32.
0 would map the entire internet, 32 would only allow one mapped IP. Common values range from 24 to 12 depending on how many IPs need to be attached to the NAT.
A common PrefixLength is 24 — this is a subnet mask of 255.255.255.0
InterfaceIndex — ifIndex is the interface index of the virtual switch, which you determined in the previous step.
Run the following to create the NAT Gateway:
Configure the NAT network using New-NetNat.
Here is the generic command:
In order to configure the gateway, you’ll need to provide information about the network and NAT Gateway:
Name — NATOutsideName describes the name of the NAT network. You’ll use this to remove the NAT network.
InternalIPInterfaceAddressPrefix — NAT subnet prefix describes both the NAT Gateway IP prefix from above as well as the NAT Subnet Prefix Length from above.
The generic form will be a.b.c.0/NAT Subnet Prefix Length
From the above, for this example, we’ll use 192.168.0.0/24
For our example, run the following to setup the NAT network:
Congratulations! You now have a virtual NAT network! To add a virtual machine, to the NAT network follow these instructions.
Connect a virtual machine
To connect a virtual machine to your new NAT network, connect the internal switch you created in the first step of the NAT Network Setup section to your virtual machine using the VM Settings menu.
Since WinNAT by itself does not allocate and assign IP addresses to an endpoint (e.g. VM), you will need to do this manually from within the VM itself — i.e. set IP address within range of NAT internal prefix, set default gateway IP address, set DNS server information. The only caveat to this is when the endpoint is attached to a container. In this case, the Host Network Service (HNS) allocates and uses the Host Compute Service (HCS) to assign the IP address, gateway IP, and DNS info to the container directly.
Configuration Example: Attaching VMs and Containers to a NAT network
If you need to attach multiple VMs and containers to a single NAT, you will need to ensure that the NAT internal subnet prefix is large enough to encompass the IP ranges being assigned by different applications or services (e.g. Docker for Windows and Windows Container – HNS). This will require either application-level assignment of IPs and network configuration or manual configuration which must be done by an admin and guaranteed not to re-use existing IP assignments on the same host.
Docker for Windows (Linux VM) and Windows Containers
The solution below will allow both Docker for Windows (Linux VM running Linux containers) and Windows Containers to share the same WinNAT instance using separate internal vSwitches. Connectivity between both Linux and Windows containers will work.
User has connected VMs to a NAT network through an internal vSwitch named “VMNAT” and now wants to install Windows Container feature with docker engine
Docker/HNS will assign IPs to Windows containers and Admin will assign IPs to VMs from the difference set of the two.
User has installed Windows Container feature with docker engine running and now wants to connect VMs to the NAT network
Docker/HNS will assign IPs to Windows containers and Admin will assign IPs to VMs from the difference set of the two.
In the end, you should have two internal VM switches and one NetNat shared between them.
Multiple Applications using the same NAT
Some scenarios require multiple applications or services to use the same NAT. In this case, the following workflow must be followed so that multiple applications / services can use a larger NAT internal subnet prefix
We will detail the Docker 4 Windows — Docker Beta — Linux VM co-existing with the Windows Container feature on the same host as an example. This workflow is subject to change
C:> net stop docker
Stop Docker4Windows MobyLinux VM
PS C:> Get-ContainerNetwork | Remove-ContainerNetwork -force
PS C:> Get-NetNat | Remove-NetNat
Removes any previously existing container networks (i.e. deletes vSwitch, deletes NetNat, cleans up)
New-ContainerNetwork -Name nat -Mode NAT –subnetprefix 10.0.76.0/24 (this subnet will be used for Windows containers feature) Creates internal vSwitch named nat
Creates NAT network named “nat” with IP prefix 10.0.76.0/24
Remove-NetNAT
Removes both DockerNAT and nat NAT networks (keeps internal vSwitches)
New-NetNat -Name DockerNAT -InternalIPInterfaceAddressPrefix 10.0.0.0/17 (this will create a larger NAT network for both D4W and containers to share)
Creates NAT network named DockerNAT with larger prefix 10.0.0.0/17
Run Docker4Windows (MobyLinux.ps1)
Creates internal vSwitch DockerNAT
Creates NAT network named “DockerNAT” with IP prefix 10.0.75.0/24
Net start docker
Docker will use the user-defined NAT network as the default to connect Windows containers
In the end, you should have two internal vSwitches – one named DockerNAT and the other named nat. You will only have one NAT network (10.0.0.0/17) confirmed by running Get-NetNat. IP addresses for Windows containers will be assigned by the Windows Host Network Service (HNS) from the 10.0.76.0/24 subnet. Based on the existing MobyLinux.ps1 script, IP addresses for Docker 4 Windows will be assigned from the 10.0.75.0/24 subnet.
Troubleshooting
Multiple NAT networks are not supported
This guide assumes that there are no other NATs on the host. However, applications or services will require the use of a NAT and may create one as part of setup. Since Windows (WinNAT) only supports one internal NAT subnet prefix, trying to create multiple NATs will place the system into an unknown state.
To see if this may be the problem, make sure you only have one NAT:
If a NAT already exists, delete it
Make sure you only have one “internal” vmSwitch for the application or feature (e.g. Windows containers). Record the name of the vSwitch
Check to see if there are private IP addresses (e.g. NAT default Gateway IP Address – usually x.y.z.1) from the old NAT still assigned to an adapter
If an old private IP address is in use, please delete it
Removing Multiple NATs
We have seen reports of multiple NAT networks created inadvertently. This is due to a bug in recent builds (including Windows Server 2016 Technical Preview 5 and Windows 10 Insider Preview builds). If you see multiple NAT networks, after running docker network ls or Get-ContainerNetwork, please perform the following from an elevated PowerShell:
Reboot the operating system prior executing the subsequent commands ( Restart-Computer )
See this setup guide for multiple applications using the same NAT to rebuild your NAT environment, if necessary.
Записки IT специалиста
Технический блог специалистов ООО»Интерфейс»
Настраиваем сеть NAT в Hyper-V
 Долгое время Hyper-V не имел возможности организации NAT собственными средствами, что в ряде случаев сильно ограничивало сетевые возможности гипервизора. Особенно остро это чувствовалось в лабораторных и тестовых средах, которые требовалось отделить от локальной сети, обеспечив при этом выход в интернет. С введением поддержки контейнеров потребность в сетях NAT только возросла, что сделало закономерным добавление функции преобразования сетевых адресов в гипервизор. Более подробно о настройке и особенностях применения NAT в Hyper-V мы расскажем в данной статье.
Создание сетей NAT возможно в Windows Server 2016, Hyper-V Server 2016 и более поздних версиях, а также Windows 10. На одном гипервизоре может быть создана только одна сеть NAT. Также обратите внимание, что в отличие от средств настольной виртуализации, таких как VMWare Workstation или VirtualBox, служба NAT в Hyper-V не предоставляет дополнительных сетевых служб, таких как DHCP или DNS, поэтому сетевые настройки виртуальным машинам вам придется назначить самостоятельно.
Также настройка NAT производится исключительно в консоли PowerShell и недоступна в графическом интерфейсе, однако это не представляет никаких сложностей.
Подключимся к нужному нам гипервизору, перейдем в командную строку и запустим консоль PowerShell:
Цвет консоли при этом не изменится, останется черным, но в начале строки приглашения появятся буквы PS.
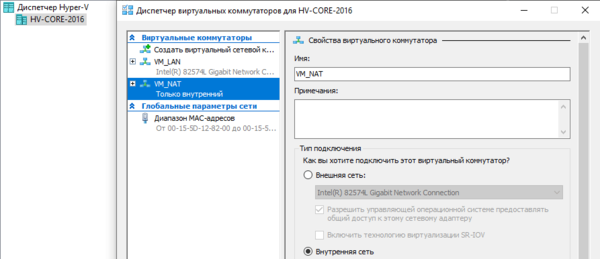
Теперь создадим новый виртуальный коммутатор с типом сети Внутренняя:
где VM_NAT — имя нашего виртуального коммутатора, которое можно задать произвольно.
 При создании сети данного типа автоматически создается виртуальный сетевой адаптер на хосте, поэтому просмотрим список адаптеров командой:
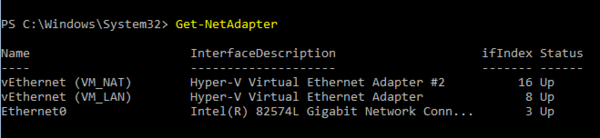 Из полученной информации нам нужно выяснить и запомнить индекс сетевого интерфейса, в нашем случае 16. Следующим шагом мы настроим на нем шлюз. Перед этим следует определиться с адресацией будущей сети NAT, выделив ей свою подсеть и указав адрес шлюза. В нашем случае это будут 192.168.192.0/24 и 192.168.192.1, теперь можно настраивать шлюз:
Где IPAddress — адрес шлюза, PrefixLength — префикс сети, префикс 24 соответствует маске 255.255.255.0, InterfaceIndex — индекс интерфейса, для которого мы выполняем настройку.
 Ну и наконец создадим NAT:
где Name — имя нашей сети NAT, в нашем случае vNAT, задается на ваше усмотрение, InternalIPInterfaceAddressPrefix — внутренняя сеть NAT.
 Теперь можно вернуться в оснастку управления Hyper-V, в Диспетчере виртуальных коммутаторов у нас появится новая сеть — VM-NAT.
 Чтобы ее использовать, просто укажите этот коммутатор в настройках виртуальной машины:
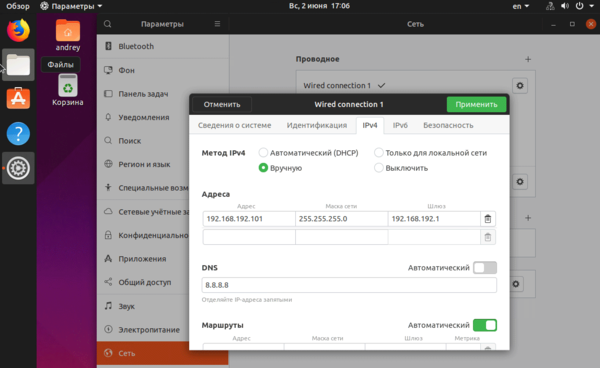
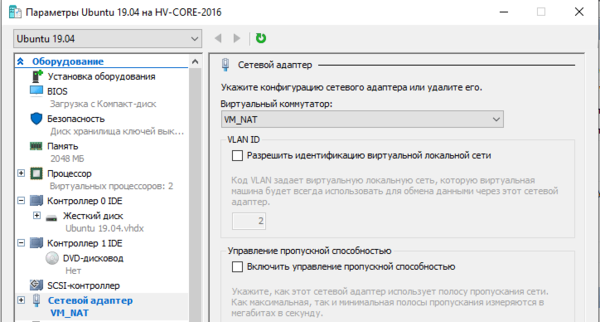 Также вам потребуется выполнить ручную настройку сети внутри виртуальной машины, ей нужно выдать адрес и указать шлюз из внутренней сети NAT, а также любые доступные DNS:
 Просмотреть существующие сети NAT, напоминаем, она должна быть только одна, можно командой:
Для удаления используйте:
После этого вам также потребуется удалить назначенный шлюзу IP-адрес:
Это может потребоваться, если вы захотите изменить адресное пространство NAT. В этом случае удаляете старую сеть NAT и создаете новую, с требуемыми параметрами. Виртуальный коммутатор и виртуальный сетевой интерфейс при этом остаются прежними.
Если вы полностью хотите отказаться от NAT, то дополнительно удалите виртуальный коммутатор, это можно сделать через графический интерфейс, либо командой, указав в ней имя коммутатора:
Связанный с коммутатором виртуальный сетевой адаптер будет удален автоматически.
Помогла статья? Поддержи автора и новые статьи будут выходить чаще:
Или подпишись на наш Телеграм-канал: