- Upgrade Windows 10 Home to Windows 10 Pro
- Как установить Windows 10
- Как обновить Windows 10 до последней версии
- Как обновить Windows 10 до последней версии
- Как происходит процесс обновления Windows 10 до последней версии
- 1. Центр обновления Windows 10
- 2. Утилита Windows 10 Upgrade (Update Assistant)
- 3. Утилита Media Creation Tool
- 4. ISO-образ Windows 10
- Manage additional Windows Update settings
- Summary of Windows Update settings
- Scanning for updates
- Specify Intranet Microsoft update service location
- Automatic Updates detection frequency
- Remove access to use all Windows Update features
- Do not connect to any Windows Update Internet locations
- Enable client-side targeting
- Allow signed updates from an intranet Microsoft update service location
- Installing updates
- Do not include drivers with Windows Updates
- Configure Automatic Updates
- Configuring Automatic Updates by using Group Policy
- Configuring Automatic Updates by editing the registry
Upgrade Windows 10 Home to Windows 10 Pro
Before upgrading to Windows 10 Pro, make sure your device is up to date and running the most recent version of Windows 10 Home. For more info about how to keep your PC updated, see Windows Update: FAQ.
To upgrade from Windows 10 Home to Windows 10 Pro and activate your device, you’ll need a valid product key or a digital license for Windows 10 Pro.
Note: If you don’t have a product key or a digital license, you can buy Windows 10 Pro from Microsoft Store. Select the Start button, select Settings > Update & Security > Activation , and then select Go to Microsoft Store. From here, you can also see how much this upgrade will cost.
Open Activation settings
Use the following chart to determine which activation method you’ll use:
If you got Windows 10 by.
Upgrading to Windows 10 for free from an eligible device running a genuine copy of Windows 7 or Windows 8.1.
Buying a Windows 10 Pro upgrade from the Microsoft Store app and successfully activated Windows 10.
Being a Windows Insider and upgrading to the newest Windows 10 Insider Preview build on an eligible device that was running an activated earlier version of Windows and Windows 10 Preview.
Buying genuine Windows 10 from the Microsoft Store app.
Buying a copy of Windows 10 from an authorized retailer.
Find it on a label inside the Windows 10 box. A digital license will be given to your device for Windows 10 based on the valid product key you entered.
If you bought your PC from a manufacturer, the manufacturer, not Microsoft, must provide a product key.
Buying a digital copy of Windows 10 from an authorized retailer.
Find it in the confirmation email you received after buying Windows 10 or in a digital locker accessible through the retailer’s website.
A digital license will be given to your device for Windows 10 based on the valid product key you entered.
Having a Volume Licensing agreement for Windows 10 or MSDN subscription.
It is available through the web portal for your program.
Buying a new or refurbished device running Windows 10.
It is preinstalled on your device, included with the device packaging, or included as a card or on the Certificate of Authenticity (COA) attached to the device.
If you bought a refurbished PC, the refurbisher, not Microsoft, must provide you a product key.
Find it in the confirmation email that contains the order history.
If you’re ready to upgrade, select one of the following headings to get started:
To upgrade, select the Start button, then select Settings > Update & Security > Activation .
Open Activation settings
If you have a digital license for Windows 10 Pro, and Windows 10 Home is currently activated on your device, you’ll see one of two messages when you select Go to Microsoft Store:
If you see Install, select the button to install Windows 10 Pro.
If you see Buy, you may need to purchase a Windows 10 Pro license. Or, try to sign in to Microsoft Store with the Microsoft account that was used to purchase the Pro license. Then, follow the instructions to install Windows 10.
If you have a digital license for Windows 10 Pro, but Windows 10 Home isn’t activated on your device, select Troubleshoot and then follow the instructions to upgrade to Windows 10 Pro.
Select the Start button, then select Settings > Update & Security > Activation .
Select Change product key, and then enter the 25-character Windows 10 Pro product key.
Select Next to start the upgrade to Windows 10 Pro.
Having issues with activation after your upgrade?
See the following for more help activating your valid product key or digital license for Windows 10 Pro:
Как установить Windows 10

- Просмотров: 211 251
- Автор: admin
- Дата: 1-06-2020
Как обновить Windows 10 до последней версии
Как обновить Windows 10 до последней версии
Итак, друзья, процесс обновления Windows 10 до последней версии, что важно о нём знать? При любом раскладе этот процесс – риск. Потенциально после обновления система может начать работать с тормозами, багами, могут быть проблемы с драйверами и работой отдельных устройств компьютера. Накатывать обновлённую версию Windows 10 всегда лучше начисто, с форматированием диска С. А чтобы не делать это каждые полгода, мы можем ставить новую версию раз в год или полтора. В 2019 году Microsoft отменила обязательность установки полугодичных масштабных обновлений на протяжении срока поддержки текущей версии Windows 10, который в основном составляет 18 месяцев со дня релиза этой версии. Теперь в рамках этих 18 месяцев обновление до последней версии является делом добровольным, инициируемым нами, пользователями.
Как происходит процесс обновления Windows 10 до последней версии
Итак, обновление Windows 10 до последней версии. Этот процесс, как упомянуто, имеет риски, но он же и имеет огромное преимущество в виде сохранения рабочего состояния нашего компьютера. Нам не нужно ничего переустанавливать, заново настраивать систему, выискивать на диске С важные данные и помещать их куда-то на время переустановки системы.
Как происходит этот процесс? У него несколько этапов:
1. Центр обновления Windows 10
2. Утилита Windows 10 Upgrade (Update Assistant)
3. Утилита Media Creation Tool
4. ISO-образ Windows 10
Ну и, наконец, последний способ обновления Windows 10 до последней версии – с помощью установочного ISO-образа новой версии Windows 10. На мой взгляд, самый оптимальный. Почему? Потому что он использует локальный образ новой установки системы.
Друзья, во-первых, этот способ можно использовать без Интернета, заранее скачав ISO-образ или привнеся его на флешке с другого устройства, где есть безлимитный Интернет, ну или вообще есть Интернет. Во-вторых, процесс обновления с использованием этого способа в целом пройдёт быстрее: никаким утилитам не нужно будет тянуть файлы обновления с Интернета и подготавливать временный образ новой установки Windows 10. Цельный ISO-образ последней версии скачается гораздо быстрее, и он сам же и будет образом новой установки. Более того, рассмотренные выше средства обновления все те данные, что они тянут с Интернета, необходимые им для выполнения своей задачи, складируют нигде иначе, как на диске С. И, как вы понимаете, это не пару Мб, а несколько Гб — минимум 3 Гб. Если вы из тех, кто заботится о ресурсе своего SSD, выделенного только под систему, вы скачаете установочный ISO на файлопомоечный HDD и избежите ненужной перезаписи данных. Ну и в-третьих, после обновления с использованием ISO не надо будет чистить систему от файлов установки Windows.
Для использования этого способа нам, соответственно, нужно скачать установочный ISO-образ Windows 10. Как его скачать с сайта Microsoft, смотрите в отдельной статье «Как скачать ISO-образы дистрибутива Windows 10». На скачанном ISO делаем двойной клик, чтобы смонтировать его. Заходим в проводнике на смонтированный образ. Запускаем в корне образа файл «setup.exe».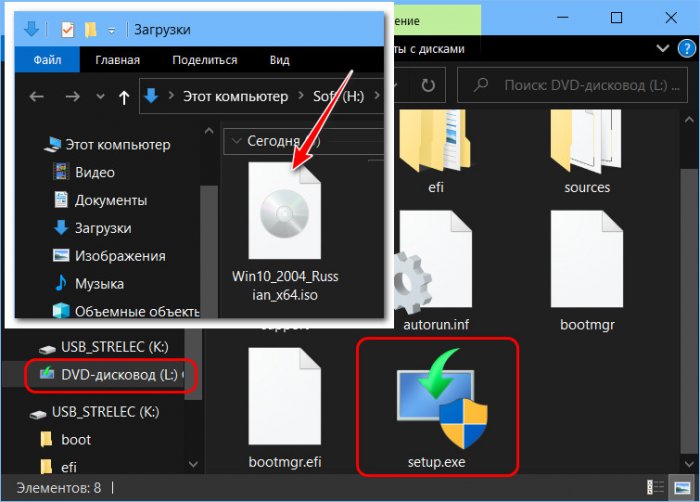 Ждём немного.
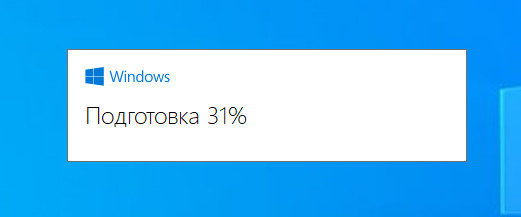 В окне программы установки жмём «Далее».
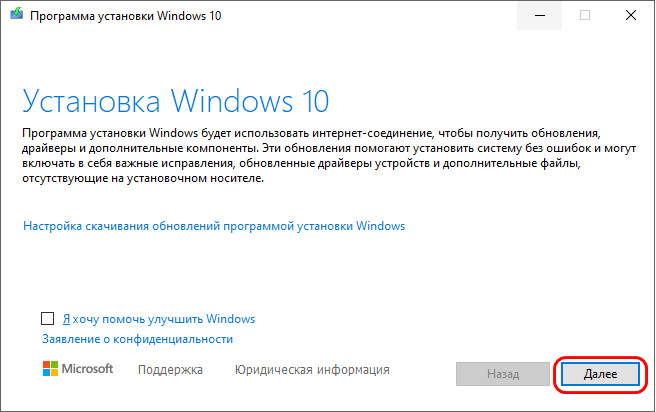 Ждём, пока программа установки всё проверит и подготовит систему. Принимаем лицензионные условия.
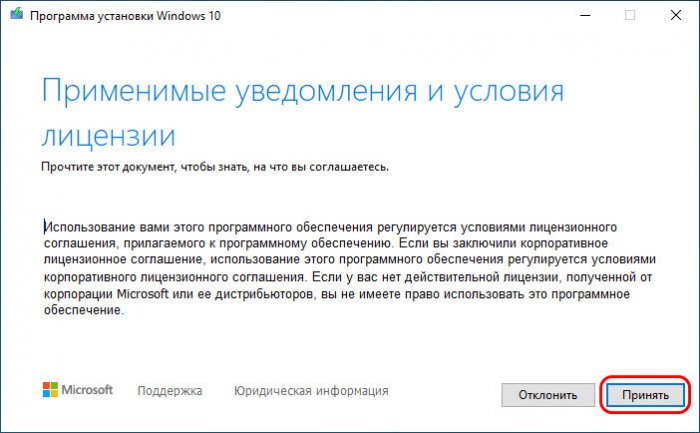 В окошке готовности к установке жмём «Установить».
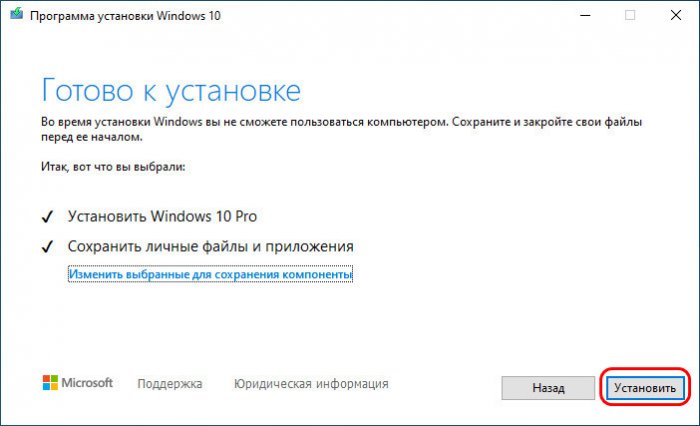 Компьютер перезагрузится, и пойдут этапы обновления, описанные в начале статьи.
Manage additional Windows Update settings
Applies to
Looking for consumer information? See Windows Update: FAQ
You can use Group Policy settings or mobile device management (MDM) to configure the behavior of Windows Update (WU) on your Windows 10 devices. You can configure the update detection frequency, select when updates are received, specify the update service location and more.
Summary of Windows Update settings
| Group Policy setting | MDM setting | Supported from version |
|---|---|---|
| Specify Intranet Microsoft update service location | UpdateServiceUrl and UpdateServiceUrlAlternate | All |
| Automatic Updates Detection Frequency | DetectionFrequency | 1703 |
| Remove access to use all Windows Update features | Update/SetDisableUXWUAccess | All |
| Do not connect to any Windows Update Internet locations | All | |
| Enable client-side targeting | All | |
| Allow signed updates from an intranet Microsoft update service location | AllowNonMicrosoftSignedUpdate | All |
| Do not include drivers with Windows Updates | ExcludeWUDriversInQualityUpdate | 1607 |
| Configure Automatic Updates | AllowAutoUpdate | All |
Additional information about settings to manage device restarts and restart notifications for updates is available on Manage device restarts after updates.
Additional settings that configure when Feature and Quality updates are received are detailed on Configure Windows Update for Business.
Scanning for updates
With Windows 10, admins have a lot of flexibility in configuring how their devices scan and receive updates.
Specify Intranet Microsoft update service location allows admins to point devices to an internal Microsoft update service location, while Do not connect to any Windows Update Internet locations gives them to option to restrict devices to just that internal update service. Automatic Updates Detection Frequency controls how frequently devices scan for updates.
You can make custom device groups that’ll work with your internal Microsoft update service by using Enable client-side targeting. You can also make sure your devices receive updates that were not signed by Microsoft from your internal Microsoft update service, through Allow signed updates from an intranet Microsoft update service location.
Finally, to make sure the updating experience is fully controlled by the admins, you can Remove access to use all Windows Update features for users.
For additional settings that configure when Feature and Quality updates are received, see Configure Windows Update for Business.
Specify Intranet Microsoft update service location
Specifies an intranet server to host updates from Microsoft Update. You can then use this update service to automatically update computers on your network. This setting lets you specify a server on your network to function as an internal update service. The Automatic Updates client will search this service for updates that apply to the computers on your network.
To use this setting in Group Policy, go to Computer Configuration\Administrative Templates\Windows Components\Windows Update\Specify Intranet Microsoft update service location. You must set two server name values: the server from which the Automatic Updates client detects and downloads updates, and the server to which updated workstations upload statistics. You can set both values to be the same server. An optional server name value can be specified to configure Windows Update Agent to download updates from an alternate download server instead of the intranet update service.
If the setting is set to Enabled, the Automatic Updates client connects to the specified intranet Microsoft update service (or alternate download server), instead of Windows Update, to search for and download updates. Enabling this setting means that end users in your organization don’t have to go through a firewall to get updates, and it gives you the opportunity to test updates after deploying them. If the setting is set to Disabled or Not Configured, and if Automatic Updates is not disabled by policy or user preference, the Automatic Updates client connects directly to the Windows Update site on the Internet.
The alternate download server configures the Windows Update Agent to download files from an alternative download server instead of the intranet update service. The option to download files with missing Urls allows content to be downloaded from the Alternate Download Server when there are no download Urls for files in the update metadata. This option should only be used when the intranet update service does not provide download Urls in the update metadata for files which are present on the alternate download server.
If the «Configure Automatic Updates» policy is disabled, then this policy has no effect.
If the «Alternate Download Server» is not set, it will use the intranet update service by default to download updates.
The option to «Download files with no Url. » is only used if the «Alternate Download Server» is set.
To configure this policy with MDM, use UpdateServiceUrl and UpdateServiceUrlAlternate.
Automatic Updates detection frequency
Specifies the hours that Windows will use to determine how long to wait before checking for available updates. The exact wait time is determined by using the hours specified here minus zero to twenty percent of the hours specified. For example, if this policy is used to specify a 20-hour detection frequency, then all clients to which this policy is applied will check for updates anywhere between 16 to 20 hours.
To set this setting with Group Policy, navigate to Computer Configuration\Administrative Templates\Windows Components\Windows Update\Automatic Updates detection frequency.
If the setting is set to Enabled, Windows will check for available updates at the specified interval. If the setting is set to Disabled or Not Configured, Windows will check for available updates at the default interval of 22 hours.
The «Specify intranet Microsoft update service location» setting must be enabled for this policy to have effect.
If the «Configure Automatic Updates» policy is disabled, this policy has no effect.
To configure this policy with MDM, use DetectionFrequency.
Remove access to use all Windows Update features
By enabling the Group Policy setting under Computer Configuration\Administrative Templates\Windows Components\Windows update\Remove access to use all Windows update features, administrators can disable the «Check for updates» option for users. Any background update scans, downloads and installations will continue to work as configured.
Do not connect to any Windows Update Internet locations
Even when Windows Update is configured to receive updates from an intranet update service, it will periodically retrieve information from the public Windows Update service to enable future connections to Windows Update, and other services like Microsoft Update or the Microsoft Store.
Use Computer Configuration\Administrative Templates\Windows Components\Windows update\Do not connect to any Windows Update Internet locations to enable this policy. When enabled, this policy will disable the functionality described above, and may cause connection to public services such as the Microsoft Store, Windows Update for Business and Delivery Optimization to stop working.
This policy applies only when the device is configured to connect to an intranet update service using the «Specify intranet Microsoft update service location» policy.
Enable client-side targeting
Specifies the target group name or names that should be used to receive updates from an intranet Microsoft update service. This allows admins to configure device groups that will receive different updates from sources like WSUS or Configuration Manager.
This Group Policy setting can be found under Computer Configuration\Administrative Templates\Windows Components\Windows update\Enable client-side targeting. If the setting is set to Enabled, the specified target group information is sent to the intranet Microsoft update service which uses it to determine which updates should be deployed to this computer. If the setting is set to Disabled or Not Configured, no target group information will be sent to the intranet Microsoft update service.
If the intranet Microsoft update service supports multiple target groups, this policy can specify multiple group names separated by semicolons. Otherwise, a single group must be specified.
This policy applies only when the intranet Microsoft update service the device is directed to is configured to support client-side targeting. If the «Specify intranet Microsoft update service location» policy is disabled or not configured, this policy has no effect.
Allow signed updates from an intranet Microsoft update service location
This policy setting allows you to manage whether Automatic Updates accepts updates signed by entities other than Microsoft when the update is found on an intranet Microsoft update service location.
To configure this setting in Group Policy, go to Computer Configuration\Administrative Templates\Windows Components\Windows update\Allow signed updates from an intranet Microsoft update service location.
If you enable this policy setting, Automatic Updates accepts updates received through an intranet Microsoft update service location, as specified by Specify Intranet Microsoft update service location, if they are signed by a certificate found in the «Trusted Publishers» certificate store of the local computer. If you disable or do not configure this policy setting, updates from an intranet Microsoft update service location must be signed by Microsoft.
Updates from a service other than an intranet Microsoft update service must always be signed by Microsoft and are not affected by this policy setting.
To configure this policy with MDM, use AllowNonMicrosoftSignedUpdate.
Installing updates
To add more flexibility to the update process, settings are available to control update installation.
Configure Automatic Updates offers 4 different options for automatic update installation, while Do not include drivers with Windows Updates makes sure drivers are not installed with the rest of the received updates.
Do not include drivers with Windows Updates
Allows admins to exclude Windows Update (WU) drivers during updates.
To configure this setting in Group Policy, use Computer Configuration\Administrative Templates\Windows Components\Windows update\Do not include drivers with Windows Updates. Enable this policy to not include drivers with Windows quality updates. If you disable or do not configure this policy, Windows Update will include updates that have a Driver classification.
Configure Automatic Updates
Enables the IT admin to manage automatic update behavior to scan, download, and install updates.
Configuring Automatic Updates by using Group Policy
Under Computer Configuration\Administrative Templates\Windows Components\Windows update\Configure Automatic Updates, you must select one of the four options:
2 — Notify for download and auto install — When Windows finds updates that apply to this device, users will be notified that updates are ready to be downloaded. After going to Settings > Update & security > Windows Update, users can download and install any available updates.
3 — Auto download and notify for Install — Windows finds updates that apply to the device and downloads them in the background (the user is not notified or interrupted during this process). When the downloads are complete, users will be notified that they are ready to install. After going to Settings > Update & security > Windows Update, users can install them.
4 — Auto download and schedule the install — Specify the schedule using the options in the Group Policy Setting. For more information about this setting, see Schedule update installation.
5 — Allow local admin to choose setting — With this option, local administrators will be allowed to use the settings app to select a configuration option of their choice. Local administrators will not be allowed to disable the configuration for Automatic Updates.
If this setting is set to Disabled, any updates that are available on Windows Update must be downloaded and installed manually. To do this, users must go to Settings > Update & security > Windows Update.
If this setting is set to Not Configured, an administrator can still configure Automatic Updates through the settings app, under Settings > Update & security > Windows Update > Advanced options.
Configuring Automatic Updates by editing the registry
Serious problems might occur if you modify the registry incorrectly by using Registry Editor or by using another method. These problems might require you to reinstall the operating system. Microsoft cannot guarantee that these problems can be resolved. Modify the registry at your own risk.
In an environment that does not have Active Directory deployed, you can edit registry settings to configure group policies for Automatic Update.
To do this, follow these steps:
Select Start, search for «regedit», and then open Registry Editor.
Open the following registry key:
Add one of the following registry values to configure Automatic Update.
0: Automatic Updates is enabled (default).
1: Automatic Updates is disabled.
1: Keep my computer up to date is disabled in Automatic Updates.
2: Notify of download and installation.
3: Automatically download and notify of installation.
4: Automatically download and scheduled installation.
0: Every day.
1 through 7: The days of the week from Sunday (1) to Saturday (7).
n, where n equals the time of day in a 24-hour format (0-23).
Set this value to 1 to configure Automatic Updates to use a server that is running Software Update Services instead of Windows Update.
m, where m equals the time period to wait between the time Automatic Updates starts and the time that it begins installations where the scheduled times have passed. The time is set in minutes from 1 to 60, representing 1 minute to 60 minutes)
This setting only affects client behavior after the clients have updated to the SUS SP1 client version or later versions.
0 (false) or 1 (true). If set to 1, Automatic Updates does not automatically restart a computer while users are logged on.
This setting affects client behavior after the clients have updated to the SUS SP1 client version or later versions.
To use Automatic Updates with a server that is running Software Update Services, see the Deploying Microsoft Windows Server Update Services 2.0 guidance.
When you configure Automatic Updates directly by using the policy registry keys, the policy overrides the preferences that are set by the local administrative user to configure the client. If an administrator removes the registry keys at a later date, the preferences that were set by the local administrative user are used again.
To determine the WSUS server that the client computers and servers connect to for updates, add the following registry values to the registry:


