- Windows 10 No Sound: How to Fix Audio Problems
- Check Your Speaker Settings
- Uninstall and Re-install Audio Drivers
- Update Audio Driver
- Manually Update Drivers
- Automatic Driver Updates
- Turn Off Audio Enhancements
- Fix Realtek Audio
- Check the Audio Troubleshooter
- Restart the Windows 10 Audio Services
- Frequently Asked Questions
- How do I get my Sound Back on Windows 10?
- Why does my PC have no sound?
- Решение проблем со звуком в Windows 10
- Решаем проблему со звуком в Windows 10
- Способ 1: Регулировка звука
- Способ 2: Обновление драйверов
- Способ 3: Запуск средства поиска неполадок
- Способ 4: Откат или удаление звуковых драйверов
- Способ 5: Проверка на вирусную активность
- Способ 6: Включение службы
- Способ 7: Переключение формата динамиков
- Способ 8: Восстановление системы или переустановка ОС
- Способ 9: Использование «Командной строки»
- Способ 10: Отключение звуковых эффектов
Windows 10 No Sound: How to Fix Audio Problems

Many users face the issue of no audio and sound on their Windows 10 system. This problem often occurs after you have upgraded from a previous version of Windows to Windows 10.
If you are facing windows 10 audio issues, you need not panic. These issues are easy to solve with our guide. We have given seven simple fixes from which you can use anyone that works for your system.
To fix various PC problems, we recommend the Restoro PC Repair Tool:
This software will repair common computer errors, protect you from file loss, malware, hardware failure, and optimize your PC for maximum performance. Fix PC issues and remove viruses now in 3 easy steps:
- Download Restoro PC Repair Tool rated Great on TrustPilot.com.
- Click Start Scan to find Windows issues that could be causing PC problems.
- Click Repair All to fix issues with Patented Technologies (patent available here).
Restoro has been downloaded by 14,567 readers this week.
Note: we have a detailed guide that deals with more specific HDMI audio issues.
Check Your Speaker Settings
Here are the steps to check the speaker settings:
Step 1:
In the right bottom corner of the desktop, you can find the speaker icon. Right-click on it and choose Playback devices in the window that opens.

Step 2:
Check whether there is a tick in green color against the speakers under the Playback tab. This green colored tick denotes the speakers remain as the primary default device for audio playback.
If the speakers are not set as default, you have to click the speakers and choose Set Default option and press the OK option. Test whether the sound issue has resolved.

If the sound issue persists even after setting speakers as the default device for playback, you need to test with different audio formats. Click on ‘Speakers,’ and then on ‘Properties‘ option.

Step 3:
Choose ‘Advanced tab‘ and in the Default Format section, choose another bit depth and sample rate and click on Test.
Keep repeating this method until you get a format that solves the issue. Click on the OK option. If not, move on to our next solution.

Uninstall and Re-install Audio Drivers
No sound issues can occur if the sound driver is corrupted, removed, or incompatible with your Windows 10 system. You have to uninstall the audio driver using the following steps:
Step 1:
Press the Windows key and the X key simultaneously. This will open the menu for quick access.
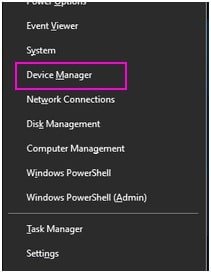
Step 2:
Click on, ‘Device Manager‘
Step 3:
Expand the Sound, video and game controllers present under Device Manager. Use right-click on the sound card. Choose the Uninstall option.

Step 4:
If you are prompted to confirm the uninstall command, check the box with ‘Delete the driver software for this device‘ and choose OK.

Step 5:
Now restart the computer to find out whether the sound issue is resolved. If this does not rectify the problem, move on to our next step.
Update Audio Driver
If experimenting with different audio enhancements and uninstalling your audio driver didn’t bring back your sound in Windows 10, it’s likely that you’re using the wrong audio driver.
Using an incompatible audio driver may also cause the issue. You can update the driver manually or by the automatic method.
Manually Update Drivers
Visit the manufacturer’s website and find the most recent device driver for the sound card in your system and the version of Windows 10 you have.
Automatic Driver Updates
You can also use software like ‘Driver Easy’ to update the driver. This tool will identify your system and choose the right driver for the Windows 10 variant and sound card you possess and install the driver on your system correctly.
Turn Off Audio Enhancements
For the sound card to work correctly, the audio enhancements feature is necessary. But this can obstruct the performance of the driver. So you have to turn off the enhancements by following the steps below:
Step 1:
Press both R and Windows key simultaneously and type Control in the search box. Now press the Enter key.
Step 2:
Under the Large Icons choose the Sound option.
Step 3:
Under the playback tab in the sound option, choose the default device, and right-click on it. Choose Properties in the drop-down menu that appears.

Step 4:
Choose the Enhancement tab and tick the ‘Disable all sound effects‘ tab present.
Step 5:
Check whether the sound has returned. If the sound issue persists, revert his option and repeat steps 2 and 3 with the other default device and try again.
Fix Realtek Audio
Changing the Realtek high definition audio driver can also solve the sound issue. Here are the steps for this solution:
Step 1:
Click on the ‘Start‘ menu and type ‘Run‘ in the search box. You will find the ‘Run‘ dialog box displayed on the desktop.

Step 2:
In the Run box, type devmgmt.msc and click on OK to open the Device Manager.

Step 3:
Expand the ‘sound, video and game controllers‘ under device manager. Use the right-click option on ‘Realtek high definition audio‘. You will see a pop window with a context menu. Choose the Uninstall option.

Step 4:
Check the box beside, ‘Delete the driver software for this device‘ and choose OK.

Step 5:
To make the changes effective, you have to reboot the system. Once the system restarts, it will reinstall the Realtek driver.
Check the Audio Troubleshooter
You can also resolve the issues in the Windows 10 operating system itself. The inbuilt troubleshooter feature in Windows 10 can help to identify the audio or network issues you face with the upgraded operating system version.
Here are the steps for this solution:
Step 1:
In the sound icon present in the taskbar, use right-click and choose the ‘Troubleshoot sound problems‘ option from the sound icon menu. The troubleshooter feature will be activated. It will automatically scan and identify any errors present.

Step 2:
If the troubleshooter identifies a problem, it will send you a notification or try resolving it automatically if possible.
If it does not automatically fix the issue, it will inform you about the problems found in detail, and provide you with steps to follow to resolve it on your own.
If it does not find any visible fault, it will just say that the device did not identify any issues and provide you with other options.
Step 3:
If the troubleshooter indicated an unplugged audio device, you have to check the connection between speakers and the physical link. You need to verify the link for proper connection.
Restart the Windows 10 Audio Services
In some cases, a disabled audio device may cause the sound and audio issues. In such a situation, you have to disable the audio services and re-enable them.
Here are the steps involved:
Step 1:
Press Windows key and R key to open the Run feature.

Step 2:
Type the letters, “service.msc” to help launch the ‘Services‘ option.
Step 3:
Select Windows Audio service and ensure the status of the service as ‘Running.’ You can also right-click on the ‘service‘ option and use the ‘Start‘ feature from the menu for initiating the service.

Step 4:
You have to restart the system to fix any issues. You need to use the right-click of the mouse on the service and choose ‘Stop‘ for disabling the service.
Now right-click again and choose ‘Start‘ option to make the service function.

Frequently Asked Questions
How do I get my Sound Back on Windows 10?
u003ca href=u0022https://techloris.com/windows-10-no-sound/#check-your-speaker-settingsu0022u003eCheck Your Speaker Settingsu003c/au003eu003cbru003eu003ca href=u0022https://techloris.com/windows-10-no-sound/#uninstall-and-re-install-audio-driversu0022u003eUninstall and Re-install Audio Driversu003c/au003eu003cbru003eu003ca href=u0022https://techloris.com/windows-10-no-sound/#update-audio-driveru0022u003eUpdate Audio Driveru003c/au003e u003cbru003e u003ca href=u0022https://techloris.com/windows-10-no-sound/#manually-update-driversu0022u003eManually Update Driversu003c/au003eu003cbru003e u003ca href=u0022https://techloris.com/windows-10-no-sound/#automatic-driver-updatesu0022u003eAutomatic Driver Updatesu003c/au003eu003cbru003eu003ca href=u0022https://techloris.com/windows-10-no-sound/#turn-off-audio-enhancementsu0022u003eTurn Off Audio Enhancementsu003c/au003eu003cbru003eu003ca href=u0022https://techloris.com/windows-10-no-sound/#fix-realtek-audiou0022u003eFix Realtek Audiou003c/au003eu003cbru003eu003ca href=u0022https://techloris.com/windows-10-no-sound/#check-the-audio-troubleshooteru0022u003eCheck the Audio Troubleshooteru003c/au003eu003cbru003eu003ca href=u0022https://techloris.com/windows-10-no-sound/#restart-the-windows-10-audio-servicesu0022u003eRestart the Windows 10 Audio Servicesu003c/au003eu003cbru003eu003ca href=u0022https://techloris.com/windows-10-no-sound/#frequently-asked-questionsu0022u003eFrequently Asked Questionsu003c/au003e
Why does my PC have no sound?
You usually have to fix sound problems after upgrading your computer to a new operating system. The majority of time it happens with new Windows 10 installations.
Решение проблем со звуком в Windows 10
Проблема с работой звука на Windows 10 — не редкость, особенно после обновлений или переходе с других версий ОС. Причина может быть в драйверах или в физической неполадке динамика, а также других компонентах, отвечающих за звук. Все это будет рассмотрено в данной статье.
Решаем проблему со звуком в Windows 10
Причины проблем со звуком бывают разными. Возможно, вам следует обновить или переустановить драйвера, а может заменить некоторые компоненты. Но прежде, чем приступить к выполнению описанных ниже манипуляций, обязательно проверьте работоспособность наушников или колонок.
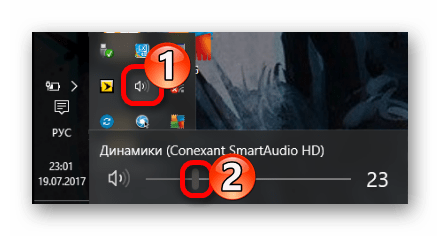
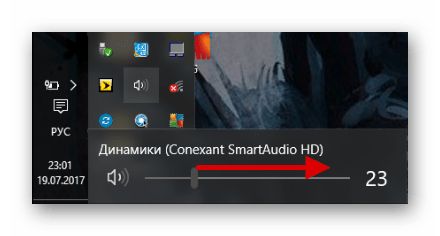
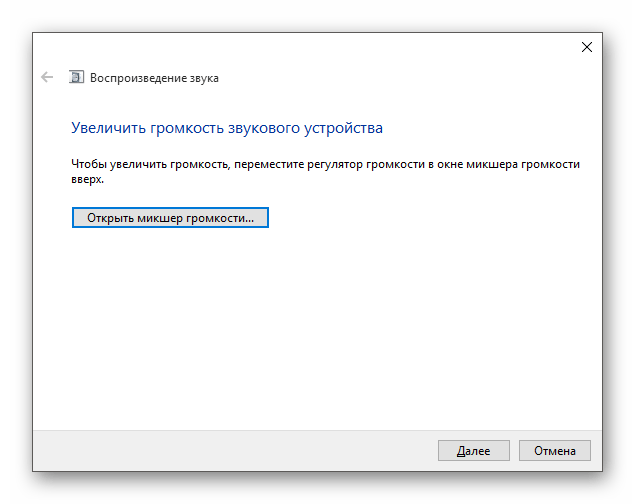
Способ 1: Регулировка звука
Возможно, звук на устройстве отключён или установлен на минимальном значении. Это можно исправить так:
- Найдите в трее иконку динамика.
Способ 2: Обновление драйверов
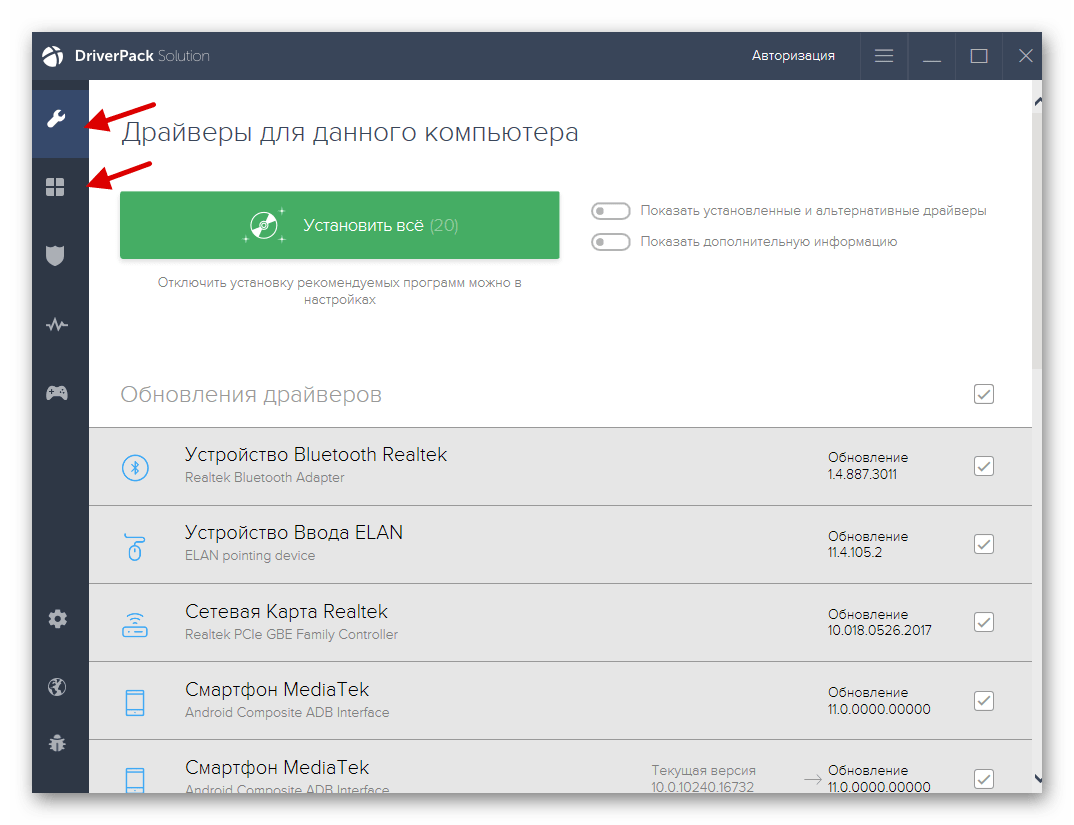
Возможно, ваши драйвера устарели. Проверить их актуальность и загрузить свежую версию вы можете с помощью специальных утилит или вручную с официального сайта производителя. Для обновления подойдут такие программы: DriverPack Solution, SlimDrivers, Driver Booster. Далее будет рассмотрен процесс на примере DriverPack Solution.
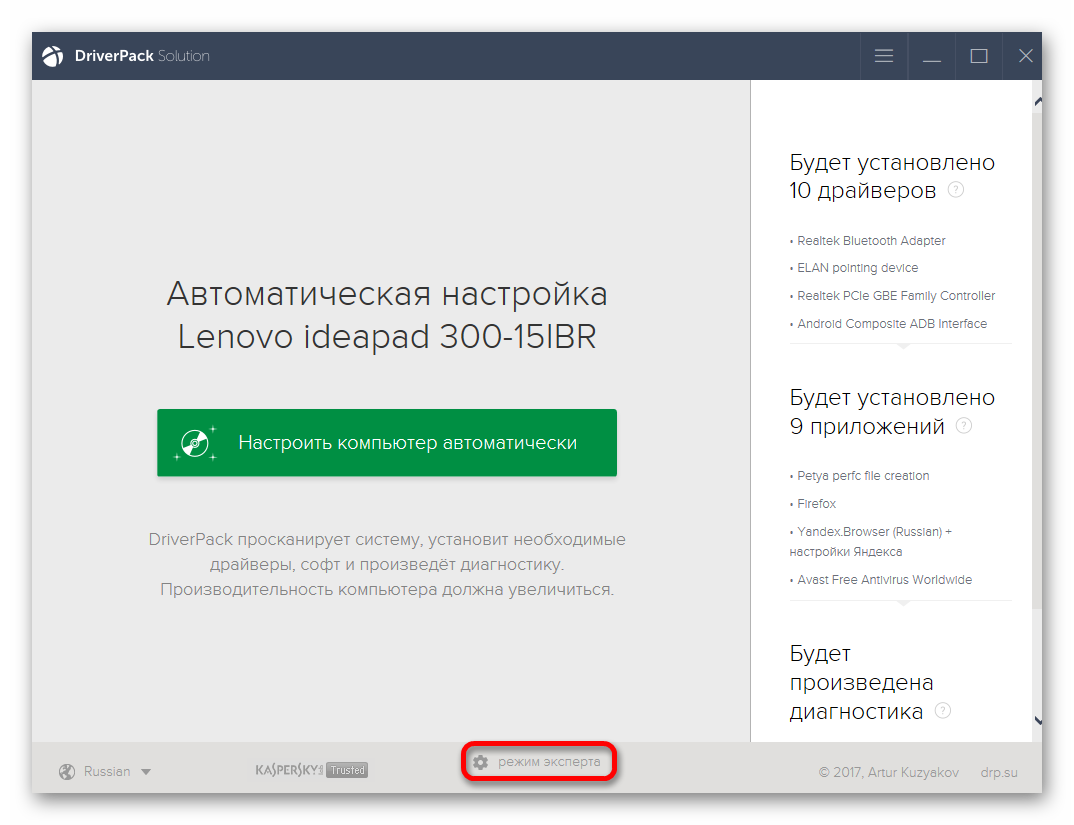
- Запустите приложение и выберите «Режим эксперта», если хотите выбрать компоненты самостоятельно.
Выберите необходимые объекты во вкладках «Софт» и «Драйвера».
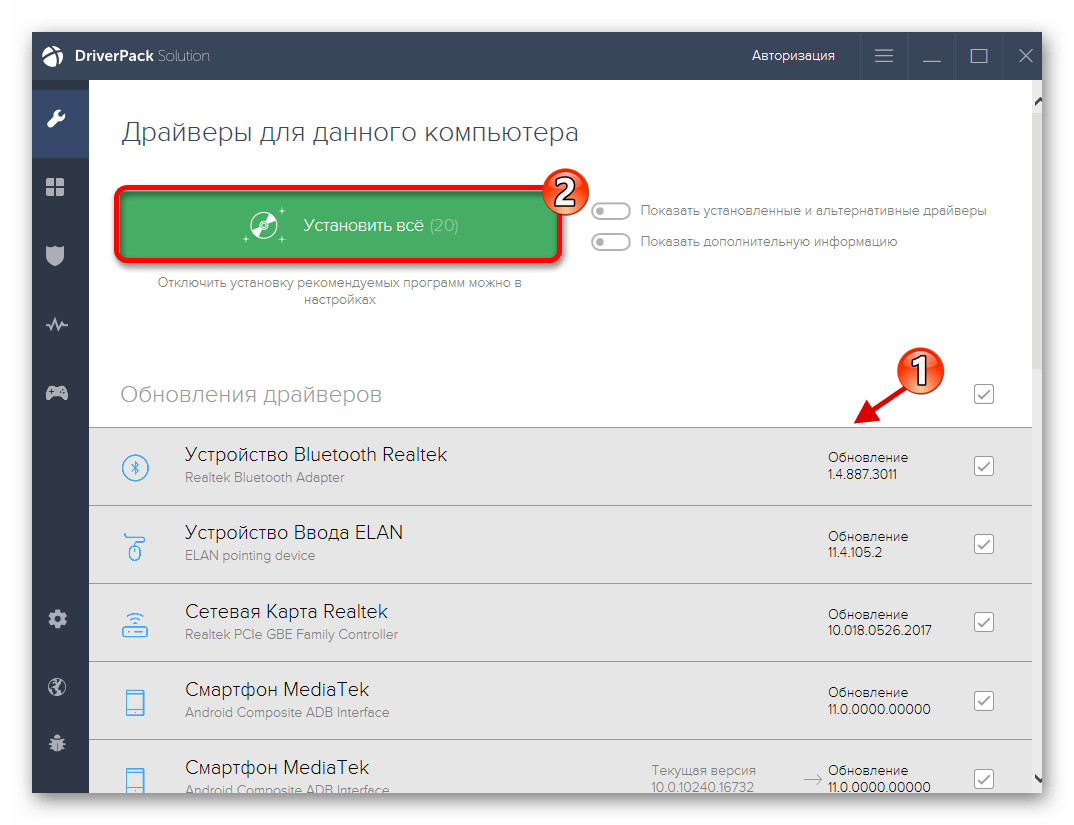
А после нажмите «Установить всё».
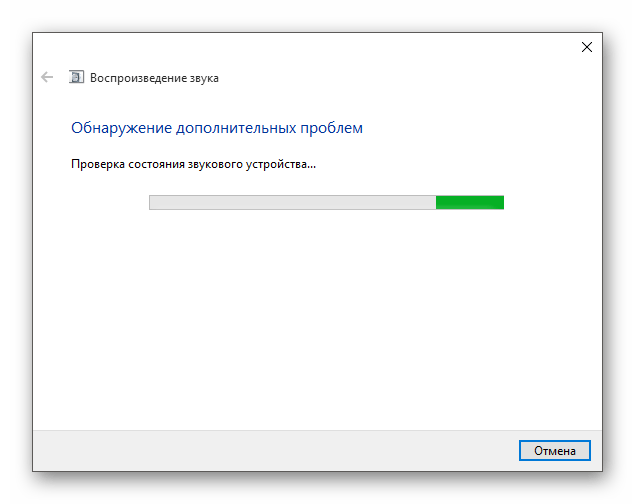
Способ 3: Запуск средства поиска неполадок
Если обновление драйверов не дало результатов, то попробуйте запустить поиск ошибок.
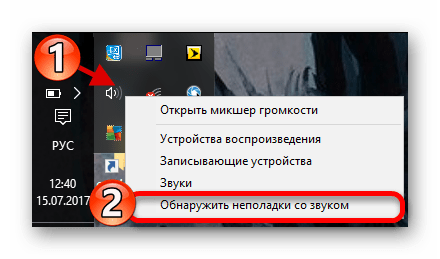
- На панели задач или трее найдите иконку управления звуком и кликните по ней правой кнопкой мыши.
- В контекстном меню выберите «Обнаружить неполадки со звуком».
Будет запущен процесс поиска.

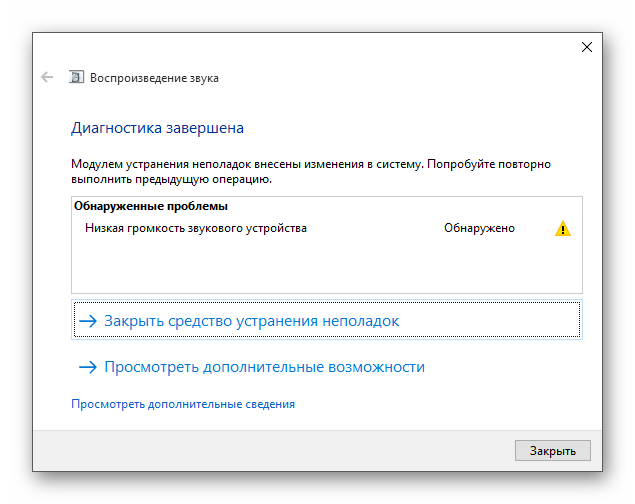
В результате вам будут предоставлены рекомендации.
Если вы нажмёте «Далее», то система начнёт поиск дополнительных проблем.
После процедуры вам будет предоставлен отчёт.
Способ 4: Откат или удаление звуковых драйверов
Если неполадки начались после установки обновлений Виндовс 10, то попробуйте сделать так:
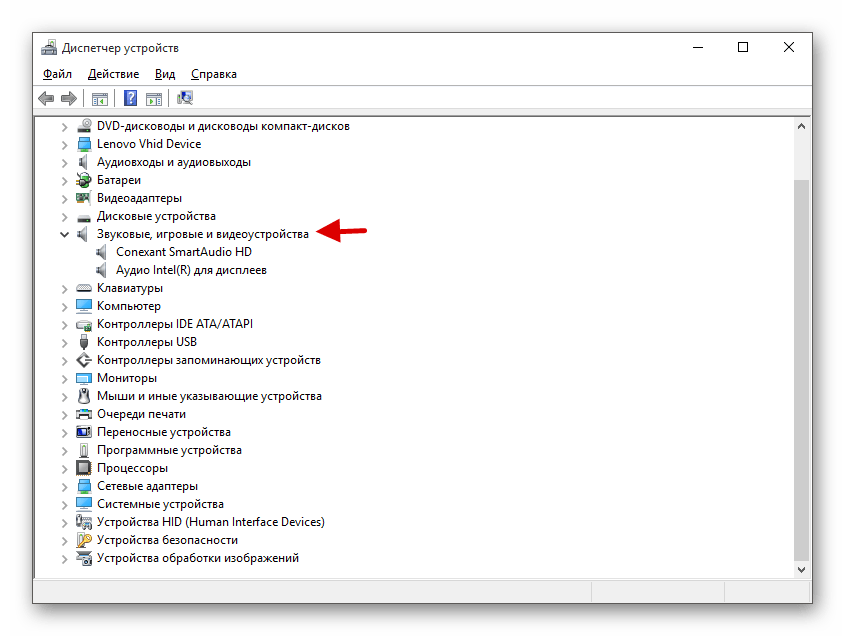
- Находим значок лупы и в поисковом поле пишем «Диспетчер устройств».
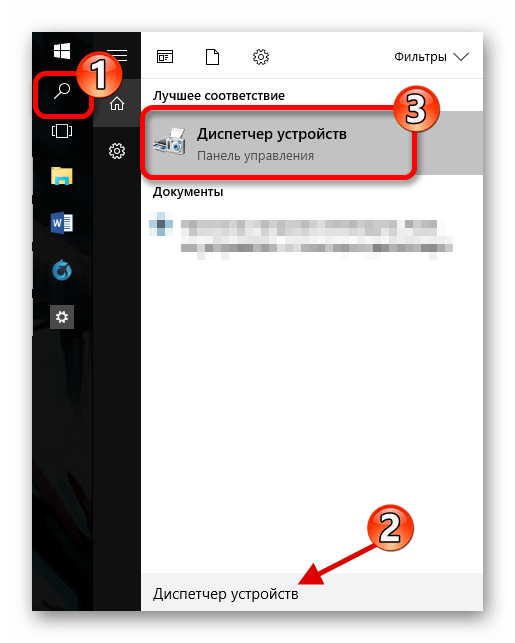
Находим и раскрываем указанный на скриншоте раздел.
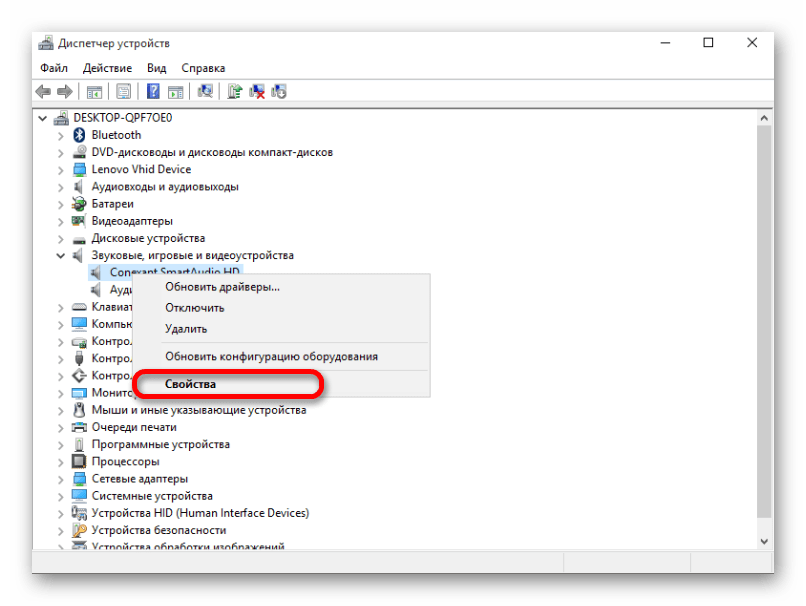
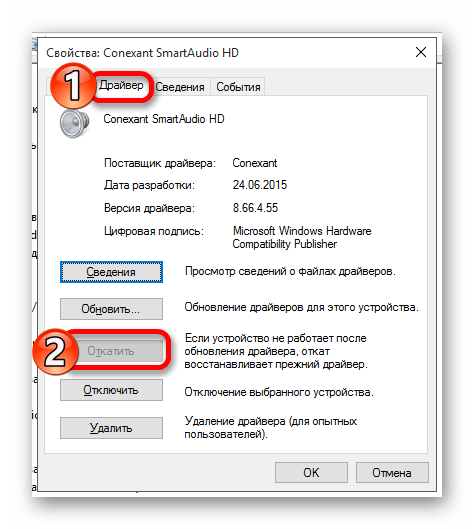
Во вкладке «Драйвер» кликните «Откатить…», если данная функция вам доступна.
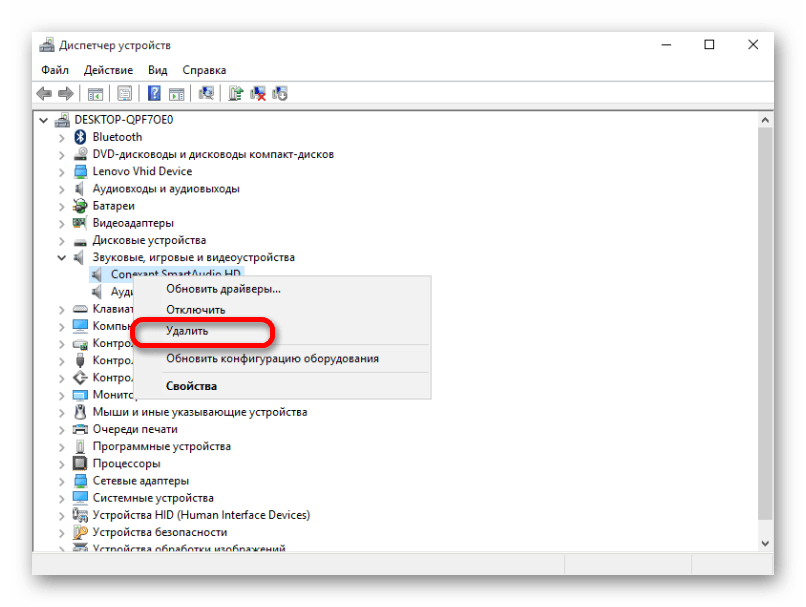
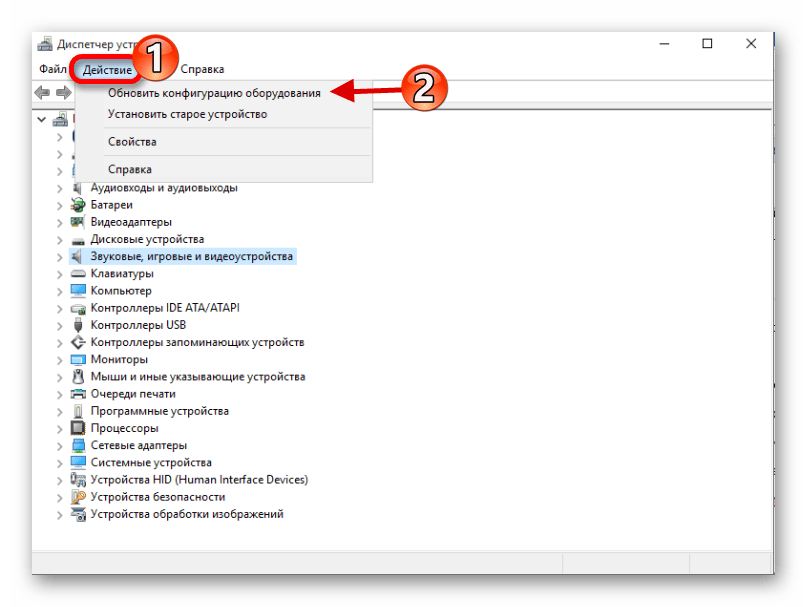
Если и после этого звук не заработал, то удалите данное устройство, вызвав на нём контекстное меню и выбрав «Удалить».
Теперь кликните на «Действие» — «Обновить конфигурацию оборудования».
Способ 5: Проверка на вирусную активность
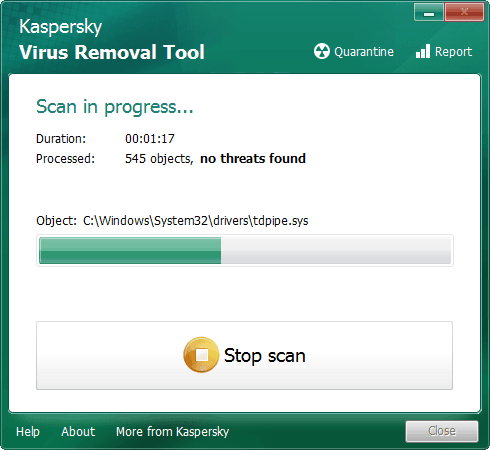
Возможно, ваше устройство было заражено и вирус повредил определённые программные компоненты отвечающие за звук. В таком случае рекомендуется проверить ваш компьютер с помощью специальных антивирусных утилит. Например, Dr.Web CureIt, Kaspersky Virus Removal Tool, AVZ. Данные утилиты довольно просты в использовании. Далее процедура будет рассмотрена на примере Kaspersky Virus Removal Tool.
- Запустите процесс проверки с помощью кнопки «Start scan».
- Начнётся проверка. Дождитесь окончания.
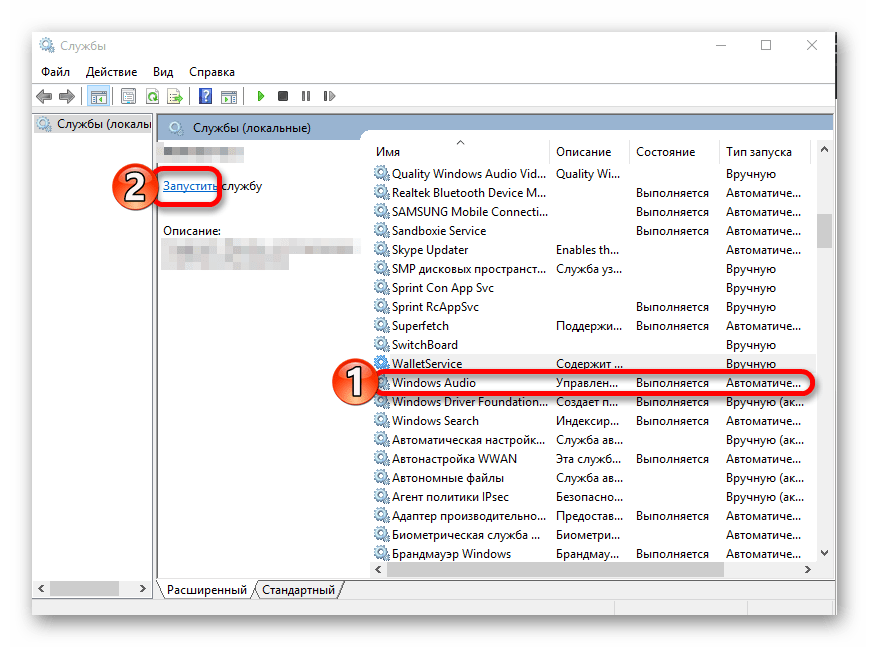
Способ 6: Включение службы
Бывает так, что служба, которая отвечает за звук, отключена.
- Найдите значок лупы на панели задач и напишите слово «Службы» в поле поиска.
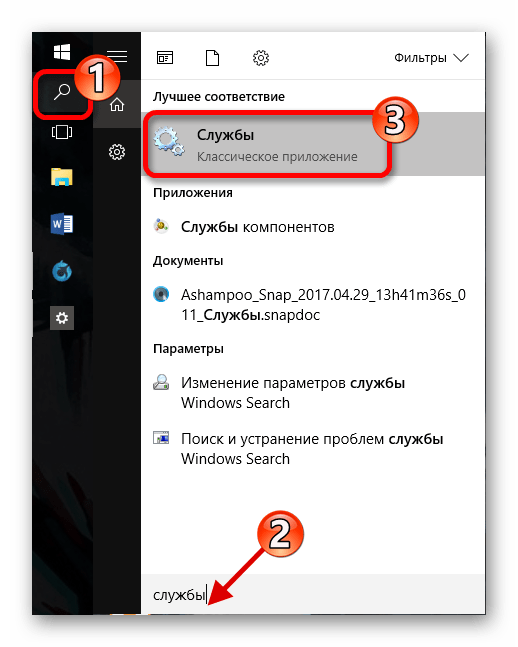
Или выполните Win+R и введите services.msc .
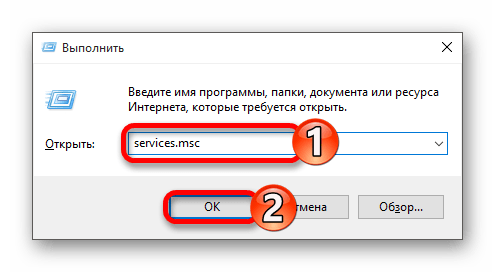
Найдите «Windows Audio». Этот компонент должен запускаться автоматически.
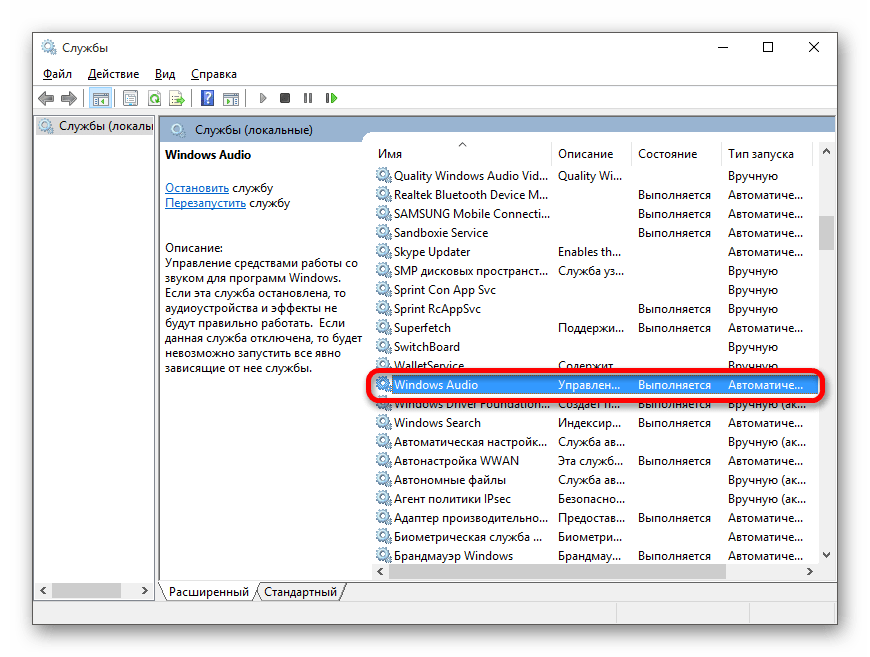

Теперь выделите данную службу и в левой части окна нажмите «Запустить».
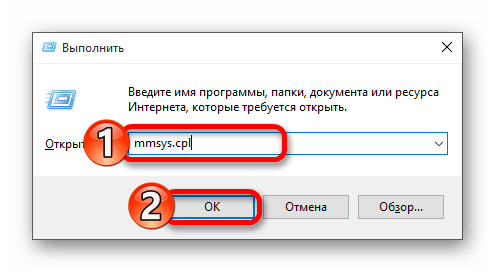
Способ 7: Переключение формата динамиков
В некоторых случаях этот вариант может помочь.
- Выполните сочетание Win+R.
- Введите в строку mmsys.cpl и нажмите «ОК».
Вызовите на устройстве контекстное меню и перейдите в «Свойства».
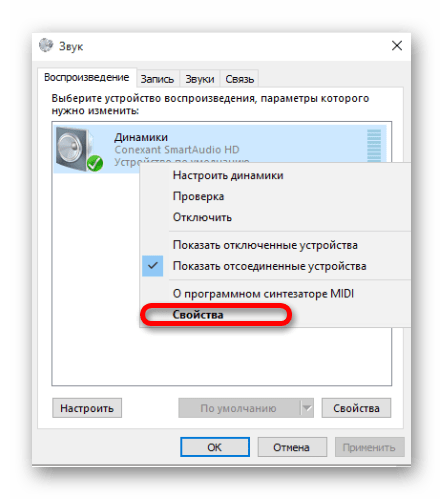
Во вкладке «Дополнительно» поменяйте значение «Формат по умолчанию» и примените изменения.

Способ 8: Восстановление системы или переустановка ОС
Если ничего из вышеперечисленного вам не помогло, то попробуйте восстановить систему до рабочего состояния. Вы можете воспользоваться точкой восстановления или резервной копией.
- Перезагрузите компьютер. Когда он начнёт включатся, зажмите F8.
- Перейдите по пути «Восстановление» — «Диагностика» — «Дополнительные параметры».
- Теперь найдите «Восстановить» и следуйте инструкции.
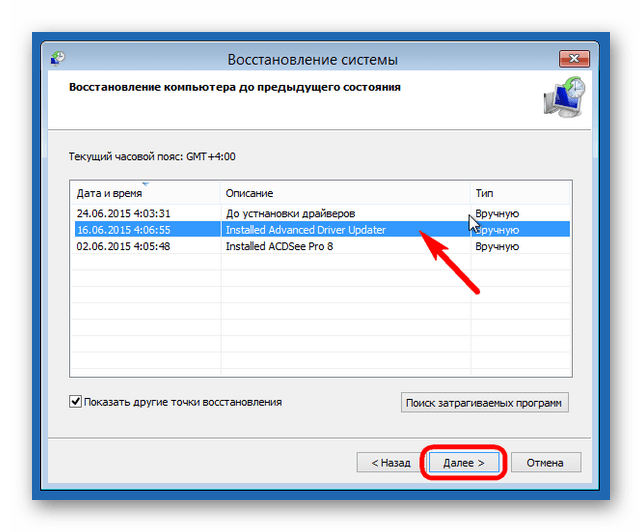
Если у вас отсутствует точка восстановления, то попробуйте переустановить операционную систему.
Способ 9: Использование «Командной строки»
Данный метод может помочь с хрипом звука.
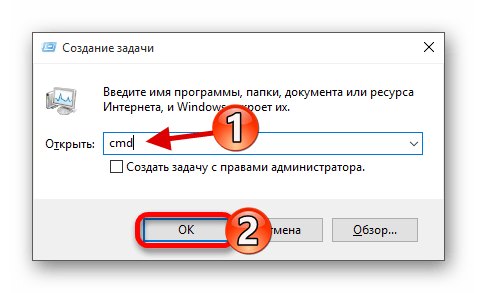
Скопируйте такую команду:
bcdedit /set
и нажмите Enter.
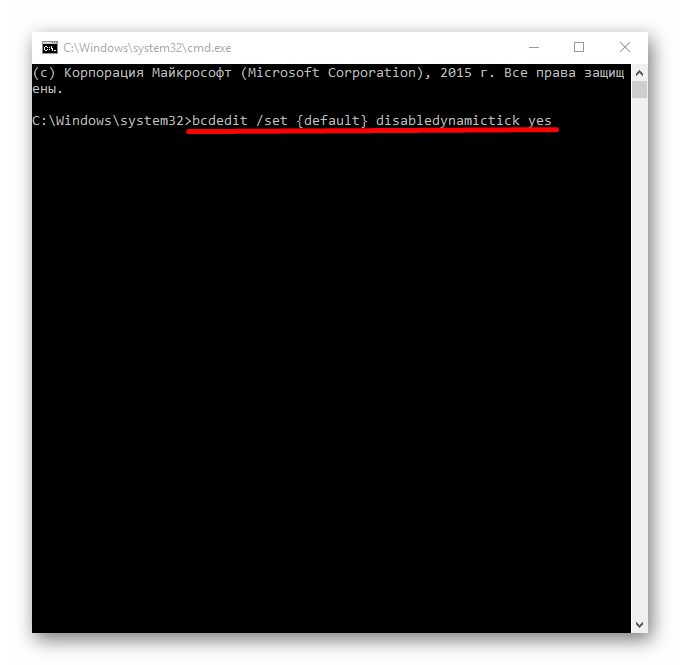
Теперь напишите и выполните
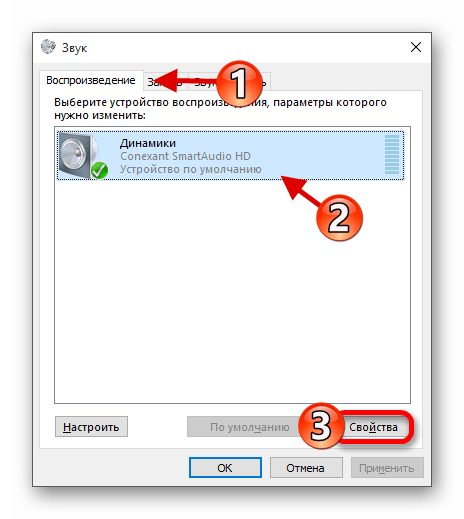
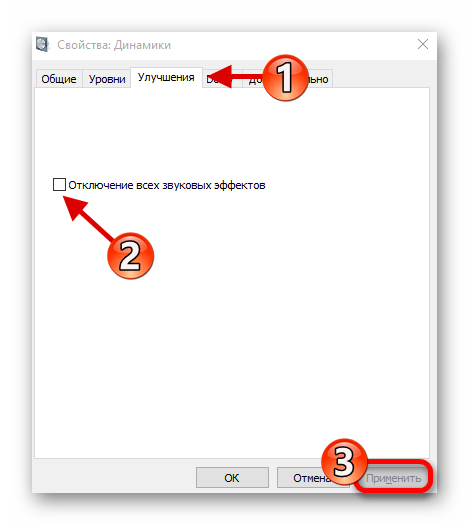
bcdedit /set Во вкладке «Воспроизведение» выделите ваши динамики и кликните на «Свойства». Перейдите к «Улучшения» (в некоторых случаях «Дополнительные возможности») и поставьте отметку напротив «Отключение всех звуковых эффектов». Если это не помогло, то:Способ 10: Отключение звуковых эффектов
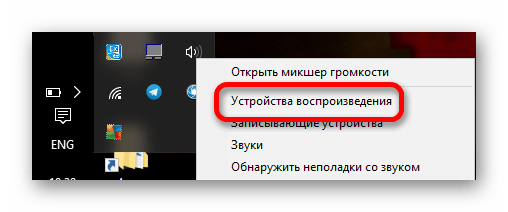
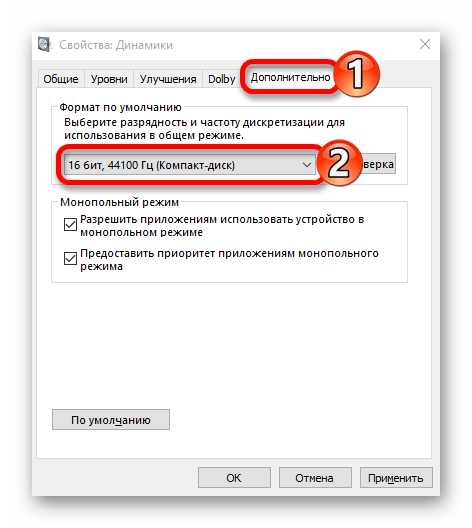
В разделе «Дополнительно» в пункте «Формат по умолчанию» поставьте «16 бит 44100 Гц».
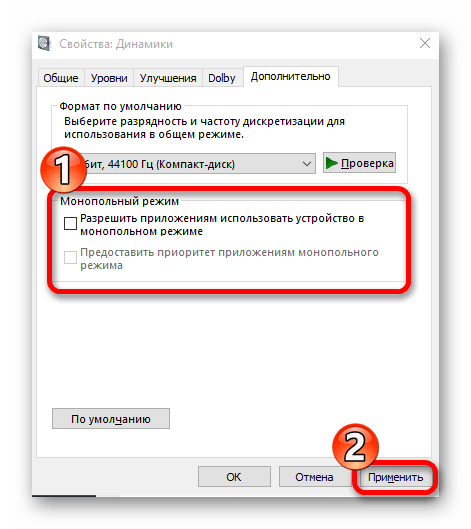
Уберите все отметки в разделе «Монопольный звук».
Вот таким образом вы можете вернуть звук на своё устройство. Если ни один из методов не сработал, то, как и было сказано в самом начале статьи, убедитесь, что оборудование исправно и не нуждается в ремонте.


