- Quick Access в Windows 10
- Размещение каталогов в Quick Access и удаление папок из раздела
- Отключение просмотра списка последних файлов и популярных каталогов
- Отключение «Быстрого доступа»
- How to Remove Files or Folders From Quick Access in Windows 10
- How to stop Quick Access from adding folders
- How to customize Quick Access in Windows 10
- How to Backup and Restore Quick Access Folders in Windows 10
- Backup Quick Access Folder in Windows 10
- Restore Quick Access Folder in Windows 10
- Exclude Files and Folders in Windows 10’s Quick Access
- How to Enable or Disable Files/Folders in Quick Access
- How to Exclude Individual Files/Folders in Quick Access
- How to Remove Quick Access Entirely
- How to use Quick access in File Explorer on Windows 10
- How to add and remove folders to Quick access in File Explorer
- How to show only manually pinned folders to Quick access in File Explorer
- How to open on This PC instead of Quick access in File Explorer
- How to clear Quick access history in File Explorer
- How to reset folders to Quick access in File Explorer
- How to customize Quick access toolbar in File Explorer
- More Windows 10 resources
- The Dell XPS 15 is our choice for best 15-inch laptop
- Halo: MCC’s live service elements make it better, not worse
- Microsoft’s Surface Duo is not ‘failing up’
- These are the best PC sticks when you’re on the move
Quick Access в Windows 10
В последней версии операционки от Microsoft Windows 10 после старта приложения File Explorer будет открыт раздел «Быстрый доступ». Quick Access в Windows 10 позволяет собрать ссылки на директории, которые часто требуются пользователю. Кроме «избранных» каталогов в разделе показаны папки, которые открывают чаще остальных, и последние вызванные файлы. Как использовать новую возможность и при этом защитить личные данные (скрыть информацию о последних просмотрах от других пользователей операционной системы)?
https://www.youtube.com/watch?v=PTBUqxTVWDo
Размещение каталогов в Quick Access и удаление папок из раздела
Чтобы поместить указатель на папку в «Быстрый доступ», нужно кликнуть по каталогу правой кнопкой (или зажать левую и удерживать некоторое время), затем следует выбрать пункт «Закрепить в Quick Access». Это действие позволяет поместить папку в начало списка в разделе быстрого доступа и сэкономить несколько секунд на последующих обращениях к директории.
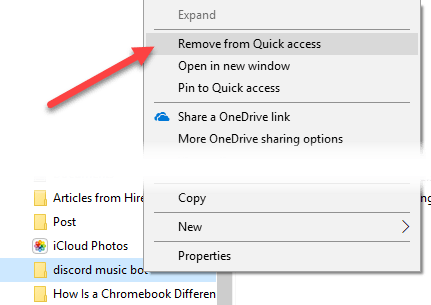
Чтобы удалить папку из раздела, нужно лишь кликнуть по ней правой клавишей (или же, как и при добавлении, зажать и держать левую клавишу мышки). В появившемся списке нужно выбрать пункт «Убрать из QuickAccess».
Отключение просмотра списка последних файлов и популярных каталогов
QuickAccess по умолчанию настроен так, чтобы показывать последние вызванные пользователем файлы и открытые каталоги. Получить доступ к информации может любой пользователь компьютера, запустивший File Explorer.
Для отключения отображения последних файлов и папок нужно из File Explorer щелкнуть мышью по разделу «Вид». Затем выбирают пункт «Параметры». В нижней части экрана есть настройки параметров конфиденциальности. Здесь можно откорректировать в том числе отображение последних выполненных файлов и открытых каталогов — запретить их просмотр.
Альтернативное решение — очистить историю просмотров. Для этого в том же разделе нужно кликнуть по кнопке «Очистить».
Отключение «Быстрого доступа»
Раздел QuickAccess удобен, но может не понравиться некоторым пользователям. Можно отключить раздел «Быстрого доступа» и перенастроить поведение File Explorer. Для этого из приложения переходят в «Вид», а после в «Параметры». Теперь нужно найти пункт с текстом «Открывать File Explorer в». Взамен указанного по умолчанию QuickAccess пользователь может выбрать любой раздел — например, текущий ПК.
После отключения QuickAccess не удалится из системы. К нему все еще можно будет получить доступ, однако при каждом запуске File Explorer последние файлы и папки отображаться перестанут.
How to Remove Files or Folders From Quick Access in Windows 10

Microsoft changed a couple of things in File Explorer in Windows 10 Technical Preview builds, as well as the stable Windows 10 OS versions. One of these changes/additions is Quick Access, which allows you to open the files you recently used. But if you want to remove a certain file from Quick access, we’ll show you how in this article.
In Windows 10, a new File Explorer location, Quick access opens automatically whenever you open File Explorer. It collects information about files and folders you recently used and shows them in the File Explorer, so you can easily access them again.
How to stop Quick Access from adding folders
But sometimes you might not want your private files to show up in Quick access, and you’ll want to hide them. You can simply delete the file, but it will also be deleted from its original location, so we don’t recommend this. But you can also hide the file from Quick access section and prevent it from further showing up, and here’s how to do that:
- Open File Explorer and Quick access will probably be opened by default, if not click on Quick access
- Right-click any file or folder you want to hide from Quick access
- Choose “Remove from Quick Access” to hide the selected file or folder

That would be all, the file or folder you selected will never show up in the Quick access again.
The Quick access location in File Explorer is the successor of Recent files feature, which was placed in the Start Menu in older versions of Windows. Since the Recent files feature is removed in Windows 10 Technical Preview, using the Quick access is probably the easiest and fastest way to access your recent files.
How to customize Quick Access in Windows 10
If you want to fully configure Quick Access on your computer, you can also set it to show only pinned items and choose what folder you want it to open first. We’ll list the steps to follow below.
Display pinned folders in Quick Access
- Open Quick Access > go to the View tab > select Options.
- Clear the check boxes listed in the Privacy section > hit Apply and that’s it.
Open Windows 10 to This PC
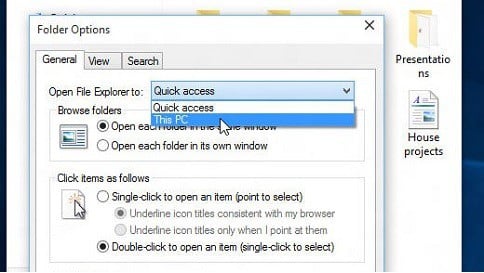
- In this case, navigate to the View tab > select Options.
- Go to ‘Open File Explorer to’ > use the drop-down menu to select This PC > hit Apply.
If you have any comments or suggestions, please write to us in the comments section below, we would love to hear your thoughts.
RELATED STORIES TO CHECK OUT:
How to Backup and Restore Quick Access Folders in Windows 10
Windows 10 was subjected to some major changes ever done by Microsoft and a lot of interesting features made their debut. One feature that was carried over from Windows 7, is the Quick Access Folder. In this article, we are going to see how to backup and restore the Quick Access Folder in Windows 10.
Backup Quick Access Folder in Windows 10
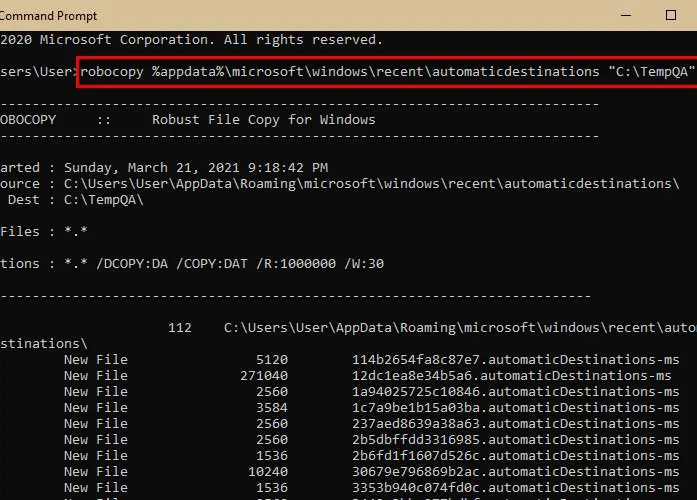
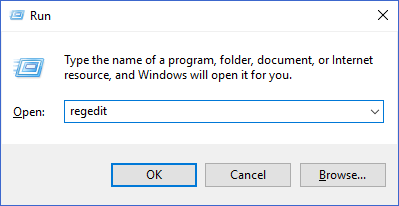
To Backup Quick Access Folder, you need to type the following command in the Run box that can be launched by Win + R.
You need to make sure that you do not alter anything here, as doing so can delete your Quick Access files.
Go to your C Driver, create a New Folder to do that right-clicking on the screen, and select New > Folder. Name it TempQA and close Windows Explorer.
Now, launch Command Prompt as an administrator from the Start Menu, type the following command, and hit Enter.
Now, all your Quick Access files have been backed up in the newly created TempQA folder.
You can confirm this by visiting the C Drive and checking the “TempQA” folder for Quick Access files.
Restore Quick Access Folder in Windows 10
If you want to transfer your Quick Access Files to another computer, just copy the TemQA folder and paste it in the C Drive of the other computer.
To restore the Quick Access Folder we are going to use the Command Prompt. So, launch the Command Prompt as an administrator from the Start Menu, type the following command, and hit Enter.
Now, launch Task Manager by Win + X > Task Manager, go to the Process tab, search for Windows Explorer, right-click on it, and select Restart.
Now, launch File Explorer and check the Quick Access Folder, it will be restored.
Exclude Files and Folders in Windows 10’s Quick Access
So they won’t be prominently displayed
Windows’ Quick Access is a quick and easy way to gain dynamic access to the files and folders that are most important to you on your Windows machine. It’s such a small feature, but it’s one that Windows just wouldn’t be the same without.

WIndows isn’t perfect, though. As it’s learning the files and folders that you access the most, there may be a few that you don’t want to be displayed in a menu that’s so prominent in Windows Explorer. If so, there are ways around that.
In this article, let’s talk about a few of the ways you can customize your Windows 10 Quick Access menu so that you get the most out of it.
How to Enable or Disable Files/Folders in Quick Access
One customization option for Quick Access in Windows 10 is the ability to disable displaying recently used files and/or folders. Disabling both of these will render Quick Access useless unless you’ve specifically pinned files or folders to Quick Access, so keep that in mind.
To do so, navigate to File Explorer Options in your Control Panel.
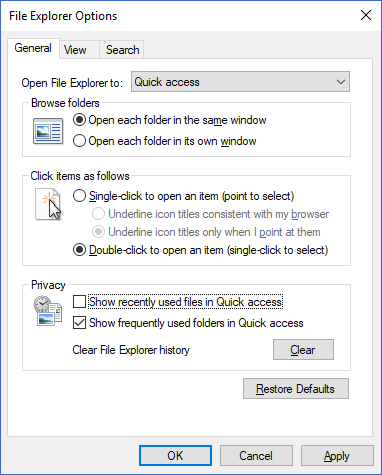
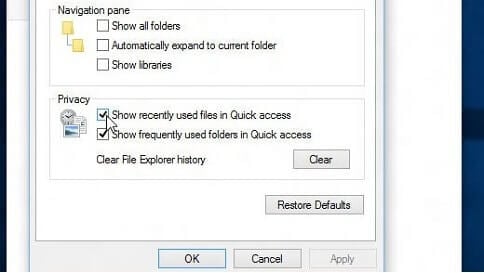
The following window will pop up. Towards the bottom, you will see two checkboxes that allow you to toggle showing recent files and/or folders on and off. Bear in mind that this does not mimic the functionality of Windows 10’s Recent Items. Only items that have seen repeated use over time will display in Quick Access.
You also have the option of clearing your File Explorer history. This will effectively give you a clean slate in Quick Access so that more recent and relevant items can start to appear.
How to Exclude Individual Files/Folders in Quick Access
If you have a certain file or folder showing up in your Quick Access that you don’t want to appear, excluding it is a very simple process.
All you have to do is right-click on the file or folder and select Remove from Quick Access or Unpin from Quick Access.
If you ever want to allow any files or folders to appear again, use the Clear button from File Explorer Options (shown in the previous section).
How to Remove Quick Access Entirely
If you’ve decided that Quick Access just isn’t for you and you want to get rid of it entirely, this is possible through some simple registry editing. However, before you ever make any changes, remember to back up your Windows registry.
First, press the Windows key + R to bring up the Run prompt. In the field, type in “regedit” and press Enter.
On this window, in the folder tree to the left, navigate to the following registry key:
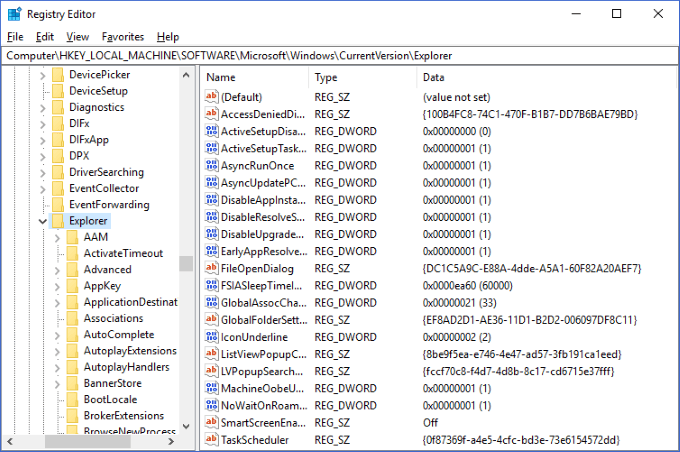
Right-click on an empty portion of the pane to the right and select DWORD (32-bit) Value from the New menu.
Change the value’s name to “HubMode” and give it a value of 1.

Now, if you bring up Windows Explorer, you should see that the Quick Access menu is no longer present on the left side. If you still see it, you may need to restart Windows Explorer or your computer altogether.
If you want to reverse this at any time, all you have to do is delete the value you just created.
Quick Access is one of the most useful features in Windows 10’s file manager, and taking control of it can seriously improve your everyday PC productivity. With the tips above, we hope you’ve learned how to make Quick Access fit your needs!
Craig is a long-time writer, coder, and marketer with years of experience in the technology and gaming spaces. Since 2008, he’s worked remotely with some of the most notable publications in these industries, specializing in Windows, PC hardware and software, automation, and the like. Read Craig’s Full Bio
How to use Quick access in File Explorer on Windows 10
 Source: Windows Central
On Windows 10, whenever you open File Explorer, you’re presented with the Quick access view, which includes your frequent folder navigations as well as a list of your recent files. Also, the feature can show the folders you access most often from the left pane.
If you spend a lot of time browsing content with File Explorer, on Windows 10, you can customize the Quick access experience to improve the usability. For instance, since frequent folders are added dynamically, you can add or remove items manually. You can clear the Quick access history for files and folders. If you prefer not to open the Quick access view every time you open File Explorer, you can change it to open This PC instead, and more.
In this Windows 10 guide, we’ll walk you through the steps to use Quick access with File Explorer.
How to add and remove folders to Quick access in File Explorer
To add or remove locations to Quick access in File Explorer, use these steps:
- Open File Explorer.
- Browse to the location with the folder you want to pin to Quick access.
- Select the folder.
(Option 1) Click the Pin to Quick access button from the «Home» tab.
 Source: Windows Central
(Option 2) Right-click the folder and select the Pin to Quick access option to list in the left pane.
Source: Windows Central
(Option 3) Under the «Quick access» section, right-click a recent folder from the list and select the Pin to Quick access option to keep the location in the list.
 Source: Windows Central
(Optional) Under the «Quick access» section, right-click the folder and select the Unpin from Quick access option to remove it.
Source: Windows Central
Quick tip: Alternatively, you can select the Quick access button from the left pane, right-click an item from the right side, and select the Unpin from Quick access option.
Once you complete the steps, you may need to repeat the steps to add or remove more items as needed.
How to show only manually pinned folders to Quick access in File Explorer
On Windows 10, Quick access can show folders that you frequently accessed folders and folders you’ve pinned manually. If you want to show only manually pinned locations, then use these steps:
- Open File Explorer.
Click the Options button from the «View» tab.
Source: Windows Central
Under the «Privacy» section, clear the Show frequently used folders in Quick access option.
 Source: Windows Central
After you complete the steps, only manually pinned items will appear in the navigation pane.
How to open on This PC instead of Quick access in File Explorer
When you open File Explorer, by default, you’re directed to the Quick access view that shows you frequent folders and recent files. If you prefer to start in the This PC view that shows a list of all the drives, network locations, and profile folders, you can change this behavior from the Folder Options page.
To change the start location in File Explorer, use these steps:
- Open File Explorer.
Click the Options button from the «View» tab.
Source: Windows Central
Use the «Open File Explorer to» drop-down menu and select the This PC option.
Source: Windows Central
Once you complete the steps, File Explorer will open on This PC for faster access to your files, local drives, and network shares.
How to clear Quick access history in File Explorer
In the case that you want Quick access to show files and folders, but you want to clear the current history, you can use these steps:
- Open File Explorer.
Click the Options button from the «View» tab.
Source: Windows Central
Under the «Privacy» section, click the Clear button.
Source: Windows Central
Once you complete the steps, Quick access will continue to show recent files and frequent folders, but the current history will be deleted.
How to reset folders to Quick access in File Explorer
Although you can clear the history of recent files and frequent folders and restore the default settings, the «Folders Options» page doesn’t include an option to completely reset the feature, including removing all manually pinned items.
This approach to reset the feature will usually come in handy when you’re trying to fix problems with Quick access. Or when you need to unpin locations pointing to network folders that are no longer available, since when trying to remove non-existing locations can cause File Explorer to freeze for a long time.
If you want to reset Quick access in File Explorer, use these steps:
- Open Start.
- Search for Command Prompt, right-click the top result, and select the Run as Administrator option.
Type the following command and press Enter:
del /q /f %appdata%\Microsoft\Windows\Recent\*
 Source: Windows Central
Type the following command and press Enter:
del /q /f %appdata%\Microsoft\Windows\Recent\AutomaticDestinations\*
Type the following command and press Enter:
del /q /f %appdata%\Microsoft\Windows\Recent\CustomDestinations\*
After you complete the steps, all the history and manually pinned items will be removed from Quick access, and the default view when opening File Explorer should now be the Quick access page.
How to customize Quick access toolbar in File Explorer
File Explorer also includes the Quick Access Toolbar that gives you faster access to specific commands, and you can customize the toolbar to show only the commands you use.
To add or remove items from the Quick Access toolbar, use these steps:
- Open File Explorer.
- Click the down-arrow button from the top-left corner.
(Option 1) Check the button you want to see in the toolbar, for instance, Undo, Redo, Properties, New Folder, or Rename.
 Source: Windows Central
(Option 2) Right-click any button from the ribbon menu, and select the Add to Quick Access toolbar option.
Source: Windows Central
In addition to adding and removing commands, you can also relocate the toolbar below the ribbon menu by right-clicking the toolbar and selecting the Show Quick Access Toolbar below the Ribbon or Show Quick Access Toolbar above the Ribbon option.
More Windows 10 resources
For more helpful articles, coverage, and answers to common questions about Windows 10, visit the following resources:
![]()
The Dell XPS 15 is our choice for best 15-inch laptop
For a lot of people, a 15-inch laptop is a perfect size that offers enough screen for multitasking, and in a lot of cases, some extra performance from powerful hardware. We’ve rounded up the best of the best at this size.
![]()
Halo: MCC’s live service elements make it better, not worse
Halo: The Master Chief Collection is more popular than ever, but some fans don’t agree with the live service approach 343 Industries has taken with it. Here’s why those elements are, at the end of the day, great for the game and for Halo overall.
![]()
Microsoft’s Surface Duo is not ‘failing up’
Microsoft announced this week that it was expanding Surface Duo availability to nine new commercial markets. While Surface Duo is undoubtedly a work in progress, this is not a sign of a disaster. It’s also doesn’t mean that Surface Duo is selling a ton either. Instead, the reason for the expansion is a lot more straightforward.
![]()
These are the best PC sticks when you’re on the move
Instant computer — just add a screen. That’s the general idea behind the ultra-portable PC, but it can be hard to know which one you want. Relax, we have you covered!


