- How to Remove Files or Folders From Quick Access in Windows 10
- How to stop Quick Access from adding folders
- How to customize Quick Access in Windows 10
- How to Add or Remove folders in a Library in Windows 10
- Add or Remove folders in Windows Library.
- Cannot delete files, folders or icons in Windows 10 [Solved]
- How can I delete files, folders or icons on Windows 10?
- 1. Reboot your system
- 2. Use a dedicated third-party cleaner
- IObit Uninstaller
- 3. Delete the file/folder using Command Prompt
- 4. Check your antivirus
- 5. Change the Ownership of the file/folder
- How to remove the Folders from This PC in Windows 10
- Remove the Folders from This PC in Windows 10
- Related Posts
- Windows cannot access Shared Folder or Drive in Windows 10
- How to create a Folder Tree in Windows 10?
- How to enable Wallpaper Slideshow in Windows 10
- [email protected]
How to Remove Files or Folders From Quick Access in Windows 10

Microsoft changed a couple of things in File Explorer in Windows 10 Technical Preview builds, as well as the stable Windows 10 OS versions. One of these changes/additions is Quick Access, which allows you to open the files you recently used. But if you want to remove a certain file from Quick access, we’ll show you how in this article.
In Windows 10, a new File Explorer location, Quick access opens automatically whenever you open File Explorer. It collects information about files and folders you recently used and shows them in the File Explorer, so you can easily access them again.
How to stop Quick Access from adding folders
But sometimes you might not want your private files to show up in Quick access, and you’ll want to hide them. You can simply delete the file, but it will also be deleted from its original location, so we don’t recommend this. But you can also hide the file from Quick access section and prevent it from further showing up, and here’s how to do that:
- Open File Explorer and Quick access will probably be opened by default, if not click on Quick access
- Right-click any file or folder you want to hide from Quick access
- Choose “Remove from Quick Access” to hide the selected file or folder

That would be all, the file or folder you selected will never show up in the Quick access again.
The Quick access location in File Explorer is the successor of Recent files feature, which was placed in the Start Menu in older versions of Windows. Since the Recent files feature is removed in Windows 10 Technical Preview, using the Quick access is probably the easiest and fastest way to access your recent files.
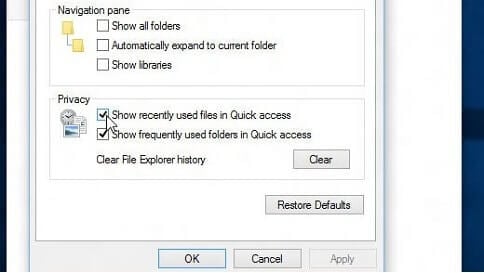
How to customize Quick Access in Windows 10
If you want to fully configure Quick Access on your computer, you can also set it to show only pinned items and choose what folder you want it to open first. We’ll list the steps to follow below.
Display pinned folders in Quick Access
- Open Quick Access > go to the View tab > select Options.
- Clear the check boxes listed in the Privacy section > hit Apply and that’s it.
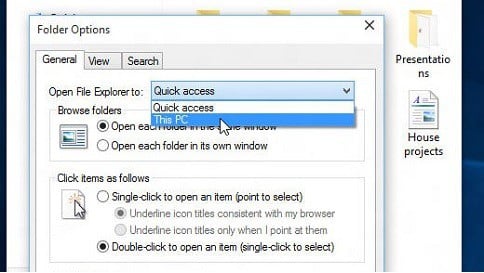
Open Windows 10 to This PC
- In this case, navigate to the View tab > select Options.
- Go to ‘Open File Explorer to’ > use the drop-down menu to select This PC > hit Apply.
If you have any comments or suggestions, please write to us in the comments section below, we would love to hear your thoughts.
RELATED STORIES TO CHECK OUT:
How to Add or Remove folders in a Library in Windows 10
To improve and enhance users’ working experience, Windows 10 allows folders from different locations in the Windows Library to be viewed and accessed from a single place. For instance, if you keep some audio/video content on an external hard drive or a shared folder on your network, you can include it in any of the default folders of the Windows 10 Library. In this post, let us learn how to add a folder to the Library in Windows 10.
Add or Remove folders in Windows Library.
Library in Windows 10 can be defined as a virtual collection of folders on a system. Virtual because it does not exist as a real folder. By default, Windows 10 comes with the following as Libraries:
- Camera Roll
- Documents
- Music
- Pictures
- Saved Pictures
- Videos.
Libraries are also is pinned to the navigation pane. If you would like to add more folders to the Libraries, follow the steps given below. Windows 10 allows the addition of up to 50 locations to a Library.
First method
Open the Libraries folder using File Explorer. Next, right-click a library and select Properties in the context menu. If Libraries is not visible under File Explorer, press the Win + R keys and type shell:Libraries into the Run box and hit Enter.
In Properties, click on the Add button seen on the right-hand side to browse to a location and add it to the library.
In the next dialog, browse for a folder and select the Include folder button to add to the library.
Second method
Similarly, you can add a folder to a Library via Manage Library dialog, readily accessible through the Ribbon menu.
Select the desired library in the Libraries folder.
Under the ‘Ribbon’ menu, navigate to the Manage tab visible under Library tools.
After that, click on the Manage library button on the left.
Then, in the next dialog, add the folder/s of choice using the buttons adjacent to the folder list.
Third method
Then there is another simple way. Open File Explorer and navigate to the location, which includes the folder you want to add to the Library. Now right-click on it and select Include in library > Create new library.
Open the Libraries folder, and you will see it there.
To remove a library folder, right-click on the library folder and select Delete.
Cannot delete files, folders or icons in Windows 10 [Solved]
- If you can’t delete files, folders, and icons in Windows 10, the problem is pretty hard to pinpoint.
- In this article, you will learn how to force delete a folder in Windows 10 and many more.
- When you’re not allowed to delete a folder, a possible solution is just to restart your system.
- Another fix for this annoying issue is to use a third-party tool to solve the problem.

- Download Restoro PC Repair Tool that comes with Patented Technologies (patent available here).
- Click Start Scan to find Windows issues that could be causing PC problems.
- Click Repair All to fix issues affecting your computer’s security and performance
- Restoro has been downloaded by 0 readers this month.
One of the problems users are noticing in Windows 10 is that they’re unable to delete some files or folders. And if you’re facing the same issue, we’ll show you a few solutions to this problem.
We frequently remove files from our PCs, but sometimes you cannot delete a folder, file, or icon in Windows 10.
This can be an annoying problem, and speaking of file removal, many Windows 10 users reported the following issues:
- How to delete a folder that won’t delete
- Sometimes you might encounter a folder that you’re unable to delete.
- This can be a big problem, but you should be able to fix it using one of our solutions.
- Can’t delete folder in use
- In some cases, you might get a message that the folder you’re trying to delete is in use.
- To fix the problem, you need to close all applications that might be using this directory.
- We covered a similar problem in our File in use error article, so be sure to check it out for more information.
- Cannot delete file access denied
- This error message can appear if you don’t have the necessary privileges to delete a certain file or folder.
- Simply change your security permissions and you’ll be able to delete the file.
- Can’t delete folder open in another program
- By default, Windows prevents you from deleting files that are currently used by other applications.
- To fix this error, make sure that other applications aren’t using that file.
- Can’t delete files with long names
- Windows can’t work well with files that exceed a certain character limit.
- If that’s the problem, the best solution is to rename the problematic file
- We explained how to do that in our The filename or extension is too long article, so be sure to check it out for more information.
- Can’t delete files need permission
- This is just a variation of this error, but in most cases, you can fix it simply by changing your security permissions.
- Force delete folder windows 10
- These solutions act by overwriting any protocols so that the data is forcefully deleted.
How can I delete files, folders or icons on Windows 10?
1. Reboot your system

Sometimes, all you need to do is to restart your machine and the problem will be gone.
Unresponsiveness doesn’t just happen in this case, for example, a lot of people reported that they’re unable to open the start menu sometimes, but when they restart their computer, everything works fine.
But if restarting your PC didn’t solve the problem, you can try one of the following solutions.
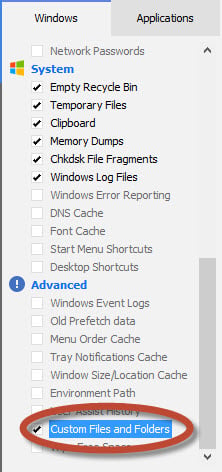
2. Use a dedicated third-party cleaner
- The third-party software recommended by us can unlock and remove locked files from your PC. You can choose specific files, file types, and folders to be included in Cleaner operations.

- To include files and folders in the cleaning process, you must select the Custom Files and Folders check the box on the list of options screen.
- You can then add separate Include statements (as many as necessary) by following these steps each time:
- Click the Options icon from the left sidebar.
- Hit the Include button.
- Add a new include statement by clicking Add.
- Complete details in the Include dialog box.
IObit Uninstaller
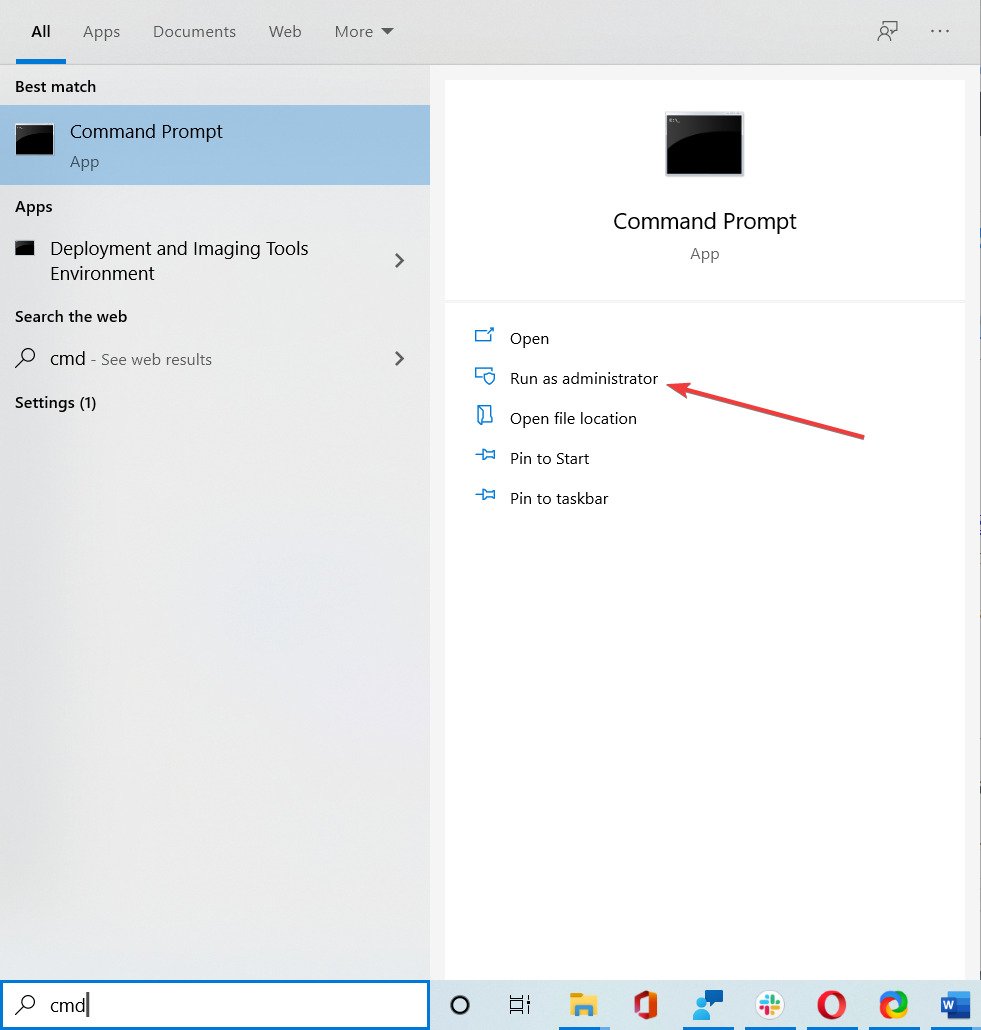
3. Delete the file/folder using Command Prompt
- Go to Search and type cmd.
- Click on Run as administrator to open Command Prompt with full permissions.
- In the Command Prompt, enter del, followed by the path of the folder or file you want to delete, and press Enter (for example del c:\users\JohnDoe\Desktop\text.txt).
4. Check your antivirus
Antivirus software is a necessity, and many antivirus tools have a useful feature that can protect your files. Thanks to this feature, malicious applications and users won’t be able to delete your files.
Even though this feature is useful, it can also prevent you from removing certain files.
To fix this problem, you need to check your antivirus settings and see if this feature is enabled. If so, disable it for the files that you want to delete and check if that solves the issue.
If you can’t find this feature, you can remove your antivirus and check if that helps.
If removing the antivirus solves the problem, you should consider switching to a different antivirus solution. There are many great tools available, but you should always choose the best.
⇒ Get Bitdefender
5. Change the Ownership of the file/folder
- Right-click on the file you want to delete and choose Properties.
- Under Security tab, click the Advanced button.
- The Advanced Security Settings window will appear, and you’ll spot Owner.
- In some cases, SYSTEM is listed as the owner, and in some it is TrustedInstaller, click on Change option, next to the name of Owner.
- Enter the username you want to become the owner of the file, press Check Names to make sure if it’s okay, and press OK.
- You’ll notice that the name of the Owner has changed, and you’ll also notice a checkbox called Replace owner on subcontainers and objects, check that checkbox and click Apply.
- Close Windows Security Properties (Windows will require a restart).
- Open the Properties again, by right-clicking on the file, click on Security, and then on Advanced.
- Under Permission tab, check Replace all child object permission entries with inheritable permission entries from this object.
- After that, click Edit.
- In Permission Entry window check Full Control and hit OK.
- Try to delete the file/folder again.
If you need further guidance on how to take full ownership of a file or folder, check out this comprehensive guide.
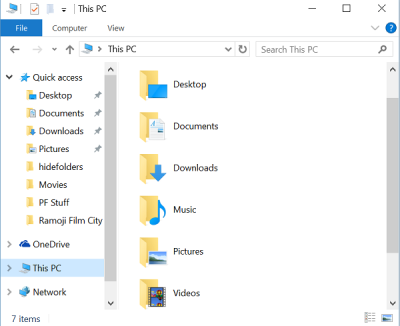
How to remove the Folders from This PC in Windows 10
Microsoft renamed My Computer to Computer and then to This PC in Windows 8.1. It followed the same in Windows 10. Along with this name change, Microsoft introduced the display of 6 folders namely Documents, Pictures, Videos, Downloads, Music, and Desktop in This PC in both Windows 10 and Windows 8.1.
Those who did not want to display these folders found a way to hide these folders from This PC in Windows 8.1. This procedure will not work in Windows 10, as things are a bit different.
Remove the Folders from This PC in Windows 10
Even though you know how to show or hide folders from This PC in Windows 8.1, the same way is not possible in Windows 10 as Microsoft has changed Registry Keys a bit in Windows 10. But, do not worry. In this tutorial, I will let you know how to remove the six personal folders from This PC in Windows 10.
TIP: To do this with a click, use our Ultimate Windows Tweaker. You will see the setting in Customization > This PC > Customize inbuilt folders.
In Windows 10 Microsoft is maintaining a string ThisPCPolicy with a value of Show or Hide based on which folder is shown or hidden in This PC. If you set the ThisPCPolicy value to show, then that particular folder is shown in This PC, and if you set that value to Hide, then that folder is hidden from “This PC” in Windows 10.
Follow These Steps to show or hide folders from This PC in Windows 10
Press WIN+R key and open the RUN Dialog box and type “regedit” and hit enter. It opens the Registry Editor.
Next, we need to go to the following keys one after the other and need to change the value of ThisPCPolicy to Hide to hide that particular folder from “This PC” window in Windows 10.
Documents Folder:
Pictures Folder:
Videos Folder:
Downloads Folder:
Music Folder:
Desktop Folder:
As an example, let me show it for Pictures Folders and hide it from “This PC” window.
Open Registry Editor and navigate to the key specified and change the value of ThisPCPolicy to Hide.
Now, close the Registry Editor and open the “This PC” folder. You could see that Pictures folder from “This PC” window has been removed.
To get back the Pictures folder back, go the respective key and change the value of ThisPCPolicy to Show and you could see the Pictures folder again.
In this way, you need to change the value of ThisPCPolicy to Hide for all the six keys to hide them from the This PC window.
Note: All the keys mentioned above have the ThisPCPolicy string except for this key which is related to the Desktop folder-
For this, you need to create the string ThisPCPolicy for the desktop key and change its value to Hide.
PS: You can also remove the 3D Objects folder from This PC in Windows 10.
Date: December 23, 2019 Tags: Customize, Folder
Related Posts
Windows cannot access Shared Folder or Drive in Windows 10
How to create a Folder Tree in Windows 10?
How to enable Wallpaper Slideshow in Windows 10
[email protected]
Sridhar is a Software Engineer who loves to stay updated with developments in the world of technology. He is fond of writing everything related to Internet, Computers and Mobile and Desktop Operating Systems.


