- How to Fix Corrupt User Profile In Windows 10
- Corrupt User Profile in Windows 10
- 1. Use Registry Editor to Fix Corrupt User Profile in Windows 10
- 2. Create A New User Account
- 2.1 Access Hidden Admin Account
- 2.2. Create New User Account
- 2.3. Transfer Files From Old to New User Account
- Windows 10 repair profile
- Узнайте свой идентификатор безопасности
- Редактирование реестра
- 1: Удалить дублируемую папку
- 1 и 2: Переименовать .BAK-папку
- 1, 2 и 3: Настройка пути и состояния папки
- Поделиться ссылкой:
- Вам также может понравиться
- Как исправить ошибку синего экрана смерти hardlock.sys в Windows 10
- Как установить Windows на флешку
- Как оценить производительность вашего компьютера. Wagnardsoft CPU Benchmark
- Как изменить приоритеты подключения к Wi-Fi сетям в Windows 10
- Как включить режим максимальной производительности в Windows 10
- Как настроить вход без пароля в Windows 10
- партнёры блога
- telegram
- Последние статьи
- Рубрики
- СЧЕТЧИКИ
- РЕКЛАМА И ДОНАТЫ
- Социальные сети
- Архив
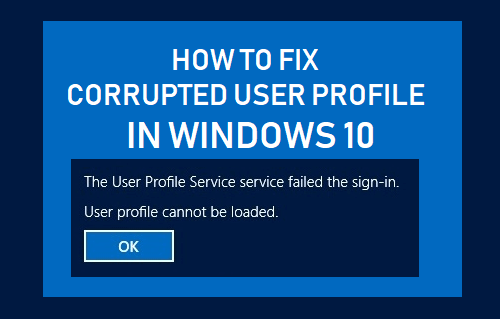
How to Fix Corrupt User Profile In Windows 10
By: Waseem Patwegar
Not being able to login to your computer due to Corrupted User Profile can be quite frustrating. You will find below the steps to Fix Corrupt User Profile in Windows 10.
Corrupt User Profile in Windows 10
According to Microsoft, User Profile can get corrupted if the Antivirus program on your computer was busy scanning the PC while you were trying to Login to your User Account.
Apart from this, there could be many other reasons for Corrupted User Profile in Windows 10.
If the User Profile is Corrupted, you won’t be able to login to your User Account. You can either Login to another User Account (with Admin privileges) or boot your computer in Safe Mode and use any of the following methods.
- Fix Corrupted User Profile Using Registry Editor
- Create New User and Transfer Files from Old to New User Account.
1. Use Registry Editor to Fix Corrupt User Profile in Windows 10
Login to another User Account (With Admin Privileges) or boot your computer in Safe Mode and follow the steps below to Fix Corrupted User Profile in Windows 10.
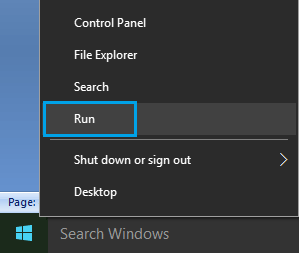
1. Right-click on the Start button and click on Run .
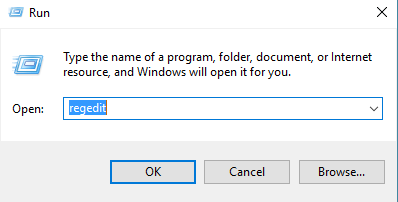
2. On the Run Command window, type regedit and click on OK .
3. On the Registry Editor screen, navigate to HKEY_LOCAL_MACHINE\SOFTWARE\Microsoft\Windows NT\CurrentVersion\ProfileList .
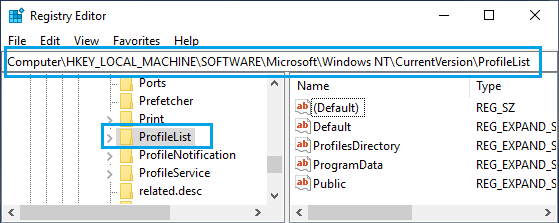
4. Open the ProfileList Folder and you will see Folders starting with S-1-5. Each of these Folders represents a User Profile or a User Account created on your computer.
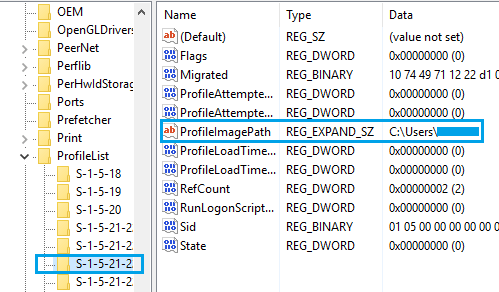
Now, the task is to identify the right S-1-5 Folder that belongs to the Corrupted User Profile. You can do this by clicking on each S-1-5 Entry and taking a look at the “Data” Column for ProfileImagePath Entry.
As you can see in above image, the “User Name” is visible in the “Data” Column for ProfileImagePath Entry.
5. Once you find the right S-1-5 Folder , double-click on the State Field in the right pane. This will launch an Edit DWORD Window.
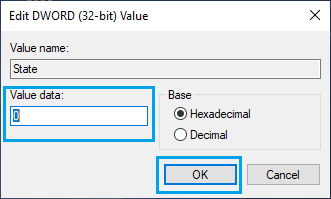
6. On the Edit DWORD Window, change the Value Data from 1 to 0 and click on the OK button.
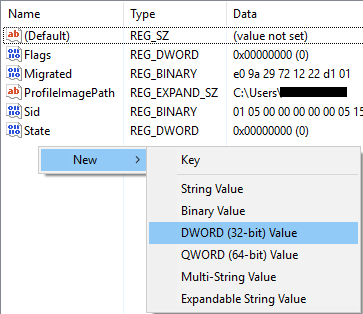
7. Similarly, double-click on RefCount entry and change the Value Data from 1 to 0 .
If you cannot find “RefCount”, right-click anywhere (blank space) in the right pane > click on New > DWORD (32 bit) and type RefCount as the Name for this New DWORD.
8. Close the Registry Editor and Restart your computer.
After this, you should be able to Login to your User Account.
2. Create A New User Account
Another method to Fix Corrupted User Profile in Windows 10 is to create a New User Account and transfer Files from Old to New User Account.
In case you have an alternate Admin Account that is not blocked, you can straight away Login to your Spare Admin Account and create a New User Account.
However, if your Admin Account is blocked, you can follow the steps below (2.1) to get access to Hidden Admin Account that Microsoft makes available for such occasions.
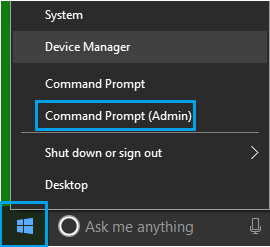
2.1 Access Hidden Admin Account
1. Start your computer in Safe Mode.
2. Next, right-click on Start and click on Command Prompt (Admin) .
3. In the Command Prompt window, type net user administrator /active:yes and press the Enter Key on the Keyboard of your computer.
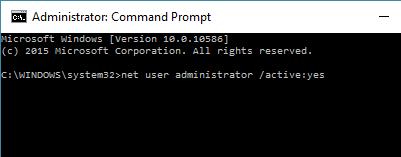
4. You will see a message reading “ The command completed successfully “.
5. Now, Restart your computer and you will be able to login to the Secret Admin Account that you just activated.
2.2. Create New User Account
When you reboot your computer after enabling the Hidden Admin Account, you will be able to see both your New Admin Account and also the Corrupted User Account.
Login to the secret Admin Account (no password required) and follow the steps below to create a New User Profile on your computer.
1. Go to Settings > Accounts > click on Family & other users > Add someone else to this PC .
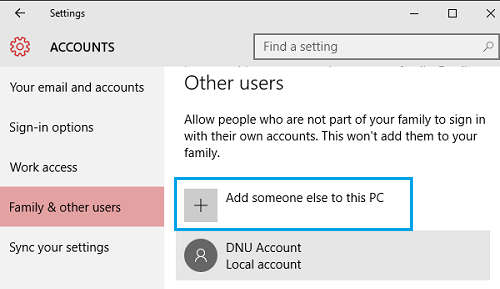
2. Follow the instructions to create a New User Account .
Note: You can either create a New User Account that is linked to your Microsoft ID or create a local user account that is not linked to Microsoft ID.
Important: The Account Name of the New User Account needs to be different from the Corrupted User Account. Later on you can Rename the Account (if you want to maintain the same User Name as before).
2.3. Transfer Files From Old to New User Account
Now the last and final step is to Transfer all your required files from Old to New User Account.
1. Go to Users Folder located at C:/Users.
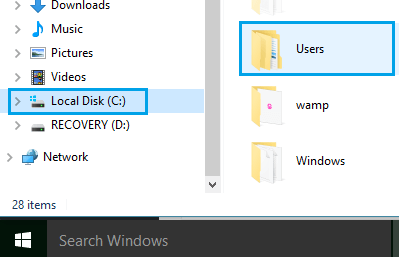
In this Folder, you will find sub-folders for every User Account on your computer, including the User Account with Corrupted User Profile and the New User Account that you had just created.
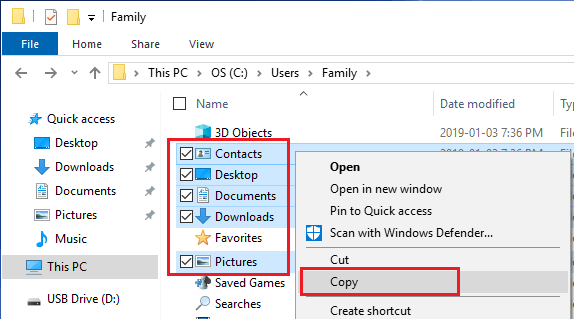
3. Open the Corrupted User Profile Folder and copy Desktop, Contacts, Downloads and other Files that you want to transfer to the New User Account.
Important: Do not copy the entire User Folder, as you will end up copying the following hidden system files that are related to your Corrupted User Profile.
4. Next, open the New User Account Folder (located at C:/Users) and Paste the Files into the New User Folder.
Now, Login to your New User Account and you will be able to see all the Files from your Corrupted User Account.
Your new User Account will not be exactly the same as your old account, you will still need to change your desktop background, create Folder/Program shortcuts as required by you.
Windows 10 repair profile
Профиль пользователя в Windows 10 может повредиться при неудачном обновлении системы или при установке какой-либо программы. В самых сложных случаях вам придётся создать себе новую учётную запись, настроить её и скопировать все файлы. Но для начала можно попробовать восстановить профиль.

Для начала вам всё-таки придётся загрузиться с временным профилем или создать новый. Это необходимо для доступа к командной строке и реестру.
Узнайте свой идентификатор безопасности
Вам нужно узнать идентификатор безопасности (SID) учетной записи пользователя, которую вам необходимо восстановить.
Нажмите «Win+X» и выберите «Командная строка (Администратор)». Затем введите:
wmic useraccount where name=’test_user’ get sid
И нажмите Enter .
Для текущего пользователя ещё работает команда:
На PowerShell скрип можно реализовать с помощью двух классов — SecurityIdentifier и NTAccount:
$objUser = New-Object System.Security.Principal.NTAccount(«LOCAL_USER_NAME»)
$strSID = $objUser.Translate([System.Security.Principal.SecurityIdentifier])
$strSID.Value

SID пользователя выглядит так: S-1-5-21-1175651296-1316126944-203051354-1005. Запишите или скопируйте его. Для этого нажмите Ctrl + M, чтобы включить выделение, выделите строку и затем нажмите «Ctrl + C».
Редактирование реестра
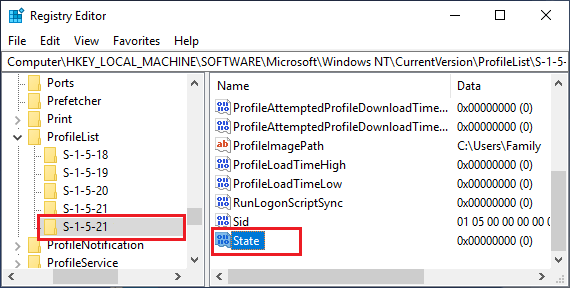
Теперь нам нужно внести изменения в реестр, чтобы восстановить повреждённый профиль. Для этого нажмите «Win+R» и наберите regedit . Запустите Редактор реестра от имени Администратора. Вставьте путь в адресную строку и нажмите Enter:
В левой панели вы увидите список SID в папке ProfileList.

Рассмотрим три случая и варианты решения проблемы для каждого:
- Ваш SID указан дважды — с расширением .BAK и без него.
- Ваш SID указан только один раз с расширением .BAK (например, S-1-5-21-2795999757-2048908912-3492586281-1000.bak).
- Ваш SID указан только один раз без расширения .BAK (например, S-1-5-21-2795999757-2048908912-3492586281-1000).
1: Удалить дублируемую папку
Если ваш SID указан дважды, и только в этом случае, то вам нужно удалить папку БЕЗ расширения .BAK. Щелкните правой кнопкой мыши на папке в левой панели и нажмите « Удалить» . Нажмите « Да» для подтверждения.

1 и 2: Переименовать .BAK-папку
Щелкните правой кнопкой мыши на папке, соответствующей вашему SID, с расширением .BAK, нажмите «Переименовать» и удалите .BAK с конца. Нажмите « Ввод», чтобы сохранить изменения.

1, 2 и 3: Настройка пути и состояния папки
Щелкните левой кнопкой мыши на папке на левой панели, которая соответствует вашему SID. На правой панели дважды щелкните ProfileImagePath. В поле Значение введите правильный путь для своего профиля пользователя.

После этого нажмите «ОК». Затем на правой панели реестра дважды щелкните на State. Измените Value data на 0 и нажмите «ОК» .

Если вы не знаете пути к профилю, то нажмите клавишу «Win + R», чтобы открыть «Выполнить». Затем введите C:\Users и нажмите Enter.

Закройте редактор реестра и перезагрузите компьютер. Войдите в свою учетную запись пользователя.
Читайте анонсы и посты целиком в ЖЖ, Medium, Голосе и Яндекс.Дзен!
Поддержите мой блог финансово. Все донаты пойдут на оплату хостинга и развитие сайта!
Поделиться ссылкой:

Вам также может понравиться

Как исправить ошибку синего экрана смерти hardlock.sys в Windows 10
Как установить Windows на флешку
Как оценить производительность вашего компьютера. Wagnardsoft CPU Benchmark
Как изменить приоритеты подключения к Wi-Fi сетям в Windows 10
Как включить режим максимальной производительности в Windows 10
Как настроить вход без пароля в Windows 10
ху…. Создает новый профиль. для статей необходимо указывать подробности такие как
Версия 10.0.17134 Сборка 17134
а также какие стоят пакеты обновлений.
Учтём. Посту уже год с лишним точно
- Opens in a new tab Opens in a new tab Opens in a new tab Opens in a new tab Opens in a new tab
партнёры блога

telegram
Последние статьи


Рубрики
СЧЕТЧИКИ
РЕКЛАМА И ДОНАТЫ
Социальные сети
Архив
©2016-2020 Блог Евгения Левашова. Самое интересное и полезное из мира ИТ. Windows 10, Linux, Android и iOS. Обзоры программ и веб-сервисов. Статьи о мотивации и продуктивности.
Использование материалов разрешается с активной ссылкой на levashove.ru. 
Данный блог является личным дневником, содержащим частные мнения автора. В соответствии со статьей 29 Конституции РФ, каждый человек может иметь собственную точку зрения относительно его текстового, графического, аудио и видео наполнения, равно как и высказывать ее в любом формате. Блог не имеет лицензии Министерства культуры и массовых коммуникаций РФ и не является СМИ, а, следовательно, автор не гарантирует предоставления достоверной, не предвзятой и осмысленной информации. Сведения, содержащиеся в этом блоге не имеют никакого юридического смысла и не могут быть использованы в процессе судебного разбирательства. Автор блога не несёт ответственности за содержание комментариев к его записям.


