- Как создавать скриншоты в Windows 10 с помощью «Фрагмент и набросок»
- Как делать скриншоты с помощью Snip & Sketch
- Использование приложения «Фрагмент и набросок»
- Использование быстрой кнопки Action Center
- Использование кнопки Print Screen
- Как включить кнопку Print Screen для Snip&Sketch
- Как комментировать скриншоты Snip & Sketch
- How to take and annotate screenshots on Windows 10
- Take a screenshot
- Annotate snips with Snip & Sketch
- Take a Screenshot with Screen Snip in Windows 10
- About Sergey Tkachenko
- 7 thoughts on “ Take a Screenshot with Screen Snip in Windows 10 ”
- How to use Snip & Sketch to take screenshots on Windows 10 October 2018 Update
- How to take screenshots with Snip & Sketch
- Using Snip & Sketch app
- Using Action Center quick button
- Using the Print Screen button
- How to enable Print Screen button to use Snip & Sketch
- How to annotate screenshots with Snip & Sketch
- More Windows 10 resources
- The Dell XPS 15 is our choice for best 15-inch laptop
- Halo: MCC’s live service elements make it better, not worse
- Microsoft’s Surface Duo is not ‘failing up’
- These are the best PC sticks when you’re on the move
Как создавать скриншоты в Windows 10 с помощью «Фрагмент и набросок»

Начиная с обновления за октябрь 2018 года, Windows 10 модернизирует работу по созданию снимков экрана с новым приложением «Фрагмент и набросок», которое сочетает в себе устаревший инструмент Snipping Tool с «Эскиз экрана» (ранее входившим в Windows Ink Workspace).
В результате вы получаете возможность создавать и комментировать скриншоты рабочего стола, приложений и игр без необходимости использования сторонних инструментов, а также приложения, которые будут часто обновляться через Microsoft Store.
В этом руководстве по Windows 10 мы расскажем, как начать работу с новым приложением «Фрагмент и набросок», чтобы делать снимки экрана с обновлением за октябрь 2018 года.
Как делать скриншоты с помощью Snip & Sketch
Используя приложение «Фрагмент и набросок», мы получаем в Windows 10 как минимум три способа создавать скриншоты:
Использование приложения «Фрагмент и набросок»
Самый простой способ получить доступ к инструментам – запустить приложение «Фрагмент и набросок», выполнив следующие действия:
- Откройте Пуск.
- Найдите «Фрагмент и набросок», нажмите на совпадающий результат.
- Нажмите кнопку Создать в верхнем левом углу.
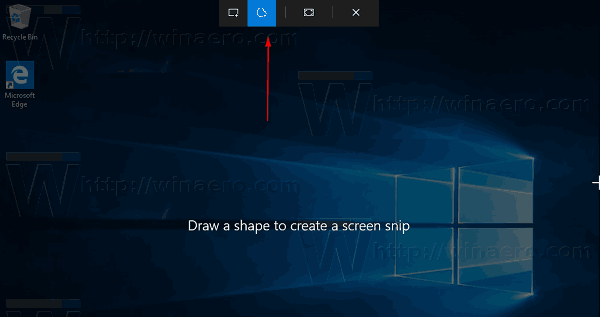
- Прямоугольная вырезка.
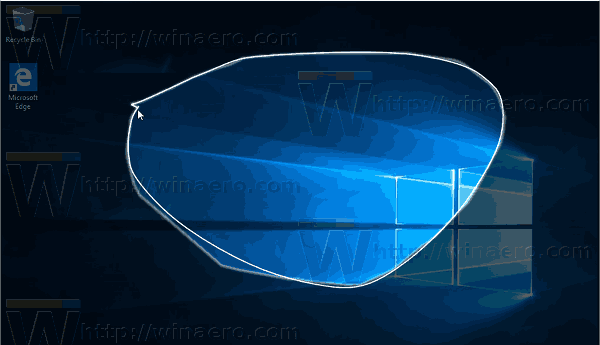
- Вырезка произвольной формы.
- Полноэкранный снимок.
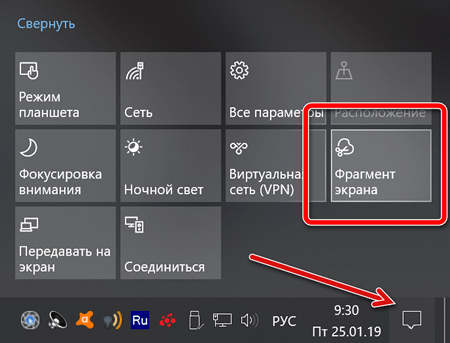
Использование быстрой кнопки Action Center
Если вы хотите сделать скриншот для вставки в документ, вы можете использовать новую кнопку Снимок экрана , выполнив следующие действия:
Откройте Центр действий.
Совет: используйте сочетание клавиш Win + A или нажмите кнопку Центра действий в области уведомлений, чтобы открыть интерфейс.
- Прямоугольная вырезка.
- Вырезка произвольной формы.
- Полноэкранный снимок.
Использование кнопки Print Screen
Если вы включили эту опцию, вы можете делать снимки экрана в Windows 10 с помощью клавиши Print Screen .
Нажмите кнопку Print Screen .
Совет. В качестве альтернативы вы можете использовать сочетание клавиш Win + Shift + S , чтобы открыть панель инструментов.
- Прямоугольная вырезка.
- Вырезка произвольной формы.
- Полноэкранный снимок.
В отличие от прямого запуска приложения Snip & Sketch, при использовании кнопки «Снимок экрана» или клавиши «Печать экрана», снимок экрана будет скопирован в буфер обмена. Если вы хотите аннотировать фрагмент или сохранить его в файл, вам нужно щелкнуть уведомления Snip & Sketch в Центре действий.
Как включить кнопку Print Screen для Snip&Sketch
Вы также можете вызывать инструмент создания скриншотов экрана, используя кнопку Print Screen на клавиатуре, но этот параметр необходимо включить вручную, выполнив следующие действия:
- Откройте Параметры.
- Нажмите на Специальные возможности .
- Откройте вкладку Клавиатура.
- В разделе «Сочетание клавиш: Print Screen» активируйте Используйте кнопку Print Screen, чтобы запустить создание фрагмента экрана .

После выполнения этих шагов вы можете нажать клавишу Print Screen на клавиатуре, чтобы сделать снимки экрана в Windows 10.
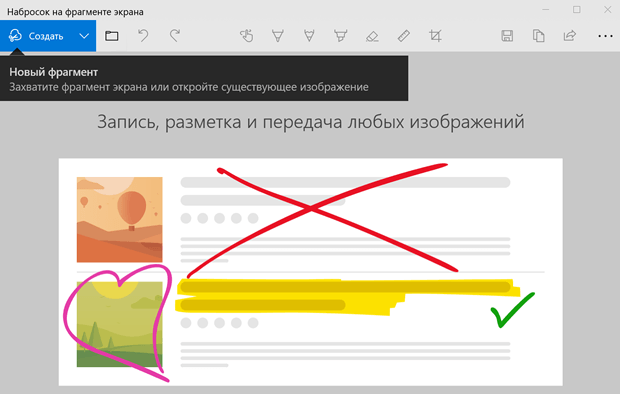
Как комментировать скриншоты Snip & Sketch
Помимо возможности быстро делать снимки экрана в Windows 10, приложение включает в себя ряд инструментов для аннотирования изображений практически любым удобным для вас способом.
После того, как вы сделали снимок экрана изображение откроется в Snip & Sketch. В процессе работы вы можете использовать ряд инструментов для комментирования скриншота, включая шариковую ручку, карандаш и маркер. Для всех вы можете настроить цвет и толщину.

Кроме того, есть ластик для удаления одной или всех надписей со скриншота. Вы можете использовать цифровую линейку для рисования прямых линий, и есть инструмент обрезки, чтобы обрезать лишнее.
Эти инструменты были оптимизированы для работы с помощью стилуса на устройстве с сенсорным экраном, но они также работают с клавиатурой и мышью.
В дальнем правом углу вы найдете варианты сохранения фрагмента в формате PNG. Вы также можете использовать кнопку копирования, чтобы скопировать изображение в буфер обмена, а затем можно вставить в любой документ.
Наконец, есть кнопка «Поделиться», которая позволяет отправлять снимки экрана другому человеку с помощью электронной почты, совместного доступа или другого поддерживаемого приложения.
How to take and annotate screenshots on Windows 10
Sometimes the easiest way to make a copy of something is to take a snapshot of your screen. While you can already capture your screen using your keyboard’s PrtScn button, you can now press Windows logo key + Shift + S to open the new modern snipping experience (also called the snipping bar), then drag the cursor over the area you want to capture.
Here are some common ways to take and annotate screenshots in Snip & Sketch on Windows 10.
Take a screenshot
Option 1: Using the Snip & Sketch app
Press the Start button and enter Snip & Sketch in the search field.
Press the New button to start snipping with the snipping bar.
The snipping bar allows you to capture the following types of snips:
Rectangular snip. Drag the cursor around an object to form a rectangle.
Free-form snip. Draw a free-form shape around an object.
Full-screen snip. Capture the entire screen.
Once you snip an area of your screen — the snipped image is added to your clipboard and you can paste it immediately in another app. A screen prompt will also allow you to annotate, save or share it using the Snip & Sketch app.
Option 2: With the Print Screen key
While the PrtScn key already captures your full screen and sends it to your clipboard, opening the snipping bar provides you with more snipping tools you can use for precise snipping. For better control of your screen capturing options, you can opt to have your PrtScn key open the new snipping bar instead of having to type Windows logo key + Shift + S.
To turn on the new snipping feature keyboard shortcut Select Start > Settings > Ease of Access > Keyboard
Option 3: With the Window logo key + Shift + S shortcut
Pressing the S key + Windows logo + Shift keys down initiates the snipping bar at any time.
Annotate snips with Snip & Sketch
Opening images for editing with Snip & Sketch
To open an image from Snip & Sketch, select Open File or drag and drop an image from apps like File Explorer or Photos in the Snip & Sketch window.
Annotating images with Snip & Sketch
Snip & Sketch provides a few tools for annotating images, namely pen, pencil and highlighter. Once you click a tool to select it, you can click it again to change its color or thickness.
The tools work better with a pen device, but they can also be used with mouse or touch if you select the Touch Writing button icon.
Use the Eraser tool to remove specific strokes or click it twice to get the option to erase all ink.
Use the ruler or protractor tools and draw straight lines or arches.
Press the ruler/protractor button again to hide the ruler/protractor
Reside or rotate the ruler/protractor by using two finger touch gestures (if the Touch Writing button is selected) or with the mouse wheel.
Use the crop tool to crop the annotated image.
To undo cropping, select the crop tool again and press Cancel to restore the image to its full original area.
Panning the view
Some of the images you annotate might be larger than the size of the Snip & Sketch window. You can use the scroll bars to pan the view, but you can also pan the view with touch input (if the Touch Writing button is not selected) or by dragging with your mouse button while holding the Ctrl key down.
Zoom in and out of screenshots to make them easier to mark up using the magnifying glass icon. You can also zoom in and out of screenshots by pressing the Ctrl key down and tapping the + or — buttons.
Sharing and saving snips
Snip & Sketch copies the annotated snip to your clipboard when you open it and every time you make edits. Snip & Sketch allows you to save the annotated image to a file, share it or open with another app, or print it on paper or to a pdf file.
Using keyboard in Snip & Sketch
While annotating is best done using a pen or mouse — Snip & Sketch provides a lot of keyboard shortcuts you can use. Access keys are activated if you press and hold the Alt key.
Take a Screenshot with Screen Snip in Windows 10
In the upcoming Windows 10 version, currently referred to as «Redstone 5», Microsoft is going to rework the built-in tools for taking screenshots. The recently released build 17661 comes with a new Screen Snip feature that has been added to Windows 10 to quickly snip and share a screenshot.
Windows 10 already includes a bunch of options for taking screenshots. I’ve covered them in the article
In short, you can use
- The Win+Print Screen hotkey
- Only the PrtScn (Print Screen) key
- The Alt+Print Screen keys
- The Snipping Tool application, which also has its own Win + Shift + S shortcut. Tip: You can also create a shortcut to capture a screen region in Windows 10.
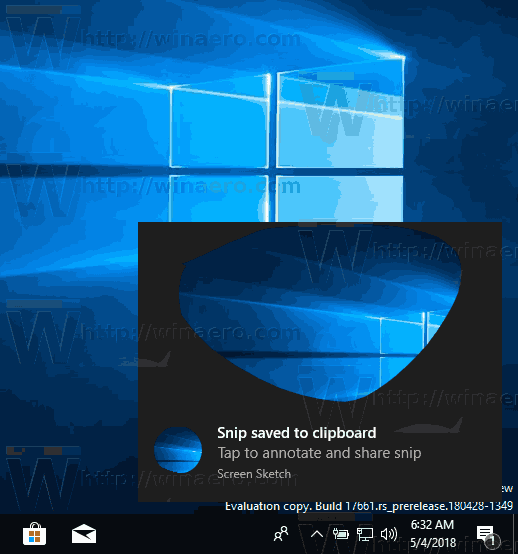
Using the new tool, you can capture a rectangle, snip a freeform area, or take a full screen capture, and copy it directly to the clipboard. Immediately after taking a snip you’ll now get a notification that will take you and your snip to the Screen Sketch app where you can annotate and share away. In the current implementation, other traditional tools available in the Snipping Tool (Delay, Window snip, and ink color, etc) are missing.
To take a screenshot with Screen Snip in Windows 10, do the following.
- Press the Win + Shift + S keys. Alternatively, you can press the Print Screen key or click on the pen tail button (if you have a pen). Finally, you can use the Screen snip quick action button in the Action Center.
- A snipping toobar will open. Select to snip a rectangle, freeform, or full screen.

- Take a snip using the desired tool.
- A notification will appear informing you that your capture is saved to the clipboard. Now you can paste it to any supported document.
That’s it.
Related articles:
Winaero greatly relies on your support. You can help the site keep bringing you interesting and useful content and software by using these options:
Share this post
About Sergey Tkachenko
Sergey Tkachenko is a software developer from Russia who started Winaero back in 2011. On this blog, Sergey is writing about everything connected to Microsoft, Windows and popular software. Follow him on Telegram, Twitter, and YouTube.
7 thoughts on “ Take a Screenshot with Screen Snip in Windows 10 ”
Cant seem to get the toolbar to show up if i hit win-shift-s the draw free form works but no toolbar
“SnippingTool.exe” has been included in windows since 7 and still works just fine in 10. I’m betting the “new” functionality is the ability to send everything you snip to M$.
I do hope that you will make the old snipping tool available for download here like you have for so many other old (non invasive) versions of windows tools.
For some reason the notification doesn’t show up, and I’m unable to download my screenshot. How do I get the notification to appear? Or does the screenshot go somewhere?
Maybe you have Focus Assist enabled?
Yeah I had the same thing had focus assist on then switched it off and it still dos’t come up with a notification
Yeah I had the same thing had focus assist on then switched it off and it still dosn’t come up with a notification
How to use Snip & Sketch to take screenshots on Windows 10 October 2018 Update

Starting with the October 2018 Update, Windows 10 is modernizing the experience to take screenshots with the new Snip & Sketch app, which combines the legacy Snipping Tool with Screen sketch (previously part of Windows Ink Workspace).
The result is a single experience to take and annotate screenshots of the desktop, apps, and games without the need for third-party tools, and an app that will be frequently updated through the Microsoft Store.
In this Windows 10 guide, we’ll walk you through the steps to get started with the new Snip & Sketch app to take screenshots with the October 2018 update.
How to take screenshots with Snip & Sketch
Using Snip & Sketch, there are at least three ways to access and take screenshots on Windows 10:
Using Snip & Sketch app
The easiest way to get to the snipping tools is to use the Snip & Sketch app with these steps:
- Open Start.
- Search for Snip & Sketch, click the top result to open the experience.
Click the New button in the top-left corner.

Select the type of snip you want to use, including:
- Rectangular Clip.
- Freeform Clip.
- Fullscreen Clip.

Using Action Center quick button
If you want to take a screenshot to paste on a document, you can use the new Screen snip button using these steps:
Open Action Center.
Quick tip: Use the Windows key + A keyboard shortcut, or click the Action Center button in the notification area to open the experience.
Click the Screen snip button.

Select the type of snip you want to use, including:
- Rectangular Clip.
- Freeform Clip.
- Fullscreen Clip.
Using the Print Screen button
If you enabled the option, you can take screenshots on Windows 10 using the Print Screen key.
Hit the Print Screen button.
Quick Tip: Alternatively, you can use the Windows key + Shift + S shortcut to open the snipping toolbar.
Select the type of snip you want to use, including:
- Rectangular Clip.
- Freeform Clip.
- Fullscreen Clip.
Unlike using Snip & Sketch app when using the Screen snip button or the Print Screen key, the screenshot will copy to the clipboard. If you want to annotate the snip or save it into a file, you need to click the Snip & Sketch notifications in Action Center.
How to enable Print Screen button to use Snip & Sketch
You can also bring up the screen snipping tool using the Print Screen button on the keyboard, but it’s an option that you need to enable manually using these steps:
- Open Settings.
- Click on Ease of Access.
- Click on Keyboard.
Under «Print Screen shortcut,» turn on the Use the PrtScn button to open the screen snipping option.
After completing the steps, you can hit the Print Screen key on your keyboard to take screenshots on Windows 10.
How to annotate screenshots with Snip & Sketch
Alongside the ability to quickly take screenshots on Windows 10, the app includes a number of tools to annotate images virtually any way you like.
Once you’ve taken the screenshot (or you can use the open (folder) button to load an image), the image will open in Snip & Sketch. While in the experience, you can use a number of tools to annotate the screenshot, including ballpoint pen, pencil, and marker. All of which you can click to customize the color and thickness.
In addition, there’s an eraser to delete one or all the strokes from the screenshot. You can use the digital ruler to draw straight lines, and there’s a cropping tool to trim the excess.
These tools have been designed to work best using a stylus on a touch-enabled device, but they also work with a keyboard and mouse.
On the far-right corner, you’ll find the options to save the snip as a PNG file. You can also use the copy button to copy the image to the clipboard, which you can then paste on any document.
Finally, there’s the share button that brings up the experience to send the screenshot to another person using email, nearby sharing, or another supported application.
Do you like the new experience to take screenshots on Windows 10? Tell us in the comments.
More Windows 10 resources
For more helpful articles, coverage, and answers to common questions about Windows 10, visit the following resources:
![]()
The Dell XPS 15 is our choice for best 15-inch laptop
For a lot of people, a 15-inch laptop is a perfect size that offers enough screen for multitasking, and in a lot of cases, some extra performance from powerful hardware. We’ve rounded up the best of the best at this size.
![]()
Halo: MCC’s live service elements make it better, not worse
Halo: The Master Chief Collection is more popular than ever, but some fans don’t agree with the live service approach 343 Industries has taken with it. Here’s why those elements are, at the end of the day, great for the game and for Halo overall.
![]()
Microsoft’s Surface Duo is not ‘failing up’
Microsoft announced this week that it was expanding Surface Duo availability to nine new commercial markets. While Surface Duo is undoubtedly a work in progress, this is not a sign of a disaster. It’s also doesn’t mean that Surface Duo is selling a ton either. Instead, the reason for the expansion is a lot more straightforward.
![]()
These are the best PC sticks when you’re on the move
Instant computer — just add a screen. That’s the general idea behind the ultra-portable PC, but it can be hard to know which one you want. Relax, we have you covered!


