- How to skip the Windows login screen using these two methods
- How to remove the login screen in Windows 10
- Solution 1: Use netplwiz
- Solution 2: Use Group Policy
- How to Install Windows 10 Without a Microsoft account
- How do I install Windows 10 without a Microsoft account?
- Complete Guide to Manage User Accounts in Windows 10
- Manage User Accounts in Windows 10
- Using Microsoft account or Local account?
- Link Local Windows 10 Account with Microsoft Account
- Some of your Apps use different email account?
- Multiple Ways to Sign-in to your Windows 10 PCs
- Require Sign-in & Privacy
- Use Work or School Account on Personal PC
- Managing Family & Guest Account
- Adding a Non-Family Member
- Removing and Disabling an Account
- Sync your Settings
How to skip the Windows login screen using these two methods


Since Windows 10 is very security-oriented operating system, it requires you to enter a password of your Microsoft account before login, just like it was the case in Windows 8.x.
But, if you’re the only person using the computer, this can become annoying over time, and you might want to start your computer automatically. So, if you belong to this category, we have a solution.
This action is actually very simple and it doesn’t require any registry hacks or tweaks, all you need to do is to change a couple of settings in your User Account.
How to remove the login screen in Windows 10
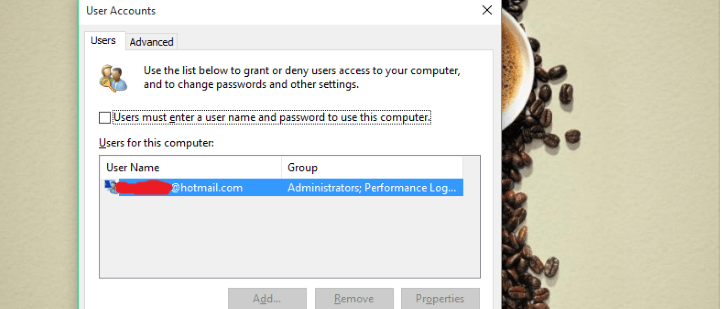
Solution 1: Use netplwiz
Here’s exactly what you need to do to prevent Windows 10 from requesting a password of your Microsoft account every time you turn your computer on:
- Go to Search, type netplwiz and hit Enter
- Uncheck Users must enter a username and password to use this computer

- Enter and repeat your password and click OK
- Restart your computer and it should sign in automatically, without requesting a password
If you change your mind and decide to turn on password request at login again, you just repeat the process, so go to netplwiz and check ‘Users must enter a username and password to use this computer’ again. Simple and easy.
We advise you to perform this action only if you’re one hundred percent sure that no one else will use your computer, because it will leave it completely unprotected, so if you’re using Windows 10 at work, keeping your computer safe is the better idea for sure.
This method also works in Windows 8, so if you’re still using that operating system, you now know how to get rid of password request at login.
Solution 2: Use Group Policy
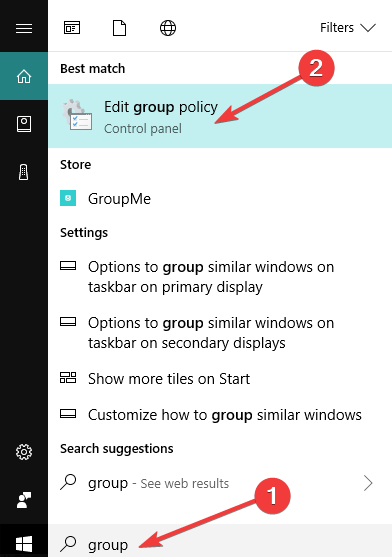
Another way to get rid of the Windows 10 login screen is to disable this feature directly from the Group Policy Editor. Here’s how to do that:
- Go to Start > type ‘group policy‘ > double click on the feature ‘Edit Group Policy‘ to launch it
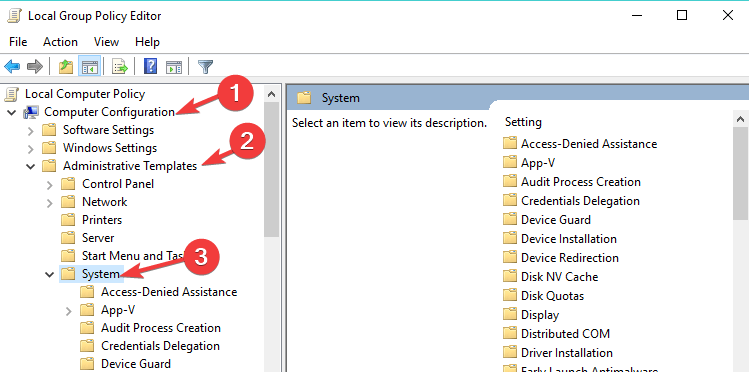
- Navigate to Computer Configuration > Administrative Templates > System
- Now, locate the option ‘Logon’ > go to ‘Don’t display the Getting Started welcome screen at logon”.
- All you need to do is enable this option and the login screen will no longer appear when you start your computer.
So, this is how you can skip the Windows 10 welcome screen when logging in.
If you have any other Windows 10-related problems, you can search for the solution in our Windows 10 Fix section.
RELATED GUIDES TO CHECK OUT:
How to Install Windows 10 Without a Microsoft account
- Windows 10 is currently the most popular OS from Microsoft.
- We will be showing you in the guide below how to install this OS on your PC even if you don’t have a Microsoft Account.
- For more handy articles like this one, visit our Windows 10 Tutorials page for more info.
- If want to learn more tips on all things PC-related, you should also check out our How-To page.
Can you install Windows 10 without a Microsoft account? The short answer is yes but you need to follow a series of specific steps to do this. We’ll list them below.
Perhaps you want to try the Windows 10 operating system for yourself but you do not want or do not need a Microsoft account to sign in with.
You will be glad to learn that you don’t really need a Microsoft account to install your Windows 10 operating system.
Read the guide below to learn exactly what you need to do in order to install Windows 10 without a Microsoft account.
Although Microsoft will not make this as easy as it should be, you can avoid signing into a Microsoft account and still install Windows 10 on your device.
Unfortunately for some users, the options you need to choose in order to install Windows 10 without a Microsoft account are not that easy to spot but you will be able to do it if you follow the instructions below.
How do I install Windows 10 without a Microsoft account?
- Place in your device the Windows 10 boot CD/DVD or external drive.
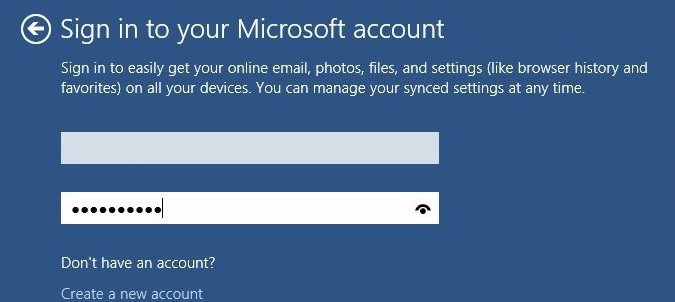
- Follow the instructions on the screen until you reach the Sign in to your Microsoft account page.
- In the Sign in to your Microsoft account page, you will see in the lower side of the screen a feature that says Create a new account.
- Left-click or tap on the Create a new account feature.
- In the Create a new account screen left click or tap on the Sign in without a Microsoft account but keep in mind that this option has almost the same purple contrast as the Create a new account window so it is a bit harder to spot.
- Note: the Sign in without a Microsoft account link is situated beneath the Country/Region box.
- From here you can go and install your Windows 10 operating system without a Microsoft account and use it as you please.
You can also install Windows 10 without using a Microsoft account by replacing your administrator account with a local account. First, sign in using your admin account, then go to Settings > Accounts > Your Info. Click on the option ‘Manage my Microsoft account’ and then select ‘Sign in with a local account instead’.
As you can see, the steps to follow are not that hard. We hope that you successfully managed to install Windows 10 without a Microsoft account. If you have any questions, you can use the comments section below and we will help you further with this particular subject.
Complete Guide to Manage User Accounts in Windows 10
Want to create a new user account on your Windows 10 PC? Manage everything about an account? Set up a PIN instead of a long password? Welcome to our Windows 10 User Account Guide 101! In this post, I am exploring all possible options around a user account, and how it can be managed. It will be helpful for those who are new or even if you are an expert, you can find things which will help you set-up another account on your PC, and manage it in every aspect.
Manage User Accounts in Windows 10
Windows 10 Settings offer a central place under Accounts settings to manage all user accounts where you can configure everything except a few settings, that we will tell you as we go ahead.
Using Microsoft account or Local account?
When installing Windows 10, the Setup process asks for a Microsoft Account or lets you create a local admin account. If you don’t remember what you did during the setup, then its time to find out everything about your account – especially if you are still using a local account.
Go to Settings > Accounts. Here you can view details of your account including Microsoft Account association, Administrator or local account, profile picture, and so on. You will have 6 sections here:
- Your info
- Email & App Accounts
- Sign-in Options
- Access work or school
- Family & Other people
- Sync your settings.
If your account is a Microsoft account (check if there is an Outlook or a Hotmail or a Live ID), then a lot of things are already sorted, but if its a Local Account, you should link it to a Microsoft Account. You can create it on the fly if you don’t have one at all. There are many reasons you should, and we will get to learn about it as we move ahead.
Link Local Windows 10 Account with Microsoft Account
So if it reads “Local Account” under your username, look for a link which says Sign in with a Microsoft Account instead. Post that you can enter your email ID, and password to link this PC and account with your MSA. It is possible that Microsoft will verify your account, new or old, with your phone number to enable features like Sync and File Settings across devices.
Linking your local Windows 10 Account with Microsoft Account (MSA) has many benefits. One of the major benefits is that it will link your Windows 10 License Key with your Account. So the next time when you install Windows 10, and sign-in with your same MSA account, it will not ask you to activate Windows. Apart from this, you need an MSA account for downloading apps from the Store as well.
Some of your Apps use different email account?
It is possible that you might have used a different email account for some of the apps or even for the Microsoft Store. While it is simple to use the same account for everything – but if it’s your choice to have another account for Store and other apps, you can add it without creating a second account.
Under Settings > Email & app accounts, you can add that account to Accounts used by other apps. This will make sure it is not connected with Outlook, Calendar, and Contacts. You will have to verify your account the usual way, including phone number verification. Once done, if your app asks which account to choose, you can select this one.
Multiple Ways to Sign-in to your Windows 10 PCs
While the most secure way to login to your Windows 10 PC is to use the complex password associated with your Microsoft account, it’s a tedious as well, especially when you lock, and unlock your PC multiple times.
Windows 10 Sign-in options page offers you option to use Windows Hello, PIN or Picture password and even Dynamic Lock options. The last option is my favorite. I have it configured with my Fitbit Ionic, and every time I move away from my PC, it locks it automatically. You can also connect to your Bluetooth headphone or even your speaker.
- A PIN is a 4 digit password which is just for the device where you set. You can have a different PIN for every Windows 10 device.
- Picture Password lets you select a picture, and draw three types of gesture on the image. These gestures become your password, but be careful that you remember where you are drawing the gestures.
- Windows Hello needs special Webcams.
This section also offers you to change your password, but remember it changes your Microsoft Account password. This means if you use it anywhere with Microsoft Services, you will have to use the new password if you change.
Read: How to obtain List, Settings & Details of all User Accounts using the command line.
Require Sign-in & Privacy
Now that your password is all set, its time to tighten up security a bit. Windows 10 Sign-in options offer you to option where you will need to enter password or pin again, in case your PC sleeps. This will make sure your PC isn’t directly accessible when it wakes up.
Go to Settings > Sign-in options > Select When PC wakes up from sleep.
Under Privacy, you can choose to hide your email address on sign-in screen and let Windows 10 remember your password for an uninterrupted update. The later is a very useful feature if you have to set to upgrade your PC overnight. This way you will save a lot of time when its time works in the morning.
Use Work or School Account on Personal PC
Many a time you would want to connect to your work or school with a dedicated account which has been assigned to you. Windows 10 has a dedicated setting for “Work Access” which lets you connect to the resources of the organization right from the home. You will need to talk to your network administrator to use the School PCs app.
Managing Family & Guest Account
We have an extensively detailed post on how you can manage your Family Accounts on a PC, there are few things you should know when you are setting up a second Windows 10 PC.
- For each Windows 10 PC, you will have to enable access by visiting Settings > Family & others.
- This will make sure all your settings and shared resources under Microsoft Family is honored.
- Child account is just like a Standard user account with more restriction when it comes to downloading games and apps.
- It’s highly recommended to not make your spouse an Administrator unless you are very confident she or he will be able to handle things.
The ability to add guest account was removed in Windows 10. Windows 10, v1607 introduced Shared or Guest PC Mode. This sets up Windows 10 Pro, Pro Education, Education, and Enterprise for limited use in certain scenarios.
Adding a Non-Family Member
If you need to let somebody access your PC, it is always a good idea to use Windows 10 Guest Account, but in case the person needs access for a longer period of time, its best to add his email id to your PC. This way he gets a standard account with restrictions.g:
- Open Settings > Accounts > Family & other People > Add someone else to this PC.
- Ask the person to sign-in with his MSA account, and he will be all set.
- You can also create a new MSA account if it becomes necessary from the same screen.
Removing and Disabling an Account
Under Family & Other people section, you can select an account you want to remove, and hit the Remove Button. If you wish to remove a family member, you will get an option to Block the person from Sign-in. This post shows how you can enable or disable a User Account.
Sync your Settings
If you wish to have the same kind of themes, language preferences, and other things on all Windows 10 devices, turn on Sync Settings.
If you read till here, and all the posts we linked in here, you now know everything about Windows 10 User Account management. If you still have a question, do let us know in the comments.


