- Top 6 Ways to Windows 10 Audio Crackling [2021 Update] [MiniTool News]
- Summary :
- Top 6 Ways to Windows 10 Audio Crackling [2021 Update]
- Way 1. Change Minimum Processor State
- Way 2. Change Sound Format
- Way 3. Disable Audio Enhancements and Exclusive Mode
- Way 4. Uninstall the Driver
- Way 5. Edit the Registry
- Way 6. Change USB Adapter
- Final Words
- ABOUT THE AUTHOR
- Fix: Audio Crackling Windows 10
- Solution 1: Changing Minimum Processor State
- Solution 2: Changing your Sound Format
- Solution 3: Uninstalling drivers
- Solution 4: Editing the Registry
- Solution 5: Disabling Audio Enhancements and Exclusive mode
- Solution 6: Purchasing a USB to 3.5mm adapter
Top 6 Ways to Windows 10 Audio Crackling [2021 Update] [MiniTool News]
By Tina | Follow | Last Updated December 29, 2020
Summary :
It is common for you to come across the error Windows 10 audio crackling or popping or other problems. The Windows 10 audio crackling error may be caused by a lot of reasons. This post from MiniTool will show you how to fix the error crackling audio Windows 10.
People may encounter the Windows 10 audio crackling or Windows 10 audio stuttering error when playing audio. In general, the Windows 10 audio crackling error may be caused because of the internal system settings. But in rare cases, the error of sound hardware of the computer would be the cause.
So, in the following section, we will show you how to fix the error Windows 10 audio crackling. If you have the same problem and do not know how to fix it, just keep on your reading.
Top 6 Ways to Windows 10 Audio Crackling [2021 Update]
Now, we will walk you through how to fix this error Windows 10 audio crackling.
Way 1. Change Minimum Processor State
The Windows 10 audio crackling error may be caused by the minimum processor state. Windows provides an integrated power saving protocol which minimized the usage of your processor so as to save energy and prolong battery life. If the processor usage lowers, the audio output is not the same so that you may come across the error Windows 10
Now, we will show you how to change the minimum processor state.
- Type Power and Sleep in the search box of Windows and choose the best-matched one.
- In the pop-up, choose Additional Power settings.
- Then you will see a lot of power plans on your computer. Select the one you are using and click Change plan settings.
- Next, click Change advanced power settings.
- Then navigate to the Processor power management and expand it.
- Select Minimum processor state.
- Change the value from 5% to 100% in both On battery and Plugged in.
- After that, save your changes.
When all steps are finished, you can check whether the error Windows 10 audio crackling is fixed.
Way 2. Change Sound Format
To solve the error audio crackling Windows 10, you can also choose to change sound format.
Now, here is the tutorial.
- Open Control Panel.
- Choose Hardware and Sound.
- Click Sound.
- In the popup window, select the audio device connected with computer and choose Properties.
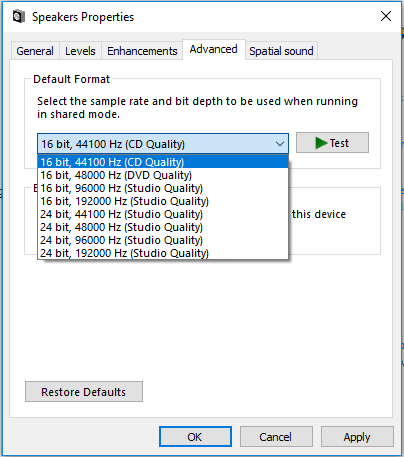
- Navigate to Advanced Expand the drop-down list under Default Format and choose CD quality to continue.
- Click Apply and Save to confirm the changes.
When all steps are finished, reboot your computer and check whether the Windows 10 audio crackling is fixed.
Way 3. Disable Audio Enhancements and Exclusive Mode
In order to fix the error Windows 10 audio crackling, you can also choose to disable audio enhancements and exclusive mode.
Now, here is the tutorial.
1. Open the audio device connected with your computer and choose Properties as the way listed above.
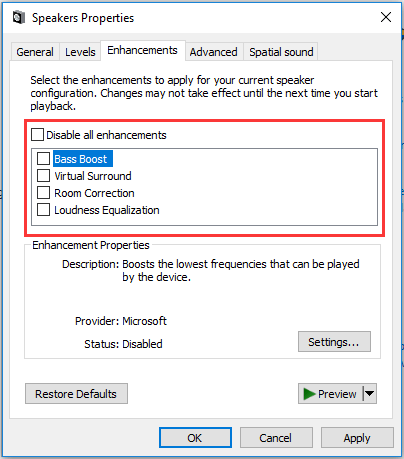
2. Then navigate to the Enhancements tab and uncheck all the enabled enhancements.
3. Next, navigate to the Advanced tab, and uncheck Allow applications to take exclusive control of this device and Give exclusive mode applications priority.

4. Then click Apply and OK to save the changes.
When all steps are finished, you can reboot your computer and check whether the Windows 10 crackling audio is fixed.
Way 4. Uninstall the Driver
If the sound drivers are not correctly installed or are outdated on your computer, the error Windows 10 audio crackling would also occur. Besides, the drivers are at the very core of your sound quality. Hence, in order to fix the audio crackling Windows 10 error, you can choose to uninstall the driver and reinstall it.
Now, here is the tutorial.
2. In the popup window, expand the Audio inputs and outputs.
3. Right-click on the Speakers driver and choose Uninstall device from the context menu.

4. Next, you will receive a confirmation message and click Uninstall.
5. After that, the Speakers driver will be removed from your computer.
6. Then restart the computer and Windows will install the default drivers for your speakers.
7. Open the Device Manager window again and select the Speakers driver again. Then choose Update drivers.
8. Next, follow the on-screen instructions to continue.
When all steps are finished, you can check whether the error Windows 10 audio crackling is fixed.
Way 5. Edit the Registry
In order to fix crackling audio Windows 10, you can choose to edit the registry to improve the sound quality.
Now, here is the tutorial.
- Press Windows key and R key together to open Run dialog, then type regedit in the box and click OK to continue.
- In the Registry Editor window, navigate to the HKEY_CURRENT_USER\Software\Realtek\RAVCpI64\Powermgnt path.
- Change the value data of Delay time to 10. Change the value data of Enabled from 0 to 1 so as to fix Windows popping sound. Change Only Battery to 1.
After that, reboot your computer and check whether the audio crackling and lagging Windows 10 error is fixed.
Way 6. Change USB Adapter
If you are experiencing Windows 10 audio crackling error on your external speakers, it might be possible that your audio jack is damaged or isn’t working as expected. Thus, you can choose to purchase a USB to 3.5mm jack. Then connect it with your computer and device and check whether the Windows 10 crackling audio is fixed.

If you own a Blue Yeti Microsoft, you may encounter the error Blue Yeti not recognized. This post shows how to fix this error.
Final Words
To sum up, this post has introduced 6 ways to fix the error Windows 10 audio crackling. If you have the same problem, try these solutions. If you have any better idea to fix audio crackling Windows 10 problem, please share it in the comment zone.
ABOUT THE AUTHOR

Position: Columnist
Tina is a technology enthusiast and joined MiniTool in 2018. As an editor of MiniTool, she is keeping on sharing computer tips and providing reliable solutions, especially specializing in Windows and files backup and restore. Besides, she is expanding her knowledge and skills in data recovery, disk space optimizations, etc.
On her spare time, Tina likes to watch movies, go shopping or chat with friends and enjoy her life.
Fix: Audio Crackling Windows 10
Users experience the Audio in their Windows 10 ‘crack’ when playing primarily because of internal system settings. In rare cases, the sound hardware of the computer is the culprit. According to use reports, the audio output was much distorted and had a specific “crackling or popping” sound whenever used. Your audio drivers might not be updated or your processor state needs changing. We will guide you step by step on how to fix all these problems and get your audio up and running in no time.
Solution 1: Changing Minimum Processor State
Your minimum processor state might be causing this issue. Windows 10 has an integrated power saving protocol which minimizes the usage of your processor in order to save energy and prolong battery life. Although this can be a plus point for most of the people, it can affect your audio quality directly. Whenever the processor usage lowers, the audio output isn’t the same and you may experience distortion and bad sound. We will try to set the minimum processor state to 100% and check if this solves the problem.
- Press Windows + S button to bring up your start menu’s search bar. Type “Power and Sleep” in the dialogue box and open the first result.

- Once in the Power and Sleep settings, select “Advanced power settings” option present at the right side of the screen.

- You will see different power plans your computer has. Select the one you are using and click “change plan settings”.
- A new window will come forward consisting of details such as when to turn off the display etc. Ignore all of this and click on “Change advanced power settings” located at the near bottom of the tab.

- Now a small window will pop up consisting of different advanced options that you can change. Navigate through them and locate “Processor power management”. From the subheadings, select “Minimum processor state”.

- Change the value from 5% to 100% in both cases (on battery and plugged in).

- Save changes and exit. Restart your computer and don’t change your computer’s power plan. Keep it where we made the changes. Now check if your audio has improved or not.
Solution 2: Changing your Sound Format
Windows has an option to change your sound quality according to your speakers. You can set CD quality, DVD quality or Studio quality. The frequencies vary in all these options accordingly. The maximum being 192000 Hz with the lowest 44100 Hz. If you don’t have high-quality speakers or the speakers don’t configure correctly, setting high sound quality can cause the popping sound in your audio. We can try changing your sound quality and checking if the problem got solved.
- Press Windows + R button to launch your Run In the dialogue box, type “Control Panel” to launch the application.
- Once in the control panel, type “sound” on the search bar present at the top right side of the screen. Open the options of sound the return in the search result.

- Once the sound options are opened, click on the audio device connected to your computer. Right click and select Properties.
- Select the Advanced tab present at the top of the screen. Here you will see a section of “Default Format”. Click it and a drop down will appear.
- Select CD quality (the first option present) and save changes.
- You might want to restart your computer even though the effects are immediate. Check if your issue is fixed.
Note: You can always try changing the sound formats to different values and keep checking if this solved your problem.
Solution 3: Uninstalling drivers
There can also be an issue of your sound drivers not properly installed or being outdated. Drivers are at the very core of your sound quality. They relay information to your speakers and are practically running your speakers and producing the sound. We can try updating them through reinstallation and checking if the problem gets solved.
- Press Windows + R button to bring up the Run application on your computer. In the dialogue box type “devmgmt.msc”. This will launch your computer’s device manager.

- All connected devices to your computer will be listed here according to a category. Click on the category of “Audio inputs and outputs”
- Right click on Speakers and select Properties.
- Click on Driver tab present at the top of the screen. Here you will see an option to uninstall your sound driver. Click it.
- Now Windows will confirm your action. After confirming the driver will be uninstalled from your system.
- Restart your PC Upon the restart, Windows will install the default drivers for your speakers.

- Head over to the sound options just like we did. Right click on Speakers and open its properties.
- Now click on the option of “Update Driver”. Windows will prompt you to either install the drivers manually or automatically. Select automatically and let Windows search and install the drivers.
- Check if your sound quality improved.
Solution 4: Editing the Registry
We can change registry settings on your computer and check if it brings any improvement to the sound quality. Your sound chipset powers down after a specified time of inactivity to save power and conserve energy. This can be the likely cause of the popping sound and the high pitched tone. You can easily configure this by editing the registry settings.
- Press Windows + R to bring up the Run application. In the dialogue box, type “regedit”. This will launch your PC’s registry so you can edit it accordingly.

HKEY_CURRENT_USER\Software\Realtek\RAVCpI64\Powermgnt
- The settings are as following:
Delay time: It is the time in seconds which triggers the powering down of the chipset. The default value is 10.
Enabled: This option enables the power management. The default value is 0. You should set it to 1 to disable and prevent the popping sounds coming.
Only Battery: If your power management is enabled, you should set this setting to 1 to disable the power management only when the laptop is plugged in. You will still be able to hear the popping sounds if your laptop is on battery.
Solution 5: Disabling Audio Enhancements and Exclusive mode
Some sound drivers use enhancements in an attempt to improve your sound quality. If these properties are not compatible or if your CPU is being overloaded a lot, this can result in some major problems. We can try disabling the audio enhancements and check the sound quality gets better. Not all sound drivers perform this function. They may have the Enhancements tab renamed as a sound blaster. In that case, we can try disabling all the effects to the audio.
Some sound drivers also have an issue with the “Exclusive mode” option which allows other applications to take full control of your sound card. This shouldn’t be a problem but it is worth a try to see if this fixed our problem.
- Press Windows + R button to launch your Run In the dialogue box, type “Control Panel” to launch the application.
- Once in the control panel, type “sound” on the search bar present at the top right side of the screen. Open the options of sound the return in the search result.
- Once the sound options are opened, click on the audio device connected to your computer. Right click and select Properties.

- Now head over to the Enhancements tab and uncheck all the enhancements enabled (you can also check the box which says “Disable all enhancements”).
- Now select the Advancedtab and uncheck the exclusive mode where applications are allowed to override the settings. Save your changes and exit.
Note: If this doesn’t bring any change you can always turn all these options back on.
Solution 6: Purchasing a USB to 3.5mm adapter
If you are experiencing popping sounds on your external speakers, it might be possible that your audio jack is damaged or isn’t working as expected. You can purchase a USB to 3.5mm jack. You plug one end of the cable into the USB slot on your computer and the end will be connected to your audio device. This way Windows will automatically detect that an external speaker is connected and we can bypass your audio jack this way.


