- Solved — How to Change Desktop Icon Spacing in Windows 10
- 1. Three Steps to Change Desktop Icon Spacing in Windows 10
- 2. Extensions: Two Ways to Resize Desktop Icon
- Desktop icon spacing
- Replies (8)
- Change Desktop Icon Spacing in Windows 10
- Change Icon Spacing on Desktop
- Windows 10 Desktop Icon Spacing Messed Up
- How to Change Desktop Icon Spacing in Windows 10?
- Steps to Change Desktop Icon Spacing (Horizontal and Vertical) in Windows 10
- About Nick
Solved — How to Change Desktop Icon Spacing in Windows 10
Is there any way to change desktop icon spacing in Windows 10? How to increase or decrease desktop icon spacing on Windows 10? Are you confused at this question? Don’t worry! This tutorial will guide you How to Change Desktop Icon Spacing in Windows 10 in detail. After reading this article, you can change the desktop icon spacing only with three simple steps!
Overview:
Attentions: Desktop icon spacing has a default value for both horizontal and vertical spacing. The default value is -1125. The parameter of icon spacing ranges from -480 to -2730. So you can select any value within this range as you want.
1. Three Steps to Change Desktop Icon Spacing in Windows 10
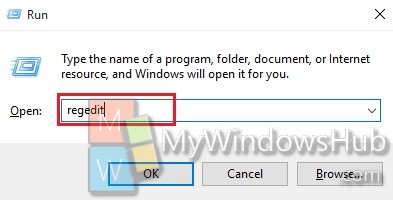
Step 1. Press Windows+R simultaneously, and then a new window is opened. Type «regedit» in the blank, and click the button of OK.
Step 2. Navigate to the following location: HKEY_CURRENT_USER> Control Panel> Desktop> WindowMetrics
To change desktop icon horizontal spacing, double click IconSpacing to modify the value. You can choose any value from -480 to -2730 (-480 represents the minimum and -2780 represents the maximum). Then tap OK.
To change desktop icon vertical spacing, double click IconVerticalSpacing. You can set any value between -480 to -2730 the same way. Tap OK to save changes.
Step 3. Log off or restart the computer, the changes would be made to the icons on the desktop.
Tips: You can set different value for the vertical and the horizontal icon spacing from -480 to -2730 according to your preference, as you may want wider or narrower icon space between the rows or columns. You can try a few more times to get your ideal desktop icon spacing.
2. Extensions: Two Ways to Resize Desktop Icon
Do you want to make your desktop icon larger or smaller? Two ways here help you resize your desktop icons easily.
Way 1. Right kick an empty space on the desktop. Select View and choose Large icons, Medium icons, or Small icons. The default one is Medium icons.
Way 2. Right kick an empty space on the desktop, select View and tick Auto arrange icons. Press Ctrl, and then slide the mouse’s roller (larger forward, smaller backward).
Tips: If you don’t tick Auto arrange icons at first, when desktop icons are resized, the arrangement of desktop icons will be disordered.
Desktop icon spacing
Replies (8)
16 people found this reply helpful
Was this reply helpful?
Sorry this didn’t help.
Great! Thanks for your feedback.
How satisfied are you with this reply?
Thanks for your feedback, it helps us improve the site.
How satisfied are you with this reply?
Thanks for your feedback.
Hey GW. I’m Greg, an installation specialist and 9 year Windows MVP, here to help you.
The easiest method: Click on Desktop, hold Ctrl button while rolling the mouse wheel (or tap + or — key) forward and back to adjust icon size and spacing.
I hope this helps. Feel free to ask back any questions and let us know how it goes. I will keep working with you until it’s resolved.
Always set a System Restore point first before editing registry: http://home.bt.com/tech-gadgets/computing/how-t.
I hope this helps. Feel free to ask back any questions and let us know how it goes. I will keep working with you until it’s resolved.
________________________________________________________
Standard Disclaimer: There are links to non-Microsoft websites. The pages appear to be providing accurate, safe information. Watch out for ads on the sites that may advertise products frequently classified as a PUP (Potentially Unwanted Products). Thoroughly research any product advertised on the sites before you decide to download and install it.
Windows MVP 2010-20
Over 100,000 helped in forums in 10 years
I do not quit for those who are polite and cooperative.
I will walk you through any steps and will not let you fail.
Change Desktop Icon Spacing in Windows 10
Be careful because you have to edit the registry
In Windows 10, there is no easy way to adjust the desktop icon spacing as we used to be able to do in Windows 7. There you could go to Personalize, choose Window Color and then click on Change advanced appearance settings.
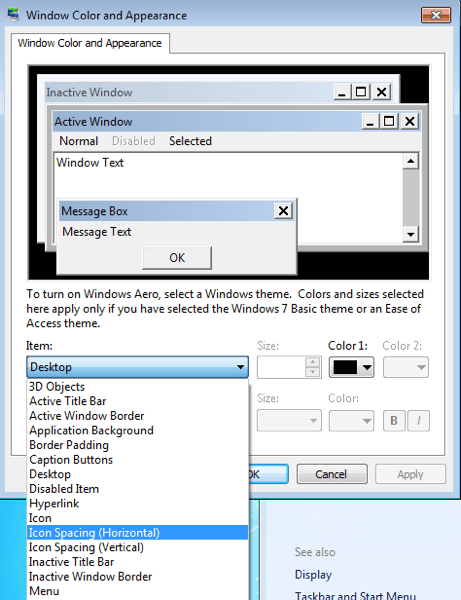
Then the dialog Window Color and Appearance box above would pop up and you could adjust all kinds of settings. Now that is gone, unfortunately, in Windows 10.
Instead, if you want to change some of these settings like Icon Spacing (Horizontal) or Icon Spacing (Vertical), you have to edit the registry!
Change Icon Spacing on Desktop
Before doing this, make sure you backup the registry in case something goes wrong. I tried it on my machine and it works pretty well. Note that you will need to sign out and sign back in after you change the values in the registry to see the changes.
You have to open the registry editor in Windows 10 by clicking on Start and typing in regedit.
Then navigate to the following registry key:
You will see two values here: IconSpacing and IconVerticalSpacing. They are defaulted to this odd number of -1125. You can adjust the horizontal spacing by changing the value of IconSpacing.
The range of values is -480 to -2730. Close to -480 will be less horizontal space and close to -2750 will be more horizontal space.
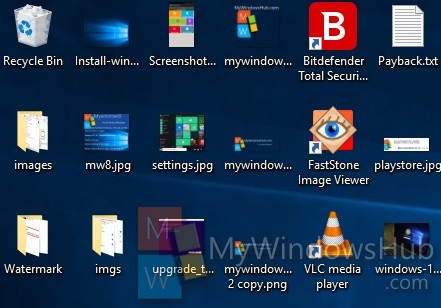
Note that this is not really the space between the icons on the desktop. It’s the space of the bounding box for the desktop icon. Here’s what I mean:
As you can see above, I have change the value of IconSpacing to -2000. This means that width of the bounding box around each icon is increased, but the actual spacing between the icon plus box is very small. So if you go to a lower value like -500, the text will actually get cut off:
For some reason, the vertical spacing key works slightly differently. It doesn’t actually increase the area of the bounding box, but instead increases the actual space between the icons. Here’s what I mean:

As you can see, the bounding boxes are all small, but the actual space between the icons has increased when I changed the value to -2000 for IconVerticalSpacing. You can also mess around with other values under the WindowMetrics key.
For example, I changed the BorderWidth to 25 instead of -15. This makes the border of any window 25 pixels! The range of values here is 0 to 50 pixels. The negative numbers is some different type of calculation method called twips that you don’t need to worry about for this setting.
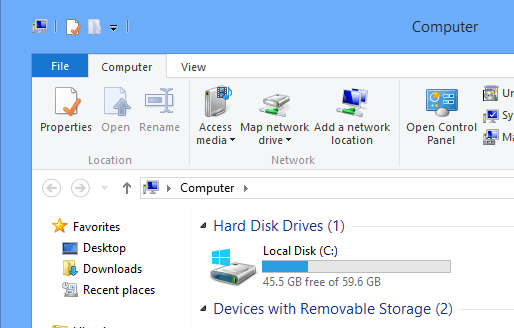
Check out my huge border in Explorer on Windows 10! Like I said, make sure you backup your system before you do this. You can tweak a lot of desktop settings here and Microsoft even has a link that tells you what each value does:
Even though Windows 10 does not provide a GUI for customizing the look and feel like Windows 7 did, you can still do it yourself via the registry and a little playing around.
If you have managed to customize something using these keys in the registry, post a comment and let us know. Enjoy!
Founder of Online Tech Tips and managing editor. He began blogging in 2007 and quit his job in 2010 to blog full-time. He has over 15 years of industry experience in IT and holds several technical certifications. Read Aseem’s Full Bio
Windows 10 Desktop Icon Spacing Messed Up
Almost a month ago I was told to download/install/update my computer with the «creators update» to fix a Skype problem, and ever since then there has been some things messing up on my computer.
Desktop spacing has been messed up and I cannot find any way to fix it: as the picture shows, there is a massive space between the icons that I can put on the lowest area on my desktop and between the task bar below it. Icon spacing in general seems to have been messed up, and it’s basically made me lose an entire row that I once had. I can only fit 21 x 8 on my main display of 1600 x 900, but my secondary monitor of 1440 x 900 is completely fine — I’m able to place icons on that lower row.
Sometimes when moving around icons they bump each other out of the way. Sometimes icons are not placed where I want them to be placed: the ‘spacing’ that is messed up prevents me from even moving some of them around at all. Sometimes when this happens, icons are placed in that lower spaced area, but I cannot see the entire icon, my task bar being in the way of it. If I move them, then I cannot place them back down in the lower area.
I have tried updating my graphics card driver. Creating a new user account does not solve this issue. Pressing Win-D, right clicking and going through the ‘view’ menu does not solve my issue. I have tried going through regedit and it does not fix this, too.
I used to have another topic on this, but the page was not loading for me, and the topic had been open since Spring, or so. The second page of the conversation does not load for me, it just has an infinite loading circle and everything is grayed out.
I forgot to mention that this has been happening ever since I was told to ‘install the creator’s update’ to fix a Skype problem. I do not know how to undo this and I do not want to have to format my computer to fix this issue.
EDIT #2
I messed around with my regedit again, and while it did ‘fix’ the problem — AFTER A SYSTEM RESTORE, wiping my entire computer clean — when I try to move icons around on my desktop now, anything on the entire bottom row of my desktop moves around no matter what icon in any position I’m trying to move. I cannot put icons on my bottom row; they refuse to go in certain spots now, or mess up the order of other icons. I am trying to put them in blank spaces, and random ones still move on their own.
EDIT #3 9/1/17
After looking up — or a link provided in this thread was given to me, I cannot access the first page to the conversation anymore due to an infinite loading screen — other people who have this issue since March 2017, I have found that the Creators Update itself IS the actual cause. I was advised in a live chat support, over an hour and a half with three different support agents ( rejoin links they provided me did not work ), that my icons messing up was due to my drivers not being compatible with the Creators Update. I can either wait, or roll back to the previous version before the Creators Update came out.
I am unable to roll back to previous versions due to not having any USB drive like I was told to use, and there is no option on my computer to roll back at all. The support agents and myself checked: there is no roll back option. Rolling back would not help regardless due to the fact that my computer updates automatically even without my permission. I told the agents this. I have every option turned off to make sure this does not happen. I cannot change my active hours for a longer period of time than 18 hours: Windows 10 does not let you anymore. The agents said nothing on this and kept telling me to roll back my computer. They said I had to make an ISO file or something, but I told them that I could not since I had no USB. They still told me to roll back.
So, my only option now is to just sit and wait for an issue to be fixed that never will be fixed. I will, at my earliest convenience, connect back with Microsoft support and see if there’s anything else they can help me with this issue at all, but I sincerely doubt it. I will continue to update and bump and post on this thread until it is fixed, or until I have to make another one.
***Post moved by the moderator to the appropriate forum topic.***
How to Change Desktop Icon Spacing in Windows 10?
The following tutorial will help you to learn how to change the desktop icon spacing, both vertical and horizontal in Windows 10. Desktop icon spacing has a default value for -1125 units for each of horizontal and vertical spacing. This spacing can be changed by tweaking specific keys in the registry Editor. The steps are very simple and you can change the value back to default anytime by applying the same process. The parameter of icon spacing runs from -480 to -2730. So you can select any value within this range.
Steps to Change Desktop Icon Spacing (Horizontal and Vertical) in Windows 10
1. press Windows+R to open Run window, type regedit and hit Enter.
2. Navigate to the following location
HKEY_CURRENT_USER\Control Panel\Desktop\WindowMetrics
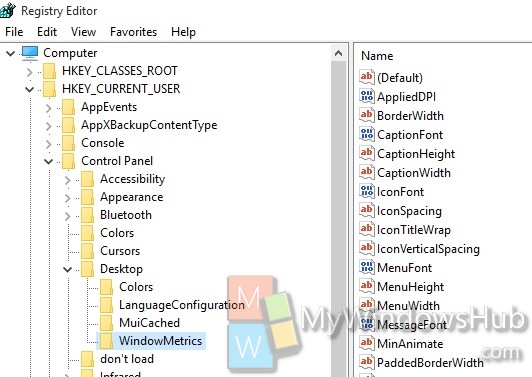
3. In the right panel, find out WindowMetrics. This is the horizontal spacing. Double click on IconSpacing to modify the value. Choose any value between -480 to -2730 where -480 represents the minimum spacing and -2780 represents the maximum spacing.
4. Now the vertical spacing is same as step 4. All you need to do is double click on IconVerticalSpacing. Now set any value between -480 to -2730. Tap OK to save changes. The icon spacing is thus changed.
5. Reboot the computer to save the changes.
About Nick
Nick is a Software Engineer. He has interest in gadgets and technical stuffs. If you are facing any problem with your Windows, feel free to ask him.


