- Настройка наушников на компьютере с Windows 10
- Процедура настройки наушников
- Способ 1: Управление аудиокартой
- Способ 2: Штатные средства ОС
- Заключение
- No sound from headphones in Windows 10? Try these solutions
- What can I do if I’m getting no sound from my headphones?
- 1. Use the Troubleshooting tool
- 2. Check if the audio driver is updated
- DriverFix
- 3. Set default speakers and test the sound
- 4. Solve the audio problems in the Device Manager
- 5. Restore your computer
- 6. More General Fixes
- Run a System Scan to discover potential errors
- 1. Change the default sound format
- 2. Roll back your headphones driver
- 3. Disable all audio enhancements
- 4. Disable Exclusive mode
- 5. Use Sound Troubleshooter
- 6. Restart Windows Audio service
- 7. Perform a SFC scan
Настройка наушников на компьютере с Windows 10
Процедура настройки наушников
В десятой версии Виндовс отдельное конфигурирование устройств вывода звука обычно не требуется, но эта операция позволяет выжать максимум из возможностей наушников. Проделать её можно как посредством интерфейса управления звуковой картой, так и системными средствами. Давайте разберёмся, как это делается.
Способ 1: Управление аудиокартой
Как правило, диспетчер карты вывода звука предоставляет возможность более тонкой настройки, чем системная утилита. Возможности данного инструмента зависят от типа установленной платы. В качестве наглядного примера воспользуемся популярным решением Realtek HD.
- Вызовите «Панель управления»: откройте «Поиск» и начните набирать в строке слово панель, после чего кликните левой кнопкой мыши по результату.

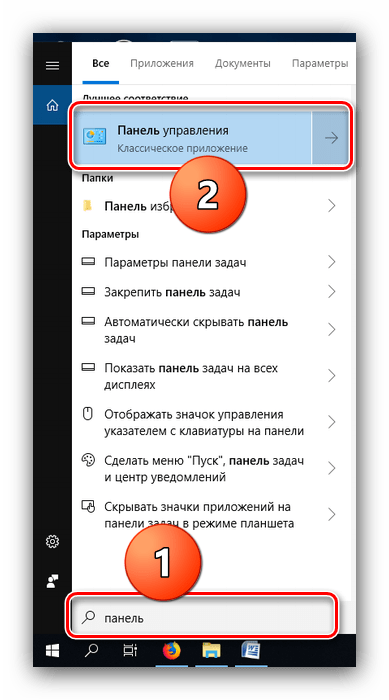
Подробнее: Как открыть «Панель управления» на Windows 10
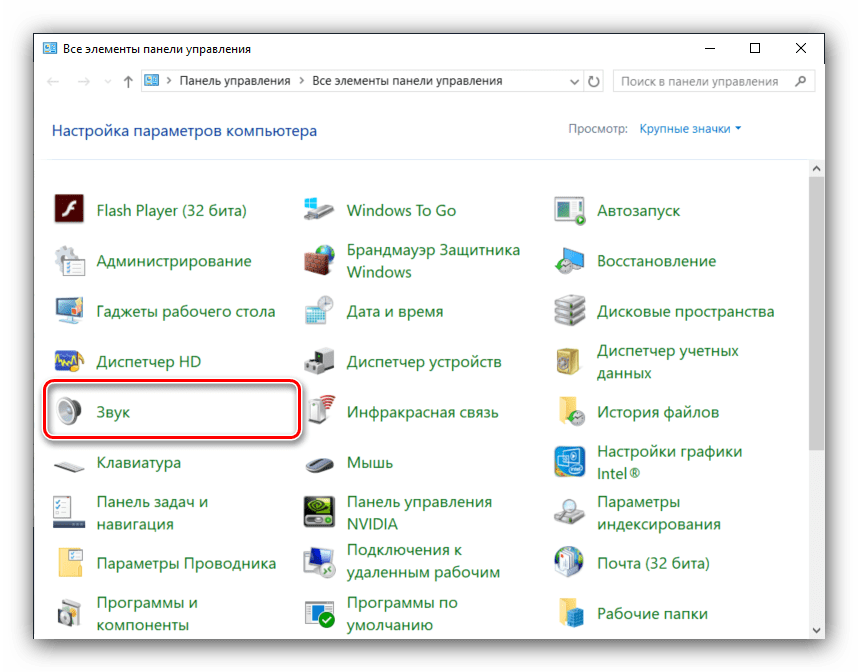
Переключите отображение значков «Панели управления» в режим «Крупные», после чего найдите пункт под названием «Диспетчер HD» (может также называться «Диспетчер Realtek HD»). 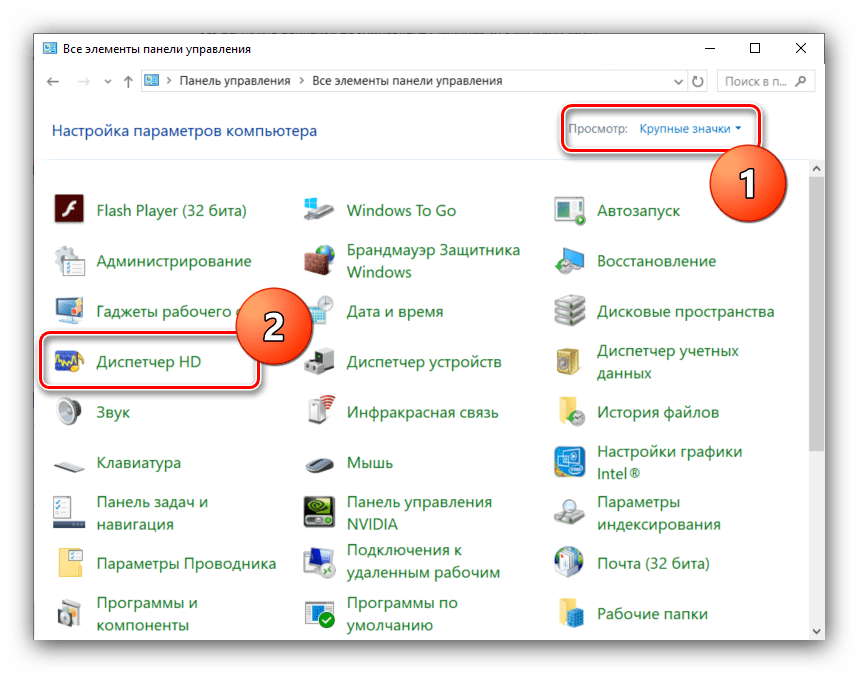
Читайте также: Скачиваем и устанавливаем звуковые драйвера для Realtek
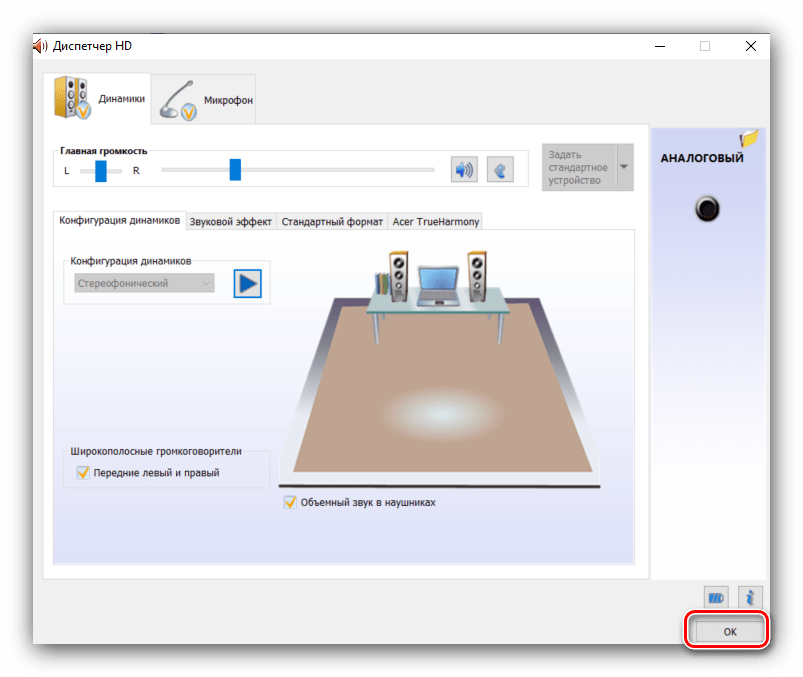
Настройка наушников (равным образом как и колонок) производится на вкладке «Динамики», открытой по умолчанию. Основными параметрами являются установка баланса между правым и левым динамиками, а также уровень громкости. Маленькая кнопка с изображением стилизованного человеческого уха позволяет установить ограничение максимальной громкости для защиты слуха. 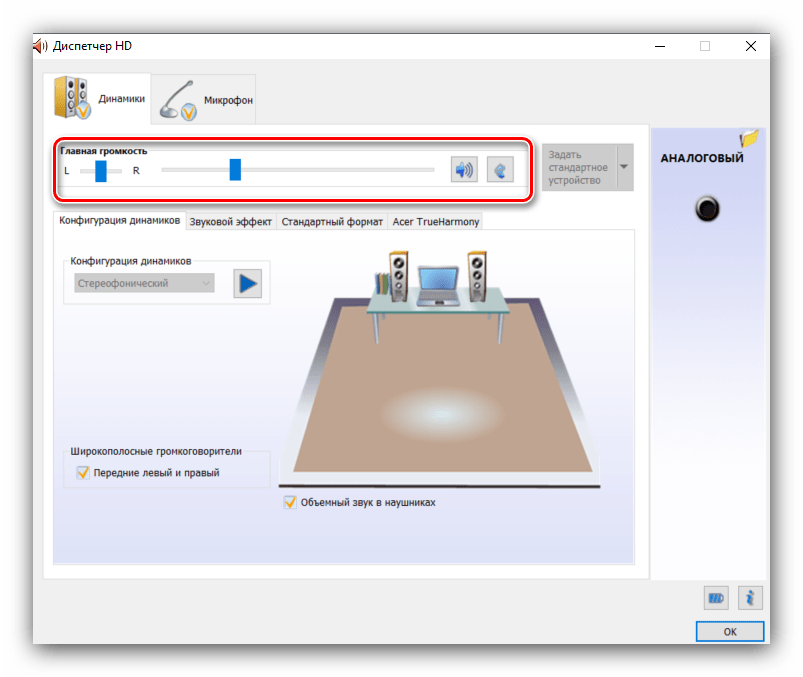
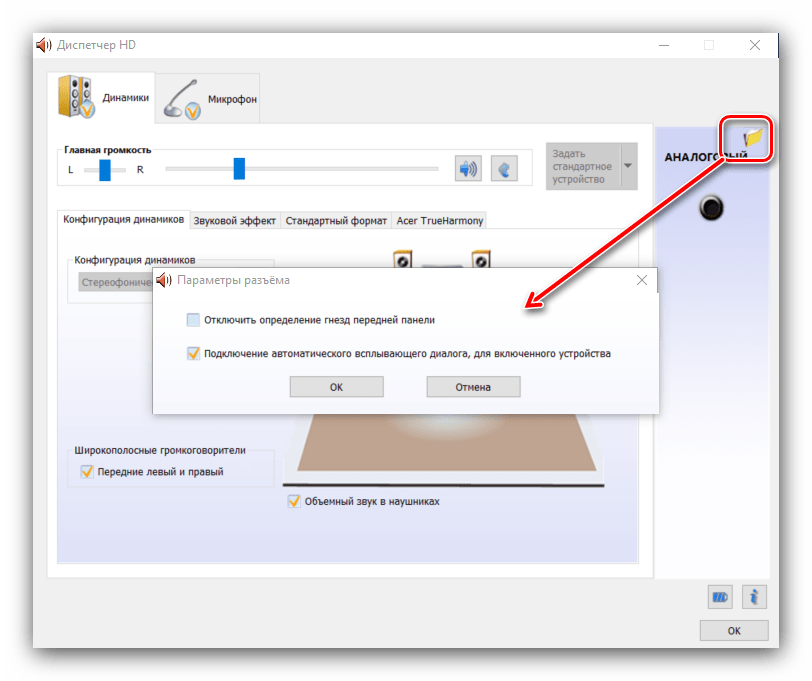
В правой части окна находится настройка разъёма — на скриншоте отображена актуальная для ноутбуков с совмещённым входом для наушников и микрофона. Клик по кнопке с иконкой папки вызывает параметры гибридного звукового порта.
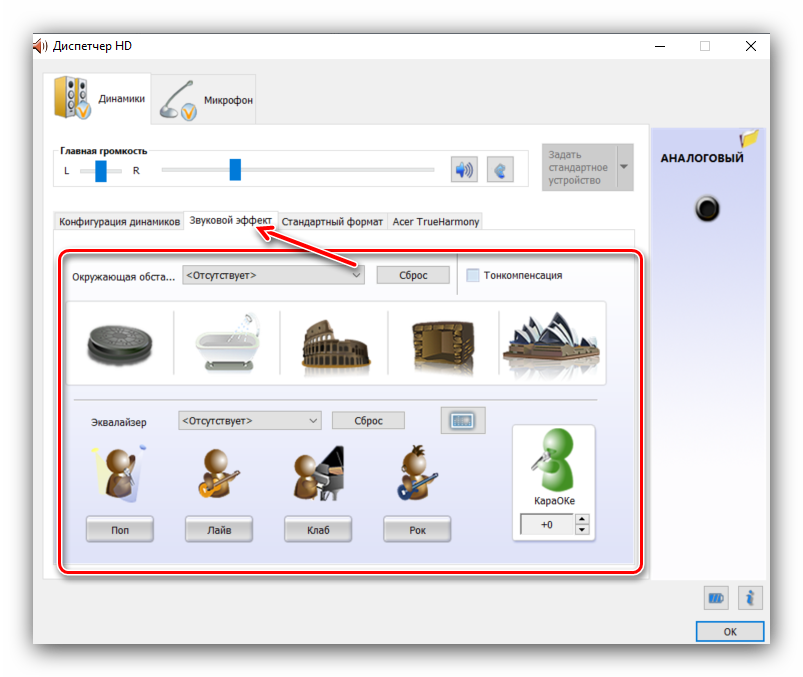
Вкладка «Звуковой эффект» содержит в себе настройки эффектов присутствия, а также позволяет воспользоваться эквалайзером как в виде пресетов, так и путем изменения частоты в ручном режиме.
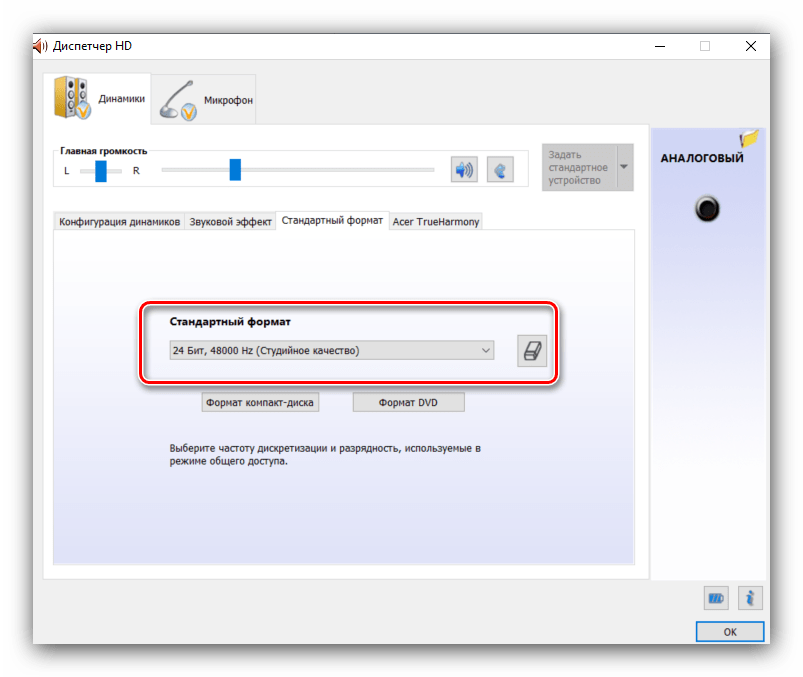
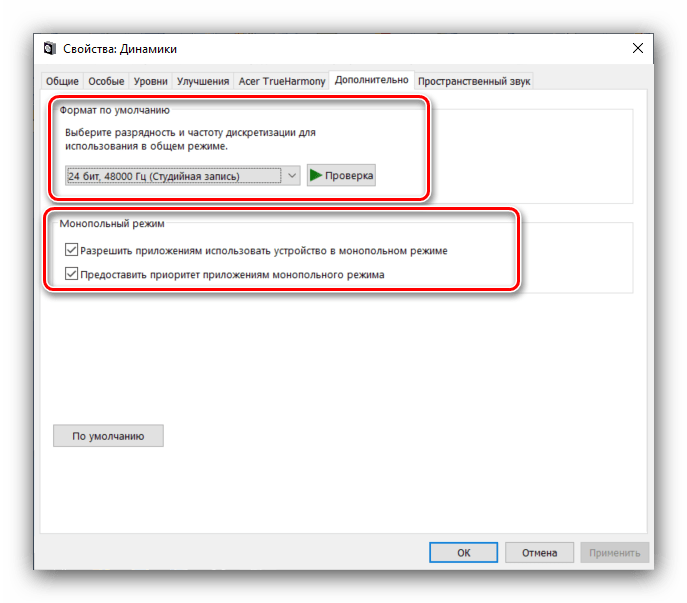
Пункт «Стандартный формат» пригодится меломанам: в этом разделе можно установить предпочитаемую частоту дискретизации и разрядность воспроизведения. Наилучшее качество получается при выборе варианта «24 бит, 48000 Гц», однако не все наушники могут его адекватно воспроизводить. Если после установки этой опции вы не заметили улучшений, имеет смысл выставить качество пониже для экономии ресурсов компьютера.
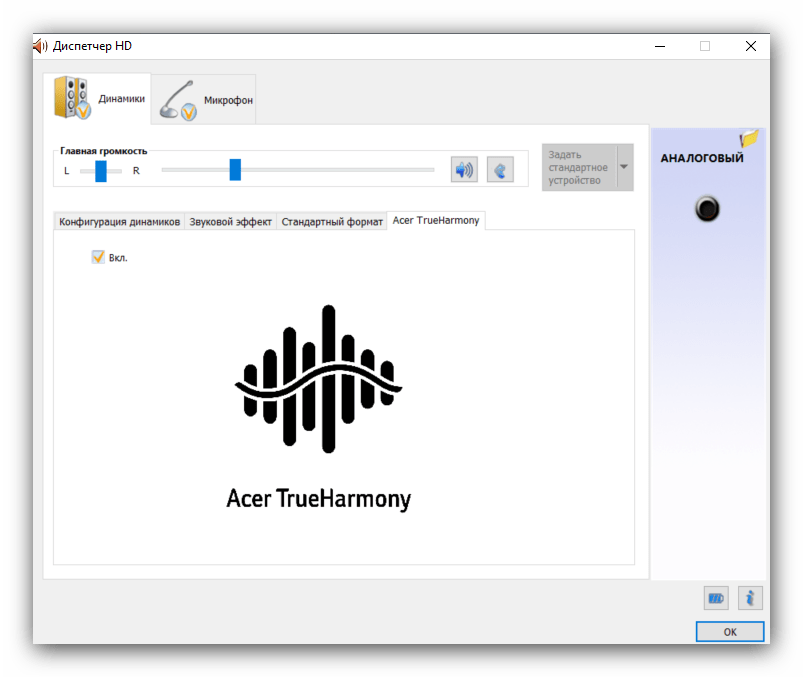
Последняя вкладка специфична для разных моделей ПК и ноутбуков, и содержит в себе технологии от производителя устройства.
Отдельные звуковые карты предоставляют собственное ПО, но ничем принципиальным оно не отличается от диспетчера аудиооборудования Realtek.
Способ 2: Штатные средства ОС
Простейшую настройку звукового оборудования можно произвести как с помощью системной утилиты «Звук», которая присутствует во всех версиях Виндовс, так и с помощью соответствующего пункта в «Параметрах».
«Параметры»
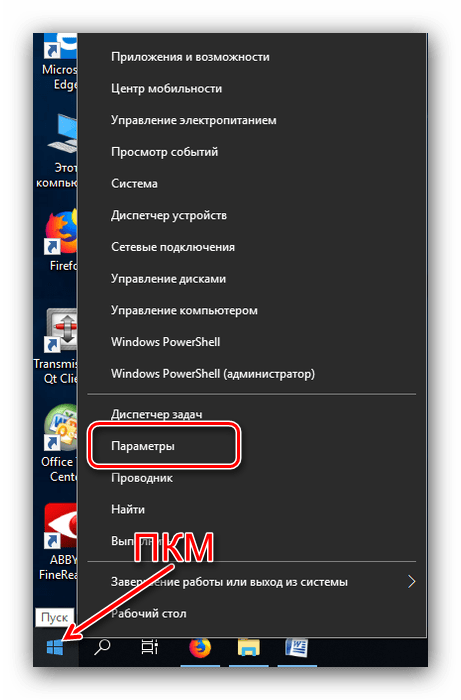
- Открыть «Параметры» проще всего с помощью контекстного меню «Пуска» – наведите курсор на кнопку вызова этого элемента, кликните правой кнопкой, затем щёлкните левой по нужному пункту.
Читайте также: Что делать, если не открываются «Параметры» в Windows 10
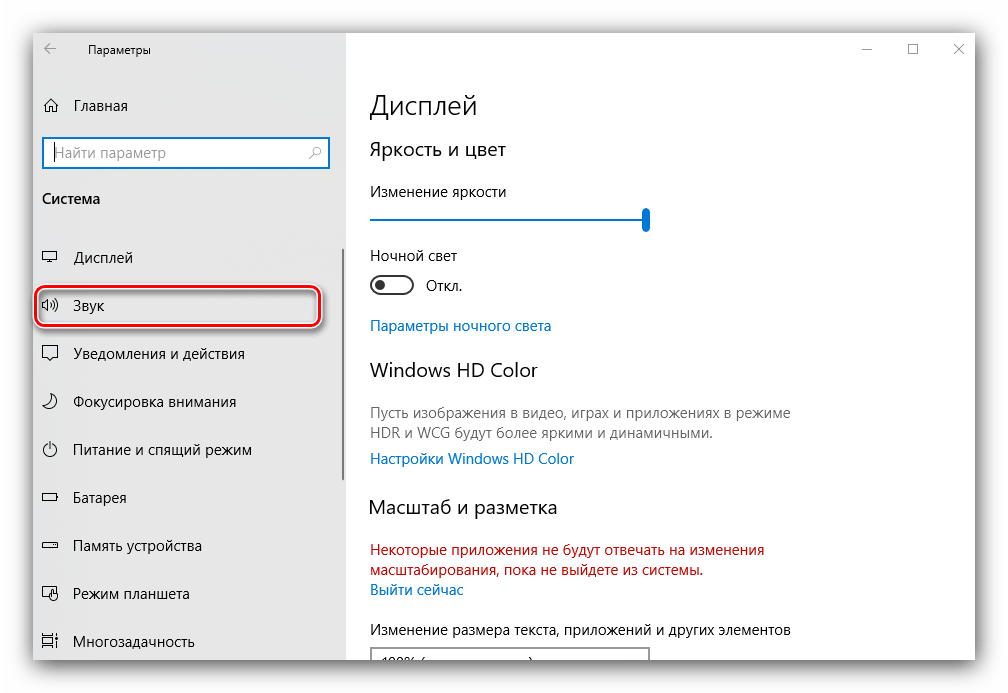
В главном окне «Параметров» кликните по варианту «Система».

Затем с помощью меню слева перейдите к пункту «Звук».
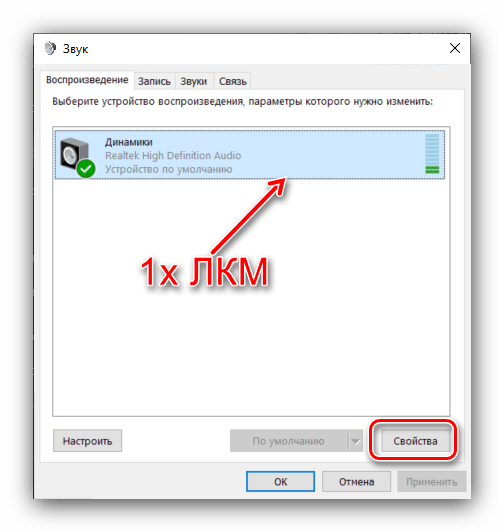
Настроек здесь на первый взгляд немного. Первым делом из выпадающего списка сверху выберите ваши наушники, затем кликните по ссылке «Свойства устройства».
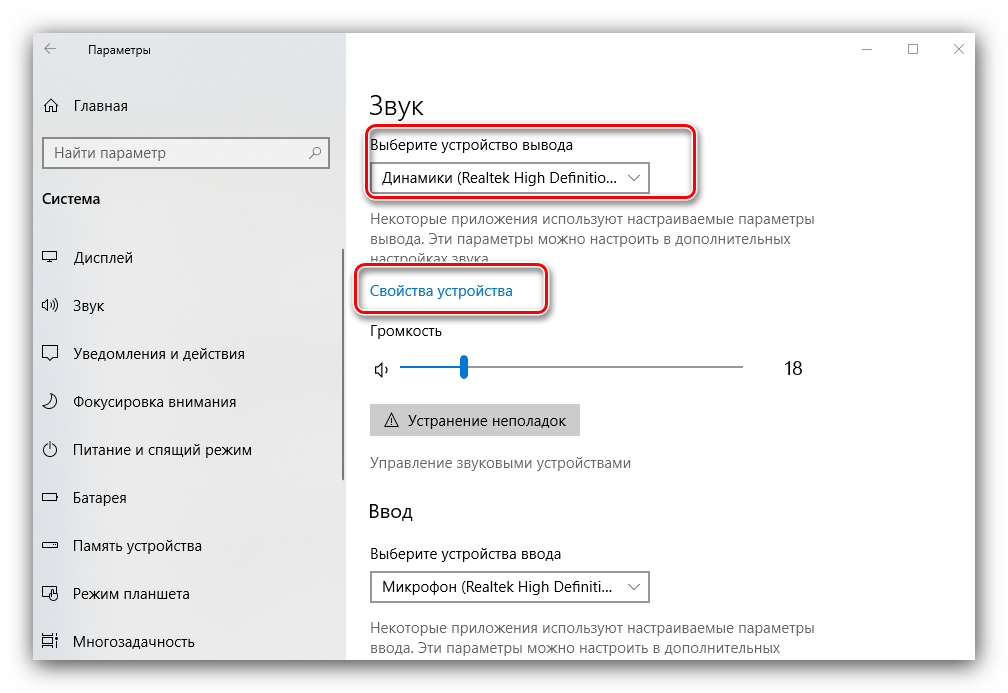
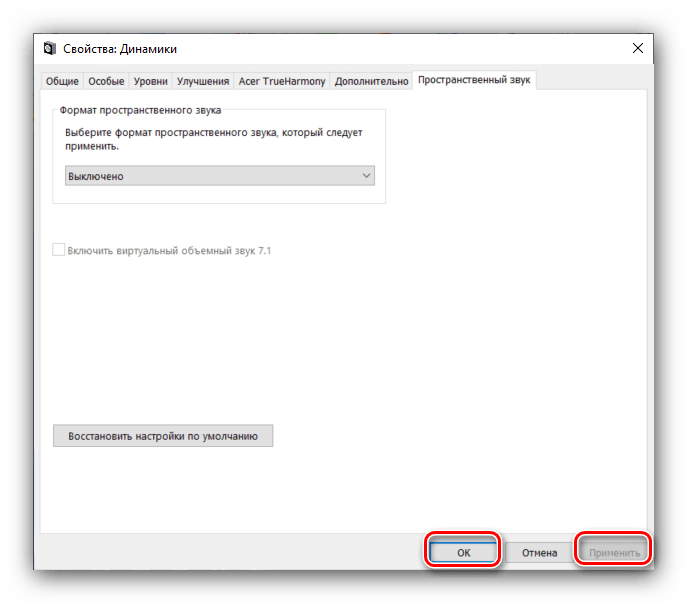
Выбранное устройство можно переименовать или отключить, отметив чекбокс с наименованием этой опции. Также доступен выбор движка пространственного звука, который может улучшить звучание на дорогих моделях.
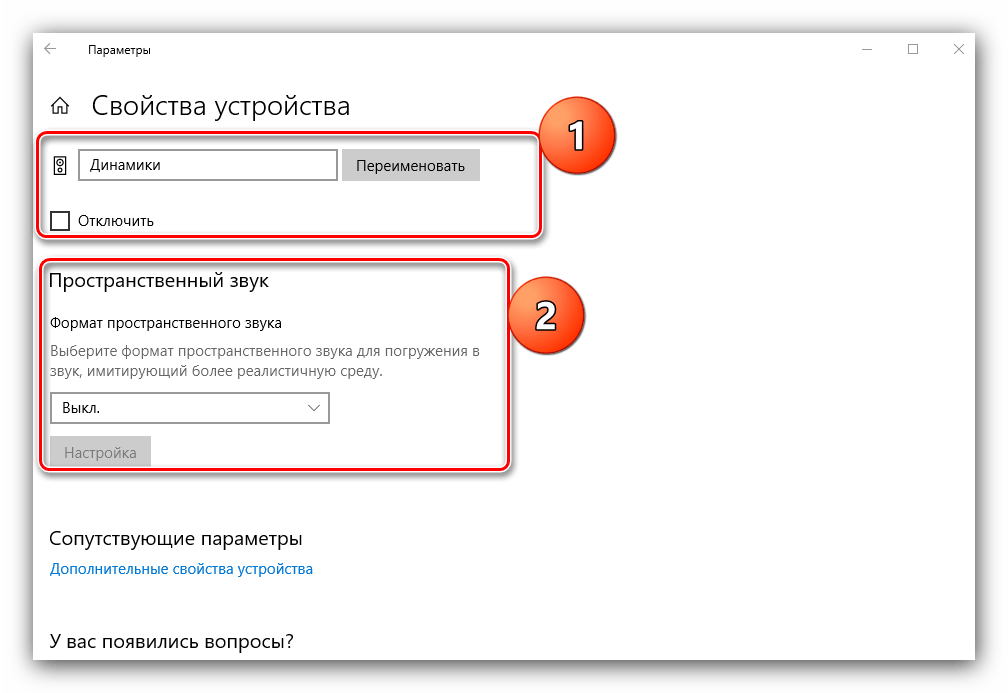
Самый важный пункт находится в разделе «Сопутствующие параметры», ссылка «Дополнительные свойства устройства» — кликните по ней. 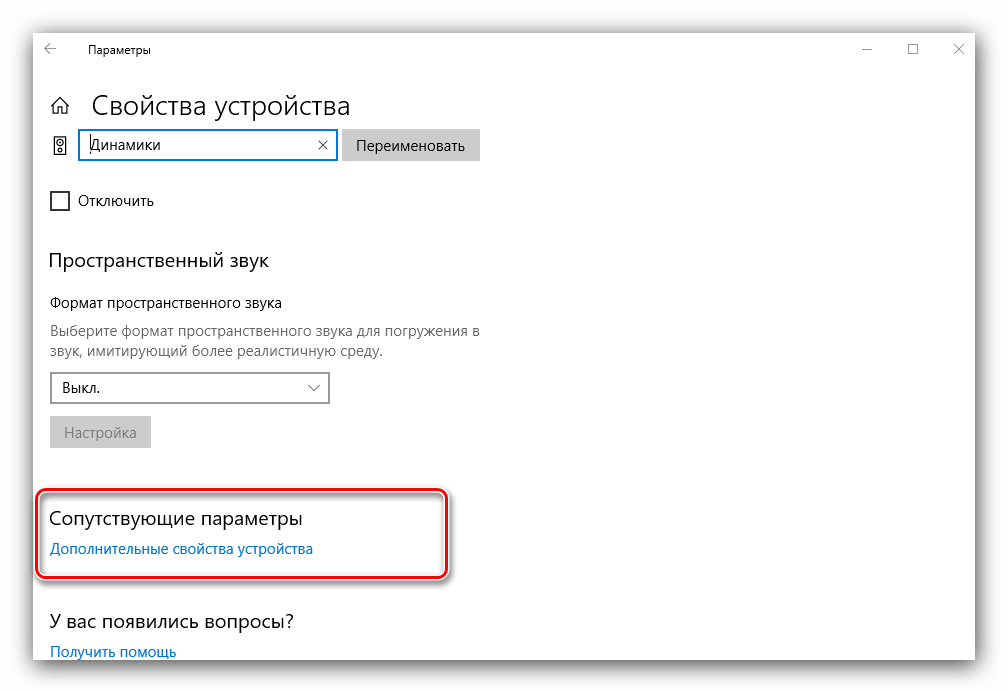
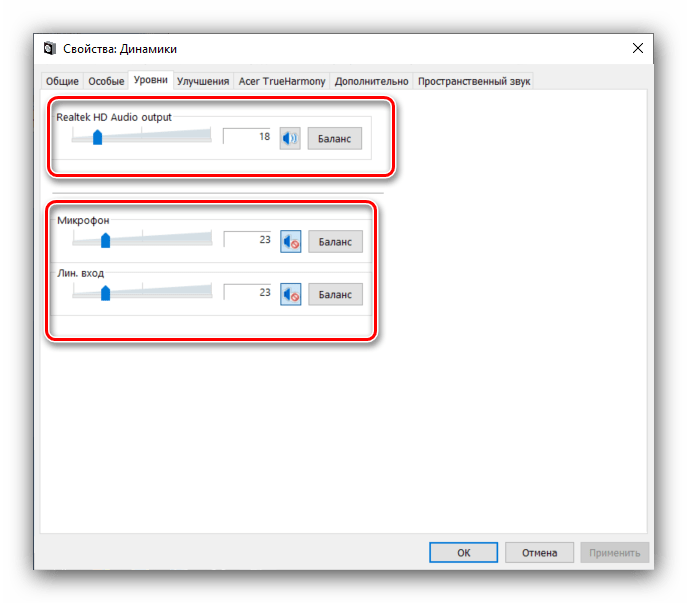
Откроется отдельное окошко свойств девайса. Перейдите ко вкладке «Уровни» – здесь можно задать общую громкость вывода наушников. Кнопка «Баланс» позволяет отдельно настроить громкость для левого и правого каналов.
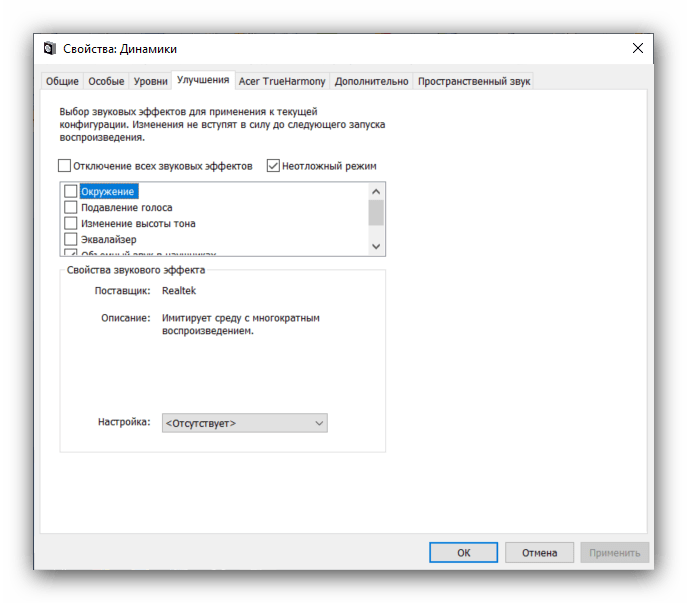
Следующая вкладка, «Улучшения» или «Enhancements», выглядит по-разному для каждой модели звуковой карты. На аудиокарте Realtek настройки имеют следующий вид.
Раздел «Дополнительно» содержит уже знакомые нам по первому способу параметры частоты и битности выводимого звука. Однако в отличие от диспетчера Реалтек, здесь можно прослушать каждый вариант. Кроме того, рекомендуется отключить все опции монопольного режима.
«Панель управления»
- Подключите наушники к компьютеру и откройте «Панель управления» (см. первый способ), но на этот раз найдите пункт «Звук» и перейдите в него.
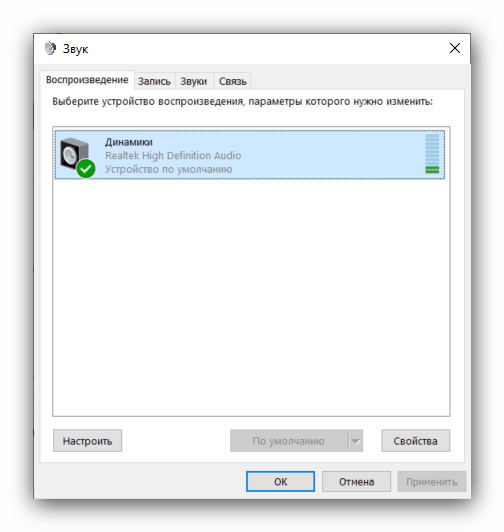
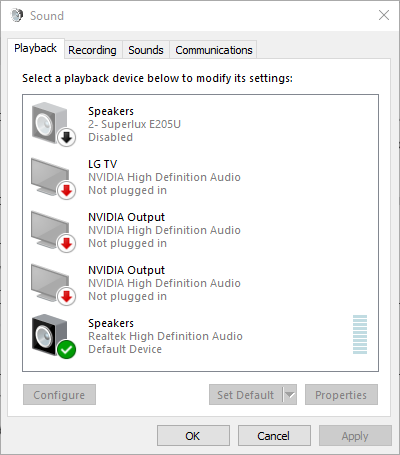
Убедитесь, что ваши наушники установлены как устройство по умолчанию – под их наименованием должна отображаться соответствующая надпись. Если таковая отсутствует, наведите курсор на позицию с девайсом, нажмите правую кнопку мыши и выберите вариант «Использовать по умолчанию».
Заключение
Мы с вами рассмотрели методы настройки наушников на компьютерах под управлением Windows 10. Подводя итоги, отметим, что некоторые сторонние приложения (в частности, музыкальные проигрыватели), содержат в себе настройки наушников, которые не зависят от системных.
No sound from headphones in Windows 10? Try these solutions

- If you are experiencing no sound from your headphones on Windows 10, it is probably due to your sound drivers.
- Using the Windows troubleshooting tool will fix the sound not coming through your headphones on Windows 10.
- Make sure that you have the latest sound drivers installed. Try using a third-party driver updater to make things easier.
- You can solve any audio problems by checking your sound settings through the Device Manager.

- Download Restoro PC Repair Tool that comes with Patented Technologies (patent available here).
- Click Start Scan to find Windows issues that could be causing PC problems.
- Click Repair All to fix issues affecting your computer’s security and performance
- Restoro has been downloaded by 0 readers this month.
Microsoft has confirmed that after installing certain updates, some Windows users had problems with sound on their computers.
If you’re among one of these users, don’t worry, here are some solutions for your problem with no sound in your headphones.
Various factors could cause this problem, so we put a couple of solutions on the table, as we hope some of them will help.
What can I do if I’m getting no sound from my headphones?
1. Use the Troubleshooting tool
- In the search section type find and fix audio.
- Choose Find and fix audio playback problems in the Search results.
- Click Next.
- Select the device you want to troubleshoot, in this case, your headphones and click Next.
- Wait a couple of minutes until the troubleshooter detects problems and makes changes.
- When the troubleshooter is done, the Troubleshooting has completed page will display with all found problems listed, as well as the list with changes that were made to the system. If you want to get detailed information about the troubleshooting, click View detailed information.
- Click Close.
- If a recommended action displays, select Apply this fix or Skip this step to continue to search for other problems.
- If your problem has not been resolved, continue to manually troubleshoot using the rest of this document.

The Troubleshooting feature is a tool that can automatically fix common problems in your system, such as audio.
Although it can’t fix every problem, it is recommendable to run the Troubleshooting tool just in case, before performing other operations.
2. Check if the audio driver is updated
- Press the Windows Key.
- Go to the Device Manager.
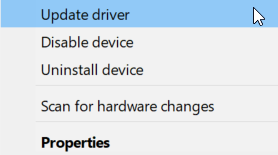
- Find your speakers and right-click on them.
- Select Update driver.
An updated audio driver might resolve the problem if the computer is experiencing sound problems after upgrading the operating system to Windows 10.
One of the first things everyone is going to tell you to do is to check if your audio drivers are up to date. Outdated drivers often cause various problems, and the case is the same with speakers.
Update drivers automatically
Updating drivers manually is very annoying, so we recommend you to download a third-party driver updater to do it automatically for you.
Thus, you will prevent file loss and even permanent damage to your computer by constantly having the latest available drivers installed.
DriverFix
3. Set default speakers and test the sound
- In search, type sounds and select Change system sound in the Search results.
- In the Sound section, click on the Playback tab and then select your headphones. Click the Set Default button. If you have only your speakers connected to your computer, and no other playback device, they will be set to default automatically.
- With the default Playback Device selected, click the Configure button.
- Click your speaker setup in Audio channels.
- Click the Test button to play sound with your device, or click an individual speaker to play sound with it.
After you finished using the Troubleshooting tool, get the system speakers back to default.
If you correctly hear the sound in your headphones, you’re all done. If the sound is still missing, try to finish your configuration setup. Click Next and follow further on-screen instructions.
If you still didn’t solve your problem with sound, don’t get mad, there’s still something you can do.
4. Solve the audio problems in the Device Manager
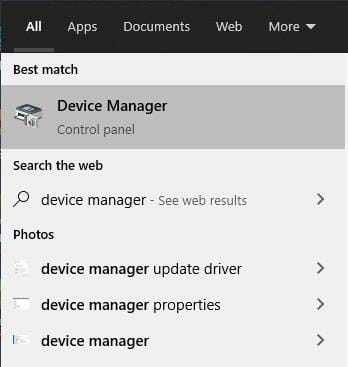
- Right-click on This PC and go to Device Manager. You can also access Device Manager from search, by typing device manager into it.
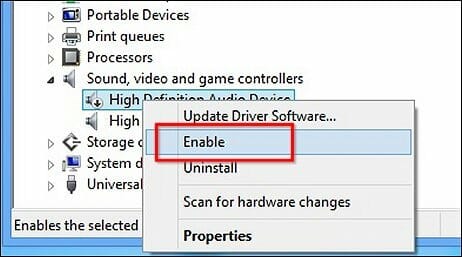
- In Device Manager, open Sound, video and game controllers.
- Do the following, depending on what displays:
- If your headphones are displayed with a down arrow, the device is disabled. Right-click the name of your headphones and select Enable , to re-enable them.
- If your headphones are listed, right-click on the name of the device and select Properties to view more information about the device, in order to solve your problem easier.
- If the Device Status says that the headphones are connected correctly, the problem probably lays in the sound settings or cables.
Maybe you somehow disabled your headphones or something like that. In that case, you’ll have to go to Device Manager and perform a couple of actions.
5. Restore your computer
- Click the Start button, and search System Restore.
- Follow the instructions in the installation wizard.
- Choose a restore point and restore your system.
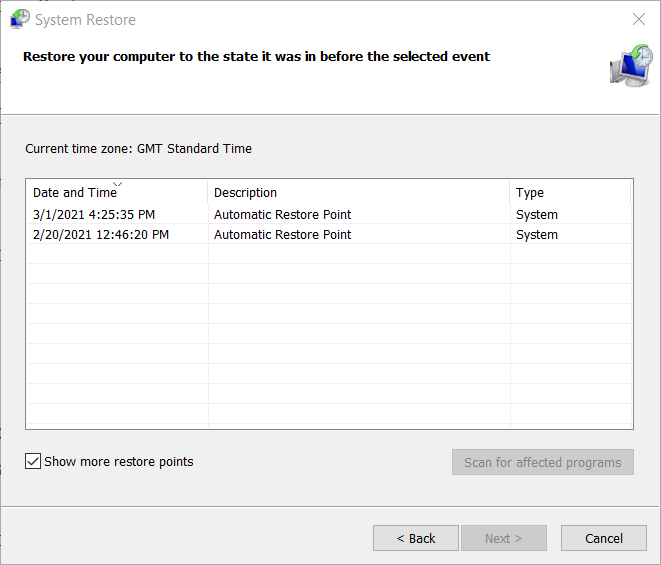
If you tried all of these troubleshooting steps, and sound on your headphones still doesn’t work, try restoring your computer.

6. More General Fixes
Run a System Scan to discover potential errors


Here are some additional problems and error messages that can cause sound problems in Windows 10, so we prepared a couple of more solutions for you.
- Windows 10 headphones not showing up in playback devices
- Windows 10 headphones not plugged in
- Windows 10 headphones and speakers at the same time
- Realtek headphone driver
- Headphones do not show up in playback devices
- Headphones not detected
- Windows 10 headset mic not working
- Windows 10 doesn’t work with headphones
1. Change the default sound format
- Right-click on the speaker icon in the taskbar and go to Playback Devices.
- Open your default playback device by double-clicking on it (it has a green tick mark next to it).
- Go to the Advanced tab.
- Now just change default sound format from the dropdown menu (experiment a little, because these settings aren’t the same for all).
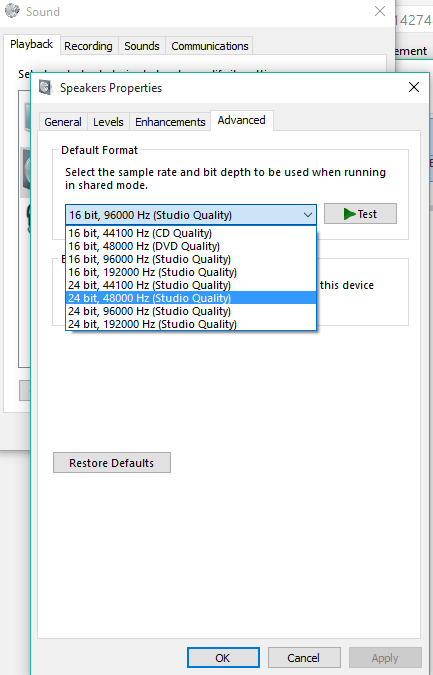
This is actually the most common issue which causes the disappearance of sound from your speakers or headphones. If your default sound format is wrong, you just won’t be able to play any sound on your computer.
So, all you need to do is simply change the sound format and everything should work fine.
2. Roll back your headphones driver
- Right-click on the speaker icon in the taskbar and go to Sounds.
- Then, go to Playback Devices.
- Open your default playback device by double-clicking on it.
- In the General tab, under Controller information, go to Advanced.
- Go to Driver tab.
- And now go to Roll back driver.
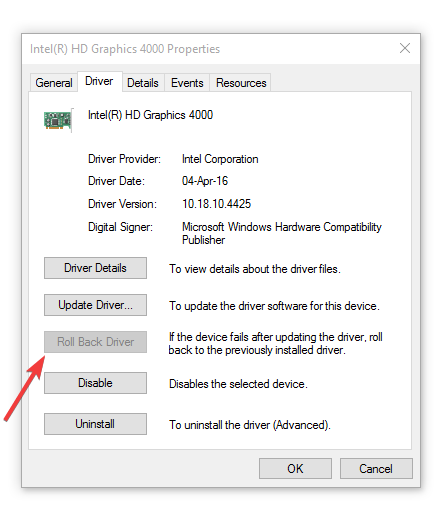
We told you at the beginning of the article to update your sound driver, but maybe the solution is exactly the opposite.
If you’re using an older version of the sound card, its latest driver may not be compatible with Windows 10, so you can try rolling back to the previous version, which worked.
Many users had no sound after updating Realtek driver. Check this quick article out for some quick tips to solve the problem!
3. Disable all audio enhancements
- Right-click the sound icon in the taskbar.
- Click Playback Devices.
- Double-click your current playback device (headphones).
- Go to the Enhancements tab, and click Disable all sound effects.
- Restart your computer
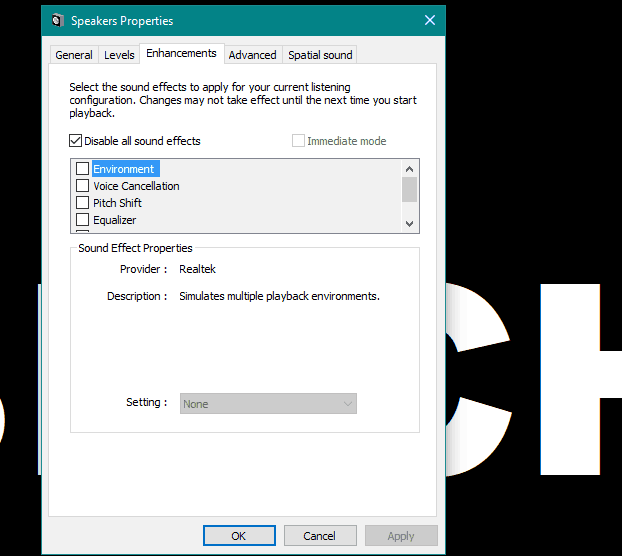
Another solution that might come in handy, and that a few users actually said to be useful is disabling audio enhancements.
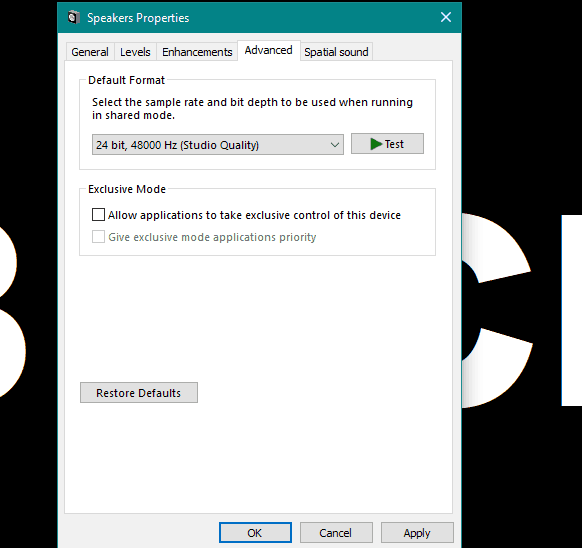
4. Disable Exclusive mode
- Right-click the sound icon in the taskbar.
- Click Playback Devices.
- Double-click your current playback device (headphones).
- Head over the Advanced tab.
- Under the Exclusive Mode section, disable Allow applications to take exclusive control of this device .
- Now click on Apply and OK to save changes.
5. Use Sound Troubleshooter
- Go to the Settings app.
- Go to Update & Security >Troubleshoot.
- Click Playing Audio, and go to Run the troubleshooter.
- Follow further on-screen instructions.
- Restart your computer.

Users can always benefit from this troubleshooting tool to resolve various system-related problems, including the headphone sound issue.
6. Restart Windows Audio service
- Go to Search, type services.msc, and open Service.
- Find the Windows Update service.
- If this service is not enabled, right-click it, and select Start.
- If it’s enabled, right-click it and select Restart.
- Wait for the process to finish.
- Restart your computer.
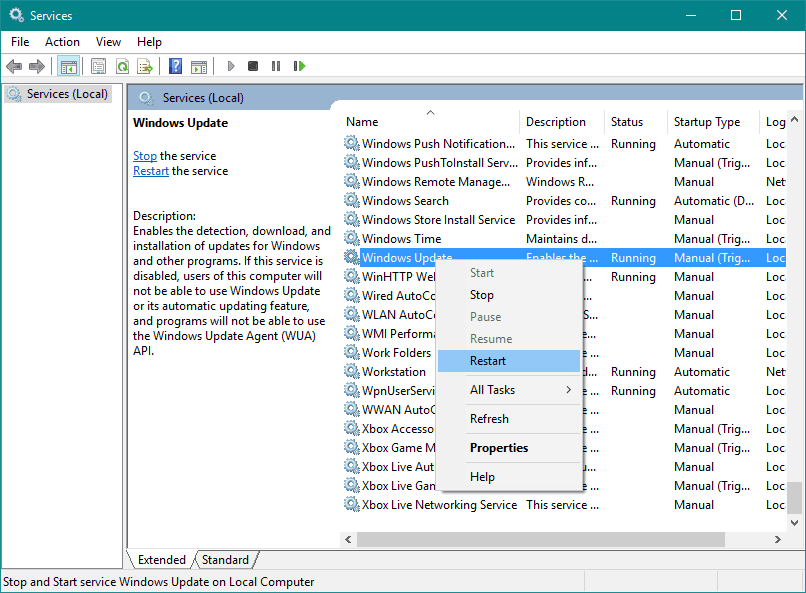
There’s a chance Windows’ default audio service got disrupted, and that exactly what blocks the sound from your headphones. So, we’re going to restart this service, and see if it has any positive effects.
7. Perform a SFC scan
- Go to Search, type cmd, right-click Command Prompt, and select run As Administrator.
- Enter the following command, and press Enter: sfc/scannow
- Wait for the process to finish.
- Restart your computer.
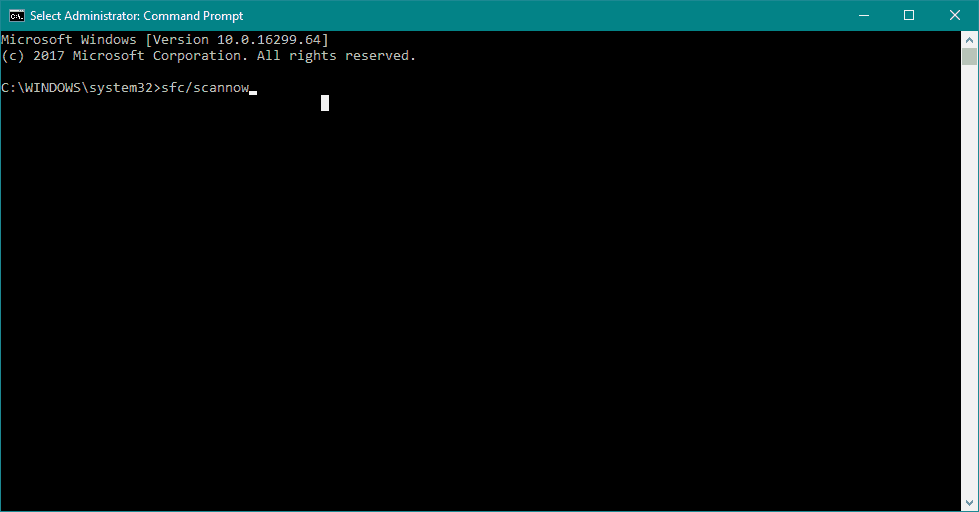
The SFC scan is another built-in troubleshooter in Windows. It helps with various problems, including our sound issue.
As you probably noticed, all these solutions are system-related so if you’re actually able to play sound on other devices, like speakers or other headphones, the problem lays in hardware.
If that’s the case, you should consider getting new headphones, because your current headphones may be broken.
Looking for the best headphone? Look no further! Here is a detailed list of the best USB-C headphones for top-notch audio experience!
If you’re using VIA HD Audio driver, and you have some problems with playing sound, you can check out our article about solving problems with VIA HD Audio.
This marks the end of our article. We hope that one of these solutions helped you solve the sound problem. Make sure you give us any feedback regarding the subject in the comment section below.


