- Как быстро очистить память в Windows 10 при ее внезапном заполнении
- How to Disable memory caching/standby memory in windows 10?
- Replies (2)
- This is how we fixed standby memory issues on Windows 10
- What is Standby Memory?
- When do standby memory issues usually occur?
- What to do if standby memory is low on PC?
- Run a System Scan to discover potential errors
- How to check if this is a Standby memory issue?
- Solution 1: Install RAMMap
- Solution 2: Download EmptyStandbyList
- Windows 10 not releasing standby memory when required.
- Replies (6)
Как быстро очистить память в Windows 10 при ее внезапном заполнении

В последних инсайдерских сборках Windows 10 есть маленький баг, который при определенных обстоятельствах может привести к заполнению резервной памяти, в результате чего наблюдается резкое снижение производительности системы. Чаще всего такое внезапное заполнение памяти наблюдается во время игр и работы некоторых приложений, причем последние совсем необязательно должны предъявлять к системе высокие требования.
В Microsoft о проблеме знают и в следующих версиях, вероятно, устранят ее причины, а пока что можно воспользоваться альтернативой — сторонними утилитами для работы с оперативной памятью. Суть временного исправление заключается в следующем — время от времени во время игры нужно запускать функцию, которая будет очищать память. Такой запуск лучше всего реализовать с помощью встроенного планировщика задач, так вам не придется отвлекаться во время работы или игры.
Для дела вам понадобится маленькая консольная тулза Empty Standby List.
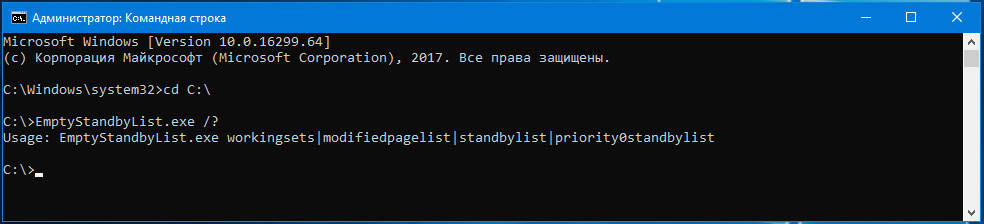
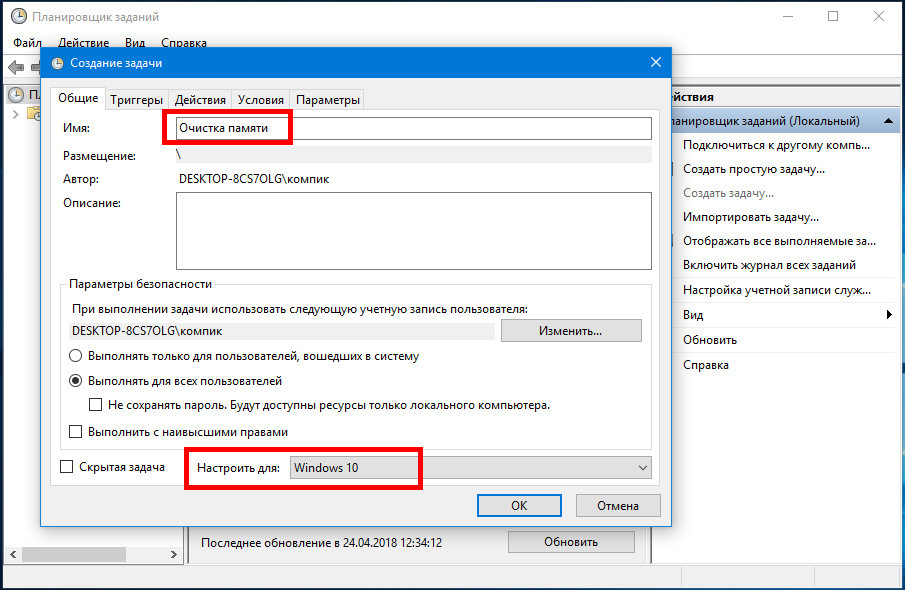
Она служит для одной единственной цели — очистке памяти, не нуждается в установке и настройке. Чтобы очистить с помощью тулзы память, достаточно через равные промежутки времени запускать ее исполняемый файл. Посему создаем в планировщике заданий новую задачу.
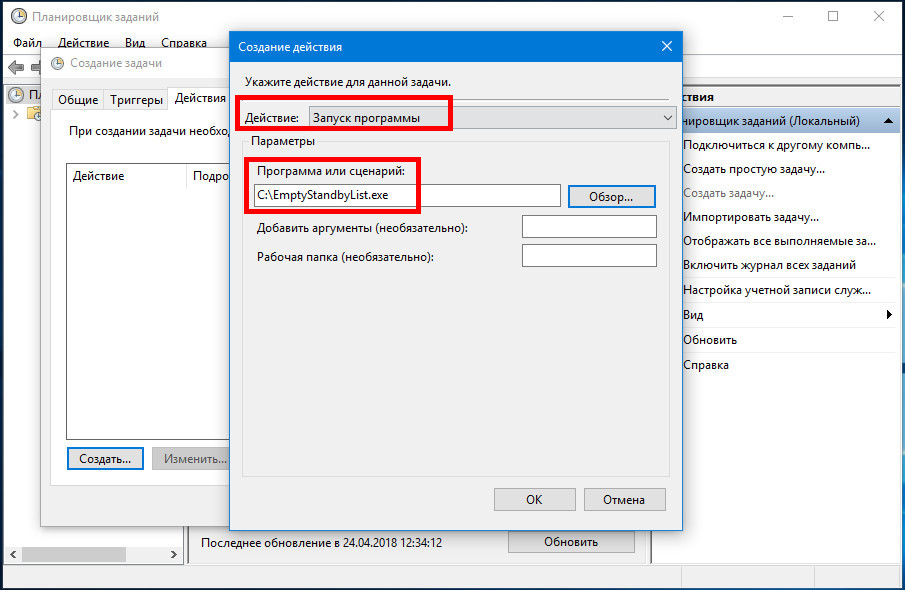
Тип действия выбираем «Запуск программы», указываем путь к исполняемому файлу утилиты.
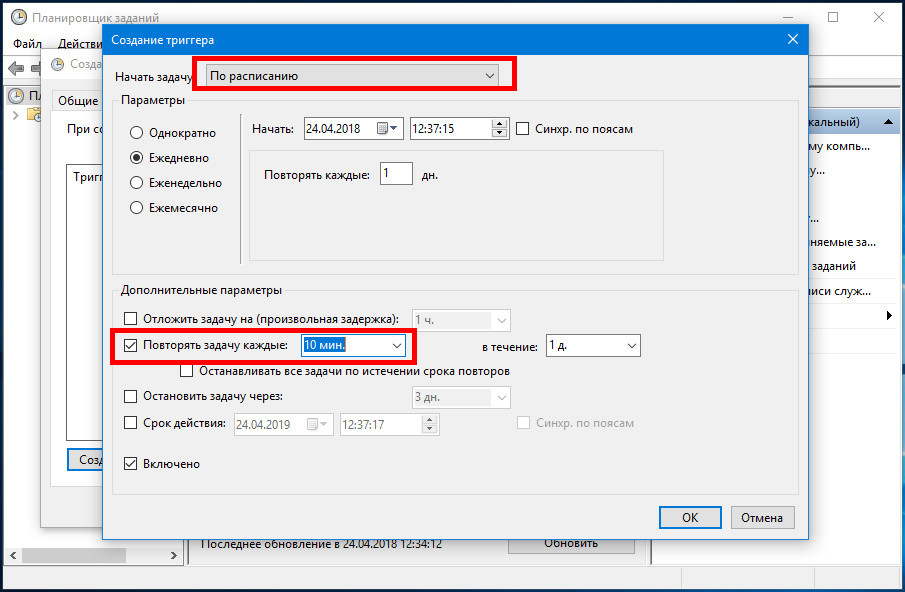
В параметрах триггера выбираем «По расписанию», включаем и задаем повтор выполнения задачи через нужный отрезок времени.
Вместо Empty Standby List для очистки памяти в ручном режиме вы также можете использовать утилиту RamMap, входящую в состав пакета Sysinternals Suite. Запустив утилиту, выберите в меню «Emrty» нужные вам опции.
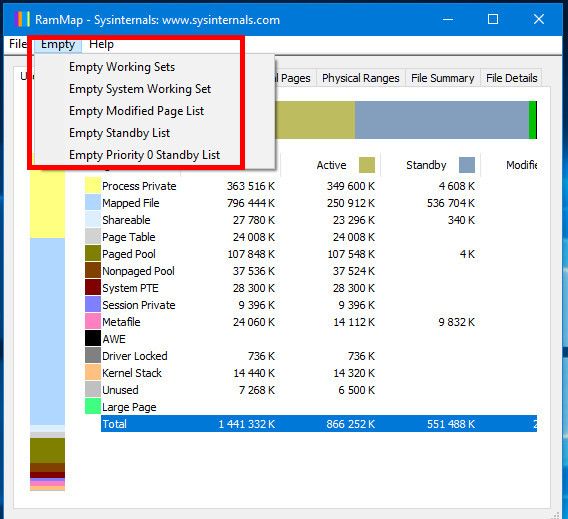
Функция Empty Working Sets выгружает все запущенные приложения и процессы, Empty Modified Page List очищает только модифицированные страницы, Empty Priority 0 Standby List выгружает из памяти процессы с низким приоритетом, функция Empty Standby List очищает всю ОЗУ независимо от приоритетов процессов.
Примечание: старайтесь по возможности не использовать опцию Empty Working Sets, так как в этом случае система предпримет попытку восстановить данные из файла подкачки. В результате количество обращений к HDD/SSD резко возрастет, что в свою очередь в моменте может сказаться не лучшим образом на производительности Windows.
How to Disable memory caching/standby memory in windows 10?
Okay I know this is going to sound strange and I know Im going to get people that will tell me how I dont want to turn off standby memory.
yes I do. don’t tell me I dont.
I have been having several stability and preformance problems related to standby memory slowly growing and taking up space during a usage session, noticeably impacting performance and causing response time lags and even stutters.
When my system is freshly booted up and the standby memory is hardly taking up any space on my ram at all, my system is lightning fast with no performance issues at all, but as the standby memory grows i start getting audio stuttering, video stuttering, and even mouse response lag.
When I clear the standby memory that all goes away.
Please can anyone tell me how do I 100% turn off standby memory/memory caching in its entirety? Meaning yes there will be empty space in my RAM unless an application decides to fill it. meaning applications also dont have to wait for the standby memory to be unloaded to replace the adress with its own memory. As far as I’m concerned at this point Standby memory in windows 10 is just a fancy kind of memory leak.
Replies (2)
We understand that you are aware on how it works with the memory caching and the standby memory. However, the feature to completely turn off standby memory or memory caching is not yet available. To better assist you, we suggest that you post your query to our Feedback Hub. From there, you’ll be able to submit a new issue where Microsoft developers will cater it.
We encourage you to submit your issue using the Feedback Hub. You can either vote on an existing submission or submit a new issue. When you submit a feedback item we gather additional details and information about your issue that will help determine what’s causing it and address it. Feedback items regularly receive Microsoft responses on the submissions in the Feedback app so you can see what we are doing about your feedback. Please revisit frequently to see the status of your feedback items.
In order to submit new feedback, please follow these steps:
- On a Windows 10 device, search for Feedback Hub in Cortana search, then launch the app.
- Navigate to Feedback in the left menu, then press + Add new feedback.
- Select the Problem, and share any details you think are relevant, and choose an appropriate category and subcategory.
Important: If possible, reproduce the problem(s) after clicking Begin monitoring (or Start capture) near the end of the form; Stop monitoring when you’re done. - Once you’ve completed the form and monitoring, click Submit.
- Click Continue using Feedback Hub.
- Click My feedback at the top, then find the item you submitted (it may take a while to appear).
- Open the item you submitted, then click Share.
- Click Copy link, then paste the link here in your response (it will look like https://aka.ms/ ).
Let us know if this information was helpful to you.
This is how we fixed standby memory issues on Windows 10


- Download Restoro PC Repair Tool that comes with Patented Technologies (patent available here).
- Click Start Scan to find Windows issues that could be causing PC problems.
- Click Repair All to fix issues affecting your computer’s security and performance
- Restoro has been downloaded by 0 readers this month.
Given the plethora of functions carried out by a computer, every user would like to enjoy the best and fastest performance at all times. Nevertheless, some users have reported some slowdowns while using Windows 10.
There can be many reasons for a computer slowdown. One of the most common causes is related to Standby Memory. This problem is linked to your computer’s RAM.
This article explores the problem and aims at providing you with some easy to follow solutions for these particular issues.
What is Standby Memory?
Standby Memory is a special type of random-access memory (RAM) management on Windows 10 that often causes the computer to slow down, especially 64bit versions. This is often due to bugs affecting the operating system.
Programs and services running on Windows 10 use part of the RAM as cache. This means that they write a series of frequently used information in this memory area. The cache, after the execution of programs or services, should be released and made available, but this does not always happen.
In fact, when the bug appears, the data contained in the cache memory, rather than being deleted, lays in a permanent waiting state, becoming inactive memory or RAM in Standby.
This phenomenon, which sometimes can arrive to absorb almost all free memory, causes the processes running on your computer to slow down. This happens because Windows is forced to use the paging file on the hard disk drive. That’s something to avoid, especially with a computer equipped with a SSD disk.
This can be an annoying bug especially for people who work on their laptops or gamers who need a lot of free RAM to enjoy their games.
When do standby memory issues usually occur?
If Windows 10 Update is running, games or other programs in use may start to stutter. One may also receive message such as “memory fault” or “the program cannot allocate the necessary RAM”.
What to do if standby memory is low on PC?
Run a System Scan to discover potential errors


You can bring your system back to its normal speed by following the steps listed below.
How to check if this is a Standby memory issue?
Step 1 – Press the CTRL + SHIFT + ESC keys simultaneously to activate the Task Manager panel. Or, if you prefer, right-click on an empty part of the taskbar and select Task Manager.
Step 2 – Click on the Performance tab and click below on Open Resource Monitor.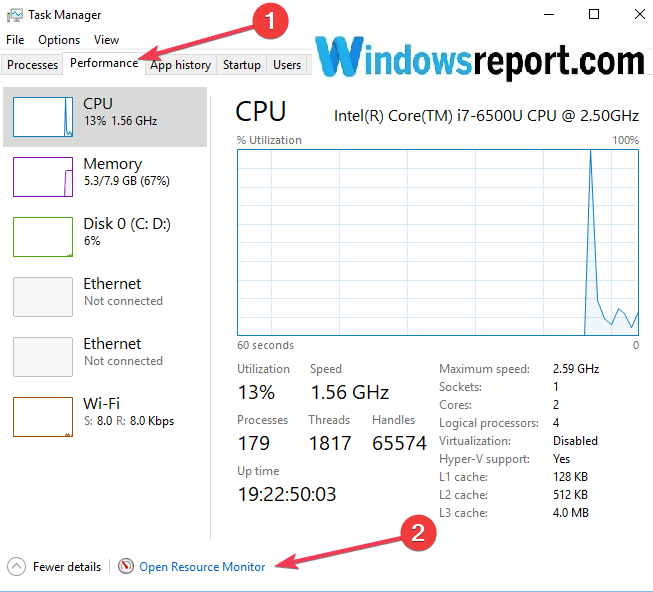
Now you can see in the panel a representation of the RAM. The one in green is the RAM in use, the one in light blue is the free memory, and the one in blue is the Standby Memory. If the latter is full, then your computer is slowing down because of the Standby Memory.
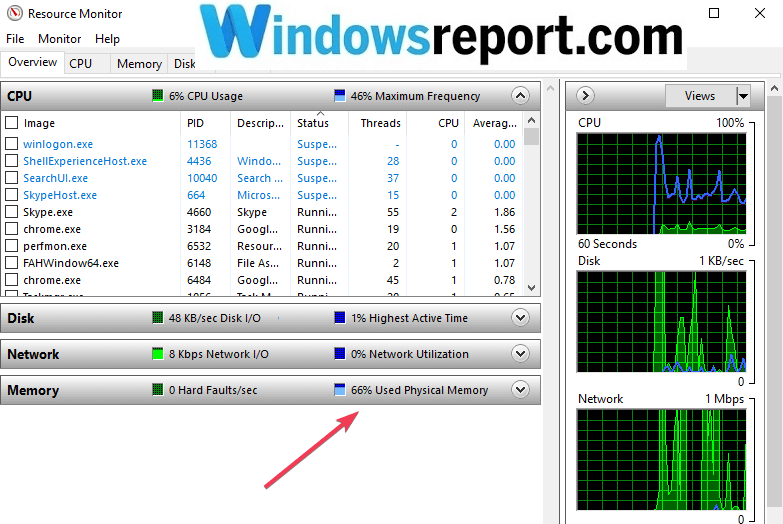
Now you can pass from the analysis phase to action. There are two useful programs to solve this problem RAMMap and EmptyStandbyList, described in Solution 1 and Solution 2, respectively.
The first is more useful if the bug is rarely bothering you.Iif the bug on Standby Memory is a common one, then the second program offers a more precise solution.
Solution 1: Install RAMMap
- Go to Microsoft’s official website and iInstall RAMMap which is a Microsoft-developed utility.
- Save the program and unzip the file
- Run the program
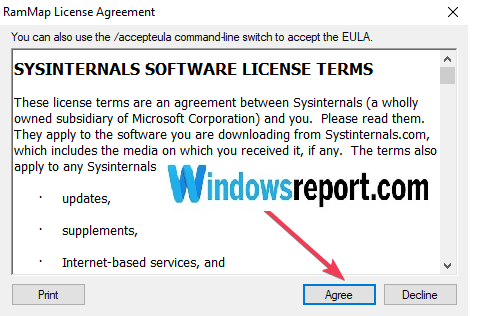
- At the user license terms panel, click I Agree

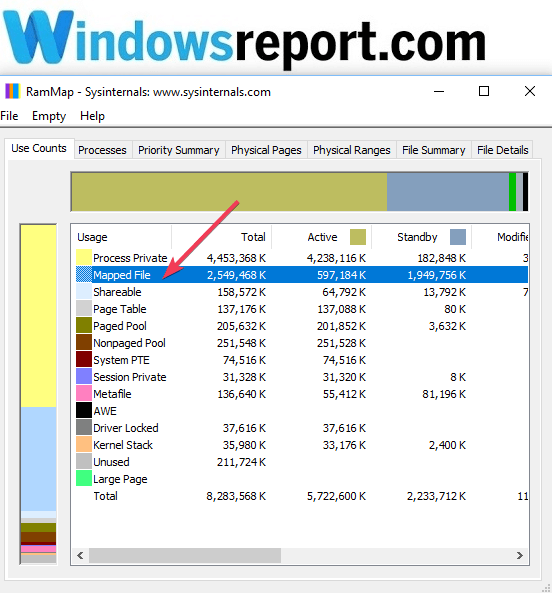
- The RAMMap panel is now open and you have a detailed graphical representation of the RAM state of use.
- Click on the Use Counts tab and then click on the Total column. There you can see the Mapped File category, which is the cache memory files both active and in Standby.
- Click Empty in the menu bar and select Empty Standby List to free the Standby Memory.
- Click File and select Refresh to update the panel to see how the program has reduced the Standby Memory and increased the Unused one.
- RELATED: Fix: LockAppHost.exe Uses a Lot of Memory in Windows 10
Solution 2: Download EmptyStandbyList
- Download EmptyStandbyList and save it in any folder. This is actually a command line that empties standby lists.
- Right click the mouse, go to Properties and select Run as Administrator under compatibility
- Open Task Scheduler and Create Task on the far right
- Give a name to the General Tab.
- Go to Security Options and click on Change User or Group
- Go to Advanced, click on Find Now and pick System, making it run silently in the background
- Choose Run with highest privileges and Hidden
- Click on Triggers tab, go to New and click On a schedule and One Time
- Set up the task every 5 minutes and choose the duration to Indefinitely
- Go to the Action Tab
- Start a program and click on the EmptyStandbyList.exe file. In this way your Standby memory will be cleared every 5 minutes until you change the settings again.
While RAM MAP and EmptyStandbyList are effective tools, it is advisable to search for the real source of the problem to update that particular software. The problem can be caused by a particular software or malware that, if detected, can be excluded from the routine scans.
Problem solved
The Standby Memory bug in Windows 10 can cause annoying problems and slowdown your computer. Nevertheless, RAM MAP and EmptyStandbyList can effectively solve the problem.
Speaking of memory issues, if the issue persists, you can use the troubleshooting guides listed below as well:
Use the comments below to let us know if you managed to fix this problem after using this guide.
Windows 10 not releasing standby memory when required.
My system has 16GB of RAM and a max pagefile of 1000MB.
The standby memory cache stays around 7GB even when my commit limit is reached causing either a low memory warning or a program which crashes because it couldn’t allocate memory.
I understand that free memory = wasted memory so have no problem that standby uses 7GB normally, but why isn’t it releasing the memory when it is needed?
I know the pagefile is small, but it is for two reasons — limited SSD space and a windows controlled pagefile was causing performance issues from swapping too often.
Any help would be appreciated.
Replies (6)
Your system is holding on to Standby memory and not releasing it to Free memory. You can force release by restarting your computer but often this is not very convenient. Another way to force the release of Standby memory is available using RAM Map (freeware from Microsoft):
http://technet.microsoft.com/en-gb/sysinternals/ff700229.aspx
Download and install, and create a shortcut on your Desktop to RAMMap and / or pin to your Taskbar. When you sense the system is becoming unresponsive use Ctrl+Shift+Esc to access Task Manager. Click the Performance tab and the Resource Monitor button. Click the Memory tab and check whether Free is near to Zero or is Zero. If it is, open RAMMap, click Empty on the Menu bar and Empty Standby list. This action instantly restores Free memory.
The procedure using RAMMap is an effective workaround but the true solution lies in discovering the source of the problem. Knowing the source you may be able to resolve the problem by contacting the provider of the software and / or updating the software.
The solution lies in identifying the software that is accessing numerous files, either to check for malware or to index to facilitate Windows Search. If you discover which files are being unnecessarily accessed you can exclude them from routine scans. The first image below illustrates the problem. The second image identifies the folders/ files. In the example Microsoft Security Essentials has been scanning my G drive, which I have since excluded from future scans.
Investigating what makes up the Standby figure may not be easy. How I found out what was the cause on this computer was achieved by following the procedure detailed below.
Open RAMMap when your Standby figure is too high and click the File Summary tab. Click the Standby column header to sort the figures as in the image below to determine the really large files held in Standby, see the image below. If you click the Path header you can sort and see what partitions are being accessed. It is important to remember that these files have been accessed since the computer was booted. You then ask yourself what programme might have accessed the file and did it really need to? Programmes having scheduled scans are good potential candidates.


