- 7 Ways to Fix Game Stuttering Windows 10 [2021 Update] [MiniTool News]
- Summary :
- 7 Ways to Fix Game Stuttering Windows 10
- Way 1. Turn off Windows Game Bar and Game DVR
- Way 2. Update the Graphics Card Driver
- Way 3. Turn off Intel Turbo Boost
- Way 4. Turn off Dynamic Tick
- Way 5. Turn off Background Software Before Running Games
- Way 6. Turn off the Diagnostic Policy Service
- Way 7. Enable V-Sync
- Bottom Line
- ABOUT THE AUTHOR
- Here’s how to fix game stuttering in Windows 10 PCs
- How can I fix stuttering in games?
- 1. Turn off the Windows Game Bar and DVR
- 2. Update the Graphics card driver
- DriverFix
- 3. Enable V-Sync
- Run a System Scan to discover potential errors
- 4. Turn off Intel Turbo Boost
- 5. Turn off Dynamic Tick
- 6. Close background software before running games
- 7. Turn off the Diagnostic Policy Service
- 8. Reduce the Graphical settings
7 Ways to Fix Game Stuttering Windows 10 [2021 Update] [MiniTool News]
By Tina | Follow | Last Updated December 29, 2020
Summary :
It is common for you to come across the error game stuttering Windows 10. Do you know how to address the computer stuttering issue? This post from MiniTool will show you 7 ways to solve the error game stuttering Windows 10.
Game stuttering is the irregular delays between GPU frames that can have a notable impact on gameplay. If you come across game stuttering Windows 10 when playing games, you will feel slow, laggy, and momentarily delay player actions. So, it would be an annoyed thing.
Thus, some people wonder how to fix stuttering in games. If you are looking for solutions, too, please keep on your reading and the following part will show you the solutions.
7 Ways to Fix Game Stuttering Windows 10
In this section, we will show you how to address the computer stuttering issue and optimize Windows 10 for gaming.
Way 1. Turn off Windows Game Bar and Game DVR
In order to fix the computer stuttering issue, you can choose to turn off Windows Game Bar and Game DVR first.
Now, here is the tutorial.
1. Press Windows key and I key together to open Settings.
2. In the Settings window, click Gaming to continue.
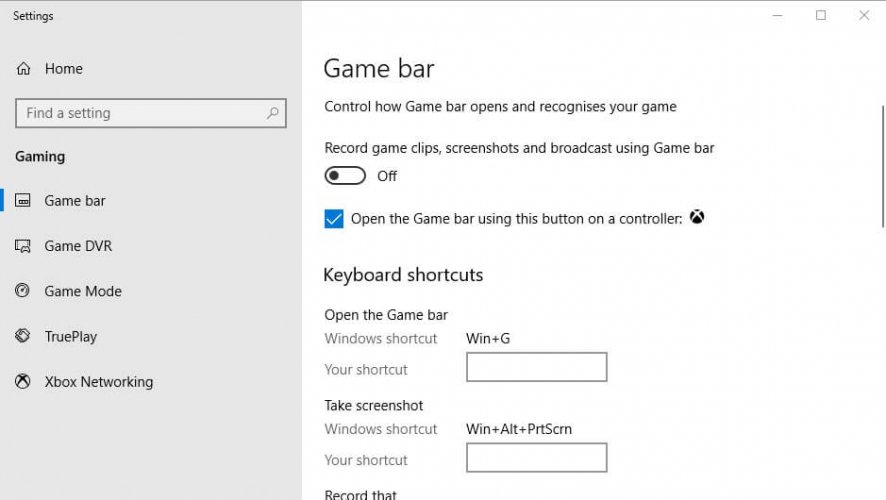
3. Go to the Game bar panel and turn off the Record game clips, screenshots, and broadcast using Game bar.

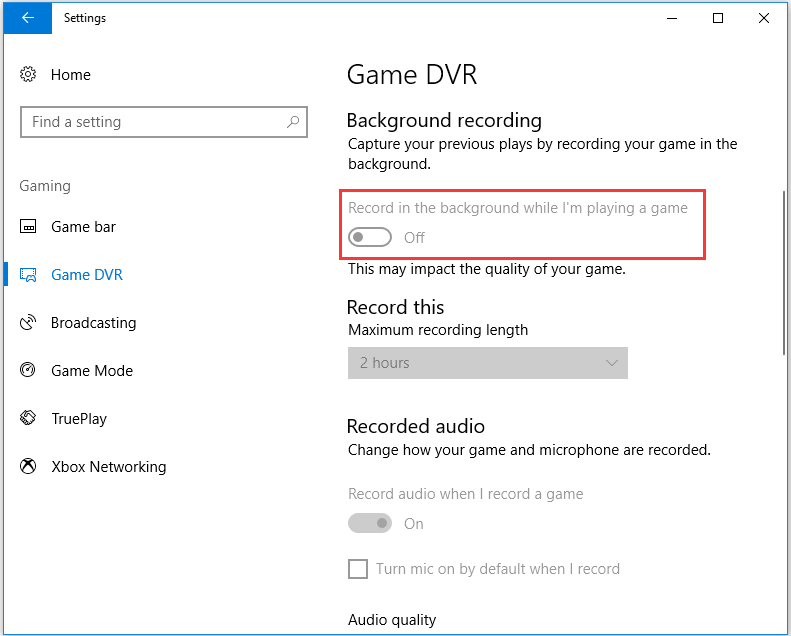
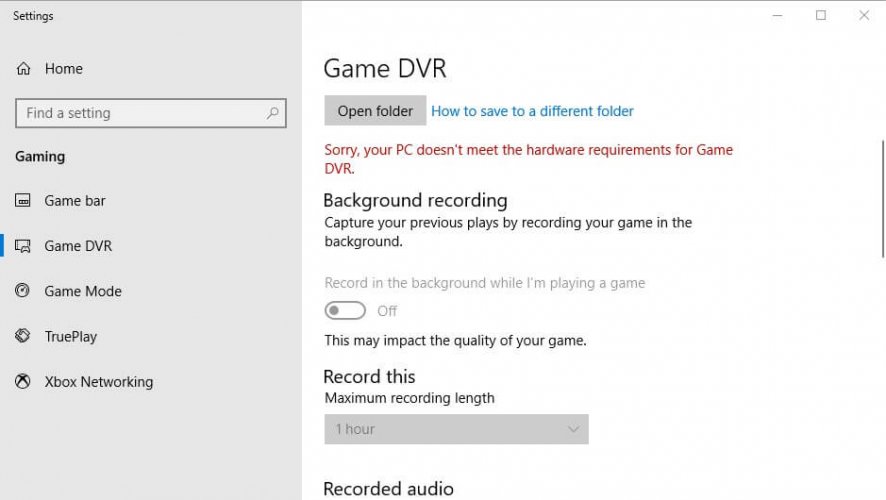
4. Then go to Game DVR tab and turn off Record in the background while I’m playing a game.
After that, exit the Settings window and check whether the game stuttering Windows 10 issue has been resolved.
Way 2. Update the Graphics Card Driver
To fix the issue game stuttering Windows 10, you can try updating the graphics card driver.
Now, here is the tutorial.
1. Press Windows key and R key together to open Run dialog.
2. In the box, type dxdiag and hit Enter to continue.
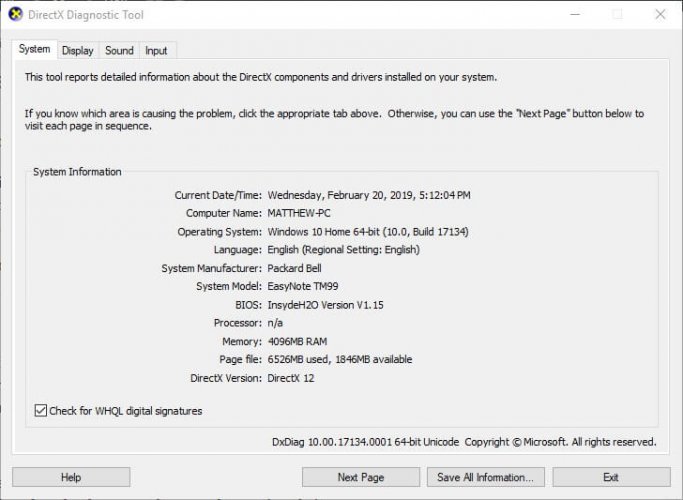
3. Then note down the OS details in the System tab.
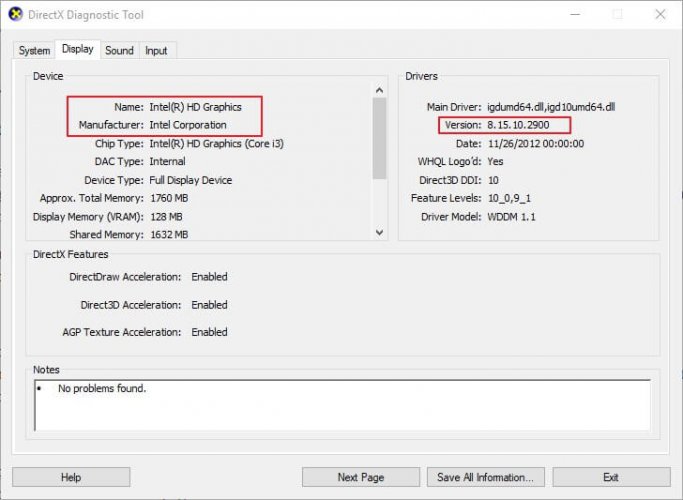
4. After that, navigate to the Display tab, note down the graphics card, manufacturer, and current driver version details.

5. Open the website of the graphics driver manufacturer, and download the latest graphics driver compatible with your platform.
6. After that, install it on your computer.
When all steps are finished, reboot your computer and check whether the error game stuttering Windows 10 is fixed.
Way 3. Turn off Intel Turbo Boost
In order to fix computer stuttering issue, you can try turning off Intel Turbo Boost.
Now, here is the tutorial.
1. Press Windows key and R key together to open Run dialog.
2. Then type powercfg.cpl in the dialog and click OK to continue.
3. In the pop-up window, click Change plan settings to continue.
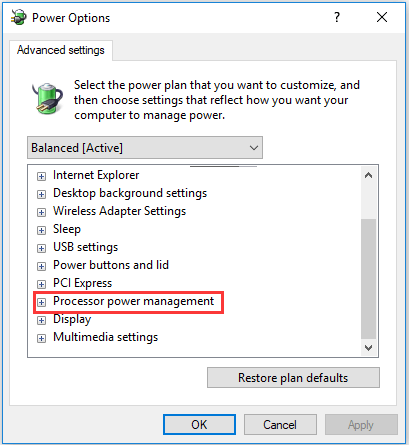
4. Then click Change advanced power settings.
5. Expand Processor power management.
6. Expand the Maximum processor rate.
7. Adjust the On battery and Plugged in values to 99%.
8. Then click Apply and OK to save the changes.
When all steps are finished, reboot your computer and check whether the error PC stuttering is solved.
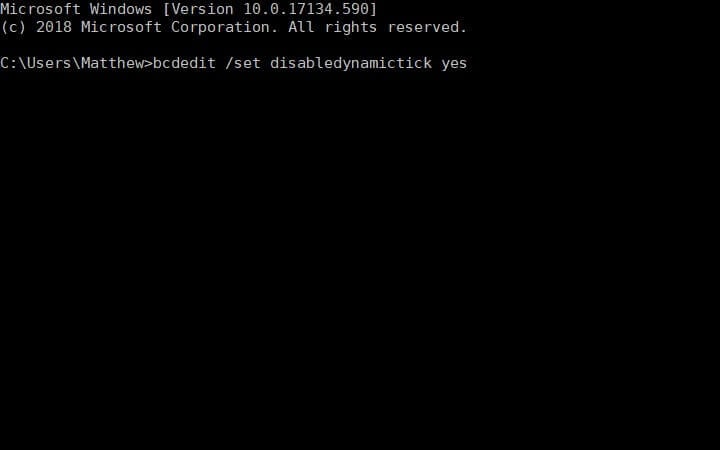
Way 4. Turn off Dynamic Tick
In order to solve the error gaming stuttering, you can choose to turn off dynamic tick.
Now, here is the tutorial.
2. In the Command line window, type the following commands and hit Enter to continue.
bcdedit /set disabledynamictick yes
bcdedit /set useplatformclock true
bcdedit /set tscsyncpolicy Enhanced

When it is finished, reboot your computer and check whether the error game stuttering Windows 10 is solved.
Way 5. Turn off Background Software Before Running Games
If there are too many programs running in the background, computer performance would be affected. So, in order to fix game stuttering Windows 10 issue, you can choose to stop apps from running in the background before playing games.
Now, here is the tutorial.
- Right-click on the Taskbar and choose Task Manager.
- Then navigate to the Processes tab,
- Select the program you want to disable and click End Task.
- You can also turn off third-party services to free up more RAM by double-click a service under Background Then right-click the service and select Stop.
After all steps are finished, check whether the issue game stuttering Windows 10 is fixed.
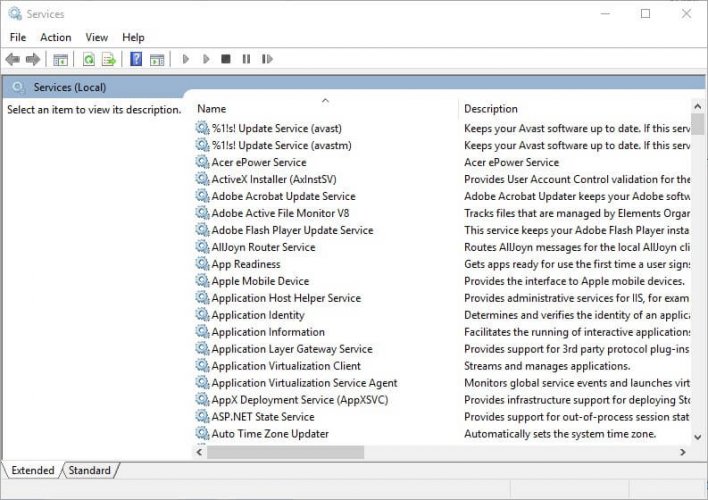
Way 6. Turn off the Diagnostic Policy Service
To fix stuttering in games, you can also try turning off the diagnostic policy service.
Now, here is the tutorial.
- Press Windows key and R key together to open Run dialog.
- Type services.msc in the box and click OK to continue.
- Scroll down to find out Diagnostic Policy Service and double-click it to continue.
- In the pop-up window, change the Startup type to Disabled.
- Change the Service status to stopped.
- Then click Apply and OK to save the changes.

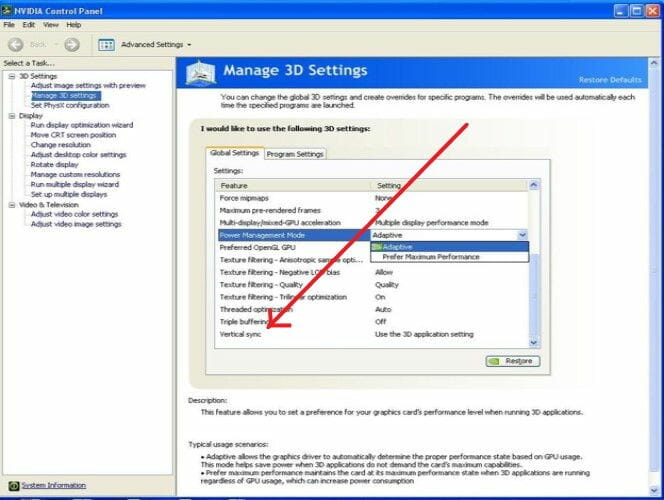
Way 7. Enable V-Sync
The last way to solve the issue game stuttering Windows 10 is to enable V-Sync. Now, here is the tutorial.
- Right-click on the desktop and select NVIDIA Control Panel.
- Click 3D Settings and select Manage 3D settings to open further options.
- Then select Force on option on the Vertical sync.
- Right-click the desktop and select the AMD Radeon Settings option.
- Click Global Settings on the AMD Radeon Settings window.
- Click Wait for Vertical Refresh to select the Enhanced Sync optio
After that, check whether the error game stuttering Windows 10 is fixed.

What are the best NVIDIA Control Panel settings for gaming? This post shows you to optimize NVIDIA Control Panel settings.
Bottom Line
To sum up, this post has introduced 7 ways to fix the error game stuttering Windows 10. If you come across the same error, try these solutions.
ABOUT THE AUTHOR

Position: Columnist
Tina is a technology enthusiast and joined MiniTool in 2018. As an editor of MiniTool, she is keeping on sharing computer tips and providing reliable solutions, especially specializing in Windows and files backup and restore. Besides, she is expanding her knowledge and skills in data recovery, disk space optimizations, etc.
On her spare time, Tina likes to watch movies, go shopping or chat with friends and enjoy her life.
Here’s how to fix game stuttering in Windows 10 PCs

- Game stuttering can be triggered by a plethora of reasons from an underequipped system to uncomplying software.
- If your images are delayed or laggy, you’ll soon find yourself wondering how to fix stuttering in games.
- Obviously, you cannot have outdated drivers on your graphics card since this is usually what causes stuttering in games.
- Finally, use the Task Manager to keep an eye on background processes as this can also trigger PC stuttering.
- Download Restoro PC Repair Tool that comes with Patented Technologies (patent available here).
- Click Start Scan to find Windows issues that could be causing PC problems.
- Click Repair All to fix issues affecting your computer’s security and performance
- Restoro has been downloaded by 0 readers this month.
Game stuttering is the irregular delays between GPU frames that can have a notable impact on gameplay.
A game that stutters will feel slow, or laggy, and momentarily delay player actions. The motion in a stuttering game might appear to be jerky.
Below are some resolutions that might eradicate stuttering in games.
How can I fix stuttering in games?
1. Turn off the Windows Game Bar and DVR
- Press the Windows key + Q hotkey.
- Enter the keyword game in Cortana’s search box.
- Select Control how Game Bar opens and recognizesyour game to open the window shown directly below.

- Then turn off the Record game clips, screenshots and broadcast using Game bar setting.
- Select the Game DVR tab shown directly below.
- Turn off the Record in the background while I’m playing a game setting.
As mentioned, the Windows 10 Creators Update generated game stuttering for some players. That might be due to some of the new game settings the Creators Update introduced.
As such, turning off the Windows Game bar and Game DVR might reduce game stutter in Windows 10.
2. Update the Graphics card driver
- First, launch Run with the Windows key + R keyboard shortcut.
- Enter dxdiag in the Open text box and click OK to open the window shown directly below.
- Note down the OS details on the System tab.
- Then click the Display tab, which includes the graphics card, manufacturer, and current drivers» href=’https://windowsreport.com/device-driver/’ data-id=»http://data.windowsreport.com/windowsreport/entity/device_driver;https://www.wikidata.org/wiki/Q1033951;http://rdf.freebase.com/ns/m.02htf;http://dbpedia.org/resource/Device_driver»>driver version details. Note down all those details.
- Open the graphic card manufacturer’s website in your browser, which will probably be AMD or NVIDIA.
- Open the driver download page on the manufacturer’s website.
- Then select your graphics card model and platform on the driver download page drop-down menus.
- Download the latest graphics card driver version compatible with your platform if it doesn’t match the current driver version shown on DirectX Diagnostic Tool’s Display tab.
- Select to save the driver to the Windows desktop.
- Then users can right-click the driver icons on their desktops and select Run as administrator.
- Some users might need to select an extraction path for the driver files.
- Thereafter, the setup wizard window will open from which you can install the driver.

Games are more likely to stutter for players playing them with antiquated graphics card drivers.
So, it’s worth checking for graphics card driver updates that can provide some notable graphical enhancements.
Now, this is how users can automatically update a graphics card driver in Windows 10.
DriverFix
3. Enable V-Sync
- Right-click the desktop and select NVIDIA Control Panel on the context menu.
- Click 3D Settings and select Manage 3D Settings to open further options.
- Then select the Force on option on the Vertical sync drop-down menu.
- To turn on AMD Enhanced Sync, which has replaced V-Sync, right-click the desktop and select the AMD Radeon Settings option.
- Click Global Settings on the AMD Radeon Settings window.
- Click Wait for Vertical Refresh to select the Enhanced Sync option.
Tearing and stuttering in Windows games can be due to a frame rate discrepancy between the monitor and GPU.
Run a System Scan to discover potential errors


Consequently, some NVIDIA and AMD PCs include V-Sync and Enhanced Sync settings that users can select to sync VDU and GPU frame rates in order to eradicate tearing and stuttering in games.
4. Turn off Intel Turbo Boost
- Enter powercfg.cpl in Run, and select the OK option.
- Click Change plan settings to open further options.
- Then click Change advanced power settings.
- Double-click the Processor power management to expand that category.
- Then double-click Maximum processor state as in the snapshot below.
- Adjust the On battery and Plugged in values to 99 %.
- Select the Apply option, and click the OK button.

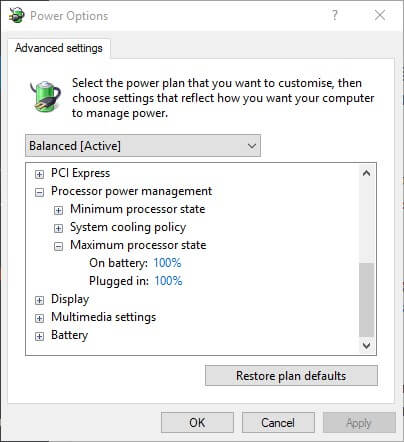
Game stutter can also be due to Intel Turbo Boost, which overclocks processors. So, turning Intel Turbo Boost off can reduce game stuttering.
5. Turn off Dynamic Tick
- Right-click the Start menu and select Command Prompt (Admin).
- First, enter the following command and press Return: bcdedit /set disabledynamictick yes
- Then input this line in the Command Prompt, and press the Enter key: bcdedit /set useplatformclock true
- Thereafter, enter this line below in the Prompt and press Return: bcdedit /set tscsyncpolicy Enhanced
- Close the Command Prompt window and restart the system.
6. Close background software before running games
- Right-click the Start menu button to select Task Manager.
- Select a program on Task Manager’s Processes tab.
- Press the End Task button to close the selected program.
- Users can also turn off third-party services to free up more RAM by double-clicking a service under Background processes. Then right-click the service and select Stop.

Note that there are a few game booster programs which optimize system resources for games.
Software such as Game Fire 6, Razer Cortex, and Wise Game Booster include numerous resources for boosting games. This software will also close superfluous third-party programs and services for users.
Game stuttering is more likely when players don’t optimize system resources for games. As such, make sure there aren’t too many background programs consuming system resources before launching the game.
7. Turn off the Diagnostic Policy Service
- Enter services.msc in Run and click OK to open the window in the image directly below.
- Double-click Diagnostic Policy Service to open the window shown directly below.
- Select Disabled on the Startup type drop-down menu.
- Press the Apply button, and then select the OK option.
- Restart the desktop and laptop after disabling Diagnostic Policy Service.

8. Reduce the Graphical settings
Games stutter more when players select graphical settings that are a little too high for the PCs they’re running the games on.
Thus, reducing a game’s graphical settings to standard or low might also eradicate at least some of the stuttering.
Lower graphical settings will certainly ensure the game runs faster and more smoothly.
Most Windows games’ setting menus include graphical options, such as resolution, that can players can adjust.
So, that’s how players can fix game stuttering in Windows 10. Then the games’ gameplay will be much smoother than before.
Let us know which of the solutions presented above worked for you and don’t be shy to share further workarounds as well.


