- Reactivating Windows 10 after a hardware change
- Prepare your Windows 10 device for a hardware change
- Reactivate Windows 10 after a hardware change
- If you don’t have a digital license or product key
- Need more help?
- Windows 10 supported motherboards
- Как установить Windows 10?
- Ниже представлены инструкции по установке на компьютер операционной системы Windows 10.
- Перед тем, как приступать к этой процедуре, убедитесь, что у вас есть:
- Создание установочного USB-накопителя
- Перезагрузите компьютер.
- Настройка BIOS
- Перезагрузите компьютер.
- Установка Windows 10
- Первоначальная настройка Windows
Reactivating Windows 10 after a hardware change
Activation helps verify that your copy of Windows is genuine and hasn’t been used on more devices than the Microsoft Software License Terms allow.
When installing Windows 10, the digital license associates itself with your device’s hardware. If you make significant hardware changes on your device, such as replacing your motherboard, Windows will no longer find a license that matches your device, and you’ll need to reactivate Windows to get it up and running.
To activate Windows, you’ll need either a digital license or a product key. To find out which you need, see «What activation method do I use, product key or digital license?» in Activate Windows 10. Then, use the following info to help you successfully prepare for a hardware change and reactivate Windows 10.
Prepare your Windows 10 device for a hardware change
First, follow these steps to find out if Windows 10 is already activated.
Select the Start button, then select Settings > Update & Security > Activation .
If you’re not activated, complete the activation process with the steps you see on the Activation page. If you experience an error while activating, see Get help with Windows activation errors.
Once you’ve confirmed that Windows 10 is activated, follow these steps:
In Windows 10 (version 1607 or later), it is essential that you link your Microsoft account with the Windows 10 digital license on your device. Linking your Microsoft account with your digital license allows you to reactivate Windows using the Activation troubleshooter whenever you make a significant hardware change.
First, you’ll need to find out if your Microsoft account (What is a Microsoft account?) is linked to your Windows 10 digital license. To find out, select the Start button, then select Settings > Update & Security and then select Activation . The activation status message will tell you if your account is linked.
Windows is activated with a digital license
This means that your Microsoft account is not linked to your digital license.
Follow instructions for Add an account.
Windows is activated with a digital license linked to your Microsoft account
This means that your Microsoft account is already linked to your digital license.
No further action is required. You are ready to use the activation troubleshooter.
If your Microsoft account is not linked to your digital license, follow these steps to Add an account:
Sign in as an administrator to add your Microsoft account. To confirm that you’re using an administrator account, select the Start button, then select Settings > Accounts > Your info . Under your name, you’ll see Administrator. If you’re not an administrator, see Create a local user or administrator account.
Go to Your info in Settings
Confirm that the administrator account is also your Microsoft account by checking to see if an email address is displayed above Administrator. If an email address is displayed, this is a Microsoft account. If not, you’re logged in using a local account. If you don’t yet have a Microsoft account, see How to create a new Microsoft account.
Once you confirm that you’re an administrator and using your Microsoft account, go back to the Activation page, select Add an account, enter your Microsoft account and password, then select Sign in.
After your Microsoft account has been added, the message on the Activation page will change to: Windows is activated with a digital license linked to your Microsoft account.
Make sure that the edition, Windows 10 Home or Windows 10 Pro, is the same before and after your hardware change. Your digital license and product key will reactivate only if the edition remains the same.
You can see your edition on the same Activation page where you checked your activation status. To see which edition you have, select the Start button, then select Settings > Update & Security > Activation .
If you used a product key to get to Windows 10, then you’ll need that key again after the hardware change. To find out how to locate your key, see Find your Windows product key.
For more info about product keys and digital licenses, see Activate Windows 10.
Reactivate Windows 10 after a hardware change
When you’re ready to reactivate, make sure that your device is connected to the internet and then follow the steps for either a digital license or product key.
You’ll need to first add your Microsoft account and link your account to the digital license on your device. After linking your Microsoft account, run the Activation troubleshooter to reactivate Windows 10.
This troubleshooter will only be available if your copy of Windows 10 (version 1607 or later) isn’t activated.
To use the Activation troubleshooter:
Select the Start button, then select Settings > Update & Security > Activation > Troubleshoot . The troubleshooter will show Windows can’t be activated on your device.
Select I changed hardware on this device recently, then select Next.
Enter your connected Microsoft account and password, then select Sign in. The troubleshooter will only work with the connected Microsoft account.
From the list of devices that are linked to your Microsoft account, select the check box next to This is the device I’m using right now.
If you don’t see the device you’re using in the list of results, make sure that you signed in using the same Microsoft account you associated with the Windows 10 digital license on your device.
If you continue to experience errors while activating, see Get help with Windows activation errors and locate the error you’re getting.
If you didn’t link your Microsoft account to the digital license before the hardware change AND you used a product key to upgrade to Windows 10, then continue to next section.
If Windows 10 wasn’t pre-installed on your device when purchased and you used a product key to upgrade to Windows 10, then you’ll need that same product key after the hardware change.
Select the Start button, then select Settings > Update & Security > Activation > Change Product Key, then enter the product key.
If you installed a retail copy of Windows 10 on your device using a Windows 10 product key and then made hardware changes, follow this same process using your Windows 10 product key.
If you continue to experience errors while activating, see Get help with Windows activation errors and locate the error you’re getting.
If you don’t have a digital license or product key
If you don’t have a product key or digital license, you can purchase a Windows 10 digital license after installation finishes. Follow these steps to make a purchase:
Select the Start button, then select Settings > Update & Security > Activation . Then select Go to Store to go to the Microsoft Store app where you can purchase a Windows 10 digital license.
Need more help?
If you need additional help reactivating Windows on your device, contact customer support.
Windows 10 supported motherboards

Ваша оценка отправлена, спасибо. Сообщите нам, пожалуйста, как можно сделать ответ вам еще более полезным.
Благодарим за ваше мнение.
Как установить Windows 10?
Ниже представлены инструкции по установке на компьютер операционной системы Windows 10.
Перед тем, как приступать к этой процедуре, убедитесь, что у вас есть:
USB-накопитель емкостью не менее 8 ГБ.
Компьютер со стабильным интернет-подключением.
Создание установочного USB-накопителя
Вставьте накопитель в USB-разъем компьютера.
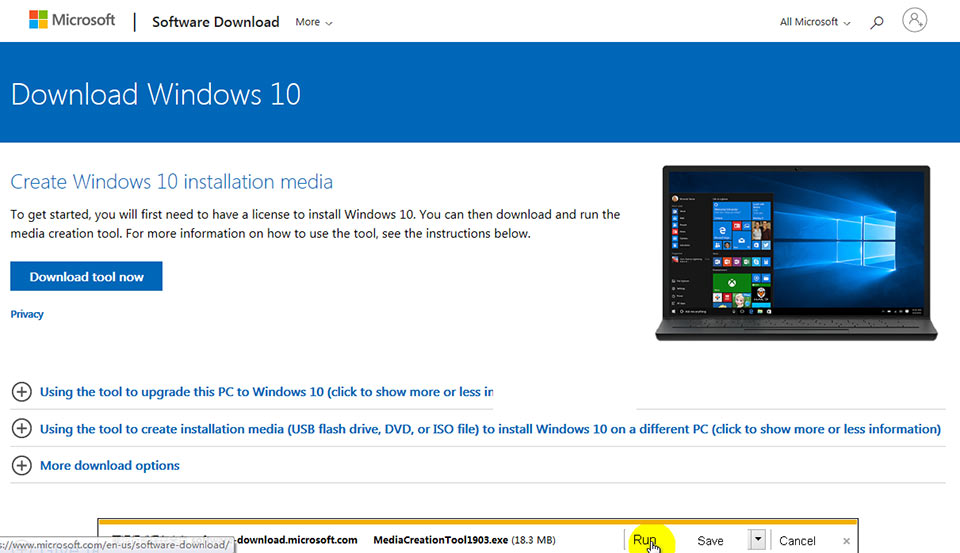
Нажмите на кнопку [Download tool now] (Скачать средство сейчас).

Нажмите на кнопку Run (Запустить).
Нажмите на кнопку Accept (Принимаю).

Выберите пункт [Create installation media(USB flash drive,DVD,or ISO file) for another PC] (Создать установочный носитель (USB-устройство флэш-памяти, DVD-диск или ISO-файл) для другого компьютера). Затем щелкните по кнопке Next (Далее).

Щелкните Next (Далее).

Выберите пункт [USB flash drive] (USB-устройство флэш-памяти) и щелкните по кнопке Next (Далее).

Щелкните Next (Далее).

Дождитесь завершения процедуры, затем щелкните по кнопке Finish (Готово).

Перезагрузите компьютер.
Настройка BIOS
Во время загрузки компьютера нажимайте клавишу Delete, чтобы зайти в интерфейс BIOS.
Выберите пункт меню [Settings]> [Advanced]> [Integrated Peripherals] («Параметры» -> «Расширенные» -> «Встроенные контроллеры») и укажите «AHCI» в качестве режима SATA ([SATA Mode]).

Выберите пункт меню [Settings]> [Advanced]> [Windows OS Configuration] («Параметры» -> «Расширенные» -> «Конфигурация Windows») и укажите «UEFI» как значение параметра [Windows 10 WHQL support] («Поддержка Windows 10 WHQL»). Нажмите клавишу F12, сохраните изменения и выйдите из интерфейса BIOS.

Перезагрузите компьютер.
Установка Windows 10
Во время загрузки компьютера нажимайте клавишу F11, чтобы открыть меню выбора загрузочного устройства. Выберите «UEFI: USB-накопитель».
Примечание: В данном меню будут показаны все установленные в системе загрузочные накопители.

Когда откроется среда установки Windows, щелкните по кнопке Next (Далее).

Щелкните по кнопке [Install Now] (Установить).

Если у вас имеется ключ продукта для Windows, введите его и щелкните по кнопке Next (Далее). В противном случае выберите [I don’t have a product key] (У меня нет ключа продукта).

Выберите версию операционной системы, которую хотите установить, и щелкните по кнопке Next (Далее).

Примите условия лицензионного соглашения и щелкните по кнопке Next (Далее).

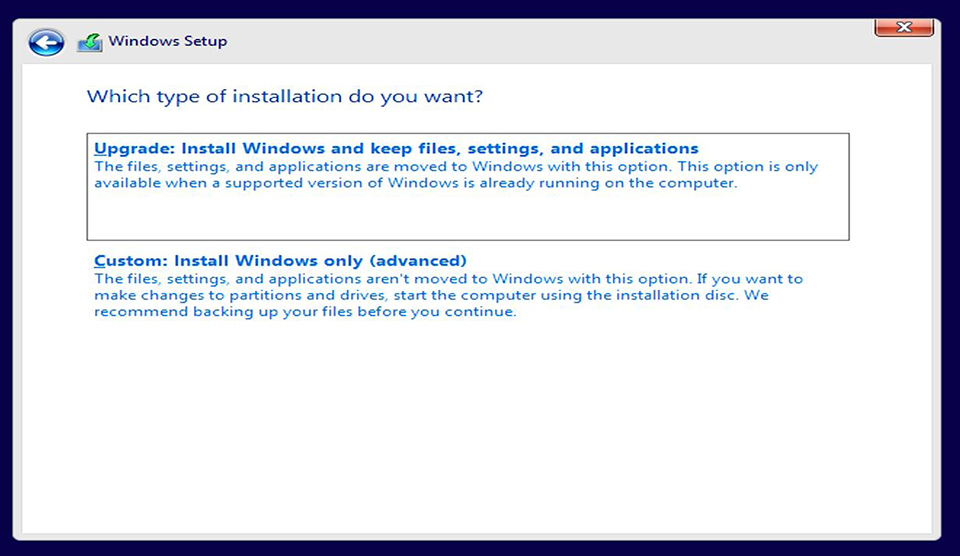
Выберите опцию [Custom: Install Windows only (advanced)] (Установить только Windows).
Примечание: Все файлы на диске будут стерты, поэтому заранее сохраните копии нужных файлов на другом накопителе.
Выберите раздел диска, на который хотите установить операционную систему и щелкните по кнопке Next (Далее).

После завершения установки компьютер будет автоматически перезапущен, после чего откроется среда первоначальной настройки Windows.

Первоначальная настройка Windows
Укажите свой регион и щелкните по кнопке Yes (Да), чтобы продолжить.

Выберите раскладку клавиатуры и щелкните по кнопке Yes (Да), чтобы продолжить.

Добавьте вторую раскладку или щелкните по кнопке Skip (Пропустить).

Подключитесь к имеющейся проводной или беспроводной сети или выберите пункт [I don’t have Internet] (У меня нет доступа в интернет).

Задайте имя пользователя и щелкните по кнопке Next (Далее).

Укажите пароль для своей учетной записи. Если пароль не нужен, щелкните по кнопке Next (Далее).

Следующие настройки задаются в соответствии с личными предпочтениями.

Следующие настройки задаются в соответствии с личными предпочтениями.

Подождите пока закончится применение настроек. После этого загрузится Рабочий стол Windows, и это значит, что операционная система была установлена успешно!


