- Create Your Own Windows 10 Custom Themes
- Opening the Themes Menu
- Change Desktop Background
- Change Theme Colors
- Change Cursor
- Change System Sounds
- Conclusion: Saving Your Theme
- How to Make Your Own Windows 10 Theme
- How To Make Windows 10 Theme
- Change the background of your desktop
- Pick up new colors
- Add sounds
- Screen saver
- Pointer
Create Your Own Windows 10 Custom Themes
In the Windows 10 Creators Update, you can now download Windows 10 Themes from the Windows Store. But in addition to those Microsoft-produced themes, you can also make your own Windows 10 custom themes using the Settings menu. Here is how you can create and use your own Windows 10 custom themes.
Opening the Themes Menu
1. Open “Settings” from the Start Menu.
2. Click “Personalization,” then click “Themes.”
3. This will open the themes menu which allows you to adjust your desktop background, choose theme colors, change your cursor and modify system sounds.
Change Desktop Background
1. Click the “Background” button which displays the name of your current wallpaper underneath.
2. Select the type of desktop background you want from the drop-down menu.
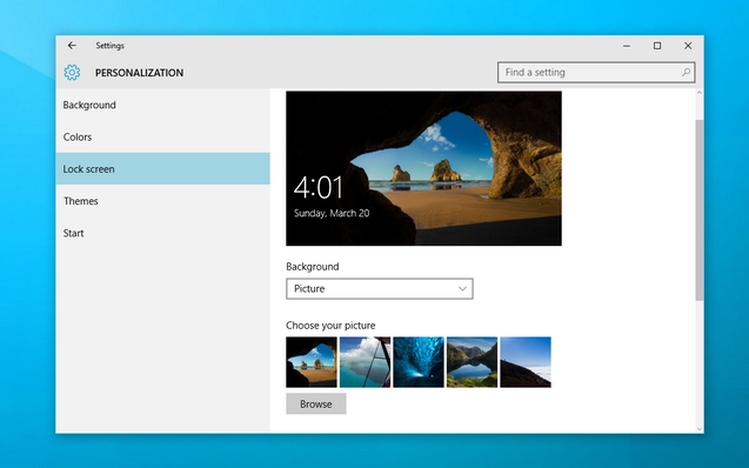
3. If you chose “Picture” from the drop-down menu, you can now select an image to appear as your background. The five most recent desktop backgrounds will appear as thumbnails below “Choose your picture.” You can also click the “Browse” button to select different images from your computer.
4. Finally, you can choose how the image should be displayed under “Choose a fit.”
- Fill: resizes the image (if necessary) to cover your entire background but does not change the proportions of the image
- Fit: fits the entire image on screen
- Stretch: changes the proportions of the image to cover your entire screen while displaying the whole image. This can seriously distort an image.
- Tile: repeats the image as many times as necessary to cover the whole desktop
- Center: centers the image on the screen without resizing or adjusting
- Span: If you have more than one monitor, stretches the desktop background to cover all your displays without repeating. Otherwise it’s the same as fill.
5. If you chose solid color, select the color from the palette or click “Custom color” to select a different color.
6. If you chose slideshow, select the folder to use as a source for your images. You can then select how often the image should be changed, from one minute to one day, and choose whether to shuffle the images.
Change Theme Colors
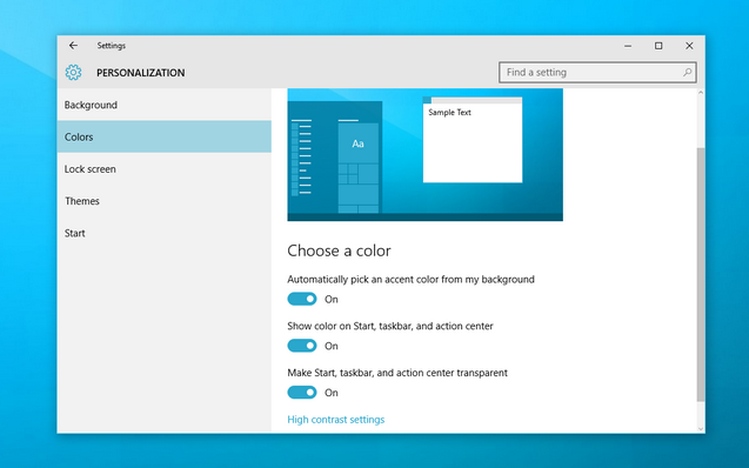
Colors refers to the accent color that shows up in certain places in the UI. The accent color will affect the background of Start Menu icons, the indicator for the Taskbar, the color of selected system menus and a few more things here and there.
1. Click the “Colors” button.
2. Choose a color from the palette or click “Custom color” to select a different color.
3. You can also tick “Automatically pick an accent color from my background,” which will analyze your current background image and change the theme color based on that. If you have a slideshow selected, it will not automatically update the color each time the background changes.
4. Below the color selection, you have the option to turn on some extra effects.
- Transparency effects: toggles system-wide transparency options
- Show accent color: enables the color you just selected on a variety of additional UI elements
- Default app mode: uses either a white or black background for system apps like Settings.
Change Cursor
1. Click the “Mouse cursor” button.
2. Click the drop-down menu under “Scheme” to select a themed set of system cursors.
3. If you’ve downloaded or created a set of .ani files to use as cursor replacements, you can click “Browse…” to open a folder with cursor replacements.
4. If you mess things up, return to the default with the “Use Default” button.
5. Click “OK” when you’re done.
Change System Sounds
1. Click the “Sounds” button.
2. Under “Sound Scheme” you can select a themed set of sounds to use for your system.
3. You can also modify or disable individual types of audio events. Click on an event under “Program Events” to select it.
4. Once you’ve selected an event, you can use the drop-down under “Sounds” to change the sound for that event. Select “(None)” if you want to disable sound for that event type.
5. To hear what a file sounds like, select it from the drop-down and click the “Test” button.
6. If you have custom .wav files you want to use as system sounds, click the “Browse” button to load them.
7. Click “OK” when you’re done.
Conclusion: Saving Your Theme
Each part of your theme will apply automatically as you make changes. To save the entire theme as a package, click the “Save Theme” button under the main Theme menu.
Give your Theme a name, then click “Save.”
Now that you have created your own custom theme, you can export it and use it on any of your Windows 10 machines.
Alexander Fox is a tech and science writer based in Philadelphia, PA with one cat, three Macs and more USB cables than he could ever use.
How to Make Your Own Windows 10 Theme
By Melanie Pinola 27 August 2015
Want to change how your desktop and windows look in Windows 10 and share that design with friends? Windows 10 lets you create your own theme with a custom desktop background, windows border and Start menu accent color. You can save these settings as a new theme file to use over and over or send to others.
1. Open the Start menu and select Settings.
2. Choose Personalization from the settings screen.
3. Change one or more of the following:
- Desktop background: Select picture, solid color, or slideshow. In addition to some default photos, you can click the Browse button to select a background picture. If you choose slideshow, the default album for the slideshow will be the Photos folder, but you can browse to a different folder and also set how often you want the picture to change on your desktop.
- Colors: You can either have Windows automatically pick an accent color from your background or select a color for the Start menu tiles background and the thin border around windows. This will also change the color of the Windows icon in the taskbar when you hover over it. Optionally, you can also have that color shown on the taskbar and Windows 10’s action center by checking those checkboxes.
You can also change the Lock screen background image and Start menu settings here, but these aren’t saved with your theme.
4. Click Themes in the Personalization window, then Theme settings.
This will open up the personalization settings in the Control Panel.
5. Right-click on the Unsaved Theme and select Save theme. The Unsaved Theme appears in the My Themes section and contains the the settings you just adjusted.
6. Give your theme a name in the window dialog box and hit OK.
Your new theme will be saved and you can switch between it and other themes easily by going to the personalization options in the Control Panel. Once your theme is saved, you can also right-click on it and save the theme for sharing as a .deskthemepack file.
Microsoft doesn’t offer a built-in way to create more complex themes than this (e.g., changing app icons or default sounds), but there’s an app in the Windows App Store called Theme Creator that promises to let create a complete Windows theme package. The app crashed on me when I tried it, but you might have better luck.
Also, Microsoft offers many Windows theme packs you can download for free here. Here are some of the best Windows 10 themes.
How To Make Windows 10 Theme
Windows 10 Theme offer you the possibility to make a number of personalization settings; you can change the background of your desktop, as well as the colours, sounds, windows borders, start menu and you can switch between themes as often as you like. You can use the following steps, in order to customize your computer exactly as you wish.
Change the background of your desktop
Windows 10, like other versions, come with several backgrounds that you can choose from. In order to do so, you need to enter the personalization group, which can be found in the Settings. Or you can always select ‘Browse’ and add your own picture. For the background you can select picture, solid color or slideshows. Your wallpaper can in fact beanything you like. For example, you can choose to upload a picture from your own collection or one that is already included on this version of Window, a solid color or even a slide show, that can play pictures that you have selected randomly on all displays.
Pick up new colors
You can choose an accent color from a palette or you can select to have Windows 10 pick up a color from your wallpaper automatically. If you wish you can extend the color choice to the Start menu, taskbar and action center, below the palette. There is also another option; you can turn on transparencies for all these items. In fact, this last one can actually allow you to eke out a bit more performance in case your card of your graphics isunderpowered or older.
Add sounds
Windows 10 Theme can play a sound when certain events take place on your PC. For instance, an event can be an action that you perform (eg. when you empty your Recycle Bin) or an action that Windows perform (e.g. when you receive a new mail). In fact, you can find a number of sound schemes offered with the new version of Windows. Keep in mind, though, that some themes on your desktops have their own sound schemes. Moreover, you can save any additional sound that you changed.
Screen saver
If you want to changer or add a screen saver, you need to click ‘Screen Saver, then click an iten in the list and change the settings, according to your preferences and at the end click OK. The screen saver is actually a moving pattern or a certain image that appears on your PC screen when you haven’t touched your mouse or keyboard for a certain period of time. Moreover, the screen saver is turned off in the themes that offered by the Windows, but you have the option to turn it on and add one to a theme. You can actually find all kind of themes in Personalization window (found in Control Panel). Then, you can alter the background of your desktops, as well as the colour, sounds etc.
Pointer
After you have added icons and sound, you can also add a fancy cursor as well. Just like the icons and sound schemes, you need to apply the new cursor, before including the same in the theme. Once you have installed it, click Change mouse pointer at thte left side of Personalization window, choose your new cursor from the drop down list and press the apply button.


