- How to Repair Windows 10 Using Command Prompt (5 Ways)?
- How do I repair Windows 10 with command prompt?
- Method 1. How to repair Windows 10 using SFC?
- Method 2. How to repair Windows 10 using DISM?
- Method 3. How to reset Windows 10 with command line?
- Method 4. How to run system restore with command prompt?
- Method 5. How to repair Windows 10 with AOMEI.exe?
- How to Repair Windows 10 using Command Prompt?
- This post all talks about how to repair Windows 10 using the command prompt.
- Part 1. How to Repair Windows 10 using Command Prompt
- Step 1. Enter Windows Recovery mode
- Step 2. Using Command Prompt to repair Windows 10
- Part 2. How to Repair and Recover Windows 10 with Bootable Media
- How to run Troubleshooter in Windows 10 from the command line
- How to run Troubleshooter in Windows 10
- Run built-in Windows Troubleshooter from the command line
- Direct Commands to open Windows 10 Troubleshooters
- Run Troubleshooters via Settings
- Run Troubleshooters using FixWin
How to Repair Windows 10 Using Command Prompt (5 Ways)?
When your computer won’t work properly, you can learn how to repair Windows 10 using command prompt from this article.

By AOMEI  / Last Updated March 9, 2021
How do I repair Windows 10 with command prompt?
When there is some problem happens to Windows, you can repair your windows with some basic repair like Windows directory repair, boot directory repair. When the error is too serious, you can run advanced repair like system restore. For Windows 10, you can also use DISM command line utility to repair Windows 10 image. Next, this article will introduce you how to repair Windows 10 using command prompt with five methods.
Method 1. How to repair Windows 10 using SFC?
SFC (System File Checker) is a command-line utility that can scan for corruption in Windows system files and replace any corrupted or missing protected system files with a known good version. When you feel buggy with your computer or notice problems during boot, you can use SFC to diagnose problems and repair it.В
To repair Windows 10 using SFC with detailed steps:
1. Open «Start», search for the Command Prompt, select it and run as administrator.
2. Then type the command: «sfc /scannow» and press «Enter».
If SFC is unable to fix the problem, probably the utility cannot get the necessary files from the Windows image, which might have become broken. In this situation, you can use DISM to repair the Windows image.
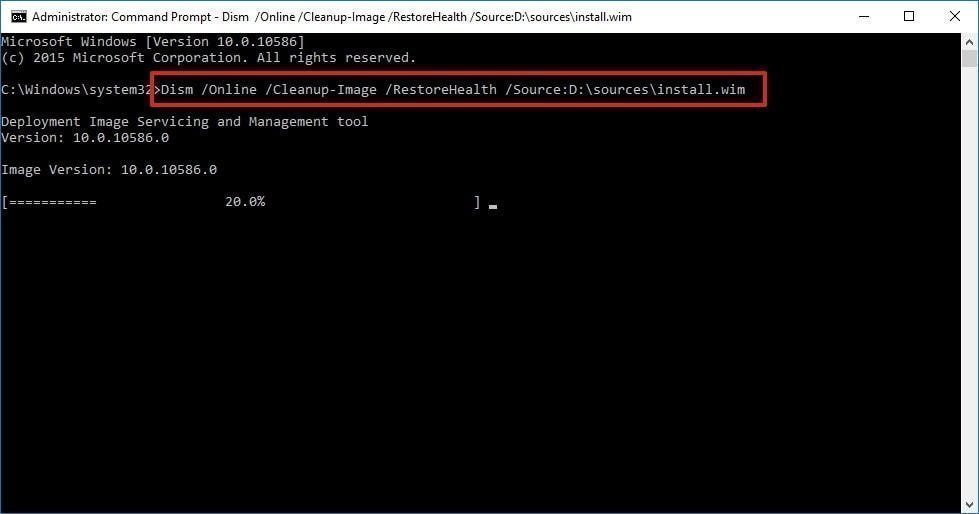
Method 2. How to repair Windows 10 using DISM?
Windows 10 includes a command-line utility known as DISM (Deployment Image Servicing and Management). DISM command Windows 10 can be used to repair and prepare Windows images, including, Windows Setup, Windows Recovery Environment, and Windows PE. Also, DISM can be used to fix the recovery image within an installation of the operating system.
To repair Windows 10 using DISM commands:
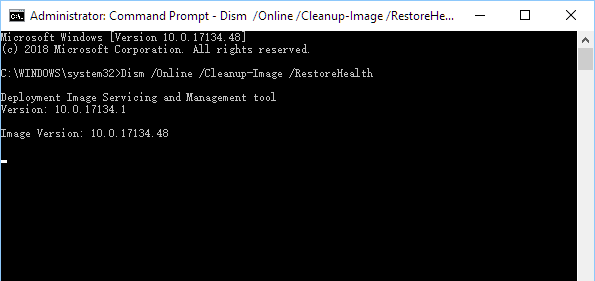
To check whether there is any corruption, Run command line as administrator, then type the following syntaxВ and press «Enter».
DISM /Online /Cleanup-Image /CheckHealth
To scan the Windows image for any corruption, type below command and hit «Enter».
DISM /Online /Cleanup-Image /ScanHealth
To fix Windows image, type the following command and hit «Enter».
DISM /Online /Cleanup-Image /RestoreHealth /Source:repairSource\install.wim
Method 3. How to reset Windows 10 with command line?
To reset Windows 10 with «Reset this PC», follow the instructions below:
Type “systemreset -cleanpc” in an elevated command prompt and press «Enter».В (If your computer cannot boot, you can boot into recovery mode and select «Troubleshoot», and then choose «Reset this PC».)
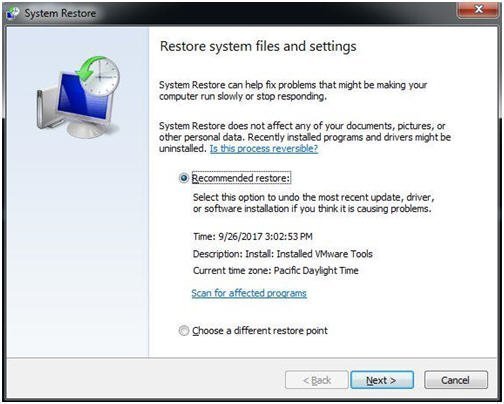
Method 4. How to run system restore with command prompt?
If the problem is too severe, you can try to restore your Windows 10 to the previous state as long as you have enabled system restore. But, it willВ notВ restoreВ documents, music, emails, or personal files of any kind. If this is what you need, see below.
To run system restore in safe mode, follow the steps below:
1. Start your computer and press «F8» repeatedly until the Windows advanced options menu appears.
2. Click «Safe Mode with command prompt» and press «Enter». If your computer can boot normally, type «cmd» in the search box and click «Command Prompt» to continue.
3. Sign in using an administrator account if needed. Once the command prompt is showing, enterВ «rstrui.exe» at first in the Command Prompt Window andВ press «Enter» to continue.
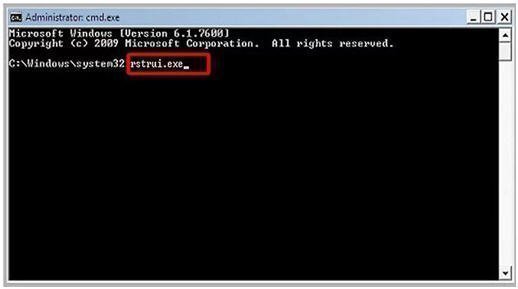
4. This command will bring you to the interface of System Restore. You can either use the recommended restore point or click «Next» to choose an available restore point. Then, follow the instruction to complete system restore.
Method 5. How to repair Windows 10 with AOMEI.exe?
Besides system restore, you can also repair Windows 10 with AOMEI.exe. AOMEI Backupper is a reliable backup and restore software which is designed for Windows 10/8/7/XP/Visa. You can either backup and restore from graphic users interface or command line. It has some features that Windows built-in tool does not have. For example, you can use AOMEI Backupper to create incremental backup, and you can restore to a dissimilar hardware.
Suppose you have created system image backup with AOMEI Backupper. Before restoring system, you can use a utility named Check Image to check if system image backup is intact and without error.В
Then, use the following steps to restore windows 10 with AOMEI.exe:
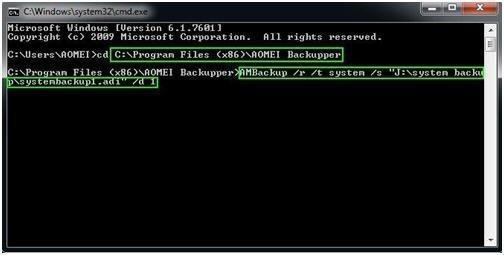
1. Navigate to AOMEI Backupper installation directory by typing the following command in command line and press «Enter». For example: cd C:\Program Files (x86)\AOMEI Backupper.
Note: If you run this command under Windows PE environment, the drive letters might change.
2. Run the following command to start restore: AMBackup /r /t [backup type] /s «[backup location path]» /d [destination location]. For example: To restore the system backup saved in J:\systembackup1 to disk 1. You should type the command: AMBackup /r /t system /s “J:\system backup\systembackup1.adi” /d 1
Tip: If you need to restore to another computer, AOMEI Backupper «Universal Restore» feature can make this very easy. For example: Run system restore in the image named «systembackup1.adi» to the partition 0 on disk 0 and perform a universal restore. AMBackup /r /t system /s «D:\system backup\systembackup1.adi» /d 0:0 /x
Now you have learned how to repair Windows 10 using command line with five methods. You can choose one based on your preference. It is also suggested to keep backup software AOMEI Backupper installed on your computer to provide continuous protection (try 30-day free trial).В
Also, you can find «Recovery Environment» utility in «Tools» toВ enable the boot option of AOMEI Backupper recovery environment. When system crashes, it enables you to perform backup/restore from boot easily.
If you want to protect unlimited computers within your company, you can pick AOMEI Backupper Technician. With the inbuilt AOMEI Image Deploy tool, you are also allowed to deploy/restore system image file on server-side computer to multiple client-side computers over network.
How to Repair Windows 10 using Command Prompt?
This post all talks about how to repair Windows 10 using the command prompt.

David Darlington
Dec 21, 2020 • Filed to: Windows Computer Solutions • Proven solutions
With the rising popularity of Windows 10, most computers are installed Windows 10 OS. Windows 10 possesses excellent stability, but in some cases, you may still encounter various Windows errors like failure to boot, blue screen issues, even crashing. For this kind of instance, we have to repair it. Fortunately, Windows provides a command-line tool to help you to solve all kinds of system issues. By following the below steps, you can learn how to repair Windows 10 using Command Prompt.
Part 1. How to Repair Windows 10 using Command Prompt
Windows 10 provides a very useful command-line tool to help you repair your system.В We just need to enter the recovery mode of the system. In most cases, we can enter the recovery mode with just simple steps when you are not able to boot your computer in the usual manner.В You can follow the steps below to enter the recovery mode of Windows 10.
Step 1. Enter Windows Recovery mode
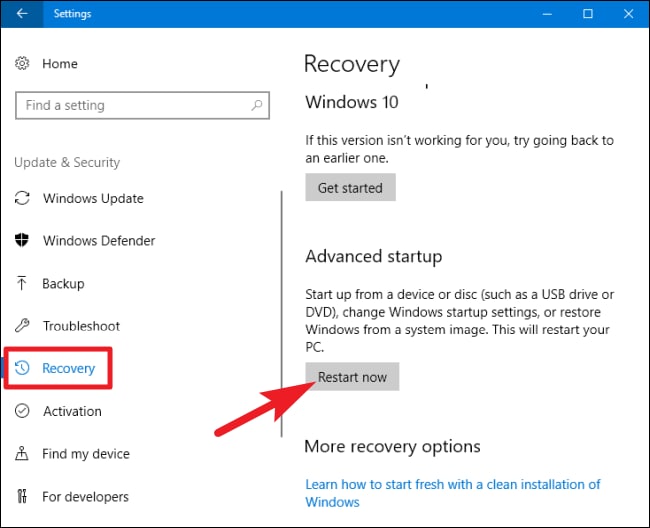
If you can still access Windows 10, open the Settings app and select Update & SecurityВ >В RecoveryВ >В Advanced startup. Then click Restart now button. The computer will boot into Windows Recovery mode automatically.
However, you can’t enter Windows as normal. Follow the below steps:
Shut down your computer first and then power it on. Then press the F11 key shortly. If it might not work, hold and press on the power switch to force shutdown when it starts loading Windows 10. Next, repeat this operation 3-4 times until seeing the Recovery mode screen. Then select Troubleshoot > Advanced options > Command Prompt.

Step 2. Using Command Prompt to repair Windows 10
Once you launch the Command Prompt tool, enter the following command:
The program will automatically fix errors in Windows 10. However, it will taker a few minutes to repair it. Just wait for it completes. After completing the operation, you can restart your system in the normal mode. If everything goes well, it will fix any issue with Windows 10.
By following these steps, you would be able to learn how to repair Windows 10 using Command Prompt. Though, if you can’t access your important data files due to a malfunctioning system, then you can follow the next tutorial.
Part 2. How to Repair and Recover Windows 10 with Bootable Media
We are sure that by following the above-mentioned solution, you would be able to learn how to repair Windows 10 using Command Prompt. If your system is working flawlessly, then you don’t have to worry a bit. Nevertheless, if you can’t restart your system or access your important content, then you might need to take some added measures for operating system crash recovery. By using Recoverit Data Recovery Software, you can easily recover your lost or inaccessible content pretty easily. Here are some of its major features.
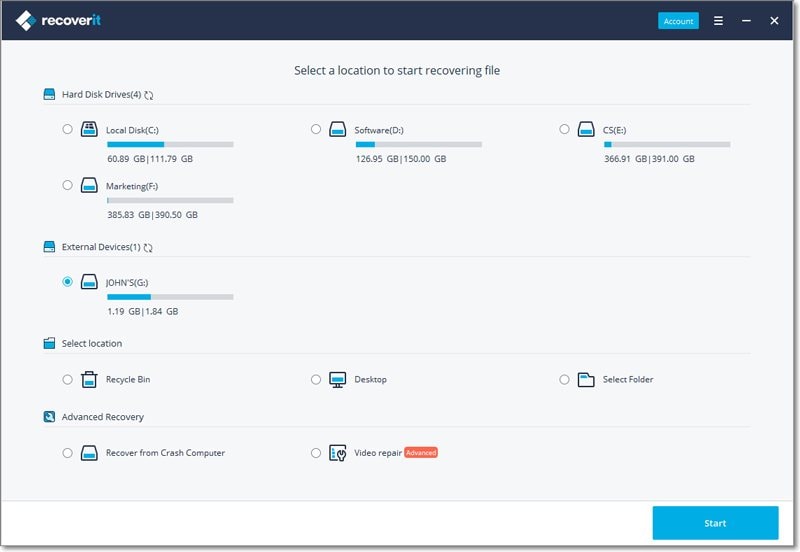
When you cannot access the Windows 10 PC, you can free download Recoverit Data Recovery Software to create bootable media and recover data from hard disk.
How to run Troubleshooter in Windows 10 from the command line
You can run a built-in Troubleshooter in Windows 10/8/7 from the command line. Microsoft Support Diagnostic Tool or MSDT.exe can be used to invoke and launch any Windows Troubleshooting Pack or Troubleshooter from the command line.
How to run Troubleshooter in Windows 10
In this post, we will see how to run Hardware, Audio or Sound, Power, Network, Windows Update, System Maintenance, App, and several other Troubleshooters in Windows from the command line using MSDT.exe, via Settings or using FixWin.
Run built-in Windows Troubleshooter from the command line
To run any Troubleshooter open an elevated command prompt and run these commands:
To invoke built-in Troubleshooters, use this command:
To run a custom-built troubleshooter stored locally use this command line:
To run a troubleshooter which is in a .diagcab file format, use this:
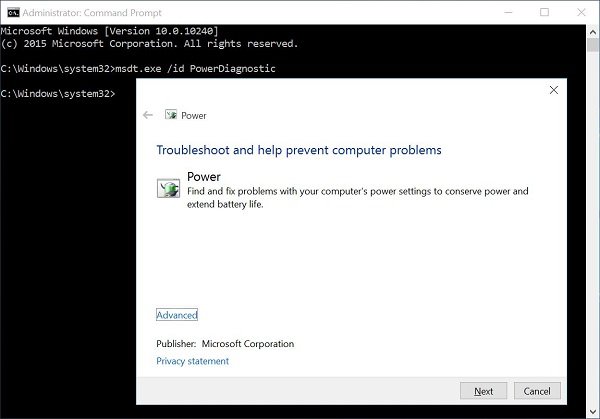
For instance, if you want to bring up the built-in Power Troubleshooter to troubleshoot problems relating to power or battery, run this command:
Once you hit Enter, you will see the Power Troubleshooter pop-up. Similarly, if you know the Diagnostic Pack ID of any Troubleshooter, you will be able to invoke it using the command line.
Here is a list of some Troubleshooting Pack ID’s sourced from TechNet, for your ready reference
| Troubleshooting Pack ID | Description | Application or Feature Dependency |
|---|---|---|
| AeroDiagnostic | Troubleshoots problems displaying Aero effects like transparency. | Aero Display Theme installed |
| NetworkDiagnosticsDA | Troubleshoots problems connecting to a workplace network over the Internet using Direct Access. | Direct Access installed |
| DeviceDiagnostic | Troubleshoots problems using hardware and access devices connected to the computer. | |
| HomeGroupDiagnostic | Troubleshoots problems viewing computers or shared files in a homegroup. | HomeGroup installed |
| NetworkDiagnosticsInbound | Troubleshoots problems with allowing other computers to communicate with the target computer through Windows Firewall. | |
| NetworkDiagnosticsWeb | Troubleshoots problems connecting to the Internet or to a specific Web site. | |
| IEDiagnostic | Helps the user prevent add-on problems and optimize temporary files and connections. | Internet Explorer installed |
| IESecurityDiagnostic | Helps the user prevent malware, pop-ups, and online attacks. | Internet Explorer installed |
| NetworkDiagnosticsNetworkAdapter | Troubleshoots problems with Ethernet, wireless, or other network adapters. | |
| PerformanceDiagnostic | Helps the user adjust settings to improve operating system speed and performance. | |
| AudioPlaybackDiagnostic | Troubleshoots problems playing sounds and other audio files. | Audio output device installed |
| PowerDiagnostic | Helps the user adjust power settings to improve battery life and reduce power consumption. | |
| PrinterDiagnostic | Troubleshoots problems printing. | |
| PCWDiagnostic | Helps the user configure older programs so that they can run in the current version of Windows. | |
| AudioRecordingDiagnostic | Troubleshoots problems recording audio from a microphone or other input source. | Audio input device installed |
| SearchDiagnostic | Troubleshoots problems with search and indexing using Windows Search. | Search enabled |
| NetworkDiagnosticsFileShare | Troubleshoots problems accessing shared files and folders on other computers over the network. | |
| MaintenanceDiagnostic | Helps the user clean up unused files and shortcuts and perform other maintenance tasks. | |
| WindowsMediaPlayerDVDDiagnostic | Troubleshoots problems playing a DVD using Windows Media Player. | Windows Media Player installed |
| WindowsMediaPlayerLibraryDiagnostic | Troubleshoots problems with adding media files to the Windows Media Player library. | Windows Media Player installed |
| WindowsMediaPlayerConfigurationDiagnostic | Helps the user reset Windows Media Player settings to the default configuration. | Windows Media Player installed |
| WindowsUpdateDiagnostic | Troubleshoots problems that prevent Windows Update from performing update tasks. |
Direct Commands to open Windows 10 Troubleshooters
Here is the list of commands you can use in the Run box or Command Prompt to open Windows Troubleshooters directly in Windows 10/8/7.
To open Troubleshooting Windows in Control Panel:
To open the Aero troubleshooter:
To open the Playing Audio troubleshooter:
To open the Recording Audio troubleshooter in Control Panel:
To open the Hardware and Devices troubleshooter in Control Panel:
To open the Shared Folders troubleshooter:
To open the HomeGroup troubleshooter:
To open the Network Adapter troubleshooter:
To open the Incoming Connections troubleshooter:
To open the Internet Explorer Performance troubleshooter:
To open the Internet Explorer Safety troubleshooter:
To open the System Maintenance troubleshooter:
To open the Program Compatibility troubleshooter:
To open the Performance troubleshooter:
To open the Power troubleshooter:
To open the Printer troubleshooter.:
To open the Windows Media Player Settings troubleshooter:
To open the Windows Media Player Library troubleshooter:
To open the Windows Media Player DVD troubleshooter:
Run Troubleshooters via Settings
You can also access the Troubleshooters via Windows Settings. Press Win+I to open Settings > Update & security > Troubleshoot. Here you will see all the Troubleshooters. More on this at – Run Troubleshooters using the Troubleshoot page.
Run Troubleshooters using FixWin
Although most of us access these Troubleshooters via Settings or the Taskbar search, there is an easy way! Use our FixWin 10 to open them with a click!
Previously, one could access Troubleshooters via the Control Panel > Troubleshooting applet or download them from the Microsoft website. However, Microsoft is now providing quite the same functionality within the Windows 10 Settings app.


