- Change Windows 10 Privacy Settings and protect your privacy
- New Windows 10 Privacy Settings
- 1] General Settings
- Let apps use my advertising ID for experiences across apps
- Let websites provide locally relevant content by accessing my language list
- 2] Speech
- 3] Inking & typing personalization
- 4] Diagnostic & Feedback
- 5] Activity History
- Apps permissions under Privacy settings
- 1] Location
- 2] Camera
- 3] Microphone
- 4] Account Info
- 5] Contacts, Calendar, Messaging, Radio
- 6] Other Devices
- 6] File System
- 1] Harden Microsoft Account Privacy Settings
- 2] Harden Edge browser privacy
- 3] Cortana settings
- 4] Adjust Bing Privacy settings, Opt-out of personalized ads
- 5] Want to turn off Wi-Fi Sense?
- 6] Use Ultimate Windows Tweaker tool
- How to Secure your Privacy in Windows 10 using Built-In Rules
- Turn off General Privacy to prevent Ads
- Stop Location Sharing with other Apps
- Turn off Diagnostics & Feedback sharing
- Other options
- Why Not to see Diagnostic Information ?
- Clear Microsoft Account Privacy History
- Turn off Device Activity History
- Turn off App Permissions
- Conclusion
Change Windows 10 Privacy Settings and protect your privacy
Windows 10 comes with many welcome changes, including a new Settings app. One of the best changes includes the Privacy Settings which give privacy control to users. Microsoft has said that Windows 10 data collection cannot be stopped. So how can we harden it at least? In this post, we will take a look at the privacy control and settings available and how to configure & fix default Windows 10 Privacy Settings and adjust & configure Microsoft account, location, camera, messaging, Edge, Cortana, etc. settings, in order to protect your privacy.
Read: Windows 10 Privacy Issues: How much data is Microsoft really collecting?
New Windows 10 Privacy Settings
To access these privacy settings, type ‘Privacy Settings’ in the Windows ‘Search’ field. Now click on ‘Open’ and open the settings.
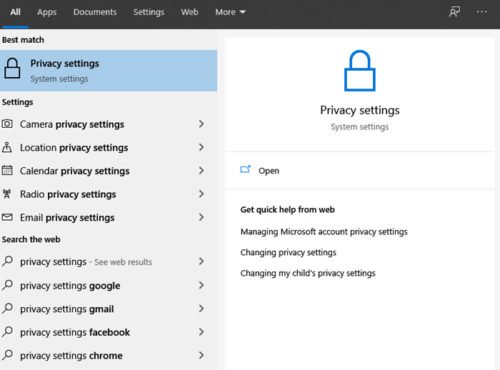
When you open the Privacy settings, you will see the following Privacy settings panel.
In the Windows 10 Privacy Settings panel, you can set Windows permissions as well as App permissions. By default, the General settings tab under Windows permissions opens. Apart from General, you can set Windows permissions for Speech, Inking & typing personalization, Diagnostic & Feedback, and Activity History.
Under App permissions, you can set permissions for various Windows apps such as Location, Camera, Microphone, Voice Activation, Contacts, Phone Calls and so on.
1] General Settings
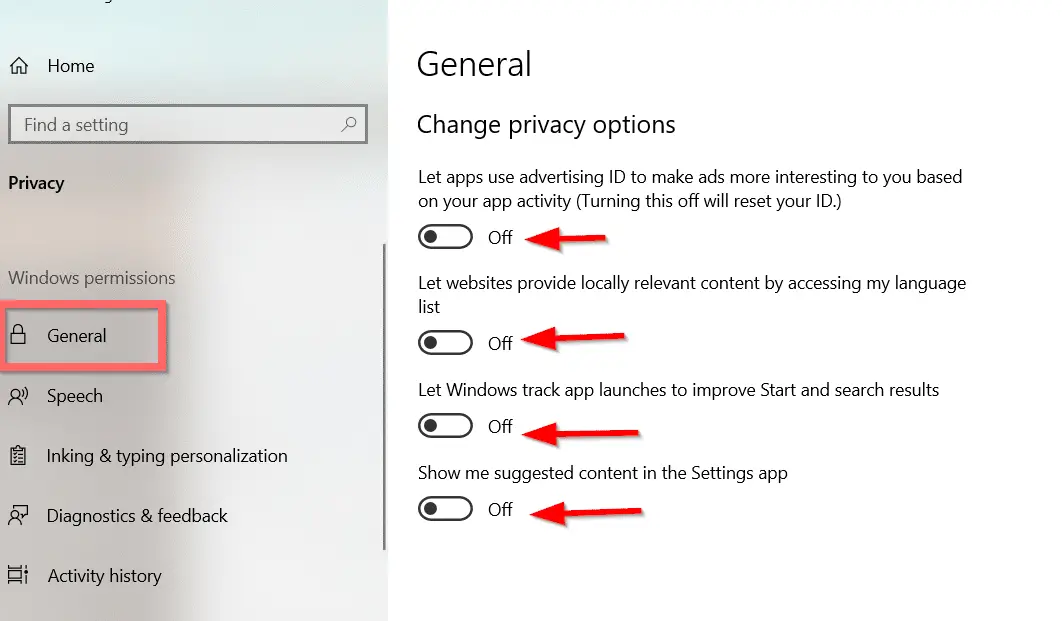
General Settings allow you to adjust the privacy settings and decide if you want to:
- Let apps use advertising IDs to make ads more interesting to you based on your app activity.
- Let websites provide locally relevant content by accessing your language list
- Let Windows track app launches to improve Start and search
- Show your suggested content in the Settings app
Let apps use my advertising ID for experiences across apps
When you install Windows 10 and log in using a Microsoft Account, an advertising ID is automatically assigned to your PC which is used to keep track of your product preferences and other relevant information. Apps can request access to this ID and it can then be used by App Developers and Advertising Networks to provide more relevant advertising to you by understanding what apps you use and how you use them. This works the same way how YouTube suggests videos based on your watch history and subscriptions.
Turning this off possibly won’t do much. Your advertising ID will be turned off, and you’ll be shown generic advertisements.
Let websites provide locally relevant content by accessing my language list
Microsoft uses this option to seek access to your language list so that it can be used by websites to provide content that is locally apropos to your location and language. You can choose to turn this toggle Off in order to prevent Microsoft from utilizing your information.
Additionally, you can view and add the languages that you want in Region and Language settings under Settings > Time & language > Region & language > Languages.
Turning these settings, ON will not risk your online security, but you can choose the options according to your privacy concerns. By default, only two of these settings are turned ON. Rest of the settings you can change according to your requirements.
2] Speech
This section lets you adjust the settings with your digital virtual assistant Cortana. You can use your voice for dictation and talk to Cortana and other apps that use Microsoft’s cloud-based speech recognition. Even after turning off you can still use the Windows Speech Recognition app and other speech services.
3] Inking & typing personalization
This section lets you adjust the settings with your digital virtual assistant Cortana. You can turn it off, by clicking on Stop getting to know me and Cortana will stop collecting your info like contacts and calendar events.
As part of the inking and typing feature, Windows collects unique words such as the names you write and saves them in a personal dictionary stored locally on your device. This dictionary helps you type and ink more accurately.
You can access and view the user dictionary by clicking on the ‘View user dictionary’ link.
You can manage the info for all your devices by clicking on Go to Bing and manage personal info for all your devices. This will take you to the Bing page where you can manage Bing privacy settings like personal info, saved browsing history, interests, places and your settings with Cortana.
4] Diagnostic & Feedback
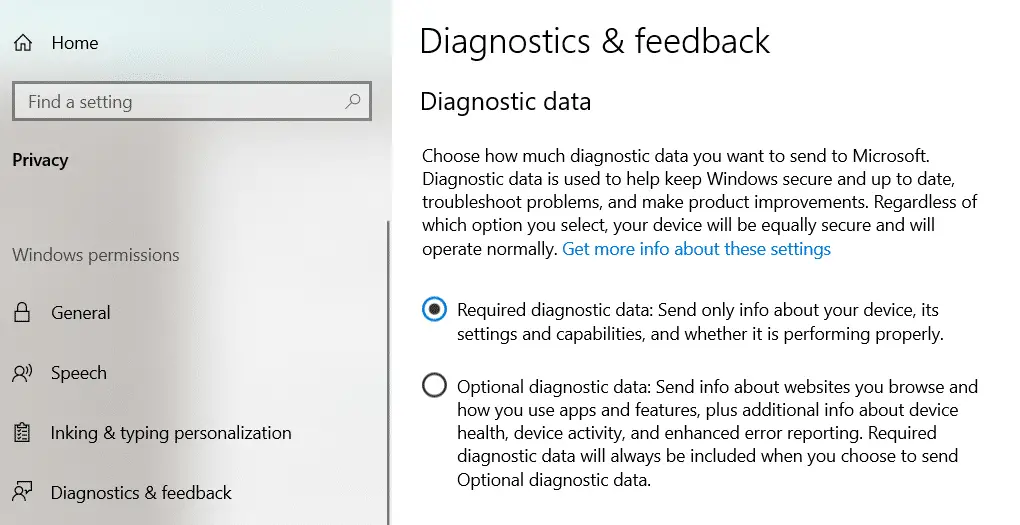
This is what Microsoft loves – Your feedback! The Diagnostic & feedback section lets you decide how often and how much data you want to send to Microsoft. It was two settings, namely Basic and Full. When you select Basic, you choose to send only the information about your device, its settings and capabilities, and whether your device is performing properly. When you select Full, you choose to send basic diagnostic data as well as information about websites you browse, how you use apps and features and enhanced error reporting.
Apart from these two settings, Diagnostic & Feedback section also includes setting regarding improving inking and typing, getting tailored experience, view and delete diagnostic data, Feedback frequency and recommended troubleshooting. This is one of the most important Windows 10 Privacy Settings, as it collects all possible user data.
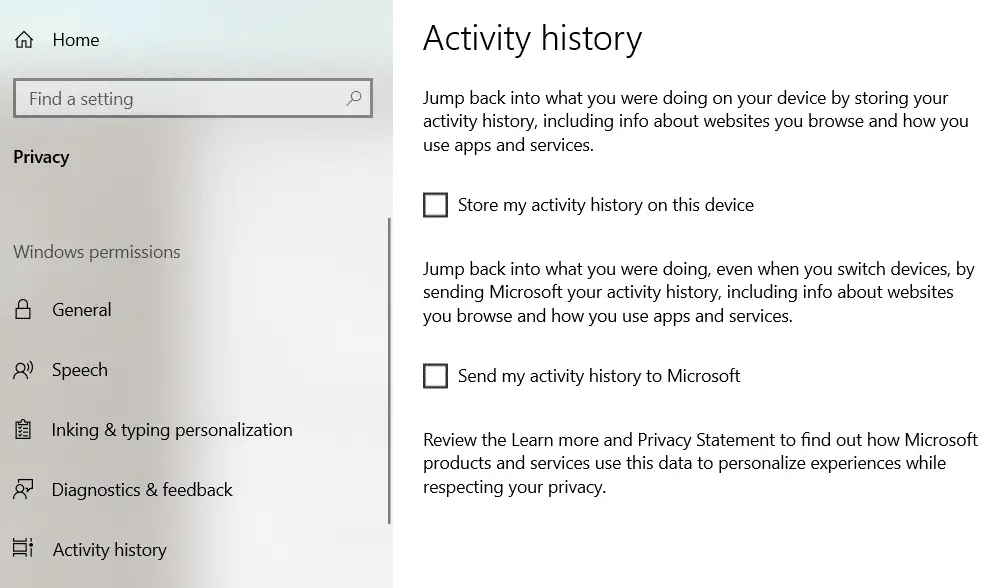
5] Activity History
As the name suggests, this is one of the Windows 10 Privacy Settings where you can store your device activity. The stored history helps you jump back into what you were doing on your device. The stored history includes your activity history, information about websites you browse, and how you use apps and services.
You can also choose to send this activity history to Microsoft. If you have multiple Microsoft accounts on the same device, you can choose to store or not store activity history for specific accounts. You can clear the history for a selected Microsoft account by clicking the ‘Clear’ tab in the same settings.
Apps permissions under Privacy settings
Under ‘Apps Permissions’ sections in the Windows 10 Privacy settings, you can set permissions for various in-built apps on a Windows 10 PC. You can change the privacy settings for the following apps:
- Location
- Camera
- Microphone
- Voice Activation
- Notifications
- Account Info
- Contacts
- Calendar
- Phone calls
- Call history
- Tasks
- Messaging
- Radios
- Other devices
- Background apps
- App diagnostic
- Automatic file downloads
- Documents
- Pictures
- Videos
- File systems.
Let us see some of these apps’ settings and how to set permissions for these apps.
1] Location
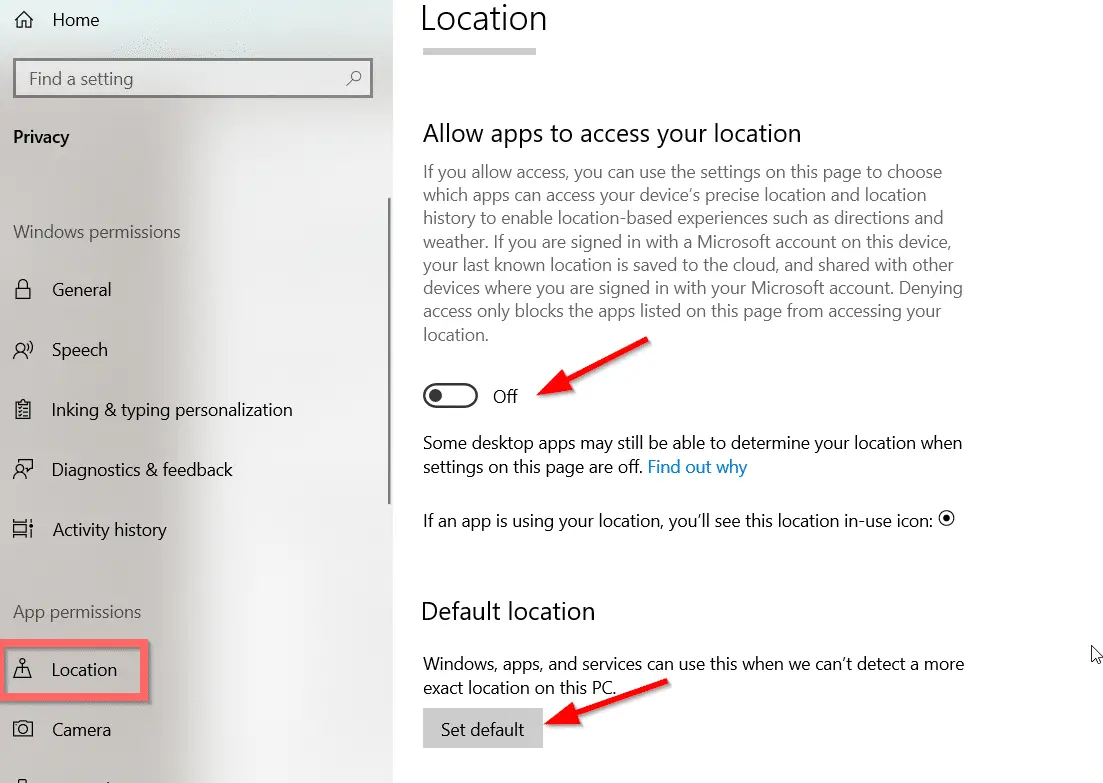
If you see Your location is currently in use icon, you might want to turn OFF the Location of your device because keeping it ON may allow your apps to access your location. Also, your PC Stores your Location history if the option is turned ON, but you can clear the history just by clicking on Clear.
In this Windows 10 Privacy Settings, you can let Windows access your device’s capabilities to determine your location as well as your location data. With this information, Microsoft can improve location services. You can set your default location. Your PC stores your Location history if the option is turned ON. However, you can clear the history just by clicking on ‘Clear’.
In this setting, you can also choose if apps can access your location. There is a list of Windows apps for which you can set permission whether these can access your precise location. Scroll down to set if the apps like the 3D viewer, App connector, Weather, Cortana, Camera and Windows Maps can have access to your location or not.
2] Camera
In this section, you can allow Microsoft apps and most desktop apps to access the camera. You can also set permission for accessing the camera for individual apps.
3] Microphone
In this section, you can allow Microsoft apps and most desktop apps to access the microphone of your device. However, it does not allow Windows Hello. You can also set permission for accessing the camera for individual apps.
4] Account Info
In this section, you can select which apps can access your account info like your name, photo, and other account details.
5] Contacts, Calendar, Messaging, Radio
In these sections, you can allow or disallow the apps to access your contacts, calendar, and events, messaging and control your radios. Allowing the apps to access your message may let them read or send messages.
6] Other Devices
Here you can allow your apps to share and sync info with the wireless devices that aren’t paired with your PC. You can also choose apps that can sync with other devices. All your connected devices will appear under this section. Let your apps use Trusted Devices.
6] File System
In the privacy settings, you can allow people to choose if your apps have access to all your files. This includes access to documents, pictures, videos, and local OneDrive files.
There are several settings included in Windows 10 Privacy Settings. With these settings, you can set permissions whether your personal data and files should be shared or not. Thus, you get complete control over your data and privacy.
We offer additional suggestions below.
1] Harden Microsoft Account Privacy Settings
Microsoft Account is used to sign in, into your Outlook.com, Hotmail.com, and other email IDs. It can also be used to sign in to other Microsoft services and devices like Windows computers, Xbox Live, Windows Phone and so on. Take a look at how to harden Microsoft Account Privacy Settings.
2] Harden Edge browser privacy
Having done this, you might want to also take a look at and configure Privacy settings in the Edge browser.
3] Cortana settings
If you do not use Cortana, you can turn Cortana off. Click inside the taskbar search box. The Cortana settings box will appear as shown below. Move the slider to Off position. Now to delete all that Cortana knows about you, click on the Manage what Cortana knows about me in the cloud link, sign in to your Microsoft Account and then do the needful.
4] Adjust Bing Privacy settings, Opt-out of personalized ads
It is always recommended to check and adjust these privacy settings carefully once so that you can maintain your online privacy.
5] Want to turn off Wi-Fi Sense?
This post will tell you what you need to know about Wi-Fi Sense in Windows 10 and show you how to turn it off if you want to.
6] Use Ultimate Windows Tweaker tool
Our Ultimate Windows Tweaker 4 will let you easily tweak Windows 10 Privacy settings & more. The Privacy tab lets you disable Telemetry, Biometrics, Advertising ID, Bing search, Cortana, Windows Update sharing, Feedback requests, Password Reveal button, Steps Recorder, Inventory Collector and Application Telemetry.
Here is a list of some more Windows 10 Privacy Tools & Fixers that help you harden your privacy.
How to Secure your Privacy in Windows 10 using Built-In Rules
Windows 10 can be used with a Microsoft account or Local account. Therefore, privacy worries are part of today’s digital world.
Location tracking . Ad Tracking . Cortana . Apps . Diagnostic data . Background services . Privacy items . Some ways by which data passes through.
Troubleshooting Data . Primarily collected to solve technical issues and other related problems. Microsoft promises that it won’t sell your private data to any third party or use it for their selfish motives.
To some extent, you can shield your Privacy using the in-built options of Windows 10.
For example visited websites, cookie information, app usage. Some intelligence might transfer between your Windows 10 device and Microsoft data centers.
It can be for support or any other issues. Even Google, Facebook, Amazon face privacy issues. In this review, we will see the integral Windows 10 privacy settings that will fortify your identity to some extent.
Following below privacy protection methods also will apply to 20H2 and 2004 updates.
Table of Contents
Turn off General Privacy to prevent Ads
Microsoft uses an advertising ID to display ads to you based on your app activity to the unknown.
In other cases also, this ID is used to identify your browsing, purchase, and other habits.
You can reset this ID by turning off the following setting.
- Press the Win + I keys together to open the Settings app.
- Click on Privacy> General
- There are four privacy options.
- Apps using your Advertising ID for showing personalized ads.
- Websites are providing locally relevant content based on your language preferences.
- Prevent Windows 10 from tracking your app launches.
- Stop suggested content in the Settings App.
- Turn off sync settings for the above four choices.
It is the first and basic privacy situation to secure yourself from unwanted ads, apps, and sites.
Stop Location Sharing with other Apps
If some kids or school-going children using their Windows 10 laptops for homework and other purposes, a parent would like to track their location.
Similarly, users would like to get weather information, a nearby restaurant, hospitals, medical shops, dining areas, hotels based on their location. You can also set a default location for app usage.
In such cases, you can use this option though it has privacy concerns.
- Click on Location below App permissions on the same screen.
- The following settings are available here.
- Allow access to location on this device
- Allow apps to access your location
- Default location
- Location history
- Choose which apps can access your precise location
- Allow desktop apps to access your location
- Geofencing
- Turn off the required location access to suit your needs.
The best way is to allow location access to Windows 10 and prevent dangerous/spying apps from accessing your location.
From the Action Center also, you can change location access. Geofencing is for the care of toddlers. Sometimes, teenagers also try to cross boundaries. Then this will display a message based on the hardware connected to Windows 10.
Turn off Diagnostics & Feedback sharing
Two choices are available here –
- Required diagnostic data
- Optional diagnostic data
So what option you choose, a certain amount of data is gathered from your Windows 10 device.
The primary use of this feature is to send some “related” information about your device, apps, sites, browsing history to Microsoft. It claims that it is secure.
This information is mainly used to troubleshoot any problems and for the Microsoft Technical Support team to look at the error codes sent through this diagnostic information.
It also helps in making Windows 10 better and other product improvements. Microsoft guarantees that which of the above option you use, your device is secure and operates normally.
The first setting will only send info about your device, its settings like the desktop resolution, basic location, personalized experiences, themes, and performance metrics.
In many cases, I choose this option as I don’t prefer the Microsoft team for fixing my errors or problems.
The second setting will collect more optional data like the websites you use, the way you use apps and their features, device health, device activity, and additional error reporting. It will add the required diagnostic data will be added to this information.
Other options
- Improve inking and Typing
- Tailored Experiences
- View Diagnostic data
- Delete Diagnostic data
- Feedback frequency
Typing history and handwriting usage (based on the hardware used) create a personal dictionary and profile.
It makes better suggestions when you use these tools in other apps and programs. It automatically gets turned off when you choose the “Required diagnostic data” option.
Microsoft will provide personalized tips, ads, and recommendations, excluding information about your sites visited to enhance personal experiences. Even though you turned off Advertising ID, this will provide relevant, personalized ads. You can turn it off for privacy protection.
The 3rd and 4th options are used to see what diagnostic data Microsoft is collecting.
Why Not to see Diagnostic Information ?
There is a tool called “Diagnostic Data Viewer” But this is only for expert troubleshooters and coders who can understand the language of Windows 10.
Basic users can be confused with the amount of data it shows and will cause more doubts.
Better not to use this tool. Instead, clear your diagnostic data using the 4th option from time to time.
Using the Feedback hub, Microsoft displays a form or notice to collect your voice on Windows 10 features. But this can be annoying for every app or error code or problem. I would better suggest keeping this option to “Never,” so you need not give any feedback.
Clear Microsoft Account Privacy History
To keep your personalized settings and transfer to another device easy, the Redmond giant introduced Microsoft Account. You were connected with various other apps, software, and tools like OneDrive, Skype, Microsoft Office 365, Meetings, Outlook, and many others.
![]()
When you use this account, most of your private information is stored and connected with it. Making use of the web interface, you can see all the details about them.
- Browsing history,
- Search history,
- Location activity,
- Voice activity,
- Media activity,
- Product and service activity,
- Product and service performance,
- Cortana’s Notebook data,
- LinkedIn information,
- Advertising preferences,
- Microsoft News Community,
- Teams,
- Skype,
- Xbox
- Other App activity
You can clear most of the history and activity using your Microsoft account. For complete details, you can look at this tutorial on privacy settings.
Turn off Device Activity History
If you navigate to Settings > Privacy > Activity History, you can see two more options. These are –
- Store my activity history on this device
- Send my activity history to Microsoft.
You can uncheck the second option to prevent Microsoft from knowing your information about the sites you visited, apps, and services-related activity and preferences.
One can also clear the history of your Microsoft account on your device from this page, time to time.
Turn off App Permissions
To safeguard your privacy from apps peeking into your browsing and activity, you can limit their permissions. Prevent them from accessing some of your hardware like microphone, camera, phone calls, devices, etc.
It makes sure that NOT only Microsoft but other apps are also prevented from accessing your activity related to your device and other information.
Some of the permission which can be denied access to the apps are –
- Microphone
- Voice activation
- Notifications
- Account Info
- Contacts
- Calendar
- Phone calls
- Call history
- Tasks
- Messaging
- Radios
- Other devices
- Background apps
- App diagnostics
- Automatic file downloads
- Documents
- Pictures
- Videos
- File System
Though the same device is used by multiple accounts or users on Windows 10, this creates a conflict of interest when apps, software, bookmarks are shared in-between.
If you allow diagnostic information (mentioned earlier) to be collected, apps may also have gained this knowledge. Also, one app intelligence like Skype and OneDrive data can be used by some other third-party apps.

In such cases, you can prevent apps from accessing diagnostic info about other apps. In this way, each app’s privacy is maintained.
Conclusion
There are privacy tools like O&O Shutup10, making the enabling and disabling of isolation options more easy and simple.
Using such software, all the privacy settings of Windows 10 are available at your fingertips on one screen. It keeps botheration about visiting various locations to maintain security to minimal.
But there are cons of using such tools also. Since they are third-party software, we can’t be sure what changes they make to your computer or device. In many cases, it is advisable to use the above settings to have some privacy.
Finally, complete security, privacy, protection of your data, browsing history, app permissions is impossible. Some info still gets a pass-through to Microsoft when you are connected to the Internet.
But the above settings make sure that at least you have some privacy privileges.


