- SOLVED: Windows 10 Won’t Install or Download Updates
- Repair Corrupt System Files
- Solution 1: Run the Windows Update Troubleshooter
- Solution 2: Ensure that all services related to Windows Update are running
- Solution 3: Using a Registry Tweak to reset Windows Update
- Solution 4: Fix the issue via an elevated Command Prompt
- Solution 5: Turn OFF Metered Connection
- How to fix Windows Update problems on Windows 10
- How to fix Windows Update covering basics
- Restarting device
- Checking internet connection
- Pausing updates
- Freeing up space
- How to fix Windows Update using Troubleshooter
- How to fix Windows Update installing update manually
- Determining system type
- Downloading updates manually
- Installing updates manually
- How to fix Windows Update repairing installation
- How to fix Windows Update skipping maintenance schedule
- How to fix Windows Update installing latest version
- How to fix Windows Update performing clean installation
- Creating bootable media
- Installing Windows 10
- More Windows 10 resources
- Halo: MCC’s live service elements make it better, not worse
- Microsoft’s Surface Duo is not ‘failing up’
- Here’s what you can do if Windows 10 update KB5001330 is causing issues
- These are the best PC sticks when you’re on the move
SOLVED: Windows 10 Won’t Install or Download Updates
While Windows 10 is the latest and greatest iteration of the Windows Operating System in existence, it is far from perfect. That being the case, Microsoft periodically rolls out tons of updates for both Windows 10 and the programs and applications that it contains. Unlike with older versions of Windows, however, all updates rolled out to Windows 10 computers via Windows Update are mandatory and are automatically downloaded and installed at one time or another. Regardless of the important status of an update and regardless of whether or not you want to install it, it will eventually be downloaded and installed, although you do have the power to delay the occurrence slightly.
Some Windows 10 users, unfortunately, have been and continue to be affected by an issue where their computers accumulate tons of pending updates, some of which are marked as waiting to be downloaded, some marked as waiting to be installed, but none actually being downloaded or installed no matter how many times affected users try to download and install them. When users affected by this issue go into Windows Update, they see a list of all of the updates available for their computer but are unable to download and/or install any of them even though some are marked as waiting to be downloaded and some waiting to be installed.
Thankfully, though, this problem is not a dead-end problem and can be fixed by pretty simple means. The following are the three most effective solutions that you can use to try and fix this problem:
Repair Corrupt System Files
Download and run Restoro to scan for corrupt files from here, if files are found to be corrupt and missing repair them and then check if it fixes the issue, if not then proceed with Solutions listed below.
Before you Proceed: Make sure to leave the process for at least an hour or two to make sure that Windows isn’t just initializing updates.
Solution 1: Run the Windows Update Troubleshooter
If a Windows 10 component is not working or behaving the way it is supposed to, what you need to do is simply run Windows 10’s built-in Troubleshooting utility, but run it specifically for the component that is malfunctioning. The same applies to Windows Update – since Windows Update is behaving strangely, the first solution you should try out is running the Windows Update Troubleshooter. To do so, you need to:
- Open the Control Panel.
- Switch to Icons
- Click on Troubleshooting.
- Click on View all in the left pane.
- Click on Windows Update.
- Click on Next, and then proceed with the troubleshooter all the way through to the end, following the on-screen instructions along the way.

The Troubleshooter will try to identify any and all problems with Windows Update and fix any problems that it finds. Once you have successfully run the Troubleshooter, you should restart your computer and try downloading and installing Windows Updates once it boots up to see whether or not the issue still persists.
Solution 2: Ensure that all services related to Windows Update are running
You may be facing this Windows Update issue if one or more of the services pertaining to Windows Update is either not enabled or are not running on your computer. If that is the case, this issue can be easily remedied by making sure that all Windows Update-related services are enabled and running.
- Hold down the Windows Logo key, and while doing so, press R to open a Run
- Type services.msc into the Run dialog and press Enter.
- Locate and right-click on the Windows Update service, and click on Properties.
- Set the service’s Startup type to Automatic, if the service is stopped, click on Start to start it, click on Apply and then click on OK.
- Locate and right-click on the Background Intelligent Transfer Service (BITS), and click on Properties.
- Repeat step 4.
- Locate and right-click on the Cryptographic Service, and click on Properties.
- Repeat step 4.
Close the utility, restart your computer and check to see whether or not the problem has been fixed once it boots up.
Solution 3: Using a Registry Tweak to reset Windows Update
If the solutions provided above doesn’t fix your problem there is a possibility that registry keys are corrupted or modified there is a Registry Tweak that you can try, basically it will reset the Windows Update‘s registry keys and set them to default which can potentially fix the issue you are having.
- Click hereto download the Registry Tweak.
- Wait for the Registry Tweak to be downloaded.
- Navigate to where the Tweak was downloaded to and double-click on it to run it.
- There will be a pop-up asking “Are you sure you want to continue?” Press “Yes”
- Now press ok.
- Restart your Computer then check to see if the issue still persists.
Solution 4: Fix the issue via an elevated Command Prompt
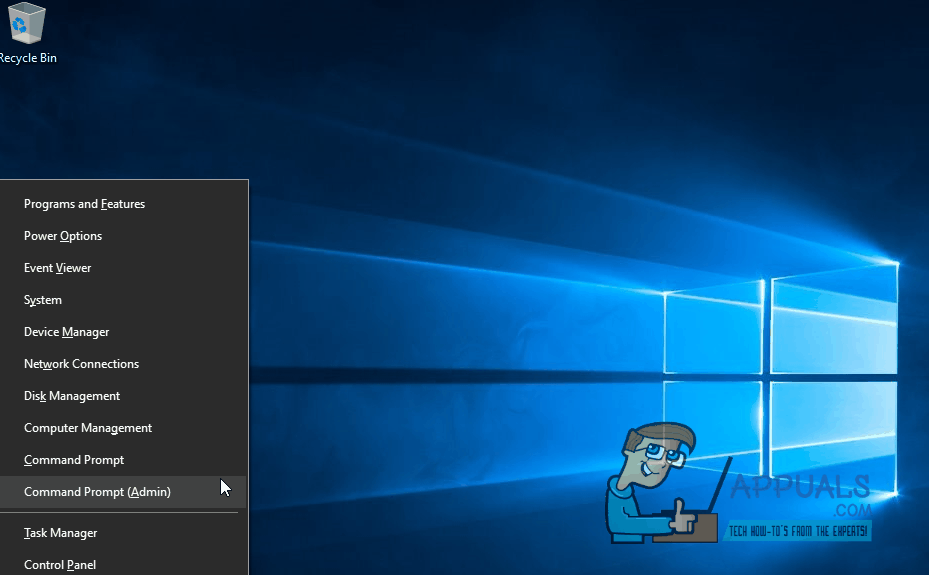
If none of the solutions listed and described above have worked for you, you may just be able to fix this issue through an elevated Command Prompt. In order to do so, you need to:
- Right-click on the Start Menu button to open the WinX Menu.
- Click on Command Prompt (Admin).
- One by one, type the following commands into the elevated Command Prompt, pressing Enter after typing in each one and waiting for one command to be executed fully before typing in the next:
Once all of the commands listed above have been fully executed, close the Command Prompt and restart your computer.
Check whether or not you are now able to download and install updates via Windows Update once your computer boots up.
Solution 5: Turn OFF Metered Connection
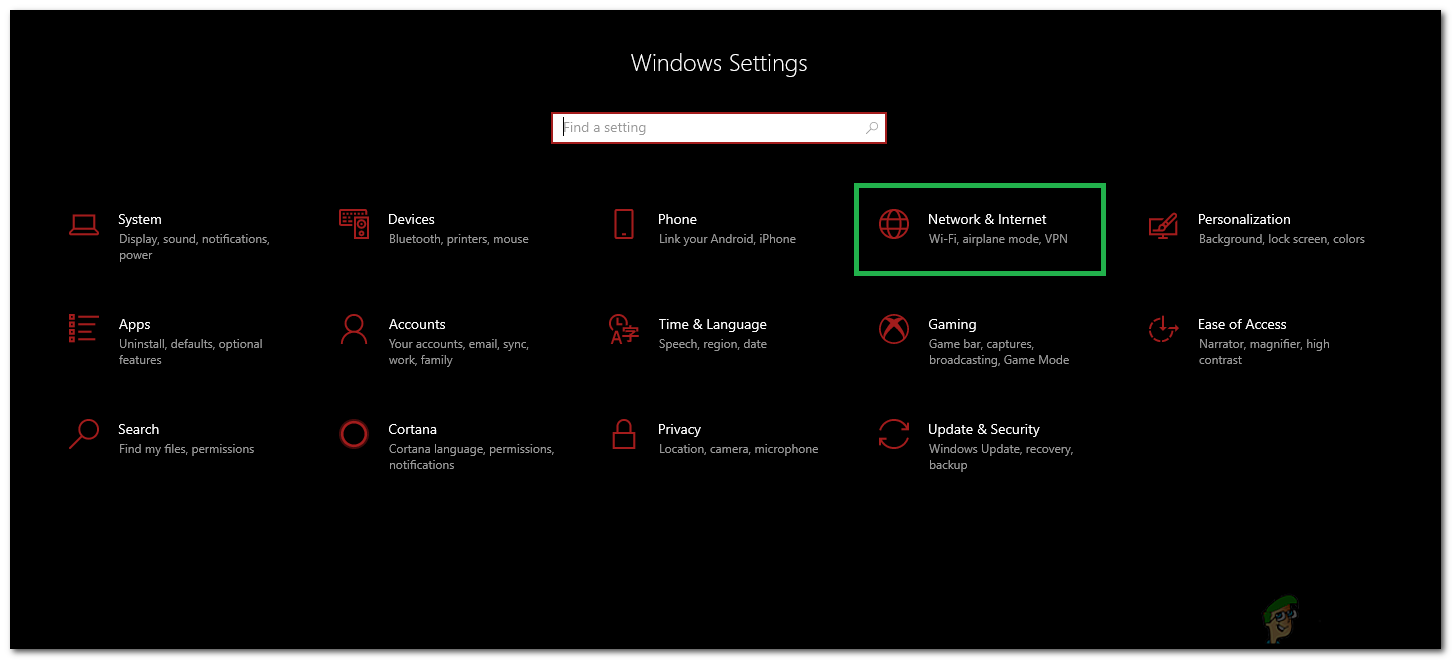
In some cases, the internet connection that you are using might be set up as a metered connection due to which the download restriction might be implemented on it. Therefore, in this step, we will be turning this metered connection OFF and then check to see if the issue still persists. For that:
- Press “Windows” + “I” to open settings.
- Click on the “Networkand Internet” option.
 Selecting “Network and Internet” Options
 - Click on the “Wifi” option on the left pane and select “Manage known Networks” in the next window. Accessing the Manage known networks menu
- Click on the Wifi name in the next window and select “Properties”.
- Click on the “Toggle” for “Set as Metered Connection” to turn it off.
- Check to see if the issue persists.
 Selecting “Network and Internet” Options
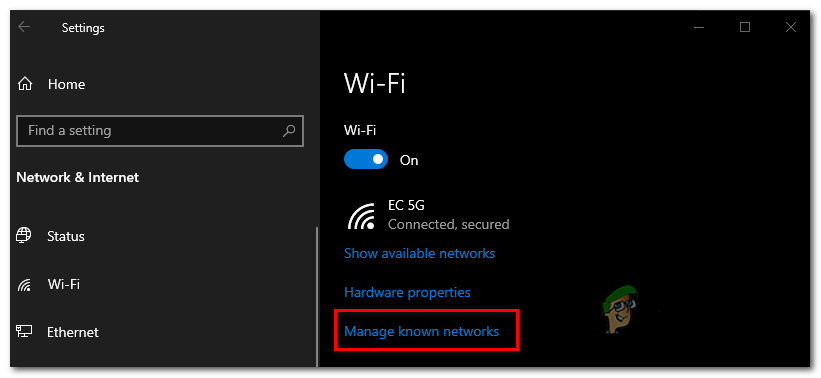 Accessing the Manage known networks menu
How to fix Windows Update problems on Windows 10
 Source: Windows Central
On Windows 10, Windows Update is an essential component that provides the mechanism to download and install quality updates as well as feature updates to improve the overall performance, integrate new features, and patch security vulnerabilities. However, for different reasons, sometimes, you may experience problems with the feature, such as stuck for a long time scanning and downloading, errors and failures during installation, and many other issues.
Thankfully, if you run into an issue or an error (for example, 0x80070020, 0x80240438, 0xC19001E2, 0x80070424, 0x80242006, 0x8007000E, 0x80D02002, 0x80070070, 0x80096004, 0x80080005, 0x8007000D, or 0x80240034), you can use a number of troubleshooting steps to fix Windows Update on your installation.
In this Windows 10 guide, we’ll walk you through several ways to fix common problems with Windows Update on your device.
How to fix Windows Update covering basics
If you’re trying to update your device and Windows Update isn’t working, you can follow a few necessary steps to resolve the problem, including restarting your computer, checking to make sure that you have a working internet connection, and using the feature to pause updates.
Restarting device
To restart your device, use these steps:
- Open Start.
- Click the Power options menu.
Click the Restart button.
 Source: Windows Central
Once you complete the steps, try to update your device again from the Windows Update settings page.
Checking internet connection
Although it might be obvious, but if you’re not connected to the internet, you won’t be able to download and install updates.
To confirm you have an active internet connection, use these steps:
- Open Start.
- Search for Command Prompt and click the top result to open the console.
Type the following command to confirm you have an active internet connection and press Enter:
Source: Windows Central
In the command, we’re pinging Google domain as an example, but you can use other pingable domains or services, such as CloudFlare.com, or Google DNS services (8.8.8.8 or 8.8.4.4).
Of course, you can always try to open any website with your web browser, but using Command Prompt is a more effective method to confirm network connectivity.
If you can’t connect to the internet, then it’s probably a problem with your connection, not Windows Update. You can use this comprehensive guide to resolve most common issues connecting to a network.
Pausing updates
Sometimes, if you’re dealing with issues downloading updates, pausing and resuming Windows Update can help to fix the problem.
To pause and resume updates on Windows 10, use these steps:
- Open Settings.
- Click on Update & Security.
- Click on Windows Update.
Click the Pause updates for 7 days button.
Source: Windows Central
Click the Resume updates button.
Source: Windows Central
After you complete the steps, try checking for updates again to see if the problem was resolved.
Freeing up space
Usually, the lack of storage can trigger errors trying to updates your device. If you need additional space to install updates, use these steps:
- Open Settings.
- Click on System.
- Click on Storage.
Under the «Local Disk C:» section, click the Temporary files section.
Source: Windows Central
Select the items that you want to clear to free up space.
 Source: Windows Central
Quick note: Selecting the Downloads option will clear the files from the «Downloads» folder. If you have important files, clear the option, or copy the files you want to keep to an external drive before proceeding.
Once you complete the steps, you’ll have more space to run Windows Update without triggering the no enough space error code.
If you have to reclaim more space, you can check this guide with many more ways to free up space on Windows 10.
How to fix Windows Update using Troubleshooter
Windows 10 comes with a Windows Update troubleshooter tool that can diagnose and resolve common problems with the feature.
To use the troubleshooter to fix problems with Windows Update, use these steps:
- Open Settings.
- Click on Update & Security.
- Click on Troubleshoot.
- Under the «Get up and running» section, select the Windows Update option.
Click the Run the troubleshooter button.
 Source: Windows Central
Once you complete the steps, the troubleshooter will diagnose and resolve any issue that it finds, and then you should be able to update again.
How to fix Windows Update installing update manually
Sometimes installing the most recent update manually can help to fix problems with the Windows Update service.
Determining system type
Before you can download the correct update package, you have to confirm whether you’re using a 32-bit or 64-bit version of Windows 10.
To determine your device system type, use these steps:
- Open Settings.
- Click on System.
- Click on About.
Under the «Device specifications» section, determine the system type.
Source: Windows Central
After you complete the steps, you can proceed to download the latest package for your installation.
Downloading updates manually
To download quality updates of Windows 10 manually, use these steps:
- Open the Windows Update History page.
- Click the version of Windows 10 that matches your installation (for example, version 1909) from the left side.
Confirm the knowledge base number of the latest update — for example, KB4530684.
Source: Windows Central
Click the Download button for the version that applies for your installation. For instance, if you’re running the 64-bit version, you should click the download button for the «Windows 10 Version 1903 for x64-based Systems» update.
Source: Windows Central
Click the .msu download link to save the package on your device.
Source: Windows Central
Once you complete the steps, you can proceed to install the update on your computer.
Installing updates manually
To install the latest update that you downloaded manually, use these steps:
- Open Start.
- Search for Command Prompt, right-click the top result, and select the Run as administrator option.
Type the following command to install the update and press Enter:
wusa C:\PATH-TO-UPDATE\NAME-OF-UPDATE.msu /quiet /norestart
This example installs the update package located in the Downloads folder:
wusa C:\Users\m__la\Downloads\windows10.0-kb4530684-x64_02ab3d424a993fbefa857f5b92999383f56c6986.msu /quiet /norestart
Source: Windows Central
Quick tip: If the name is too long to type, then type Windows10.0-kb and press the Tab key to complete the name automatically and continue typing the command.
After you complete the steps, the update package will install, but you’ll need to restart the device manually to finish applying the changes. If the update applies successfully, there’s a good chance that Windows Update will start working again.
How to fix Windows Update repairing installation
If there’s a problem with running Windows Update, there is a chance that you may have one or multiple corrupted system files, which you can repair using the System File Checker (SFC) command tool.
To repair the Windows 10 installation to resolve issues with Windows Update, use these steps:
- Open Start.
- Search for Command Prompt, right-click the top result, and select the Run as administrator option.
Type the following command to repair the system image and press Enter:
dism /Online /Cleanup-image /Restorehealth
Type the following command to repair the installation files and press Enter:
Source: Windows Central
Once you complete the steps, try running Windows Update one more time, and if the problem was a missing or damaged system file, now the update service should start working as always.
How to fix Windows Update skipping maintenance schedule
Although updates are essential to keep your device running smoothly and secure, sometimes updates can roll out with unknown bugs that may cause problems, including installation issues.
If you suspect that the problem could be the update and not your installation, it’s recommended not to install the cumulative update until the next release.
To skip an update release, you have to hide it from your device using these steps:
- Open the Windows Support website.
- Click the Download the «Show or hide updates» troubleshooter package now link to save the troubleshooter on your device.
- Double-click the wsuhowhide.diagcab file.
- Click the Next button.
Click the Hide updates option.
Source: Windows Central
Select the update causing the problem.
Source: Windows Central
After you complete the steps, the update will no longer be available for your device, resolving any errors trying to install the quality update using Windows Update. However, when a follow-up update becomes available, it’ll eventually download and install automatically.
How to fix Windows Update installing latest version
Sometimes if you’re running an older version of Windows 10, you can try upgrading to the most recent release to fix many problems with the current installation, including issues with Windows Update. While there are multiple ways to upgrade to the latest version, using the Update Assistant tool is the easiest method.
To upgrade a device to the latest version with the Update Assistant, use these steps:
- Open the Windows 10 download page.
- Click the Update now button.
- Save the Update Assistant installer to your device.
- Double-click the Windows10Upgrade file to launch the assistant.
Click the Update Now button.
Source: Windows Central
Once you complete the steps, the new version of Windows 10 will hopefully resolve the problem with Windows Update, and it might even improve system performance as well as other issues with the previous release.
How to fix Windows Update performing clean installation
If nothing seems to work to resolve the issue with Windows Update, as a last resort, you may want to consider performing a clean installation of Windows 10 to resolve this and other problems.
Creating bootable media
Before you can proceed with the installation of Windows 10, you need to create a USB media to start your device and continue with the installation.
To create a bootable media using the Media Creation Tool, use these steps:
- Open the Windows 10 download page.
- Click the Download tool now button.
- Save the Media Creation Tool installer to your device.
- Double-click the MediaCreationToolxxxx.exe file to begin the process.
- Click the Accept button to agree to the terms.
Select the Create install media (USB flash drive, DVD, or ISO file) for another PC option.
Source: Windows Central
Click the Next button.
![]() Source: Windows Central
Source: Windows Central
Select the USB flash drive option.
Source: Windows Central
Select the flash drive from the list.
Source: Windows Central
After you complete the steps, you can proceed with the clean installation of Windows 10.
Installing Windows 10
To do a clean installation of Windows 10, use these steps:
Warning: This is a friendly reminder that this process will erase everything on your computer. It’s always recommended to make a temporary full backup of your PC before proceeding.
Start the computer with the Windows 10 USB media.
Quick tip: If you can’t boot your device with the bootable media, then you need to change your basic input/output system (BIOS) settings to change the boot order to start the device from USB. Usually, this process requires hitting one of the function keys (F1, F2, F3, F10, or F12), the ESC, or Delete key as soon as you start the computer. The only caveat is that these settings will be different per manufacturer, and even by computer model. So make sure to check your device manufacturer’s support website for more specific instructions.
On prompt, press any key to boot from the device.
On the «Windows Setup,» click the Next button.
Source: Windows Central
Click the Install now button.
Source: Windows Central
Click the I don’t have a product key option to continue (assuming that your device was already activated).
Source: Windows Central
Select the edition of Windows 10. (This selection must match the version your product key activates.)
Source: Windows Central
Click on the Custom: Install Windows only (Advanced) option.
Source: Windows Central
Select the partition with the current installation (usually «Drive 0»), and click the Delete button.
Quick tip: If «Drive 0» has multiple partitions, you have to select and delete each of the partitions to allow the setup to use the entire drive for the new clean installation. Windows 10 will create the required partitions automatically during the process. It’s not necessary to delete the partitions on secondary drives.
Click the Yes button.
Source: Windows Central
Select the empty drive (Drive 0 Unallocated Space).
Source: Windows Central
Once you complete the steps, you’ll need to continue with the out-of-box experience (OOBE) to configure your device, and after the process, the issue with Windows Update should be resolved as well as other system problems.
If you need assistant performing a clean install of Windows 10, you can use this comprehensive guide.
More Windows 10 resources
For more helpful articles, coverage, and answers to common questions about Windows 10, visit the following resources:
We may earn a commission for purchases using our links. Learn more.
![]()
Halo: MCC’s live service elements make it better, not worse
Halo: The Master Chief Collection is more popular than ever, but some fans don’t agree with the live service approach 343 Industries has taken with it. Here’s why those elements are, at the end of the day, great for the game and for Halo overall.
![]()
Microsoft’s Surface Duo is not ‘failing up’
Microsoft announced this week that it was expanding Surface Duo availability to nine new commercial markets. While Surface Duo is undoubtedly a work in progress, this is not a sign of a disaster. It’s also doesn’t mean that Surface Duo is selling a ton either. Instead, the reason for the expansion is a lot more straightforward.
![]()
Here’s what you can do if Windows 10 update KB5001330 is causing issues
In this guide, we’ll show you the steps to get rid of the update KB5001330 to fix profile, gaming, and BSoD problems with the Windows 10 October 2020 Update and May 2020 Update.
![]()
These are the best PC sticks when you’re on the move
Instant computer — just add a screen. That’s the general idea behind the ultra-portable PC, but it can be hard to know which one you want. Relax, we have you covered!


