- Настройка начального экрана и панели задач Windows10 с помощью управления мобильными устройствами (MDM) Customize Windows 10 Start and taskbar with mobile device management (MDM)
- Принцип работы элемента управления макетом начального экрана How Start layout control works
- Создание политики для настраиваемого макета начального экрана Create a policy for your customized Start layout
- Включить стартовый экран в Windows 10
- Включить стартовый экран в Windows 10
- Включить стартовый экран без включения режима планшета
- Manage Windows 10 Start and taskbar layout
- Start options
- Taskbar options
- Taskbar configuration applied to clean install of Windows 10
- Taskbar configuration applied to Windows 10 upgrades
- Start layout configuration errors
Настройка начального экрана и панели задач Windows10 с помощью управления мобильными устройствами (MDM) Customize Windows 10 Start and taskbar with mobile device management (MDM)
Область применения Applies to
Ищете информацию для потребителей? Looking for consumer information? Настройка меню «Пуск» Customize the Start menu
В Windows 10 Pro, Windows10 Корпоративная и Windows10 для образовательных учреждений вы можете использовать политику управления мобильными устройствами (MDM), чтобы развернуть настраиваемый макет начального экрана для пользователей. In Windows 10 Pro, Windows 10 Enterprise, and Windows 10 Education, you can use a mobile device management (MDM) policy to deploy a customized Start and taskbar layout to users. Вам не потребуется повторно создавать образ, а чтобы обновить макет начального экрана, достаточно перезаписать XML-файл, содержащий макет. No reimaging is required, and the layout can be updated simply by overwriting the .xml file that contains the layout. Это позволяет настраивать макеты начального экрана для различных отделов или организаций с минимальными затратами времени на управление. This enables you to customize Start layouts for different departments or organizations, with minimal management overhead.
В Windows10 версии1703 добавлена поддержка для применения настраиваемой панели задач с помощью MDM. Support for applying a customized taskbar using MDM is added in Windows 10, version 1703.
Перед началом: Настройка и экспорт макет начните для настольных выпусков (также работает для настройки панели задач). Before you begin: Customize and export Start layout for desktop editions (also works for taskbar customization).
Если с помощью этого метода применяется полный макет начального экрана, пользователи не смогут закреплять приложения на начальном экране, а также откреплять или удалять их. When a full Start layout is applied with this method, the users cannot pin, unpin, or uninstall apps from Start. Пользователи могут просматривать и открывать все приложения в представлении Все приложения, но не могут закреплять их на начальном экране. Users can view and open all apps in the All Apps view, but they cannot pin any apps to Start. Если применяется частичный макет начального экрана, содержимое определенных групп плиток изменить невозможно, но пользователи могут перемещать эти группы, а также могут создавать и настраивать собственные группы. When a partial Start layout is applied, the contents of the specified tile groups cannot be changed, but users can move those groups, and can also create and customize their own groups.
Принцип работы элемента управления макетом начального экрана How Start layout control works
Элемент управления макетом начального экрана активируется двумя функциями. Two features enable Start layout control:
Командлет Export-StartLayout в Windows PowerShell экспортирует описание текущего макета начального экрана в формате XML. The Export-StartLayout cmdlet in Windows PowerShell exports a description of the current Start layout in .xml file format.
Чтобы импортировать макет начального экрана в подключенный образ Windows, используйте командлет Import-StartLayout. To import the layout of Start to a mounted Windows image, use the Import-StartLayout cmdlet.
В Microsoft Intune выберите XML-файл макета меню «Пуск» и добавьте его в профиль конфигурации устройства. In Microsoft Intune, you select the Start layout XML file and add it to a device configuration profile.
Пожалуйста, не включайте XML-прологы, как в XML-файле начните макет. Please do not include XML Prologs like in the Start layout XML file. Параметры могут не отражаться правильно. The settings may not be reflected correctly.
Создание политики для настраиваемого макета начального экрана Create a policy for your customized Start layout
В этом примере для настройки политики MDM, применяемой к настраиваемому макету начального экрана, используется средство Microsoft Intune. This example uses Microsoft Intune to configure an MDM policy that applies a customized Start layout. Дополнительные сведения о применении политики см. в документации по решению MDM. See the documentation for your MDM solution for help in applying the policy.
На портале Microsoft Azure выполните поиск Intune или перейдите в раздел Дополнительные службы > Intune. In the Microsoft Azure portal, search for Intune or go to More services > Intune.
Выберите Настройка устройства. Select Device configuration.
Выберите Профили. Select Profiles.
Нажмите кнопку Создать профиль. Select Create profile.
Введите понятное имя профиля. Enter a friendly name for the profile.
Выберите Windows 10 и более поздние версии в качестве платформы. Select Windows 10 and later for the platform.
Выберите **Ограничения устройства в качестве типа профиля. Select **Device restrictions for the profile type.
Нажмите кнопку Пуск. Select Start.
В макета меню «Пуск» найдите и выберите ваш XML-файл макета меню «Пуск». In Start menu layout, browse to and select your Start layout XML File.
Дважды нажмите кнопку ОК, а затемнажмите Создать. Select OK twice, and then select Create.
Назначьте профиль группе устройств. Assign the profile to a device group.
Для других решений MDM может потребоваться использовать параметр OMA-URI для макета меню «Пуск» на основе поставщика служб конфигурации политики (CSP). For other MDM solutions, you may need to use an OMA-URI setting for Start layout, based on the Policy configuration service provider (CSP). Параметр OMA-URI имеет значение ./User/Vendor/MSFT/Policy/Config/Start/StartLayout . The OMA-URI setting is ./User/Vendor/MSFT/Policy/Config/Start/StartLayout .
Включить стартовый экран в Windows 10
В этом посте будет показано, как включить начальный экран в Windows 10 , если хотите. Вы можете сделать это, если вы используете сенсорное мобильное устройство. Для этого вам нужно включить Режим планшета . Предыдущие сборки Windows 10 позволяли вам включить начальный экран через свойства панели задач, но теперь все изменилось, так как эта опция, кажется, была удалена. Давайте посмотрим, как включить и загрузить прямо на начальный экран в Windows 10.
Включить стартовый экран в Windows 10
Когда Windows 8 использовалась для загрузки в меню «Пуск», люди хотели загружаться непосредственно с рабочего стола. Теперь, когда Windows 10 загружается на рабочий стол, есть некоторые, кто хочет загрузиться с начального экрана напрямую.
Чтобы включить начальный экран Windows 10, вам нужно включить Режим планшета в Windows 10 . Чтобы включить планшетный режим Widows 10, щелкните значок «Уведомления» на панели задач. Вы увидите открытую панель уведомлений.

Нажмите на режим планшета. Стартовый экран будет включен. Функция Continuum позволяет Windows 10 плавно переключаться между режимами «Рабочий стол» и «Планшет». Чтобы увидеть начальный экран, нажмите Winkey или кнопку «Пуск».
Ваше активное приложение перейдет в полноэкранный режим, и начальный экран будет включен. Вы увидите изменения в панели задач. Открытые приложения больше не будут опираться на панель задач. Вы увидите только кнопку «Назад», значок поиска и кнопку «Просмотр задач».
Представление задач – это новая функция рабочего стола в Windows 10, которая позволяет пользователям создавать несколько рабочих столов на одном ПК с Windows. Это также позволяет быстро переключаться между открытыми файлами и приложениями.
Для запуска новых приложений и программного обеспечения для настольных ПК вам нужно будет сделать это через начальный экран.
Чтобы увидеть открытые приложения, вам нужно будет нажать кнопку «Просмотр задач» или пролистать их, используя сочетание клавиш Alt + Tab.
Вы заметите, что начальный экран Windows 10 теперь прокручивается по вертикали. Вы также увидите 3-х полосное меню Гамбургер. При нажатии на нее откроется «левая сторона панели», которая присутствовала в меню «Пуск». Сюда входят Наиболее часто используемые , Недавно открытые и Другие ссылки .
Включить стартовый экран без включения режима планшета
Если вы хотите включить стартовый экран без включения режима планшета, то лучшим вариантом будет включить полноэкранный запуск . Похоже, что у вас не было возможности запустить стартовый экран в режиме рабочего стола, как в Windows 8.1.
Manage Windows 10 Start and taskbar layout
Applies to
- WindowsВ 10, Windows Server 2016 with Desktop Experience, Windows Server 2019 with Desktop Experience
Organizations might want to deploy a customized Start and taskbar configuration to devices running WindowsВ 10 Pro, Enterprise, or Education. A standard, customized Start layout can be useful on devices that are common to multiple users and devices that are locked down for specialized purposes. Configuring the taskbar allows the organization to pin useful apps for their employees and to remove apps that are pinned by default.
Taskbar configuration is available starting in Windows 10, version 1607.
Start and taskbar configuration can be applied to devices running Windows 10 Pro, version 1703.
For information on using the layout modification XML to configure Start with roaming user profiles, see Deploy Roaming User Profiles.
Using CopyProfile for Start menu customization in Windows 10 isn’t supported. For more information Customize the Default User Profile by Using CopyProfile
Start options
Some areas of Start can be managed using Group Policy. The layout of Start tiles can be managed using either Group Policy or Mobile Device Management (MDM) policy.
The MDM policy settings in the table can also be configured in a provisioning package using Policies > Start. See the reference for Start settings in Windows Configuration Designer.
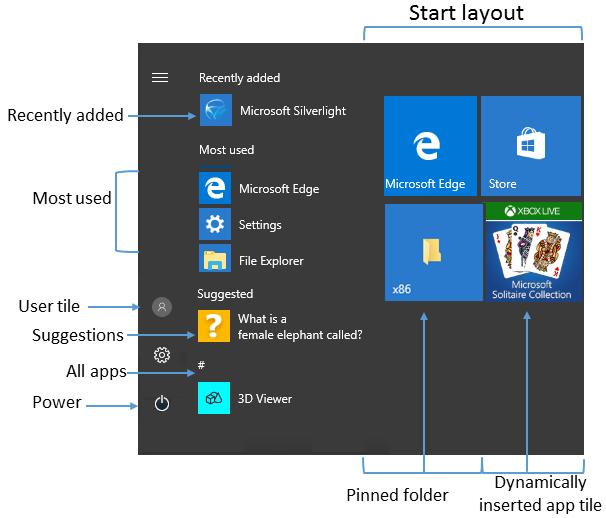
The following table lists the different parts of Start and any applicable policy settings or Settings options. Group Policy settings are in the User Configuration\Administrative Templates\Start Menu and Taskbar path except where a different path is listed in the table.
| Start | Policy | Local setting |
|---|---|---|
| User tile | MDM: Start/HideUserTile Start/HideSwitchAccount Start/HideSignOut Start/HideLock Start/HideChangeAccountSettings Group Policy: Remove Logoff on the Start menu | none |
| Most used | MDM: Start/HideFrequentlyUsedApps Group Policy: Remove frequent programs from the Start menu | Settings > Personalization > Start > Show most used apps |
| Suggestions -and- Dynamically inserted app tile | MDM: Allow Windows Consumer Features Group Policy: Computer Configuration\Administrative Templates\Windows Components\Cloud Content\Turn off Microsoft consumer experiences Note: This policy also enables or disables notifications for a user’s Microsoft account and app tiles from Microsoft dynamically inserted in the default Start menu. | Settings > Personalization > Start > Occasionally show suggestions in Start |
| Recently added | MDM: Start/HideRecentlyAddedApps Group Policy: Computer configuration\Administrative Template\Start Menu and Taskbar\Remove «Recently Added» list from Start Menu (for Windows 10, version 1803) | Settings > Personalization > Start > Show recently added apps |
| Pinned folders | MDM: AllowPinnedFolder | Settings > Personalization > Start > Choose which folders appear on Start |
| Power | MDM: Start/HidePowerButton Start/HideHibernate Start/HideRestart Start/HideShutDown Start/HideSleep Group Policy: Remove and prevent access to the Shut Down, Restart, Sleep, and Hibernate commands | none |
| Start layout | MDM: Start layout ImportEdgeAssets Group Policy: Prevent users from customizing their Start screen Note: When a full Start screen layout is imported with Group Policy or MDM, the users cannot pin, unpin, or uninstall apps from the Start screen. Users can view and open all apps in the All Apps view, but they cannot pin any apps to the Start screen. When a partial Start screen layout is imported, users cannot change the tile groups applied by the partial layout, but can modify other tile groups and create their own. Start layout policy can be used to pin apps to the taskbar based on an XML File that you provide. Users will be able to change the order of pinned apps, unpin apps, and pin additional apps to the taskbar. | none |
| Jump lists | MDM: Start/HideRecentJumplists Group Policy: Do not keep history of recently opened documents | Settings > Personalization > Start > Show recently opened items in Jump Lists on Start or the taskbar |
| Start size | MDM: Force Start size Group Policy: Force Start to be either full screen size or menu size | Settings > Personalization > Start > Use Start full screen |
| App list | MDM: Start/HideAppList | Settings > Personalization > Start > Show app list in Start menu |
| All Settings | Group Policy: Prevent changes to Taskbar and Start Menu Settings | none |
| Taskbar | MDM: Start/NoPinningToTaskbar | none |
In local Settings > Personalization > Start, there is an option to Show more tiles. The default tile layout for Start tiles is 3 columns of medium sized tiles. Show more tiles enables 4 columns. To configure the 4-column layout when you customize and export a Start layout, turn on the Show more tiles setting and then arrange your tiles.
Taskbar options
Starting in Windows 10, version 1607, you can pin additional apps to the taskbar and remove default pinned apps from the taskbar. You can specify different taskbar configurations based on device locale or region.
There are three categories of apps that might be pinned to a taskbar:
Apps pinned by the user
Default Windows apps, pinned during operating system installation (Microsoft Edge, File Explorer, Store)
Apps pinned by the enterprise, such as in an unattended Windows setup
We recommend using the layoutmodification.xml method to configure taskbar options, rather than the earlier method of using TaskbarLinks in an unattended Windows setup file.
The following example shows how apps will be pinned — Windows default apps to the left (blue circle), apps pinned by the user in the center (orange triangle), and apps that you pin using XML to the right (green square).

In operating systems configured to use a right-to-left language, the taskbar order will be reversed.
Whether you apply the taskbar configuration to a clean install or an update, users will still be able to:
- Pin additional apps
- Change the order of pinned apps
- Unpin any app
In Windows 10, version 1703, you can apply an MDM policy, Start/NoPinningToTaskbar , to prevents users from pinning and unpinning apps on the taskbar.
Taskbar configuration applied to clean install of Windows 10
In a clean install, if you apply a taskbar layout, only the apps that you specify and default apps that you do not remove will be pinned to the taskbar. Users can pin additional apps to the taskbar after the layout is applied.
Taskbar configuration applied to Windows 10 upgrades
When a device is upgraded to Windows 10, apps will be pinned to the taskbar already. Some apps may have been pinned to the taskbar by a user, and others may have been pinned to the taskbar through a customized base image or by using Windows Unattend setup.
The new taskbar layout for upgrades to Windows 10, version 1607 or later, will apply the following behavior:
- If the user pinned the app to the taskbar, those pinned apps remain and new apps will be added to the right.
- If the user didn’t pin the app (it was pinned during installation or by policy) and the app is not in updated layout file, the app will be unpinned.
- If the user didn’t pin the app and the app is in the updated layout file, the app will be pinned to the right.
- New apps specified in updated layout file are pinned to right of user’s pinned apps.
Start layout configuration errors
If your Start layout customization is not applied as expected, open Event Viewer and navigate to Applications and Services Log > Microsoft > Windows > ShellCommon-StartLayoutPopulation > Operational, and check for one of the following events:
- Event 22 is logged when the xml is malformed, meaning the specified file simply isn’t valid xml. This can occur if the file has extra spaces or unexpected characters, or if the file is not saved in the UTF8 format.
- Event 64 is logged when the xml is valid, but has unexpected values. This can happen when the desired configuration is not understood, elements are not in the required order, or source is not found, such as a missing or misspelled .lnk.


