- How to dismiss Windows 10 volume overlay if it doesn’t go away
- How to dismiss Windows 10 volume overlay
- Media overlay
- How to Fix Low Volume on Windows 10
- Solution 1: Restarting your PC and Updating Drivers
- Solution 2: Changing the Sound Quality
- Solution 3: Enabling Loudness Equalization
- Solution 4: Changing the Communications Sound Settings
- Solution 5: Changing the Volume using Volume Mixer
- Solution 6: Installing the default drivers
- How to dismiss volume overlay popup in Windows 10 display?
- What is the volume overlay in Windows?
- Why disable Volume Control Overlay?
- The overlay could be helpful in some cases
- How to reduce volume control overlay timing in Windows 10?
- Dismiss volume overlay on Chrome
- Hide Windows 10 Volume Control overlay and Popup using HideVolumeOSD
- How do I show the volume pop-up display on my screen?
- Customize the volume popup overlay in Windows
- Check out related posts to fix issues or boost user experience
How to dismiss Windows 10 volume overlay if it doesn’t go away
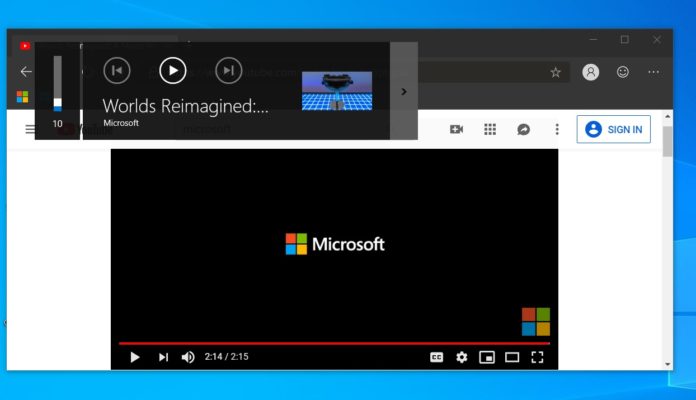
In Windows 10, a volume slider or media overlay appear in the top-left corner of your screen when you change the volume. The feature is handy, especially when you have to change the track of your Spotify playlist or pause a YouTube content in new Microsoft Edge.
Windows 10’s media overlay shows up only when you adjust volume and apps such as Chrome, Microsoft Edge or Spotify are opened. The volume overlay would automatically dismiss after a few seconds without your intervention. Unfortunately, sometimes the volume dialog takes a bit too long to disappear on its own and the delay is increased if you accidentally hover over the overlay.
If you are experiencing this and it infuriates you, there’s a simple trick to dismiss the media overlay.
How to dismiss Windows 10 volume overlay
To dismiss Windows 10 volume dialog that appears on the left side of the screen, you have to click on the app name or the artist photo.
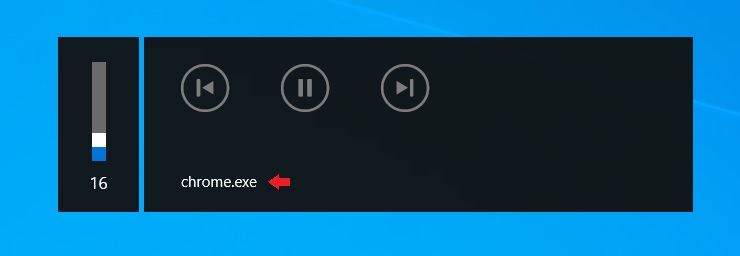
For instance, if you want to dismiss the volume overlay when no media content is playing in Chrome, simply click anywhere near Chrome.exe.
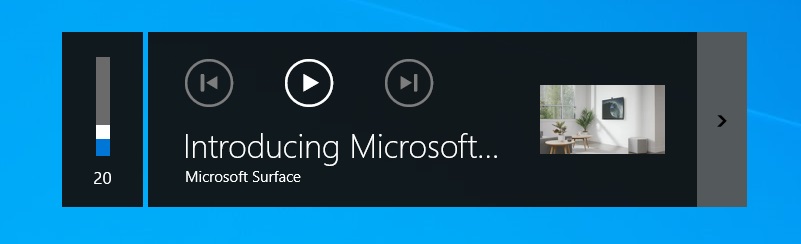
For Chromium-based Microsoft Edge and Spotify, you have to click on the artist photo or name when a media content is playing.
Media overlay
It’s worth noting that the media overlay was added to Windows with Windows 8 and the same interface is used in Windows 10. While it is useful, it takes up a pretty big chunk of the screen and UI is also dated.
The feature is still in its early day for Google Chrome and it doesn’t work properly. Unlike Chromium-based Edge, Google Chrome cannot display YouTube thumbnail or associated information on its media overlay.
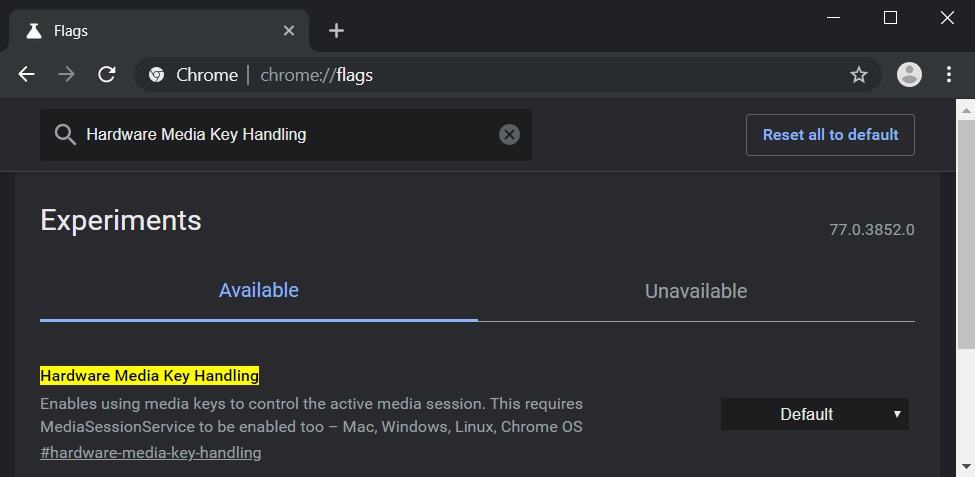
Fortunately, you can disable the media controls overlay in Chrome from the flags menu:
- Open Chrome://flags.
- Search ‘Hardware Media Key Handling’.

- Click the drop-down menu and switch it to disabled.
- Restart the browser.
How to Fix Low Volume on Windows 10
Windows 10 has issues outputting full volume primarily because of incorrect settings in your computer or because of corrupt and outdated drivers. This issue rarely surfaces because of hardware problems so rest assured. Here are some solutions on how to overcome the low volume in Windows 10.
Solution 1: Restarting your PC and Updating Drivers
One of the basic fixes is to restart your PC. If you installed an application, it is possible that it isn’t properly configured with your computer and requires a restart. Furthermore, you should update your sound drivers. Sound drivers are the main bridge between the operating system and your sound hardware. If the correct drivers are not installed on your PC, you might not get the optimum experience and the sound might not be generating to its full capacity. Update your sound drivers and turn them on and off. Then after restarting your PC, check if the problem got solved.
Solution 2: Changing the Sound Quality
We can increase the frequency of the sound output from the sound settings. Having a high-frequency output doesn’t harm your computer in any way and it is reported that varying the frequency increases the sound output from the speakers significantly. You can always change back to default settings if this doesn’t make a difference.
- Right click on the sound icon present at your taskbar and select “Playback Devices” (bottom right side of the screen).
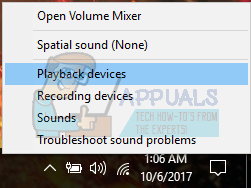
- Navigate to the Playback tab. Select the output device (your speakers) and click on Properties present at the bottom right side of the screen.

- Once in the properties, navigate to the Advanced tab. Select the drop-down under the subheading of Default Format and select the highest quality.

- Press Apply to save changes and exit. Now check if there is any significant difference in the sound quality.
Solution 3: Enabling Loudness Equalization
Loudness Equalization is an option present in the sound settings which enable you to boost your sound so the output increases. However, you might be doing a tradeoff with the performance of the sound but since this increases the sound volume a lot, we can go with it.
- Right click on the sound icon present at your taskbar and select “Playback Devices” (bottom right side of the screen).
- Navigate to the Playback tab. Select the output device (your speakers) and click on Properties present at the bottom right side of the screen.
- Once in the properties, navigate to the Enhancements tab. Check the option which says “Loudness Equalization”. Click on Apply to save changes and exit.

- A restart might be required to implement the changes. After restarting, check if the problem got fixed. If you are facing a lot of baffled and low sound than before, you can easily revert the changes.
Solution 4: Changing the Communications Sound Settings
Windows has a built-in feature which reduces your master volume by a significant percentage if it detects incoming telecommunications. We rarely use this feature in our daily lives and most probably, we don’t even know if it works. It is possible that this feature is not configured properly with your hardware and OS; thus causing your problems. We can try disabling this feature and check if the sound output changes.
- Right click on the sound icon present at your taskbar and select “Sounds” (bottom right side of the screen).

- Once in the Sound properties, navigate to the Communications tab. Select the option of “Do nothing”. Press Apply to save changes and exit.

- Restart your computer and check if the sound quality got any better.
Solution 5: Changing the Volume using Volume Mixer
Windows has the option to set different volumes for different applications present on your computer. Mostly, the sound of other applications isn’t set to the highest potential. If you are using Chrome or some other application, and not receiving the expected sound, you should check the settings of Volume Mixer and turn all the settings to highest.
- Right click on the sound icon present at your taskbar and select “Open Volume Mixer” (bottom right side of the screen).

- Once in the volume mixer, make sure that all the sounds are at their highest.

- Re-launch the application where you were having problems and check if the problem got solved.
Solution 6: Installing the default drivers
If you are having the Realtek audio drivers installed on your computer, we can try uninstalling them. We will replace Realtek with the default audio driver used by the audio hardware. For some, this solved the problem instantly. Follow this solution after all the previous ones didn’t work for you.
Windows, by default, will automatically try to update your drivers to the latest version available. We can turn this behavior off by doing the following steps.
- Press Windows + S to launch the search menu of your start bar. Type “system” in the dialogue box and select the first item which returns in the result.

- Once in the system, click on “Advanced system settings” present at the left side of the screen.

- Navigate to the Hardware tab and click on “Device Installation Settings”.

- Select the option of “No (your device might not work as expected”. Press Save changes and exit. This will disable the Windows update from updating your audio drivers automatically.

- Now press Windows + X to launch the quick start menu and select “Device Manager” from the list of options available.
- Once in the Device manager, expand “Sound, video and game controllers” category. Right-click on Realtek device and select “Uninstall device”.
- Check the uninstall driver checkbox to uninstall the driver as well and proceed with the uninstallation.

- Once the device is uninstalled, right click on any empty space on the Device manager and select “Scan for hardware changes”. Your computer will now detect the audio hardware on your computer and automatically install “High Definition Audio Device”.

- Now check if this brings any difference. Also, reboot your machine after the installation of default drivers.
Note: Try to disable hardware acceleration and check if that fixes this particular issue.
How to dismiss volume overlay popup in Windows 10 display?
Do you want to know about how volume overlay in windows operating system? Well, we have the best solutions for you. There are very less options that Windows has to offer for this thing but still, you can easily get rid of this overlay if you want. We are going to discuss everything in this article. So, make sure to read it till the end.
Windows computers are equipped with numerous features that you will not get in most of the other operating systems. When it comes to convenience, they have everything prepared for the users.
But, as we all know, all of us have different preferences. So, it is possible that you may like the feature that I don’t like. Volume control overlay is one of those features that some people would love to use whereas most of us hate these features.
Because it can hide some of your content on the screen, you may also want to get rid of this overlay as soon as possible. In some cases, people get so frustrated with it that they have to switch to another Windows. But, that also doesn’t work to get his issue fixed.
The only way to hide this overlay is to wait for the time it is fading and then getting away from the screen. However, there are some things you can do in order to get rid of this overlay.
Most of the Windows users will not be aware of these things. But, we are going to reveal all of them below in this article. You will get to know about them and the strategies to follow along.
In other words, we will help you to hide this volume control overlay using the best methods possible. But, before starting, let’s know some more things about this feature in Windows.
Table of Contents
What is the volume overlay in Windows?
If you have a Windows computer, try to decrease or increase the volume using the buttons on the Keyboard. You will see an option where you can adjust the volume and see it functioning as your press the buttons on your keyboard.
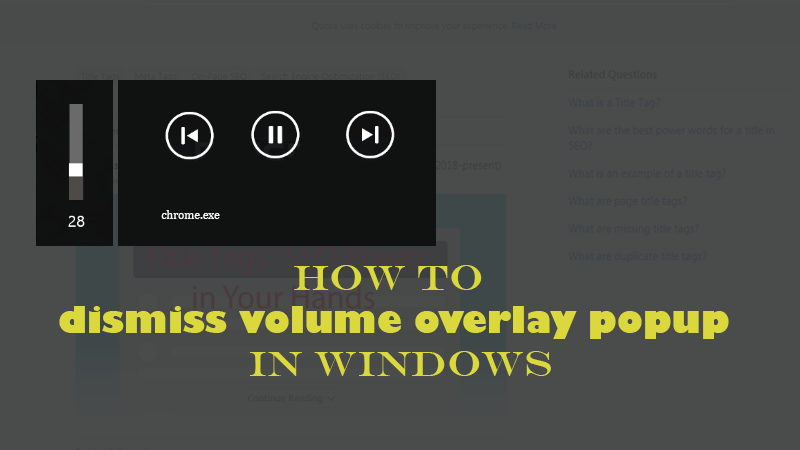
But, when you are using Spotify, YouTube, or some online media players on your computer, you see a huge banner with Artist and track details.
This banner or we can say the overlay is going to hide the whole area behind it. Also, if its timing is set to 10 or more seconds, it will remain there for that time frame. Even if you are pressing Esc, Enter, or Space buttons, this overlay will go nowhere until its time is not passed.
This overlay feature is very beneficial in some cases. Especially when you do not want to change your tabs and want to see which track is running. Also, this overlay will highlight the remaining time of your track.
You can use the next or previous functions using this function pretty easily. There are various other benefits of having this feature enabled on your Windows computer. So, if you want you can keep it.
But, it will be good to keep it away if you have some priorities. We are going to discuss that below.
Why disable Volume Control Overlay?
As we discussed earlier, dismissing the volume overlay means you want nothing between the main content on your screen. If you have this overlay appearing on your screen, it is going to hide most of the content below it.
It will remain there for some time. But, there are various benefits you will get by dismissing the volume control overlay.
It is OK to see this overlay going away after some time. But, if are doing something on your computer and you hover over this overlay, it will reset its timing and remain there for some more time.
This could be frustrating for the users. If you are also frustrated with this, it is good to stop this thing right away.
Also, if you are an occasional media consumer on your computer, it is alright to have this feature enabled. But, if you watch a lot of movies, videos, and listen to songs on your computer, it will be better to disable this thing from your computer.
The overlay could be helpful in some cases
Also, you should keep a thing in mind that this feature will give you proper highlights of whatever you are doing. So, if you have songs running in your headphones and you forgot about it.
Pressing the volume up/down/mute buttons will show that you are using the media. Again, if you do not hear music and watch videos more often on your PC, this thing is not going to hurt you anyway.
So, it is all about your preferences whether you should disable this overlay feature or not. If you do not want to have this, you are good to go.
However, most of the users find this feature worthless. So, if you are one of those, below is the detailed process for you to follow.
How to reduce volume control overlay timing in Windows 10?
In most of the cases, people find it pretty annoying when this overlay start appearing for very long time periods. In some cases, it can appear for about 1 to 5 minutes which you or anyone else will find abnormal.
A 5 to 10-second time-frame is good and for this feature, we should expect this overlay to appear for this time only. But, if you are also one of those who are seeing this overlay for huge time periods, there is a special feature in the Settings option of Windows.
You just have to change this timing from there and you will be able to get it fixed.
Windows has various other features to offer when it comes to the notifications. So, for this thing, you can get this solved using the method we are going to discuss below.
Not only for Windows 10, but you can also use this method on any other Windows version too.
- Press Windows+X button together and click on the Settings option.
- Now, click on Ease of Access option.
- Go to the visual options section and find Show Notification for option.
- In the dropdown menu, choose the 5 seconds option which is the minimum.
Now, whenever your notification will appear, it will show up just for 5 seconds. This is a normal timeframe everyone can easily tolerate. You should also be doing that.
But, if you are still not satisfied with this result, just proceed to the next step.
Dismiss volume overlay on Chrome
If you are using Google Chrome to surf the internet or to use YouTube or Spotify, it will be good if you dismiss using your browser itself. The Chrome browser offers numerous options to do this thing.
You can either get into the coding stuff yourself or you can use this simple procedure. Because Chrome has a lot of customization features, you can use different settings to perform different tasks inside it.
There are various hardware-related features you can find in Google Chrome. So, they all can work for different tasks. But, here we are going to use a special feature in the flags section of Google Chrome .
We will proceed step by step and see if can work for you. This procedure will work on all the versions of Windows and Google Chrome.
So, you should perform it in the way we have discussed and you will definitely get rid of these overlay features.
Let’s see how to dismiss Windows 10 volume popup overlay in Google Chrome.
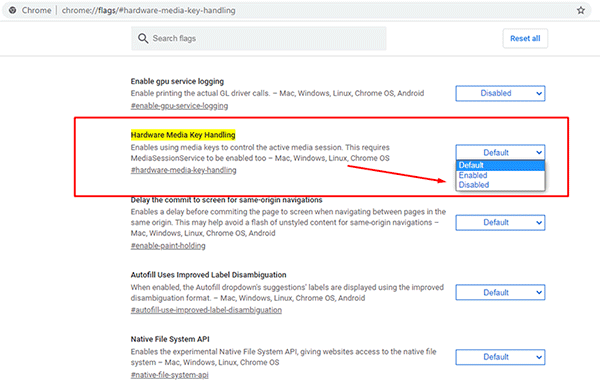
- Open Google Chrome Browser and enter this in the link bar.
chrome://flags/#hardware-media-key-handling
- Now, set the Hardware Media Key Handling option to Disabled.
- Your browser will ask for a relaunch.
Upon the restart, you will not see that huge media banner whenever you level up or down the volume. This is the best and fastest way to hide this overlay.
However, you can use the next method too for the same. You can use this method on any Chromium-based web browser on your PC.
Hide Windows 10 Volume Control overlay and Popup using HideVolumeOSD
HideVolumeOSD is a third-party software you can use to make this work easier for you. This software is developed just for this purpose. The developers have done a great job by creating this piece of software and making the process simple and straightforward.
With this software, you will be able to get rid of this volume popup overlay without changing your settings whatsoever. Just install this software and you are good to go. The software is going to help you with everything. You are just an installation away.
Because of its easy usability, this software becomes the best method to dismiss Windows 10 Overlay using the simple method.
The software is fully trusted and tested. Also, it will not put any extra load on your computer. It will keep doing its job and you can use your computer in the way you want.
The software is available for free on the internet. Below is the brief process of utilizing this software for hiding the volume overlay.
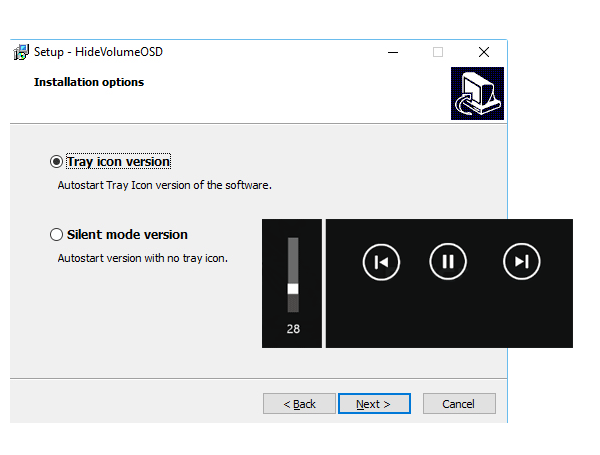
- Download the latest version of the software HideVolumeOSDfrom this Official website.
- Install the software after the download.
- Make sure to choose the tray version download option.
- Now, you can choose the tray option icon to turn On or Off this volume icon option.
This is the best way to solve this issue if you are not able to fix it using any of the above-given processes.
How do I show the volume pop-up display on my screen?
Now, you are aware of the process of hiding this volume bar overlay on your computer. But, if in any case, you want to get this bar back on the screen, you have a pretty simple process to follow.
You just have to follow these methods in a reverse manner. Means, if you have downloaded this software, you just have to uninstall it right away. Alternatively, if you have chosen the Google Chrome option to hide the overlay in your browser, you can just set it back to the default option.
By doing these things you can easily show the volume bar on the screen. Also, you can adjust the timing of this bar by going to the setting menu as we have discussed above.
Once you have removed these settings and the external software, Windows will start to show the volume bar in the way it was showing earlier.
So, this was all about enabling and disabling this volume bar overlay in your Windows computer.
Customize the volume popup overlay in Windows
Unfortunately, Windows has nothing very special to offer for the customization of volume control overlay. It means Windows will adjust the color of the overlay as per the background of your screen.
So, even if you are very curious to change this color, you will never be able to do it. You can easily change the colors of menus, borders, and backgrounds in all the Windows versions.
But, in order to change this color, Windows has nothing to offer. So, that means, you have to see this overlay in the way it is appearing. There is nothing special you can do to change its parameters.
The volume popup overlay can’t be customized in anyway. Whether you want to reduce or increase its size or modify the colors, this Windows function is developed to remain in the way it is.
We can expect Windows to change it with the time but for now, we have to see it in the same way.
Final Verdict
This Volume overlay feature can be pretty helpful for some people. However, most of the people find it worthless. Because, you can adjust its transparency, color, and appearance, it could become a waste of time for some people.
In order to disable it, we hope we have provided enough help in this article. You will definitely be able to know how to dismiss Windows 10 volume control overlay using this article.
But, we suggest you to do any of these things if you have proper technical knowledge about them. Also, do not change any other setting which we haven’t described in this article. It will be good if you follow this procedure in the way it is given. This will be beneficial for you in all the terms.
We hope you have found this article helpful in this regard. We have tried to cover all the things we could in this article. So, we hope you will get all the desired information from this.
If this article have helped you in any way, make sure to share your valuable feedback in the comment section. Also, you can send your queries, suggestions, and complains using our contact mediums.
We would love to hear from your side now. Make sure to share this article with others too. We publish regular articles here on this website. So, stay connected with us.
Thanks for reading!
Check out related posts to fix issues or boost user experience
Technology has made various things pretty easy for us. When it comes to convenience, we…

We have discussed the importance of Windows Update in various other articles on this website.…
Technology has made various things pretty easy for us. When it comes to convenience, we…


