- Connect to a VPN in Windows 10
- Create a VPN profile
- Connect to a VPN
- Подключение к сети VPN в Windows 10
- Создание профиля VPN
- Подключение к сети VPN
- VPN authentication options
- Configure authentication
- How to set up IKEv2 VPN Connection on Windows 10 with Certificate or EAP-MSCHAP v2 Authentication
- Параметры проверки подлинности для VPN VPN authentication options
- Настройка проверка подлинности Configure authentication
Connect to a VPN in Windows 10
Whether it’s for work or personal use, you can connect to a virtual private network (VPN) on your Windows 10 PC. A VPN connection can help provide a more secure connection and access to your company’s network and the internet, for example, when you’re working from a coffee shop or similar public place.
Create a VPN profile
Before you can connect to a VPN, you must have a VPN profile on your PC. You can either create a VPN profile on your own or set up a work account to get a VPN profile from your company.
Before you start:
If it’s for work, look for VPN settings or a VPN app on your company’s intranet site while you’re at work, or contact your company’s support person.
If it’s for a VPN service you subscribe to for personal use, visit the Microsoft Store to see if there’s an app for that service, then go to the VPN service’s website to see if the VPN connection settings to use are listed there.
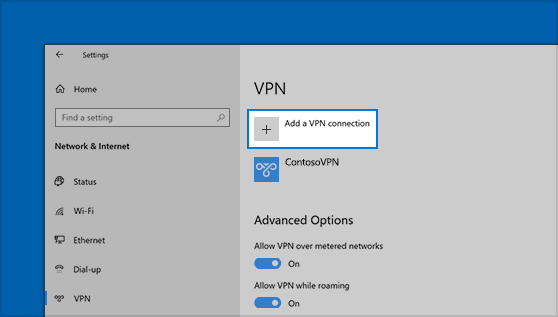
Select the Start button, then select Settings > Network & Internet > VPN > Add a VPN connection.
In Add a VPN connection, do the following:
For VPN provider, choose Windows (built-in).
In the Connection name box, enter a name you’ll recognize (for example, My Personal VPN). This is the VPN connection name you’ll look for when connecting.
In the Server name or address box, enter the address for the VPN server.
For VPN type, choose the type of VPN connection you want to create. You’ll need to know which kind of VPN connection your company or VPN service uses.
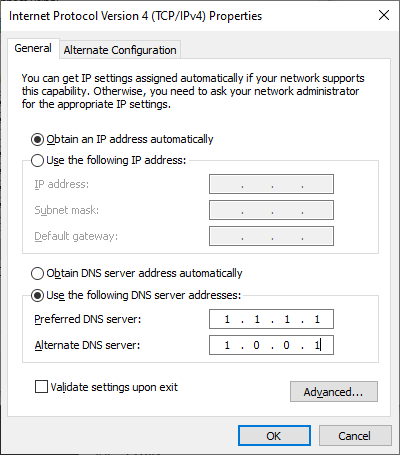
For Type of sign-in info, choose the type of sign-in info (or credentials) to use. This might be a username and password, one-time password, certificate, or a smart card if you’re connecting to a VPN for work. Enter your username and password in the respective boxes (if required).
If you need to edit the VPN connection info or specify additional settings, such as proxy settings, choose the VPN connection and then select Advanced options.
Connect to a VPN
When you have a VPN profile, you’re ready to connect.
On the far right of the taskbar, select the Network icon (either or ).
Select the VPN connection you want to use, then do either of the following depending on what happens when you select the VPN connection:
If the Connect button displays under the VPN connection, select Connect.
If the VPN section in Settings opens, select the VPN connection there, then select Connect.
If you’re prompted, enter your username and password or other sign-in info.
When connected, the VPN connection name will display Connected underneath it. To see if you’re connected to the VPN while you’re doing things on your PC, select the Network icon (either or ) on the far right of the taskbar, then see if the VPN connection says Connected.
Подключение к сети VPN в Windows 10
Вы можете подключаться к виртуальной частной сети (VPN) на компьютере с Windows 10 как для работы, так и в личных целях. VPN-подключение может обеспечить более безопасное соединение и доступ к корпоративной сети и Интернету, например, если вы работаете из кафе или похожего общественного места.
Создание профиля VPN
Перед подключением к сети VPN вам необходимо настроить профиль VPN на своем компьютере. Чтобы получить профиль VPN от вашей компании, вы можете либо создать профиль VPN самостоятельно или настроить рабочую учетную запись.
Прежде чем начать, выполните указанные ниже действия.
Если VPN-подключение будет использоваться для работы, проверьте наличие параметров и/или приложения VPN на сайте интрасети вашей компании во время работы или обратитесь к специалисту службы поддержки вашей компании.
Если вы подписываетесь на службу VPN в личных целях, посетите Microsoft Store , чтобы проверить наличие приложения для этой службы, а затем перейдите на веб-сайт службы VPN, где могут быть указаны необходимые параметры VPN-подключения.
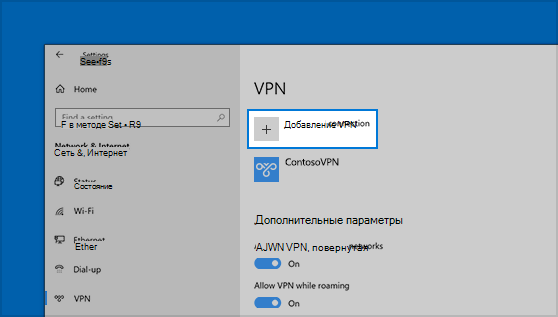
Нажмите Start кнопку «Пуск», а затем выберите Параметры > сеть & Интернет > VPN > Добавить VPN-подключение.
В разделе Добавление VPN-подключения сделайте следующее:
В поле Поставщик услуг VPN выберите Windows (встроенный).
В поле Имя подключения введите понятное вам имя (например, «Мой личный VPN»). Это имя подключения VPN, которое будет нужно искать для подключения.
В поле Имя или адрес сервера введите адрес для сервера VPN.
Выберите Тип VPN-подключения, которое вы хотите создать. Вы должны знать, какой тип VPN-подключения или служба VPN используется в вашей организации.
В поле Тип данных для входа выберите тип данных для входа (или учетные данные), которые следует использовать. Это могут быть имя пользователя и пароль, одноразовый пароль, сертификат или смарт-карта, если вы подключаетесь к сети VPN для работы. Введите свое имя пользователя и пароль в соответствующие поля (при необходимости).
Нажмите кнопку Сохранить.
Если вам требуется изменить сведения о VPN-подключении или указать дополнительные параметры, например параметры прокси-сервера, выберите соответствующее VPN-подключение и нажмите Дополнительные параметры.
Подключение к сети VPN
Если у вас есть профиль VPN, вы можете подключаться к нему.
Выберите значок сети ( или ) в дальнем правом углу панели задач.
Выберите VPN-подключение, которое вы хотите использовать, а затем выполните одно из следующих действий в зависимости от того, что происходит при выборе VPN-подключения:
Если под VPN-подключением отображается кнопка «Подключить», выберите Подключить.
Если в «Параметрах» открывается раздел «VPN», выберите это VPN-подключение, затем выберите Подключить.
При появлении запроса введите имя пользователя и пароль или другие данные для входа.
После подключения имя VPN-подключения будет отображаться под ним. Чтобы проверить наличие подключения к сети VPN во время работы за компьютером, нажмите значок Сеть ( или ) в крайнем правом углу панели задач и убедитесь, что под VPN-подключением есть надпись Подключено.
VPN authentication options
Applies to
- WindowsВ 10
- WindowsВ 10 Mobile
In addition to older and less-secure password-based authentication methods (which should be avoided), the built-in VPN solution uses Extensible Authentication Protocol (EAP) to provide secure authentication using both user name and password, and certificate-based methods. You can only configure EAP-based authentication if you select a built-in VPN type (IKEv2, L2TP, PPTP or Automatic).
Windows supports a number of EAP authentication methods.
| Method | Details |
|---|---|
| EAP-Microsoft Challenge Handshake Authentication Protocol version 2 (EAP-MSCHAPv2) |
|
| EAP-Transport Layer Security (EAP-TLS) |
|
| Protected Extensible Authentication Protocol (PEAP) |
|
| Tunneled Transport Layer Security (TTLS) |
|
For a UWP VPN plug-in, the app vendor controls the authentication method to be used. The following credential types can be used:
- Smart card
- Certificate
- Windows Hello for Business
- User name and password
- One-time password
- Custom credential type
Configure authentication
See EAP configuration for EAP XML configuration.
To configure Windows Hello for Business authentication, follow the steps in EAP configuration to create a smart card certificate. Learn more about Windows Hello for Business.
The following image shows the field for EAP XML in a Microsoft Intune VPN profile. The EAP XML field only appears when you select a built-in connection type (automatic, IKEv2, L2TP, PPTP).
How to set up IKEv2 VPN Connection on Windows 10 with Certificate or EAP-MSCHAP v2 Authentication
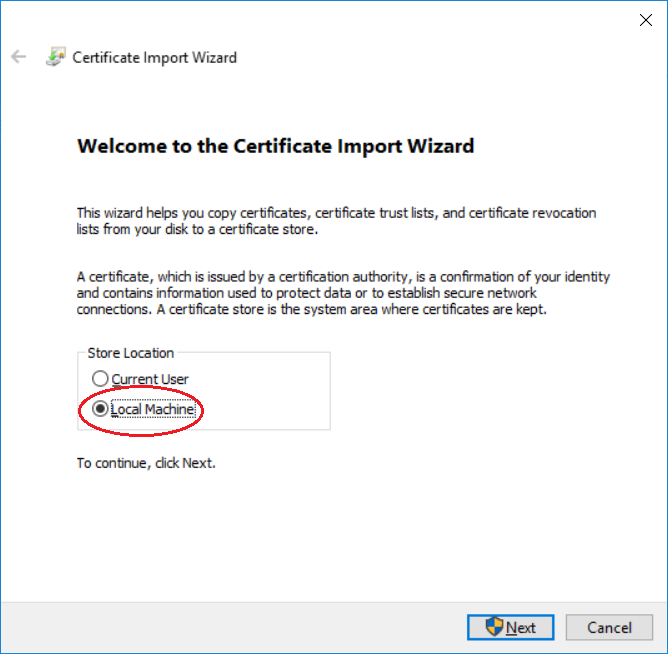
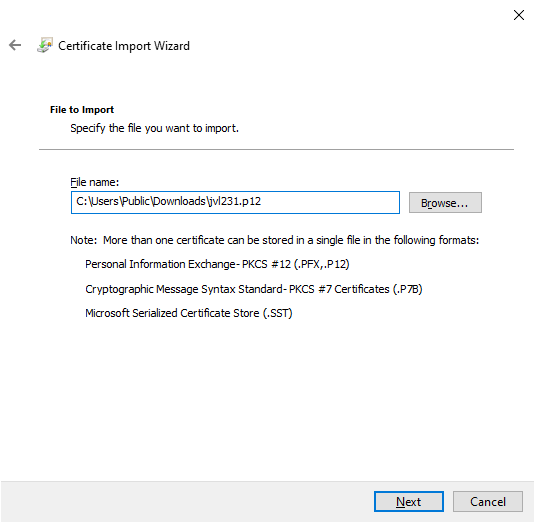
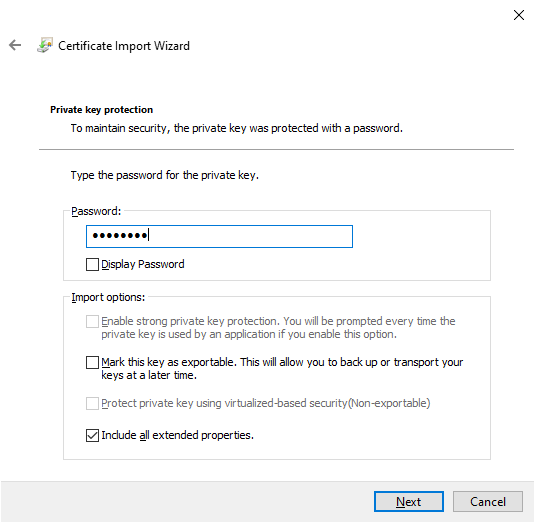
This guide assumes that you have obtained a Personal Information Exchange (p12) file from your VPN service provider. The file contains the server certificate and maybe the client private key & certificate (if using certificate authentication instead of EAP-MACHAP v2).
There are two major tasks: install the certificates and create a VPN connection.
Task 1: install the certificates.
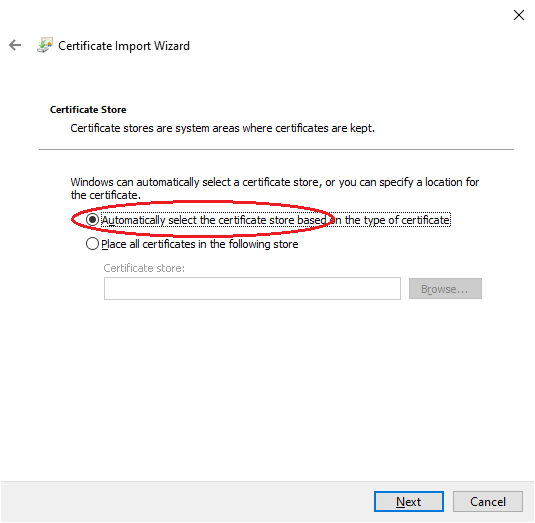
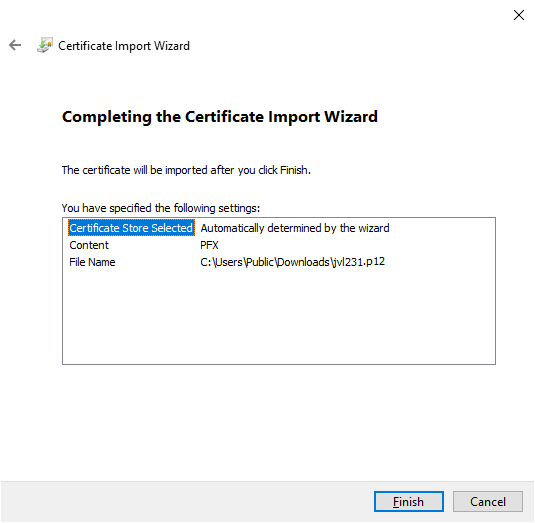
- Double click the p12 file. Select “Local Machine” on the “Certificate Import Wizard” dialog.

- Click “Next”.
- Enter the password (if there is one).
- Select “Automatic…” for the certificate store.
- Click “Finish”.
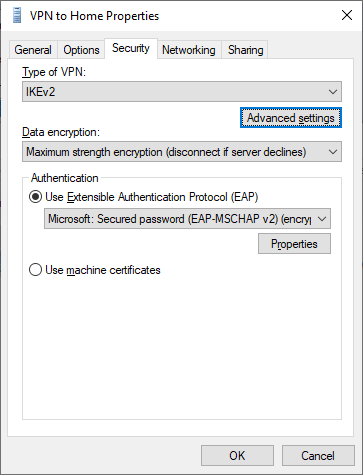
Task 2: create the VPN connection.
Alternative task 2: if authenticating with EAP-MSCHAP v2.
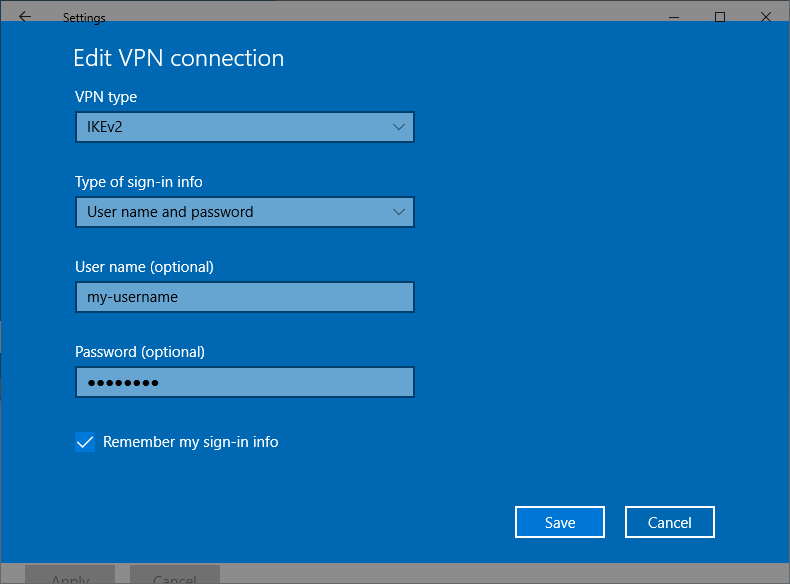
- In step 9 above, select “Use Extensible Authentication Protocol (EAP), then EAP-MSCHAP v2.
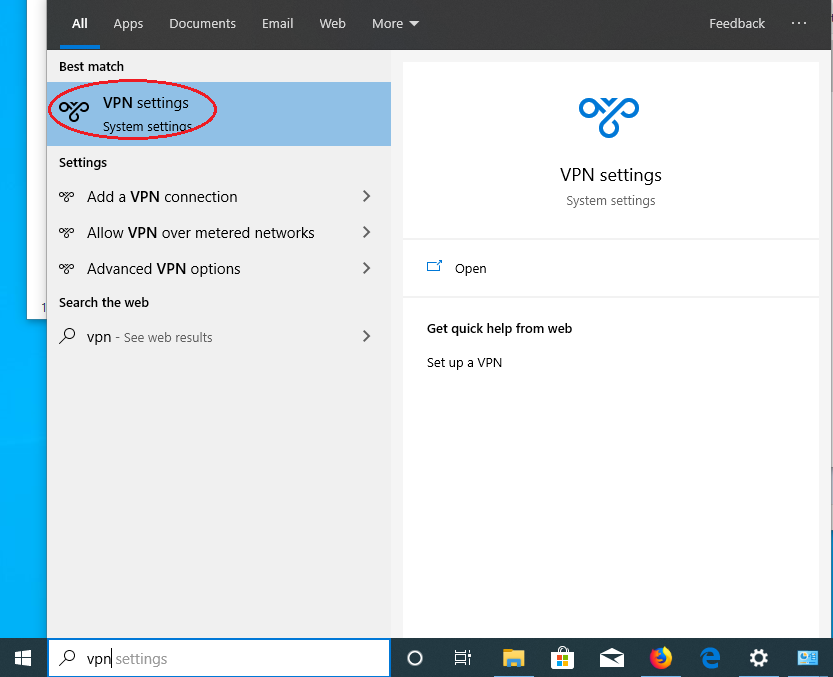
- Click the Windows icon at the left bottom corner of the screen and enter “vpn”. Then click on “VPN settings”.
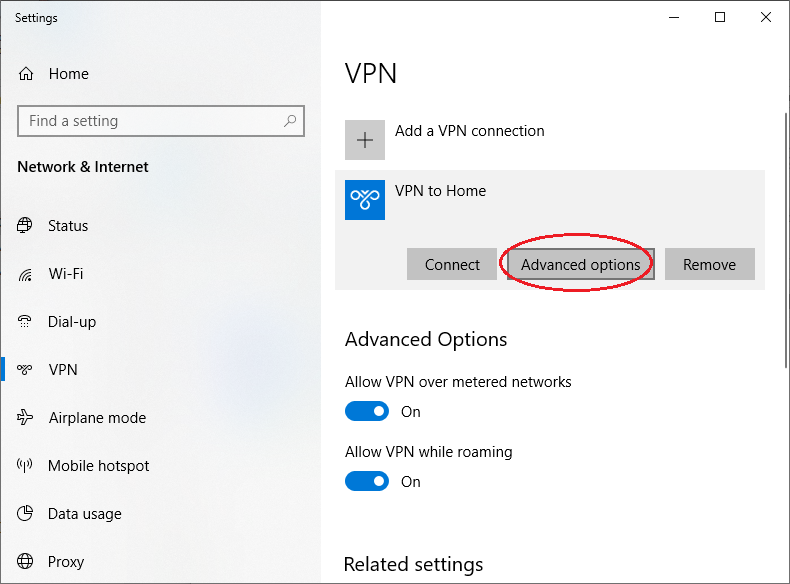
- Click on the VPN connection, then click “Advanced options”.
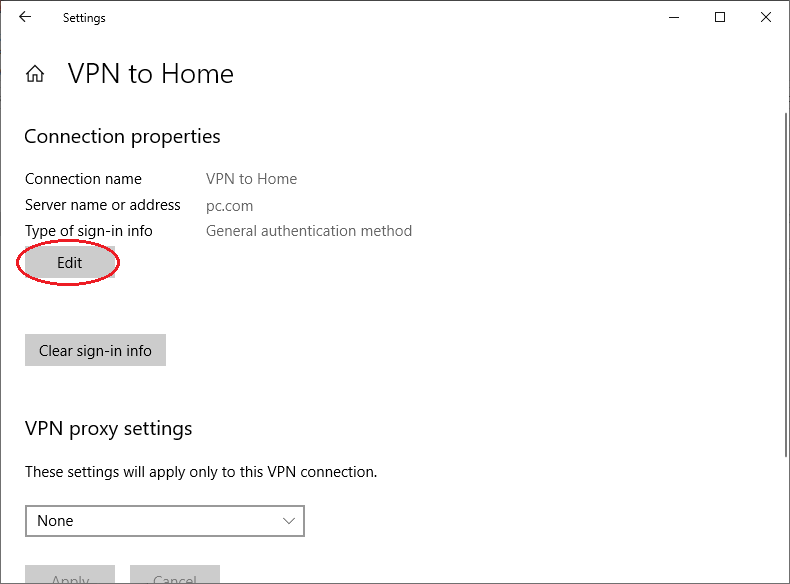
- Click “Edit”.
- Select “User name and Password” for “Type of sign-in info”. Enter user name and password. Click “Save”.
Task 3: Check that your VPN connection is working
- Open a web browser, enter https://ipleak.net/. Make sure that your IP address is that of the VPN service (i.e., no longer your ISP assigned IP address), and DNS addresses are also that from the VPN service.
- If your VPN server is located in the same geographical region as your ISP connection, sometimes it’s hard to tell if your DNS service has changed to that provided by the VPN. This page will tell you who is your DNS provider: http://whoismydns.com/
- There are instances that your browser is stuck with the ISP assigned DNS server. In that case, manually set the DNS service on your ISP connection (WiFi or Ethernet adapter) to a third party DNS service, for example, Cloudflare DNS. Just to be safe, disable IPv6 on the WiFi or Ethernet adapter too.
Параметры проверки подлинности для VPN VPN authentication options
Относится к: Applies to
- Windows 10 Windows 10
- Windows 10 Mobile Windows 10 Mobile
В дополнение к старым и менее безопасным методам проверки подлинности с паролем (которых следует избегать), встроенное решение VPN использует протокол EAP для безопасной проверки подлинности на основе сертификатов и на основе имени пользователя и пароля. In addition to older and less-secure password-based authentication methods (which should be avoided), the built-in VPN solution uses Extensible Authentication Protocol (EAP) to provide secure authentication using both user name and password, and certificate-based methods. Вы можете настроить проверку подлинности на основе EAP, только выбрав встроенный тип VPN (IKEv2, L2TP, PPTP или автоматический). You can only configure EAP-based authentication if you select a built-in VPN type (IKEv2, L2TP, PPTP or Automatic).
Windows поддерживает различные методы проверки подлинности EAP. Windows supports a number of EAP authentication methods.
| Способ Method | Подробности Details |
|---|---|
| Протокол EAP-MSCHAP версии 2 (EAP-MSCHAPv2) EAP-Microsoft Challenge Handshake Authentication Protocol version 2 (EAP-MSCHAPv2) |
|
| Протокол EAP-TLS EAP-Transport Layer Security (EAP-TLS) |
|
| Протокол PEAP Protected Extensible Authentication Protocol (PEAP) |
|
| Протокол TTLS Tunneled Transport Layer Security (TTLS) |
|
Для подключаемого модуля UWP VPN поставщик приложения управляет используемым методом проверки подлинности. For a UWP VPN plug-in, the app vendor controls the authentication method to be used. Можно использовать следующие типы учетных данных: The following credential types can be used:
- смарт-карта; Smart card
- сертификат; Certificate
- Windows Hello для бизнеса; Windows Hello for Business
- имя пользователя и пароль; User name and password
- одноразовый пароль; One-time password
- пользовательский тип учетных данных. Custom credential type
Настройка проверка подлинности Configure authentication
Конфигурацию XML для EAP см. в разделе Конфигурация EAP. See EAP configuration for EAP XML configuration.
Чтобы настроить проверку подлинности Windows Hello для бизнеса, выполните действия, описанные в разделе Конфигурация EAP для создания сертификата смарт-карты. To configure Windows Hello for Business authentication, follow the steps in EAP configuration to create a smart card certificate. Подробнее о Windows Hello для бизнеса. Learn more about Windows Hello for Business.
На следующем изображении показано поле для EAP XML в профиле VPN решения Microsoft Intune. The following image shows the field for EAP XML in a Microsoft Intune VPN profile. Поле EAP XML отображается только при выборе встроенного типа подключения (автоматический, IKEv2, L2TP, PPTP). The EAP XML field only appears when you select a built-in connection type (automatic, IKEv2, L2TP, PPTP).


